1.首先是工具的準備。 2.工具環境的搭建 首先,new建立選擇maven project工程,勾選simple project,next後如下圖所示,goup id起名為com.blog,artifact id為ssm-build,packing為war。 點擊finish後完成maven工程的創 ...
1.首先是工具的準備。
- eclipse
- jdk1.7
- maven 3.5.4
- tomcat 8.5
2.工具環境的搭建
首先,new建立選擇maven project工程,勾選simple project,next後如下圖所示,goup id起名為com.blog,artifact id為ssm-build,packing為war。
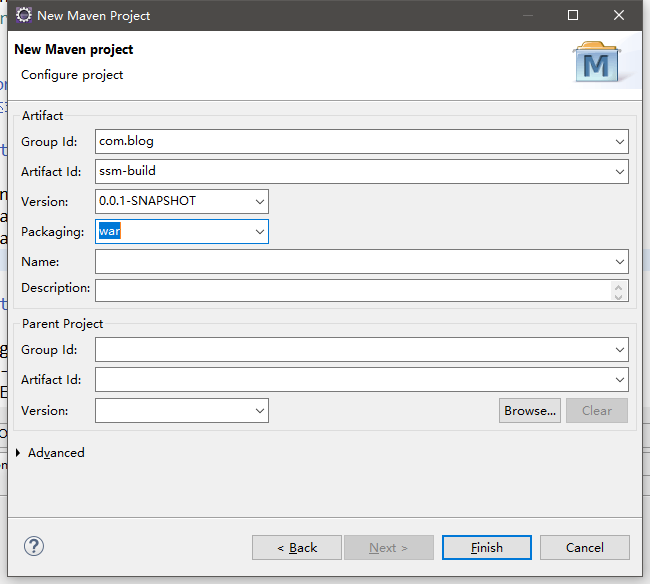
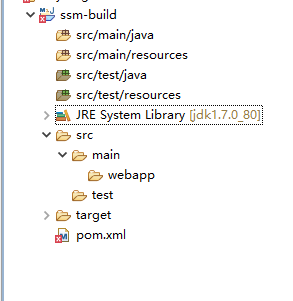
點擊finish後完成maven工程的創建。如下圖所示,目錄webapp下,沒有我們的WEB-INF,web.xml等。
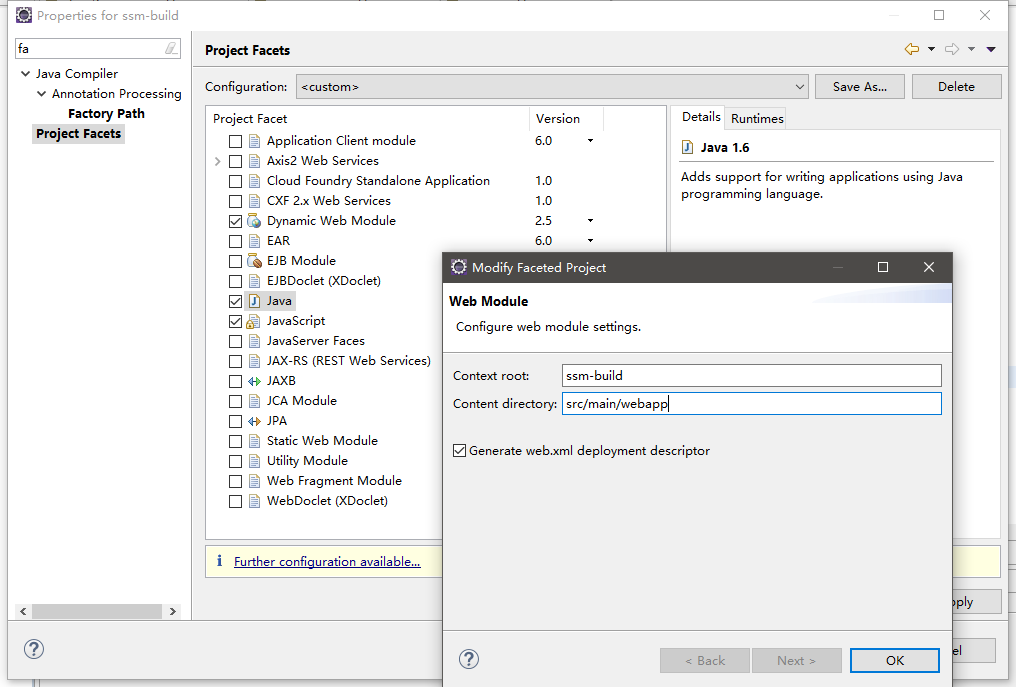
我們可以右擊項目properties,搜素project facets,去除Dynamic Web Module選項apply,再次勾選,可進行自動生成設置,如下圖所示,生成目錄為src/main/webapp,勾選生成,ok即可完成,項目的目錄搭建。
3.準備項目所需的環境對應的配置文件等
1.引入pom相關依賴,依賴可從maven repository官網進行查詢配置
<dependencies>
          <!--引入spring相關依賴  -->
        <dependency>
            <groupId>org.springframework</groupId>
            <artifactId>spring-webmvc</artifactId>
            <version>4.3.7.RELEASE</version>
        </dependency>
        <!-- Spring-Jdbc -->
        <dependency>
            <groupId>org.springframework</groupId>
            <artifactId>spring-jdbc</artifactId>
            <version>4.3.7.RELEASE</version>
        </dependency>
        <!--Spring-test -->
        <dependency>
            <groupId>org.springframework</groupId>
            <artifactId>spring-test</artifactId>
            <version>4.3.7.RELEASE</version>
        </dependency>
        <!-- Spring面向切麵編程 -->
        <dependency>
            <groupId>org.springframework</groupId>
            <artifactId>spring-aspects</artifactId>
            <version>4.3.7.RELEASE</version>
        </dependency>
        <!--MyBatis -->
        <dependency>
            <groupId>org.mybatis</groupId>
            <artifactId>mybatis</artifactId>
            <version>3.4.2</version>
        </dependency>
        <!-- MyBatis整合Spring的適配包 -->
        <dependency>
            <groupId>org.mybatis</groupId>
            <artifactId>mybatis-spring</artifactId>
            <version>1.3.1</version>
        </dependency>
        <!-- 資料庫連接池、驅動 -->
        <dependency>
            <groupId>com.alibaba</groupId>
            <artifactId>druid</artifactId>
            <version>1.1.10</version>
        </dependency>
        <!--mysql連接驅動 -->
        <dependency>
            <groupId>mysql</groupId>
            <artifactId>mysql-connector-java</artifactId>
            <version>5.1.41</version>
        </dependency>
        <!-- (jstl,servlet-api,junit) -->
        <dependency>
            <groupId>jstl</groupId>
            <artifactId>jstl</artifactId>
            <version>1.2</version>
        </dependency>
        <dependency>
            <groupId>javax.servlet</groupId>
            <artifactId>javax.servlet-api</artifactId>
            <version>3.0.1</version>
            <scope>provided</scope>
        </dependency>
        <!-- junit -->
        <dependency>
            <groupId>junit</groupId>
            <artifactId>junit</artifactId>
            <version>4.12</version>
        </dependency>
    </dependencies>
2.配置resource.properties資料庫文件
jdbc.driver=com.mysql.jdbc.Driver
jdbc.url=jdbc:mysql://localhost:3306/test?characterEncoding=utf-8
jdbc.username=root
jdbc.password=root
3.配置springMVC.xml文件,與前端交互的。
<?xml version="1.0" encoding="UTF-8"?>
<beans xmlns="http://www.springframework.org/schema/beans"
    xmlns:xsi="http://www.w3.org/2001/XMLSchema-instance"
    xmlns:context="http://www.springframework.org/schema/context"
    xmlns:aop="http://www.springframework.org/schema/aop"
    xmlns:mvc="http://www.springframework.org/schema/mvc"
    xmlns:tx="http://www.springframework.org/schema/tx"
    xsi:schemaLocation="http://www.springframework.org/schema/aop http://www.springframework.org/schema/aop/spring-aop-4.3.xsd
        http://www.springframework.org/schema/beans http://www.springframework.org/schema/beans/spring-beans-3.2.xsd
        http://www.springframework.org/schema/tx http://www.springframework.org/schema/tx/spring-tx-4.3.xsd
        http://www.springframework.org/schema/mvc http://www.springframework.org/schema/mvc/spring-mvc-4.3.xsd
        http://www.springframework.org/schema/context http://www.springframework.org/schema/context/spring-context-4.3.xsd">
    <!--SpringMVC的配置文件,包含網站跳轉邏輯的控制,配置  -->
    <context:component-scan base-package="com.blog.controller"/>
    <!--兩個標準配置  -->
    <!-- 將springmvc不能處理的請求交給tomcat -->
    <mvc:default-servlet-handler/>
    <!-- 能支持springmvc更高級的一些功能,JSR303校驗,快捷的ajax...映射動態請求 -->
    <mvc:annotation-driven/>
    <!--配置視圖解析器,方便頁面返回  -->
    <bean class="org.springframework.web.servlet.view.InternalResourceViewResolver">
        <property name="prefix" value="/WEB-INF/views/"></property>
        <property name="suffix" value=".jsp"></property>
    </bean>
</beans>
4.創建applicaitonContext.xml文件用於我們的業務邏輯
<?xml version="1.0" encoding="UTF-8"?>
<beans xmlns="http://www.springframework.org/schema/beans"
    xmlns:xsi="http://www.w3.org/2001/XMLSchema-instance"
    xmlns:mvc="http://www.springframework.org/schema/mvc"
    xmlns:context="http://www.springframework.org/schema/context"
    xmlns:aop="http://www.springframework.org/schema/aop"
    xmlns:tx="http://www.springframework.org/schema/tx"
    xsi:schemaLocation="http://www.springframework.org/schema/aop http://www.springframework.org/schema/aop/spring-aop-4.3.xsd
        http://www.springframework.org/schema/beans http://www.springframework.org/schema/beans/spring-beans-3.2.xsd
        http://www.springframework.org/schema/tx http://www.springframework.org/schema/tx/spring-tx-4.3.xsd
        http://www.springframework.org/schema/context http://www.springframework.org/schema/context/spring-context-4.3.xsd">
    <!-- 屬性讀取 -->
    <context:property-placeholder location="classpath:resource.properties" />
    <context:component-scan base-package="com.blog">
        <!-- 掃描符合@Controller的類 -->
        <context:include-filter type="annotation" expression="org.springframework.stereotype.Controller"/>
    </context:component-scan>
    <!-- 資料庫連接池 -->
    <bean id="dataSource" class="com.alibaba.druid.pool.DruidDataSource"
        destroy-method="close">
        <property name="url" value="${jdbc.url}" />
        <property name="username" value="${jdbc.username}" />
        <property name="password" value="${jdbc.password}" />
        <property name="driverClassName" value="${jdbc.driver}" />
        <property name="maxActive" value="10" />
        <property name="minIdle" value="5" />
    </bean>
    <!--================== 配置和MyBatis的整合=============== -->
    <bean id="sqlSessionFactory" class="org.mybatis.spring.SqlSessionFactoryBean">
        <!-- 指定mybatis全局配置文件的位置 -->
        <property name="dataSource" ref="dataSource"></property>
    </bean>
    <bean class="org.mybatis.spring.mapper.MapperScannerConfigurer">
        <property name="basePackage" value="com.blog" />
        <property name="sqlSessionFactoryBeanName" value="sqlSessionFactory" />
    </bean>
    <!-- ===============事務控制的配置 ================-->
    <!-- 配置事務管理器 -->
    <bean id="transactionManager" class="org.springframework.jdbc.datasource.DataSourceTransactionManager">
        <property name="dataSource" ref="dataSource" />
    </bean>
    <!-- 攔截器方式配置事物 -->
    <tx:advice id="transactionAdvice" transaction-manager="transactionManager">
        <tx:attributes>
            <tx:method name="add*" propagation="REQUIRED" />
            <tx:method name="append*" propagation="REQUIRED" />
            <tx:method name="insert*" propagation="REQUIRED" />
            <tx:method name="save*" propagation="REQUIRED" />
            <tx:method name="update*" propagation="REQUIRED" />
            <tx:method name="modify*" propagation="REQUIRED" />
            <tx:method name="edit*" propagation="REQUIRED" />
            <tx:method name="delete*" propagation="REQUIRED" />
            <tx:method name="remove*" propagation="REQUIRED" />
            <tx:method name="repair" propagation="REQUIRED" />
            <tx:method name="delAndRepair" propagation="REQUIRED" />
            <tx:method name="get*" propagation="SUPPORTS" />
            <tx:method name="find*" propagation="SUPPORTS" />
            <tx:method name="load*" propagation="SUPPORTS" />
            <tx:method name="search*" propagation="SUPPORTS" />
            <tx:method name="datagrid*" propagation="SUPPORTS" />

            <tx:method name="*" propagation="SUPPORTS" />
        </tx:attributes>
    </tx:advice>
    <aop:config>
        <aop:pointcut id="transactionPointcut" expression="execution(* com.blog.service.*.*(..))" />
        <aop:advisor pointcut-ref="transactionPointcut" advice-ref="transactionAdvice" />
    </aop:config>
</beans>
上面的四個文件是必備步驟,接下來配置web.xml文件
<?xml version="1.0" encoding="UTF-8"?>
<web-app xmlns:xsi="http://www.w3.org/2001/XMLSchema-instance"
xmlns="http://java.sun.com/xml/ns/javaee"
 xsi:schemaLocation="http://java.sun.com/xml/ns/javaee http://java.sun.com/xml/ns/javaee/web-app_2_5.xsd" id="WebApp_ID"
 version="2.5">
 <!--1、啟動Spring的容器  -->
    <context-param>
        <param-name>contextConfigLocation</param-name>
        <param-value>classpath:applicationContext.xml</param-value>
    </context-param>
    <listener>
        <listener-class>org.springframework.web.context.ContextLoaderListener</listener-class>
    </listener>
    <!--2、springmvc的前端控制器,攔截所有請求  -->
    <servlet>
        <servlet-name>springMVC</servlet-name>
        <servlet-class>org.springframework.web.servlet.DispatcherServlet</servlet-class>
        <init-param>
            <param-name>contextConfigLocation</param-name>
            <param-value>classpath:springMVC.xml</param-value>
        </init-param>
        <load-on-startup>1</load-on-startup>
    </servlet>
    <servlet-mapping>
        <servlet-name>springMVC</servlet-name>
        <url-pattern>*.do</url-pattern>
    </servlet-mapping>
    <!-- 預設訪問的頁面 -->
    <welcome-file-list>
        <welcome-file>/index.jsp</welcome-file>
    </welcome-file-list>
    <!-- 3、字元編碼過濾器,一定要放在所有過濾器之前 -->
    <filter>
        <filter-name>CharacterEncodingFilter</filter-name>
        <filter-class>org.springframework.web.filter.CharacterEncodingFilter</filter-class>
        <init-param>
            <param-name>encoding</param-name>
            <param-value>utf-8</param-value>
        </init-param>
        <init-param><!--是否強制使用encoding編碼  -->
            <param-name>forceRequestEncoding</param-name>
            <param-value>true</param-value>
        </init-param>
        <init-param><!--是否強制使用encoding編碼  -->
            <param-name>forceResponseEncoding</param-name>
            <param-value>true</param-value>
        </init-param>
    </filter>
    <filter-mapping>
        <filter-name>CharacterEncodingFilter</filter-name>
        <url-pattern>/*</url-pattern>
    </filter-mapping>
 </web-app>
到這裡我們已經基本配置完畢了,有什麼需求,可以進行任意的增加,接下來我們編輯網頁部分,在webapp下簡歷index.jsp文件,這是web.xml配置的預設訪問位置
為了使頁面更好看
引入bootstrap美化頁面
如圖,在webapp目錄下建立了static目錄,放入了jquery以及bootstrap,這些官網可進行直接下載。
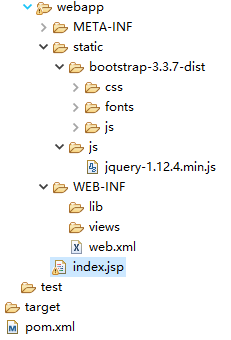
在index.jsp中引入這些jquery和bootstrap樣式。
<%@ page language="java" contentType="text/html; charset=UTF-8" pageEncoding="UTF-8"%>
<%@taglib uri="http://java.sun.com/jsp/jstl/core" prefix="c"%>
<!DOCTYPE html PUBLIC "-//W3C//DTD HTML 4.01 Transitional//EN" "http://www.w3.org/TR/html4/loose.dtd">
<html>
<head>
<meta charset="UTF-8">
<title>hello,ssm</title>
<script type="text/javascript" src="static/js/jquery-1.12.4.min.js"></script>
<link href="static/bootstrap-3.3.7-dist/css/bootstrap.min.css" rel="stylesheet">
<script src="static/bootstrap-3.3.7-dist/js/bootstrap.min.js"></script>
</head>
<body>
<form style="margin-top:18%;margin-left:38%" >
<div class="form-group">
<label for="exampleInputEmail1">用戶名</label>
<input type="email" style="width:500px;" class="form-control" id="exampleInputEmail1" placeholder="Email">
</div>
<div class="form-group">
<label for="exampleInputPassword1">密碼</label>
<input type="password" style="width:500px;" class="form-control" id="exampleInputPassword1" placeholder="Password">
</div>
<div class="checkbox">
<label>
<input type="checkbox">記住密碼
</label>
</div>
<button type="submit" style="width:500px;" class="btn btn-success">登錄</button>
</form>
</body>
</html
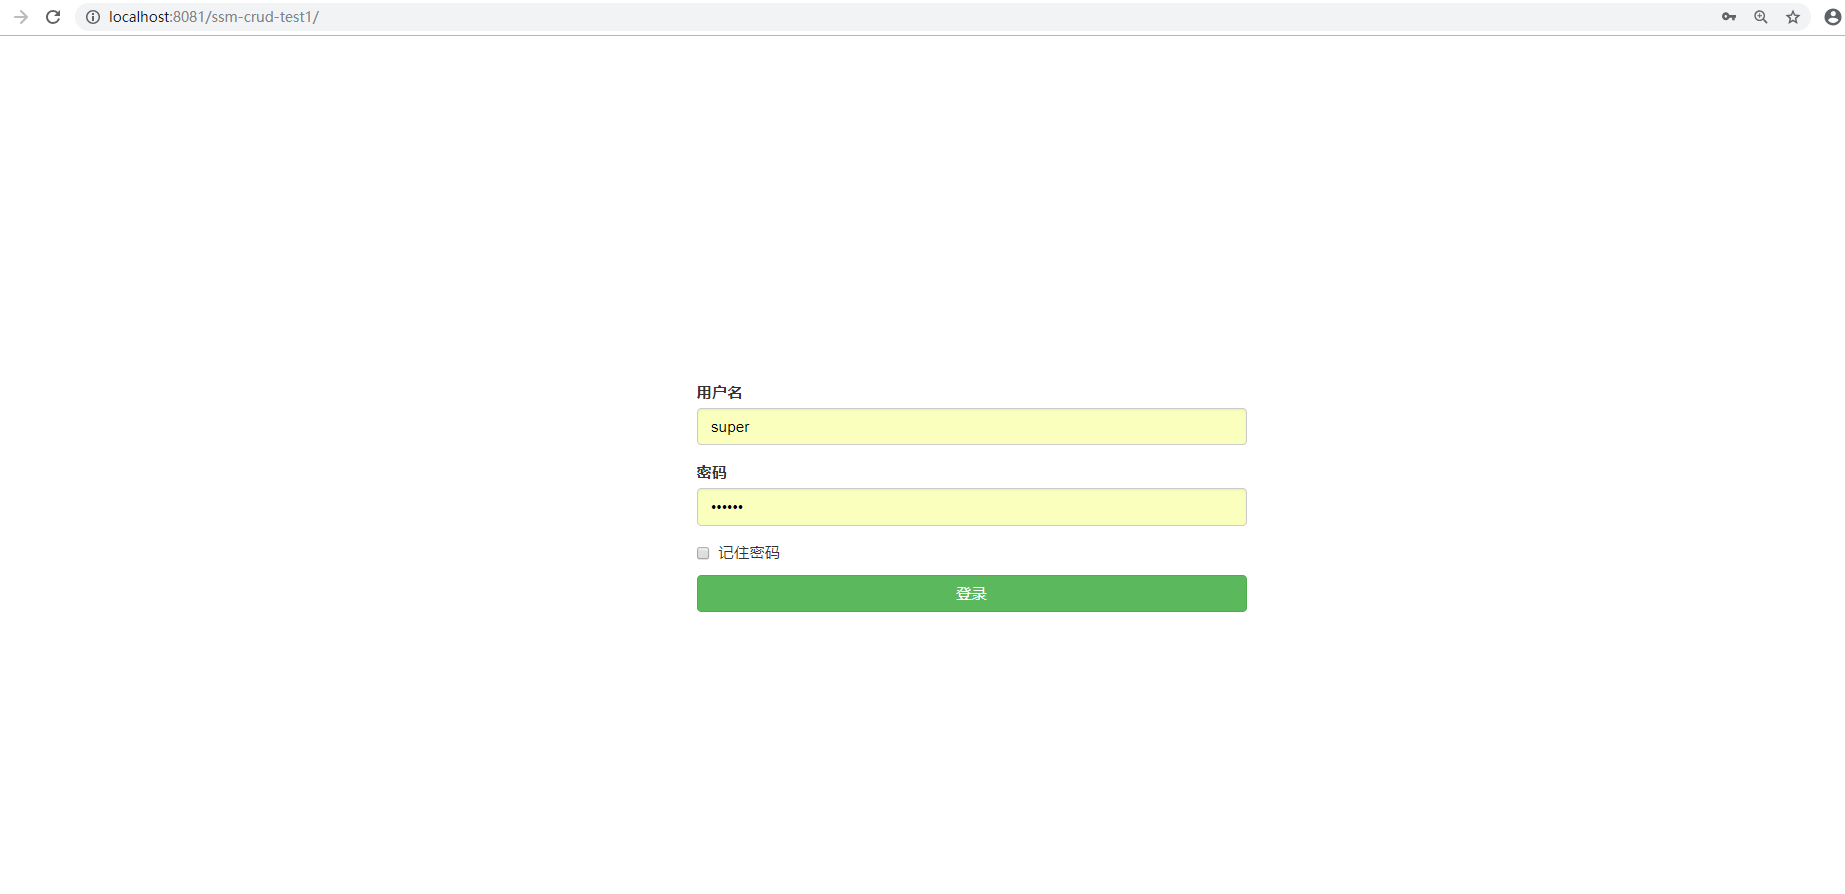
把項目載入到tomcat上運行,到此已經完成最基本的ssm環境運行了,成功頁面如下圖所示。
