
作者:[美]Adam Freeman 來源:《精通ASP.NET MVC 4》 前面的文章【MVC 4】5.SportsSore —— 一個真實的應用程式 建立了 SportsStore 應用程式的核心基礎框架。本文將利用這一基礎框架,將一些關鍵特性添加到該應用程式上。 1.添加導航控制項 如果讓客戶 ...
作者:[美]Adam Freeman 來源:《精通ASP.NET MVC 4》
前面的文章【MVC 4】5.SportsSore —— 一個真實的應用程式 建立了 SportsStore 應用程式的核心基礎框架。本文將利用這一基礎框架,將一些關鍵特性添加到該應用程式上。
1.添加導航控制項
如果讓客戶通過產品分類(Category)對象產品進行導航,SportsStore 應用程式會更加適用。這需要從三個方面著手。
* 增強 ProductController 類中的 List 動作類型,以使它能夠過濾存儲庫中的 Product 對象。
* 重載考察並增強 URL 方案,並且修訂路由策略。
* 創建一個產品分類列表,將其放入網站工具條,高亮當前分類,並對其他分類進行鏈接。
1.1 過濾產品列表
本文打算從增強視圖模型類 ProductsListViewModel 開始。為了渲染工具條,需要將當前分類傳遞給視圖,而且這是一個很好的起點。修改後代碼如下:
using SportsStore.Domain.Entities;
using System.Collections.Generic;

namespace SportsStore.WebUI.Models
{
    public class ProductsListViewModel
    {
        public IEnumerable<Product> Products { get; set; }
        public PagingInfo PagingInfo { get; set; }
        public string CurrentCategory { get; set; }
    }
}
在 ProductsListViewModel 類中新添加了一個新屬性 CurrentCategory 。下一步是更新 ProductController 類,以使 List 動作方法能通過分類來過濾 Product 對象,並利用這個添加到視圖模型的新屬性,以指示已選擇了哪個分類。其修改如下所示:
using SportsStore.Domain.Abstract;
using SportsStore.WebUI.Models;
using System;
using System.Collections.Generic;
using System.Linq;
using System.Web;
using System.Web.Mvc;

namespace SportsStore.WebUI.Controllers
{
    public class ProductController : Controller
    {
        private IProductRepository repository;
        public int PageSize = 4;

        public ProductController(IProductRepository productRepository)
        {
            this.repository = productRepository;
        }

        public ViewResult List(string category, int page = 1)
        {
            ProductsListViewModel model = new ProductsListViewModel
            {
                Products = repository.Products
                .Where(p => category == null || p.Category == category)
                .OrderBy(p => p.ProductID)
                .Skip((page - 1) * PageSize)
                .Take(PageSize),
                PagingInfo = new PagingInfo
                {
                    CurrentPage = page,
                    ItemsPerPage = PageSize,
                    TotalItems = repository.Products.Count()
                },
                CurrentCategory = category
            };
            return View(model);
        }
    }
}
以上代碼對 List 方法做了三處修改。第一個修改是添加了新參數 category 。第二修改是使用這個額 category 參數,以使 LINQ 查詢得到增強——如果 category 非空,則只選出與 Category 屬性匹配的那些 Product 對象。最後一個參數是設置添加到 ProductsListViewModel 類上的 CurrentCategory 屬性的值。然而,這些修改會導致不能正確地計算 PagingInfo.TotalItems 的值。
1.2 調整 URL 方案
沒有人喜歡看到或使用像"/?category=Soccer" 這種醜陋的 URL,為了改變這種格式,需要重新考察之前的路由方案,以創建一種更適合的 URL 方法。為了實現這種新方案,修改 App_Start/RouteConfig.cs 文件中的 RegisterRoutes 方法如下:
using System;
using System.Collections.Generic;
using System.Linq;
using System.Web;
using System.Web.Mvc;
using System.Web.Routing;

namespace SportsStore.WebUI
{
    public class RouteConfig
    {
        public static void RegisterRoutes(RouteCollection routes)
        {
            routes.IgnoreRoute("{resource}.axd/{*pathInfo}");

            routes.MapRoute(null, "", new
            {
                controller = "Product",
                action = "List",
                category = (string)null,
                page = 1
            });

            routes.MapRoute(null,
                "Page{page}",
                new { controller = "Product", action = "List", category = (string)null },
                new { page = @"\d+" }
                );

            routes.MapRoute(null,
                 "{category}",
                 new { controller = "Product", action = "List", page = 1 }
                );

            routes.MapRoute(null,
                "{category}/Page{page}",
                new { controller = "Product", action = "List" },
                new { page = @"\d+" }
                );

            routes.MapRoute(null, "{controller}/{action}");
        }
    }
}
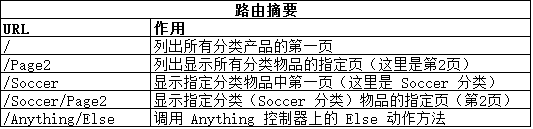
註意:路由是按其定義的順序來運用的,如果改變這種順序,會得到奇怪的效果。
下圖描述了這些路由所表示的 URL 方案。
ASP.NET 路由系統是由 MVC 用來處理客戶端請求的,但它也用來獲取符合 URL 方案的輸出 URL,以使用戶能夠把這個輸出 URL 嵌入在 Web 頁面中。這樣,就可以確保應用程式中的所有 URL 都是一致的。
Url.Action 方法是生成輸出鏈接最方便的方法。在 【MVC 4】5.SportsSore —— 一個真實的應用程式 中,為了顯示頁面鏈接,已經在List.cshtml 視圖中使用過這個輔助區方法。現在,既然已經添加對分類過濾的支持,就需要把這個信息傳遞給該輔助器方法,代碼如下所示:
1.3 建立分類導航菜單
現在需要給客戶提供一種選擇一個分類的方法。即,需要展示一個可用分類的列表,並指示出它們之中哪一個是被選中的。隨著對應用程式的擴建,將在多個控制器中使用這個分類列表,因此,需要確保它是自包含且可重用的。
ASP.NET MVC框架具有一種叫做“子動作”的概率,它特別適用於創建諸如可重用導航控制項之類的東西。子動作依賴於叫作“RenderAction”的 HTML 輔助器方法,它讓用戶能夠在當前視圖中包含一個任意動作方法的輸出。在這裡,我們可以創建一個新控制器“NavController”,它帶有一個動作方法“Menu”,該方法渲染一個導航菜單,並把該動作的輸出註入到佈局中。這種辦法可以得到一個真正的控制器它能夠包含用戶所需的各種應用程式邏輯,並且能夠像其他控制器一樣被單元測試。這是在保持 MVC 整體框架的前提下,創建應用程式小型片段的一種很好的方法。
(1) 創建導航控制器
新建控制器 NavController ,模板為“空控制器”,代碼如下:
using System;
using System.Collections.Generic;
using System.Linq;
using System.Web;
using System.Web.Mvc;

namespace SportsStore.WebUI.Controllers
{
    public class NavController : Controller
    {
        public string Menu() {
            return "Hello from NavController";
        }
    }
}
Menu 方法返回一個靜態的消息字元串,但它足以把這個子動作集成到應用程式的其餘部分。由於希望分類列表出現在所有頁面上,因此在佈局中渲染這個子動作,而不是在一個特定的視圖中進行渲染。編輯 Views/Shared/_Layout.cshtml 文件,以使它調用 RenderAction 輔助器方法,代碼如下:
<!DOCTYPE html>
<html>
<head>
    <meta charset="utf-8" />
    <meta name="viewport" content="width=device-width" />
    <title>@ViewBag.Title</title>
    <link href="~/Content/Site.css" type="text/css" rel="stylesheet" />
</head>
<body>
    <div id="header">
        <div class="title">SPORTS STORE</div>
    </div>
    <div id="categories">
        @{Html.RenderAction("Menu", "Nav");}
    </div>
    <div id="content">
        @RenderBody()
    </div>
</body>
</html>
對 RenderAction 方法的參數是希望調用的動作方法(Menu)和需要使用的控制器(Nav)。
註: RenderAction 方法會將它的內容直接寫入到響應流。即,該方法返回的是 void(無返回),因此不能對其使用規則的 Razor 標簽@(因為以@為首碼調用一個方法時,是將該方法的返回結果插入到頁面),而必須把這個調用封裝在一個 Razor 代碼塊中(而且要記住以分號為語句結束符)。
運行效果如下:

(2) 生成分類列表
現在可以回到該控制器,並生成一組實際的分類。本例不希望在控制器中生成分類的URL(註意,要記住控制器的職責,它只負責為視圖準備數據或處理從視圖而來的數據,不負責為視圖表現數據。這就是說,表現 URL 是視圖的事,與控制器無關,故不要再控制器中生成 URL)。本例打算在視圖中使用一個輔助器方法來做這件事。在 Menu 動作方法中索要做的是創建分類列表,修改代碼如下:
using SportsStore.Domain.Abstract;
using System;
using System.Collections.Generic;
using System.Linq;
using System.Web;
using System.Web.Mvc;

namespace SportsStore.WebUI.Controllers
{
    public class NavController : Controller
    {
        private IProductRepository repository;

        public NavController(IProductRepository repo)
        {
            repository = repo;
        }
        public PartialViewResult Menu()
        {
            IEnumerable<string> categories = repository.Products
                .Select(x => x.Category)
                .Distinct()
                .OrderBy(x => x);

            return PartialView(categories);
        }
    }
}
目前所做的的第一個修改時添加了構造器,它接受一個 IProductRepository 實現作為其參數——該實現將由 Ninject 提供,這是在控制器實例化時,使用 上一章 中建立的綁定來實現的。
第二個修改是 Menu 動作方法,它現在使用了一個 LINQ 查詢,以獲取存儲庫中的分類列表,並將它們傳遞給視圖。註意,由於在這個控制器中使用的是一個分部視圖,所以在動作方法中調用了 PartialVire 方法,且結果是一個 PartialViewResult 對象。
(3) 創建分部視圖
由於導航列表只是整個頁面的一部分,因此對 Menu 動作方法創建分部視圖是有意義的。建立對應的視圖文件 Menu.cshtml ,修改代碼如下:
@model IEnumerable<string>

@Html.ActionLink("Home", "List", "Product")

@foreach (var link in Model)
{
    @Html.RouteLink(link, new
{
    controller = "Product",
    action = "List",
    category = link,
    page = 1
})
}
上面添加了一個叫做“Home”的鏈接,它出現在分類列表的頂部,並將用戶帶到無分類過濾情況下所有產品列表的第一頁。這是用 ActionLink 輔助器方法來實現的,該方法用之前配置的路由信息生成了一個 HTML 的錨點元素(即超鏈接元素)。
然後枚舉了分類名,並用 RouteLink 方法為每個分類創建了鏈接。該輔助器方法與 ActionLink 類似,但在根據路由配置生成 URL 時,它能夠有針對地提供一組“名字/值”對(由上面代碼可以看出,這些“名字/值”對被放在一個匿名對象中,它們為路由的各個片段提供了數據)。
預設情況下,生成的鏈接很醜,因此定義一些 CSS ,以改善它們的外觀,其 CSS 代碼如下:
...
div#categories a { font: bold 1.1em "Arial Narrow", "Franklin Gothic Medium", Arial; display: block; text-decoration: none; padding: .6em; color: black; border-bottom: 1px solid silver; }
div#categories a.selected { background-color: #666; color: white; }
div#categories a:hover { background-color: #ccc; }
div#categories a.selected:hover { background-color: #666; }
...
運行該程式,就可以看到下圖所示的分類鏈接了。如果點擊一個分類,物品列表會做出更新,顯示所選分類物品。

(4)高亮當前分類
此刻,尚未給用戶指明他們正在查看的是哪一個分類。用戶或許可以根據所列出的物品進行判斷,但更好的辦法是提供某種實實在在的視覺反饋。
其做法是可以創建一個視圖模型,它含有分類列表和所選分類,事實上,這是常規做法。但出於多樣性的目的(同一種目標可以採用不同的方法實現),本文打算演示之前介紹過的View Bag(視圖包)特性。該特性能夠將數據從控制器傳遞給視圖,而不必使用視圖模型,修改 Nav 控制器中的 Menu 動作方法如下:
using SportsStore.Domain.Abstract;
using System;
using System.Collections.Generic;
using System.Linq;
using System.Web;
using System.Web.Mvc;

namespace SportsStore.WebUI.Controllers
{
    public class NavController : Controller
    {
        private IProductRepository repository;

        public NavController(IProductRepository repo)
        {
            repository = repo;
        }
        public PartialViewResult Menu(string category=null)
        {
            ViewBag.SelectedCategory = category;
            IEnumerable<string> categories = repository.Products
                .Select(x => x.Category)
                .Distinct()
                .OrderBy(x => x);

            return PartialView(categories);
        }
    }
}
就是給 Menu 動作方法添加了一個名為“category”的參數。此參數的值將由路由配置自動提供。在方法體中,在 ViewBag 對象中動態創建一個 SelectedCtegory 屬性,並將它的值設置為 category 參數的值。ViewBag 是一個動態對象,可以簡單的創建新的屬性,只需為該屬性設置一個值即可。
現在,此處提供了被選中的分類信息,可以更新視圖,利用這一信息把一個 CSS 的class 添加到表示被選中分類的 HTML 錨點元素上,修改 Menu.cshtml 如下:
@model IEnumerable<string>

@Html.ActionLink("Home", "List", "Product")

@foreach (var link in Model)
{
    @Html.RouteLink(link, new
{
    controller = "Product",
    action = "List",
    category = link,
    page = 1
},
new
{
    @class = link == ViewBag.SelectedCategory ? "selected" : null
})
}
上述代碼利用了 RouteLink 方法的一個重載版本,它讓用戶提供一個對象,該對象的屬性將作為標簽屬性被添加到這個 HTML 錨點元素上。在這個例子中,所添加的標簽屬性是一個 CSS 的 class 。賦給該屬性的值是 selected 。
註:上述代碼在匿名對象中使用了@class ,把它作為新參數傳遞給 RouteLink 輔助器方法。這不是一個 Razor 標簽。它使用的是一個 C#特性,以避免 HTML 關鍵字 class 與 C# 的同樣關鍵字 class 之間的衝突。 @字元允許開發者使用保留關鍵字,而不致使編譯器產生混淆。如果只把這個參數寫成 class (不帶@),編譯器會假設開發者正在定義一個新的 C# 類型。當使用@字元時,編譯器就知道開發者是想創建一個叫做 class 的匿名類型參數,於是才能得到所需要的結果。
運行效果如下:

1.4 修正頁面計數
要做的最後一件事是修正頁面鏈接,以使它們在選擇了一個分類時能正確的工作。當前,頁面鏈接的數目是由產品總數確定的,而不是被選中分類中的產品數所確定。這意味著,客戶可以點擊 Watersports 分類的第二頁,得到的卻是一個空白頁面,這是因為沒有足夠的 Watersports 分類產品來填充第二個頁面,如下圖所示:

通過更新 ProductController 中的 List 動作方法可以對此加以修正,以使分類信息吧分類考慮進來。
        public ViewResult List(string category, int page = 1)
        {
            ProductsListViewModel model = new ProductsListViewModel
            {
                Products = repository.Products
                .Where(p => category == null || p.Category == category)
                .OrderBy(p => p.ProductID)
                .Skip((page - 1) * PageSize)
                .Take(PageSize),
                PagingInfo = new PagingInfo
                {
                    CurrentPage = page,
                    ItemsPerPage = PageSize,
                    TotalItems = category == null ?
                    repository.Products.Count() :
                    repository.Products.Where(e => e.Category == category).Count()
                },
                CurrentCategory = category
            };
            return View(model);
        }
如果選中了一個分類,則返回該分類中的物品數;如果沒選擇分類,則返回產品總數。

2.建立購物車
前面部分創建的應用程式進展良好,但在沒有實現購物車之前,還不能銷售任何產品。本節將創建下圖所示的購物車體驗。

在一個分類中每個產品的旁邊都顯示一個 “Add to cart”的按鈕。點此按鈕將顯示客戶已選的產品摘要,包括總費用。在這裡,客戶可以點擊“Continue shopping”按鈕,以回到產品分類,或者點擊“Check out now”按鈕來完成訂購,並結束購物會話。
2.1 定義購物車實體
購物車是應用程式業務域的一部分,因此,在域模型中創建一個表現購物車的實體是有意義的。在 SportsStore.Domain 項目的 Entities 文件夾中添加新類 Cart.cs ,修改後代碼如下:
using System;
using System.Collections.Generic;
using System.Linq;
using System.Text;
using System.Threading.Tasks;

namespace SportsStore.Domain.Entities
{
    public class Cart
    {
        private List<CartLine> lineCollection = new List<CartLine>();

        public void AddItem(Product product, int quantity)
        {
            CartLine line = lineCollection.Where(p => p.Product.ProductID == product.ProductID).FirstOrDefault();

            if (line == null)
            {
                lineCollection.Add(new CartLine { Product = product, Quantity = quantity });
            }
            else
            {
                line.Quantity += quantity;
            }
        }

        public void RemoveLine(Product product)
        {
            lineCollection.RemoveAll(l => l.Product.ProductID == product.ProductID);
        }

        public decimal ComputeTotalValue()
        {
            return lineCollection.Sum(e => e.Product.Price * e.Quantity);
        }

        public void Clear()
        {
            lineCollection.Clear();
        }

        public IEnumerable<CartLine> Lines
        {
            get { return lineCollection; }
        }
    }

    public class CartLine
    {
        public Product Product { get; set; }
        public int Quantity { get; set; }
    }
}
此 Cart 類使用了在同一個文件中定義的 CartLine 類,以表示由客戶所選的一個產品和用戶想要購買的數量。上述代碼定義了一些方法,包括把一個物品添加到購物車、從購物車中刪除已加入的物品、計算購物車物品總費用,以及刪除全部選擇重置購物車等。該示例還提供了一個屬性,它使用 IEnumerable<CartLine> 對購物車的內容進行訪問。所有這些都很直觀,利用一點點 LINQ 的輔助,很容易用 C# 來實現。
2.2 添加“加入購物車”按鈕
需要編輯 Views/Shared/ProductSummary.cshtml 分部視圖,以便將這些按鈕添加到產品列表。修改後代碼如下:
@model SportsStore.Domain.Entities.Product

<div class="item">
    <h3>@Model.Name</h3>
    @Model.Description

    @using (Html.BeginForm("AddToCart", "Cart"))
    {
        @Html.HiddenFor(x => x.ProductID)
        @Html.Hidden("returnUrl", Request.Url.PathAndQuery)
        <input type="submit" value="+ Add to cart" />
    }

    <h4>@Model.Price.ToString("c")</h4>
</div>
上述代碼添加了一個 Razor 代碼塊,為列表中的每一個產品創建一個小型的HTML表單。當該表單被遞交時,將調用 Cart 控制器中的 AddToCart 動作方法。
在每個產品列表中使用 Html.BeginForm 輔助器方法,意味著每個“Add to cart”按鈕都會被渲染成它自己獨立的 HTML 的 from 元素。ASP.NET MVC 並不限制每頁表單的個數,可以根據需要使用任意多個。
為每個按鈕創建一個表單並不是技術上的要求。然而,由於每個表單將會回遞給同一個控制器方法,但卻帶有一組不同的參數值,所以,這是處理按鈕點擊的一種很好而簡單的方式。
另外,希望這些按鈕的樣式與應用程式的其餘部分一直,添加 CSS樣式如下:
...
form {margin:0;padding:0;}
div.item form {float:right;}
div.item input {color:white;background-color:#333;border:1px solid black;cursor:pointer;}
...
2.3 實現購物車控制器
此時,需要一個控制器來處理“Add to cart”按鈕的點擊。為此創建一個名為“CartController”的新控制器,編輯後內容如下:
using SportsStore.Domain.Abstract;
using SportsStore.Domain.Entities;
using System;
using System.Collections.Generic;
using System.Linq;
using System.Web;
using System.Web.Mvc;

namespace SportsStore.WebUI.Controllers
{
    public class CartController : Controller
    {
        private IProductRepository repository;

        public CartController(IProductRepository repo)
        {
            repository = repo;
        }

        public RedirectToRouteResult AddToCart(int productId, string returnUrl)
        {
            Product product = repository.Products.FirstOrDefault(p => p.ProductID == productId);
            if (product != null)
            {
                GetCart().AddItem(product, 1);
            }
            return RedirectToAction("Index", new { returnUrl });
        }

        public RedirectToRouteResult RemoveFromCart(int productId, string returnUrl)
        {
            Product product = repository.Products.FirstOrDefault(p => p.ProductID == productId);
            if (product != null)
            {
                GetCart().RemoveLine(product);
            }
            return RedirectToAction("Index", new { returnUrl });
        }

        private Cart GetCart()
        {
            Cart cart = (Cart)Session["Cart"];
            if (cart == null)
            {
                cart = new Cart();
                Session["Cart"] = cart;
            }
            return cart;
        }
    }
}
這個控制器有幾點需要註意。
第一是運用 ASP.NET 會話(Session)狀態特性來存儲和接收 Cart 對象,這是 GetCart 方法的意圖。 ASP.NET 有一個很好的會話特性,它使用重寫 cookies 或 URL 的辦法將一個用戶的各個請求關聯在一起,形成一個單一的瀏覽會話。一個相關的特性是會話狀態,它允許開發者吧數據和會話關聯起來。這對 Cart 類很合適。希望每個用戶都有自己的購物車,而且購物車在各次請求之間是保持的。當會話過期(典型情況是用戶很長時間沒有任何請求)時,與會話關聯的數據會被刪除,這意味著不需要對 Cart 對象的存儲或其生命周期進行管理。要把一個對象添加到一個會話狀態,只要對 Session 對象上的一個鍵設置一個值即可,如下所示:
Session["Cart"] = cart;
再次接收一個對象,只要簡單的讀取同一個鍵:
Cart cart = (Cart)Session["Cart"];
提示:Session 狀態對象預設存儲在ASP.NET 伺服器的記憶體中,但可以配置不同的存儲方式,包括使用一個 SQL 資料庫。
對於 AddToCart 和 RemoveFromCart 方法,使用與 HTML 表單中 input 元素匹配的參數名,這些 HTML 表單實在 ProductsSummary.cshtml 視圖中創建的。這可以讓MVC 框架吧輸入表單的 POST 變數與這些參數關聯起來,即不需要自己去處理這個表單。
2.4 顯示購物車內容
對於 Cart 控制器,要註意的最後一點事 AddToCart 和 RemoveFromCart 方法都調用了 RedirectToAction 方法,其效果是,把一個 HTTP 的重定向指令發送帶客戶端瀏覽器,要求瀏覽器請求一個新的 URL 。在此例中,要求瀏覽器(重新)請求的 URL 是,調用 Cart 控制器的 Index 動作方法。
本例打算實現這個 Index 方法,並用它顯示 Cart 的內容。需要把兩個數據片段傳遞給顯示購物車內容的視圖: Cart 對象,以及如果用戶點擊“Continue shopping”按鈕時要顯示的 URL。下麵為此在 Models 文件夾中創建一個簡單的視圖模型類 "CartIndexViewModel",代碼如下:
using SportsStore.Domain.Entities;

namespace SportsStore.WebUI.Models
{
    public class CartIndexViewModel
    {
        public Cart Cart{get;set;}
        public string ReturnUrl { get; set; }
    }
}
然後編輯控制器文件 CartController.cs ,添加 Index 動作方法:
        public ViewResult Index(string returnUrl)
        {
            return View(new CartIndexViewModel
            {
                Cart = GetCart(),
                ReturnUrl = returnUrl
            });
顯示購物車內容的最後已不是創建此新視圖,創建對應的 /Views/Cart/Index.cshtml 視圖文件,代碼如下:
@model SportsStore.WebUI.Models.CartIndexViewModel

@{
    ViewBag.Title = "Sports Store: Your Cart";
}

<h2>Your cart</h2>
<table class="cart_table">
    <thead>
        <tr>
            <th class="aling_center">Quantity</th>
            <th class="aling_left">Item</th>
            <th class="aling_right">Price</th>
            <th class="aling_right">Subtotal</th>
        </tr>
    </thead>
    <tbody>
        @foreach (var line in Model.Cart.Lines)
        {
            <tr>
                <td class="aling_center">@line.Quantity</td>
                <td class="aling_left">@line.Product.Name</td>
                <td class="aling_right">@line.Product.Price.ToString("c")</td>
                <td class="aling_right">@((line.Quantity * line.Product.Price).ToString("c"))</td>
            </tr>
        }
    </tbody>
    <tfoot>
        <tr>
            <td colspan="3" class="aling_right">Total:</td>
            <td class="aling_right">
                @Model.Cart.ComputeTotalValue().ToString("c")
            </td>
        </tr>
    </tfoot>
</table>
<p class="aling_center actionButtons">
    <a href="@Model.ReturnUrl">Continue shopping</a>
</p>
該視圖看上去比它本身更複雜一些。其實它只是枚舉了購物車中的各行信息,並把每行加入到一個 HTML 的表格中包括每行的總費用和整個購物車的總費用。
最後一步是再添加一些CSS 代碼如下:
.cart_table {width:90%;text-align:center;}
.aling_center {text-align:center;}
.aling_left {text-align:left;}
.aling_right {text-align:right;}
h2 {margin-top:0.3em}
tfoot td {border-top:1px dotted gray;font-weight:bold;}
.actionButtons,input .actionButtons {    font:.8em Arial;color:white;margin:5em;text-decoration:none;padding:.15em 1.5em .2em 1.5em;background-color:#353535;border:1px solid black;}
現在,已經實現了購物車的基本功能。首先,產品連同按鈕一起列出,以便將它們添加到購物車。點擊“Add to cart”按鈕時,相應的產品被添加到購物車,並顯示購物車摘要。可以點擊“Continue shopping”按鈕,返回到之前所在的頁面。
運行效果如下圖所示:


