一、組件渲染 當組件的props或者state發生改變時,組件會自動調用render方法重新渲染。當父組件被重新渲染時,子組件也會被遞歸渲染。那麼組件是如何渲染的呢? 二、組件的生命周期 組件的聲明周期可分成三個狀態:Mounting,已插入真實 DOM;Updating,正在被重新渲染;Unmou ...
一、組件渲染
當組件的props或者state發生改變時,組件會自動調用render方法重新渲染。當父組件被重新渲染時,子組件也會被遞歸渲染。那麼組件是如何渲染的呢?
# 方案一
1.state數據
2.JSX模板
3.數據 + 模板 生成真實DOM來顯示
4.state發生改變
5.JSX模板
6.數據 + 模板重新結合,生成新的真實的DOM,替換掉以前的DOM
缺陷:
    第一次生成了完整的DOM片段
    第二次生成了完整的DOM片段,替換第一次的DOM片段,比較耗性能
# 方案二
1.state數據
2.JSX模板
3.數據 + 模板 生成真實DOM來顯示
4.state發生改變
5.sJSX模板
6.數據 + 模板重新結合,生成新的真實的DOM
7.新的DOM和原來的DOM進行比對,只用新的DOM中改變的部分替換掉以前DOM對應的部分
缺陷:
    因為仍然是生成了一個新的真實的DOM,所以性能提升並不明顯
# 方案三
1.state數據
2.JSX模板
3.生成虛擬DOM,也就是一個js對象
    {
        "div": {
            id: "div-id",
            span: {
                id: "span-d",
                class: "span-class",
                content: "hello, world"
            }
        }
    }
4.數據 + 模板 生成真實DOM來顯示
    <div id="div-id"><span id="span-id" class="span-class">hello, world</span></div>
5.state發生變化
6.生成新的虛擬DOM
    {
        "div": {
            id: "div-id",
            span: {
                id: "span-d",
                class: "span-class",
                content: "what the hell"
            }
        }
    }
7.對比兩個虛擬DOM,將obj中span的content變動更改到原始真實DOM中
    <div id="div-id"><span id="span-id" class="span-class">what the hell</span></div>
優點:
    不再重新創建真實DOM,只是比較兩個js對象的不同來修改原始DOM
# 將一個object對象轉換成DOM
const dom = {
            "div": {
                id: "div-id",
                span: {
                    id: "span-id",
                    class: "span-class",
                    content: "hello, world"
                }
            }
        };
        function createDom(dom) {
            const div = Object.keys(dom)[0];
            const divNode = document.createElement(div);
            const innerKeys = Object.keys(dom.div);
            for(const i in innerKeys){
                const innerKey = innerKeys[i];
                if(innerKey === "span"){
                    const spanNode = document.createElement(innerKey);
                    const span = dom.div["span"];
                    const spanKeys = Object.keys(span);
                    for (const j in spanKeys){
                        const spanKey = spanKeys[j];
                        if(spanKey === "content"){
                            spanNode.innerText = "hello, world";
                        }else {
                            spanNode.setAttribute(spanKey, span[spanKey]);
                        }
                    }
                    divNode.appendChild(spanNode);
                }else {
                    divNode.setAttribute(innerKey, dom.div[innerKey]);
                }
            }
            return divNode;
        };
        div = createDom(dom);
二、組件的生命周期
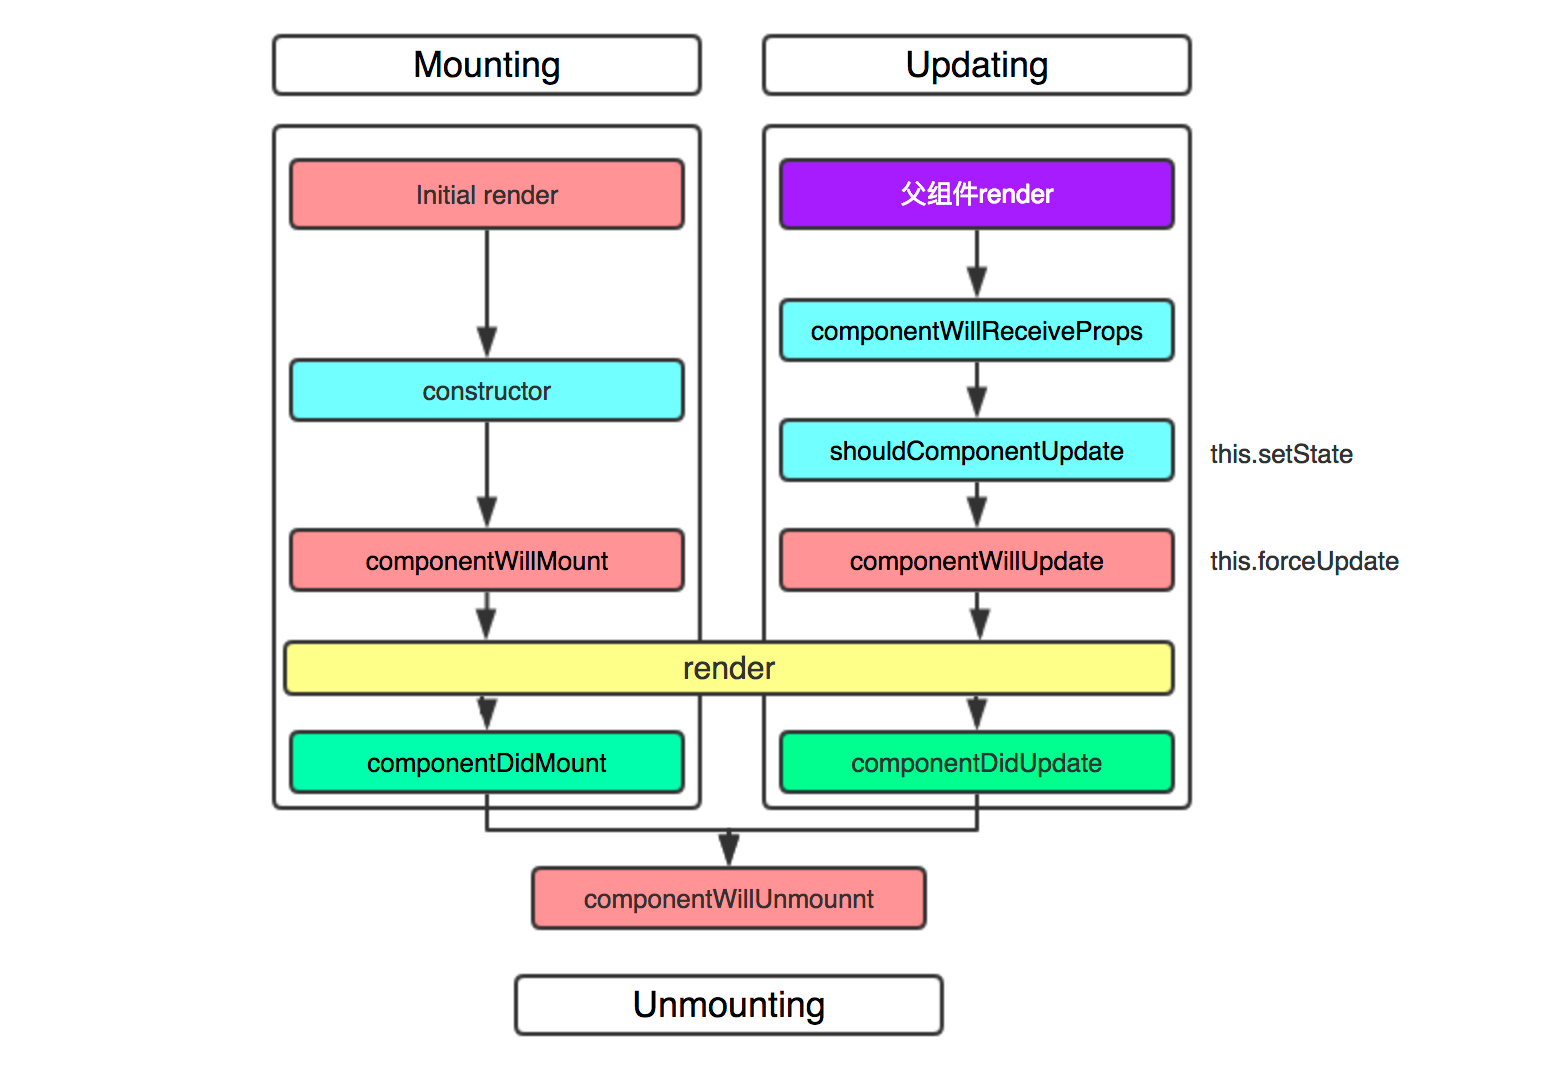
組件的聲明周期可分成三個狀態:Mounting,已插入真實 DOM;Updating,正在被重新渲染;Unmounting:已移出真實 DOM。如下圖所示(本圖根據Rosen老師示例改寫)。

各個函數的釋義(摘自菜鳥教程):
componentWillMount 在渲染前調用,在客戶端也在服務端。
componentDidMount : 在第一次渲染後調用,只在客戶端,只執行一次。之後組件已經生成了對應的DOM結構,可以通過this.getDOMNode()來進行訪問。 如果你想和其他JavaScript框架一起使用,可以在這個方法中調用setTimeout, setInterval或者發送AJAX請求等操作(防止異部操作阻塞UI)。
componentWillReceiveProps 在組件接收到一個新的 prop (更新後)時被調用。這個方法在初始化render時不會被調用。
shouldComponentUpdate 返回一個布爾值。在組件接收到新的props或者state時被調用。在初始化時或者使用forceUpdate時不被調用。
可以在你確認不需要更新組件時使用。
shouldComponentUpdate(nextProps, nextState) {
    console.log(nextProps, nextState);
    console.log(this.props, this.state);
    if(this.state.update === true){
        // 只有在給定條件發生的時候返回true,也就是可以重新渲染
        return true
    }
   // 只有在給定條件發生的時候返回true,也就是可以重新渲染
   if(nextState.update === true){
        // 在下一個狀態達到條件時重新渲染
        return true
    }
    return false // 其它條件返回false,不重新渲染
}
componentWillUpdate在組件接收到新的props或者state但還沒有render時被調用。在初始化時不會被調用。
componentDidUpdate 在組件完成更新後立即調用。在初始化時不會被調用。
componentWillUnmount在組件從 DOM 中移除的時候立刻被調用。
一個示例:
import React, {Fragment} from "react";

class LifeCircle extends React.Component{
    constructor(props){
        super(props);
        console.log("STEP1: constructor is called.");
        this.state = {
            list: [],
            input: ""
        }
    }
    componentWillMount() {
        console.log("STEP2: componentWillMount is called.");
    }
    componentDidMount() {
        console.log("STEP4: componentDidMount is called."); // 可以在這裡寫ajax數據請求,因為它只在組件被掛載到頁面上時執行一次,而不是render里(因為render會被重覆渲染)
    }

    componentWillReceiveProps(nextProps, nextContext) {
        console.log("STEP5: componentWillReceiveProps is called.")
    }

    shouldComponentUpdate(nextProps, nextState, nextContext) {
        console.log("STEP6: shouldComponentUpdate is called.");
        return true; // 是否更新,true更新,更新就是要把有關的子組件也一併渲染;如果子組件沒有數據更改那就沒重新渲染,此時可以返回一個false
    }
    componentWillUpdate(nextProps, nextState, nextContext) {
        console.log("STEP7: componentWillUpdate is called.")
    }
    componentDidUpdate(prevProps, prevState, snapshot) {
        console.log("STEP8: componentDidUpdate is called.")
    }
    componentWillUnmount() {
        console.log("STEP9: componentDidUpdate is called.")
    }

    render() {
        console.log("STEP3: render is called.");
        return (
            <Fragment>
                <div>
                    <input
                        value={this.state.input}
                        onChange={(e) => {this.handleChange(e)}}
                    />
                    <button onClick={() => {this.handleClick()}}>添加句子</button>
                </div>
                <ul>
                    {
                        this.state.list.map((name, index) => {
                            return <li
                                key={index}
                                onClick={() => {this.handleliClick(index)}}
                            > { name }</li>
                        })
                    }
                </ul>
            </Fragment>
        );
    }
    handleChange(e){
        const value = e.target.value;
        this.setState(() => ({
            input: value
        }))
    }
    handleClick(){
        this.setState((prevState)=>({
            list: [...prevState.list, prevState.input],
            input: ""
        }))
    }
    handleliClick(index){
        this.setState((prevState) => {
            const list =[...prevState.list];
            list.splice(index, 1);
            return {
                list
            }
        })
    }
}

export default LifeCircle;
三、使用component請求後臺數據並交給組件
在my-app下建立server/server.js文件,啟動一個後端服務:
const express = require('express');

const app = express();
app.get("/data", function (req, res) {
    res.json({"name": "old monkey", "age": 5000})
});
app.listen(3002, function () {
    console.log("Node app start at port 3002.")
});
Terminal啟動該服務: node server/server.js。此時可以訪問http://localhost:3002/data來獲取json數據。
安裝axios: cnpm install axios --save。併在package.json的配置文件中添加"proxy"配置,讓它轉換埠到3002:
// package.json
{
  "name": "my-app",
  "version": "0.1.0",
  "private": true,
  "dependencies": {
    "axios": "^0.18.0",
    "react": "^16.4.1",
    "react-dom": "^16.4.1",
    "react-scripts": "1.1.4"
  },
  "scripts": {
    "start": "react-scripts start",
    "build": "react-scripts build",
    "test": "react-scripts test --env=jsdom",
    "eject": "react-scripts eject"
  },
  "proxy": "http://localhost:3002"
}
在src/index.js中寫組件:
// src/index.js
import React from 'react';
import ReactDOM from 'react-dom';
import axios from 'axios';

class App extends React.Component{
    constructor(props){
        super(props);
        this.state = {name: "monkey", age: 100}

    }
  // 在component內部使用ajax請求數據,並通過setState傳遞給App。
    componentDidMount(){
        axios.get("/data").then(res=>{
            if(res.status === 200){
                console.log(res);
                this.setState({name: res.data.name, age: res.data.age});
            }
        }, err=>{
            console.log(err);
        })
    }
    addAge(){
        this.setState({age: this.state.age + 1})
    };
    decAge(){
        this.setState({age: this.state.age - 1})
    }
    render (){
        const style={
            display: "inline-block",
            width: "150px",
            height: "40px",
            backgroundColor: "rgb(173, 173, 173)",
            color: "white",
            marginRight: "20px"
        };
        return (
            <div>
                <h2>this {this.state.name } is { this.state.age } years old.</h2>
                <button style={style} onClick={()=>this.addAge()}>增加一歲</button>
                <button style={style} onClick={()=>this.decAge()}>減少一歲</button>
            </div>
        )
    }
}
ReactDOM.render(<App />, document.getElementById('root'));


