
1、reactor(反應器)模式 使用單線程模擬多線程,提高資源利用率和程式的效率,增加系統吞吐量。下麵例子比較形象的說明瞭什麼是反應器模式: 一個老闆經營一個飯店, 傳統模式 來一個客人安排一個服務員招呼,客人很滿意;(相當於一個連接一個線程) 後來客人越來越多,需要的服務員越來越多,資源條件不足 ...
1、reactor(反應器)模式
使用單線程模擬多線程,提高資源利用率和程式的效率,增加系統吞吐量。下麵例子比較形象的說明瞭什麼是反應器模式:
一個老闆經營一個飯店,
傳統模式 - 來一個客人安排一個服務員招呼,客人很滿意;(相當於一個連接一個線程)
後來客人越來越多,需要的服務員越來越多,資源條件不足以再請更多的服務員了,傳統模式已經不能滿足需求。老闆之所以為老闆自然有過人之處,老闆發現,服務員在為客人服務時,當客人點菜的時候,服務員基本處於等待狀態,(阻塞線程,不做事)。
於是乎就讓服務員在客人點菜的時候,去為其他客人服務,當客人菜點好後再招呼服務員即可。 --反應器(reactor)模式誕生了
飯店的生意紅紅火火,幾個服務員就足以支撐大量的客流量,老闆用有限的資源賺了更多的money~~~~_
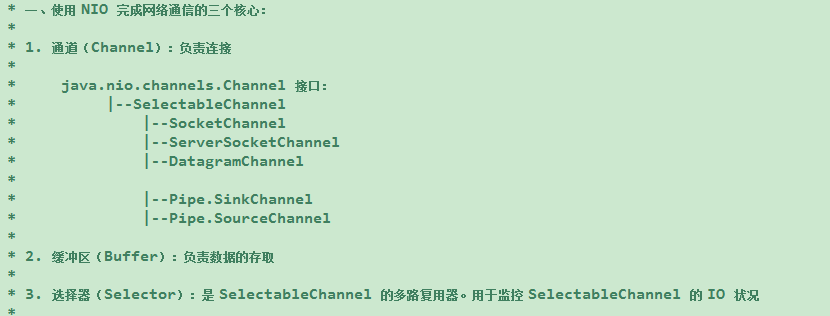
通道:類似於流,但是可以非同步讀寫數據(流只能同步讀寫),通道是雙向的,(流是單向的),通道的數據總是要先讀到一個buffer 或者 從一個buffer寫入,即通道與buffer進行數據交互。
通道類型:
- FileChannel:從文件中讀寫數據。
- DatagramChannel:能通過UDP讀寫網路中的數據。
- SocketChannel:能通過TCP讀寫網路中的數據。
- ServerSocketChannel:可以監聽新進來的TCP連接,像Web伺服器那樣。對每一個新進來的連接都會創建一個SocketChannel。
- FileChannel比較特殊,它可以與通道進行數據交互, 不能切換到非阻塞模式,套接字通道可以切換到非阻塞模式;
緩衝區 - 本質上是一塊可以存儲數據的記憶體,被封裝成了buffer對象而已!
緩衝區類型:
- ByteBuffer
- MappedByteBuffer
- CharBuffer
- DoubleBuffer
- FloatBuffer
- IntBuffer
- LongBuffer
- ShortBuffer
常用方法:
- allocate() - 分配一塊緩衝區
- put() - 向緩衝區寫數據
- get() - 向緩衝區讀數據
- filp() - 將緩衝區從寫模式切換到讀模式
- clear() - 從讀模式切換到寫模式,不會清空數據,但後續寫數據會覆蓋原來的數據,即使有部分數據沒有讀,也會被遺忘;
- compact() - 從讀數據切換到寫模式,數據不會被清空,會將所有未讀的數據copy到緩衝區頭部,後續寫數據不會覆蓋,而是在這些數據之後寫數據
- mark() - 對position做出標記,配合reset使用
- reset() - 將position置為標記值
緩衝區的一些屬性:
capacity - 緩衝區大小,無論是讀模式還是寫模式,此屬性值不會變;
position - 寫數據時,position表示當前寫的位置,每寫一個數據,會向下移動一個數據單元,初始為0;最大為capacity - 1,切換到讀模式時,position會被置為0,表示當前讀的位置
limit - 寫模式下,limit 相當於capacity 表示最多可以寫多少數據,切換到讀模式時,limit 等於原先的position,表示最多可以讀多少數據。
非直接緩衝區:通過allocate() 方法 分配緩衝區,將緩衝區建立在JVM記憶體中
直接緩衝區:通過allocateDirect() 方法直接緩衝區 將緩衝區建立在物理記憶體中
2.1 關於緩衝區各個屬性的測試
	    String str = "abcde";

		//1. 分配一個指定大小的緩衝區
		ByteBuffer buf = ByteBuffer.allocate(1024);

		System.out.println("--------------allocate()----------------");
		System.out.println(buf.position());//0
		System.out.println(buf.limit());//1024
		System.out.println(buf.capacity());//1024

		//2. 利用put存入數據到緩衝區中去
		buf.put(str.getBytes());

		System.out.println("----------------put()-------------------");
		System.out.println(buf.position());//5
		System.out.println(buf.limit());//1024
		System.out.println(buf.capacity());//1024


		//3. 切換到讀取模式
		buf.flip();

		System.out.println("----------------flip()------------------");
		System.out.println(buf.position());//0
		System.out.println(buf.limit());//5
		System.out.println(buf.capacity());//1024


		//4. 利用get() 讀取緩衝區中的數據
		byte[] dst = new byte[buf.limit()];
		buf.get(dst);
		System.out.println(new String(dst,0,dst.length));

		System.out.println("----------------get()------------------");
		System.out.println(buf.position());//5
		System.out.println(buf.limit());//5
		System.out.println(buf.capacity());//1024


		//5.可重覆讀
		buf.rewind();

		System.out.println("----------------rewind()------------------");
		System.out.println(buf.position());//0
		System.out.println(buf.limit());//5
		System.out.println(buf.capacity());//1024


		//6.clear(): 清空緩衝區, 但是緩衝區的數據依然存在, 但是處於被遺忘的狀態
		buf.clear();

		System.out.println("----------------clear()-------------------");
		System.out.println(buf.position());//0
		System.out.println(buf.limit());//1024
		System.out.println(buf.capacity());//1024

		byte[] newByte = new byte[buf.limit()];
		buf.get(newByte);
		System.out.println(new String(newByte,0,newByte.length));
2.2 關於通道的使用
1.利用通道進行 文件的複製 非直接緩衝區
		FileInputStream fis = null;
		FileOutputStream fos = null;
		FileChannel inChannel = null;
		FileChannel outChannel = null;
		try {
			fis = new FileInputStream("1.jpg");
			fos = new FileOutputStream("2.jpg");

			// ①獲取通道
			inChannel = fis.getChannel();
			outChannel = fos.getChannel();

			// ②將通道中的數據存入緩衝區
			ByteBuffer byteBuffer = ByteBuffer.allocate(1024);

			// 將通道中的數據存入緩衝區
			while (inChannel.read(byteBuffer) != -1) {
				byteBuffer.flip(); // 切換讀取數據的模式
				outChannel.write(byteBuffer);
				byteBuffer.clear();
			}

		} catch (IOException e) {
			e.printStackTrace();
		} finally {
			if (inChannel != null) {
				try {
					inChannel.close();
				} catch (IOException e) {
					e.printStackTrace();
				}
			}

			if (outChannel != null) {
				try {
					outChannel.close();
				} catch (IOException e) {
					e.printStackTrace();
				}
			}

			if (fis != null) {
				try {
					fis.close();
				} catch (IOException e) {
					e.printStackTrace();
				}
			}

			if (fos != null) {
				try {
					fos.close();
				} catch (IOException e) {
					e.printStackTrace();
				}
			}

		}
2.通道之間的傳輸
CREATE_NEW:如果文件不存在就創建,存在就報錯
CREATE:如果文件不存在就創建,存在創建(覆蓋)
		FileChannel inChannel = null;
		FileChannel outChannel = null;
		try {
			inChannel = FileChannel.open(Paths.get("hello.txt"), StandardOpenOption.READ);
			outChannel = FileChannel.open(Paths.get("hello2.txt"), StandardOpenOption.READ,StandardOpenOption.WRITE,StandardOpenOption.CREATE_NEW);

			inChannel.transferTo(0, inChannel.size(), outChannel);
		} catch (Exception e) {
			e.printStackTrace();
		}  finally {

			if(inChannel != null){
				try {
					inChannel.close();
				} catch (IOException e) {
					e.printStackTrace();
				}
			}

			if(outChannel != null){
				try {
					outChannel.close();
				} catch (IOException e) {
					e.printStackTrace();
				}
			}
		}
3. 使用直接緩衝區完成記憶體文件的複製
		FileChannel inChannel = null;
		FileChannel outChannel = null;
		try {
			inChannel = FileChannel.open(Paths.get("1.jpg"), StandardOpenOption.READ);
			outChannel = FileChannel.open(Paths.get("x.jpg"), StandardOpenOption.READ,StandardOpenOption.WRITE,StandardOpenOption.CREATE_NEW);

			MappedByteBuffer inMappedBuffer = inChannel.map(MapMode.READ_ONLY, 0, inChannel.size());
			MappedByteBuffer outMappedBuffer = outChannel.map(MapMode.READ_WRITE, 0, inChannel.size());

			System.out.println(inMappedBuffer.limit());
			byte[] b = new byte[inMappedBuffer.limit()];;
			inMappedBuffer.get(b);
			outMappedBuffer.put(b);

		} catch (Exception e) {
			e.printStackTrace();
		} finally {

			if(inChannel != null){
				try {
					inChannel.close();
				} catch (IOException e) {
					e.printStackTrace();
				}
			}

			if(outChannel != null){
				try {
					outChannel.close();
				} catch (IOException e) {
					e.printStackTrace();
				}
			}

		}
2.3 重點 NIO-非阻塞IO
個人認為 NIO 最難的兩點 一個是對於選擇器和選擇鍵的理解 其次是對於網路通信模型的理解
本章內容以防過長 只講解 NIO 的使用方法 上述兩點參看下回分解
阻塞IO示例:
	//客戶端
	@Test
	public void client() throws IOException{
		SocketChannel sChannel = SocketChannel.open(new InetSocketAddress("127.0.0.1", 9898));

		FileChannel inChannel = FileChannel.open(Paths.get("1.jpg"), StandardOpenOption.READ);

		ByteBuffer buf = ByteBuffer.allocate(1024);

		while(inChannel.read(buf) != -1){
			buf.flip();
			sChannel.write(buf);
			buf.clear();
		}

		sChannel.shutdownOutput();

		//接收服務端的反饋
		int len = 0;
		while((len = sChannel.read(buf)) != -1){
			buf.flip();
			System.out.println(new String(buf.array(), 0, len));
			buf.clear();
		}

		inChannel.close();
		sChannel.close();
	}

	//服務端
	@Test
	public void server() throws IOException{
		ServerSocketChannel ssChannel = ServerSocketChannel.open();

		FileChannel outChannel = FileChannel.open(Paths.get("2.jpg"), StandardOpenOption.WRITE, StandardOpenOption.CREATE);

		ssChannel.bind(new InetSocketAddress(9898));

		SocketChannel sChannel = ssChannel.accept();

		ByteBuffer buf = ByteBuffer.allocate(1024);

		while(sChannel.read(buf) != -1){
			buf.flip();
			outChannel.write(buf);
			buf.clear();
		}

		//發送反饋給客戶端
		buf.put("服務端接收數據成功".getBytes());
		buf.flip();
		sChannel.write(buf);

		sChannel.close();
		outChannel.close();
		ssChannel.close();
	}
非阻塞IO示例-TCP:
//客戶端
	@Test
	public void client() throws IOException{
		//1. 獲取通道
		SocketChannel sChannel = SocketChannel.open(new InetSocketAddress("127.0.0.1", 9898));

		//2. 切換非阻塞模式
		sChannel.configureBlocking(false);

		//3. 分配指定大小的緩衝區
		ByteBuffer buf = ByteBuffer.allocate(1024);

		//4. 發送數據給服務端
		Scanner scan = new Scanner(System.in);

		while(scan.hasNext()){
			String str = scan.next();
			buf.put((new Date().toString() + "\n" + str).getBytes());
			buf.flip();
			sChannel.write(buf);
			buf.clear();
		}

		//5. 關閉通道
		sChannel.close();
	}

	//服務端
	@Test
	public void server() throws IOException{
		//1. 獲取通道
		ServerSocketChannel ssChannel = ServerSocketChannel.open();

		//2. 切換非阻塞模式
		ssChannel.configureBlocking(false);

		//3. 綁定連接
		ssChannel.bind(new InetSocketAddress(9898));

		//4. 獲取選擇器
		Selector selector = Selector.open();

		//5. 將通道註冊到選擇器上, 並且指定“監聽接收事件”
		ssChannel.register(selector, SelectionKey.OP_ACCEPT);

		//6. 輪詢式的獲取選擇器上已經“準備就緒”的事件
		while(selector.select() > 0){

			//7. 獲取當前選擇器中所有註冊的“選擇鍵(已就緒的監聽事件)”
			Iterator<SelectionKey> it = selector.selectedKeys().iterator();

			while(it.hasNext()){
				//8. 獲取準備“就緒”的是事件
				SelectionKey sk = it.next();

				//9. 判斷具體是什麼事件準備就緒
				if(sk.isAcceptable()){
					//10. 若“接收就緒”,獲取客戶端連接
					SocketChannel sChannel = ssChannel.accept();

					//11. 切換非阻塞模式
					sChannel.configureBlocking(false);

					//12. 將該通道註冊到選擇器上
					sChannel.register(selector, SelectionKey.OP_READ);
				}else if(sk.isReadable()){
					//13. 獲取當前選擇器上“讀就緒”狀態的通道
					SocketChannel sChannel = (SocketChannel) sk.channel();

					//14. 讀取數據
					ByteBuffer buf = ByteBuffer.allocate(1024);

					int len = 0;
					while((len = sChannel.read(buf)) > 0 ){
						buf.flip();
						System.out.println(new String(buf.array(), 0, len));
						buf.clear();
					}
				}

				//15. 取消選擇鍵 SelectionKey
				it.remove();
			}
		}
	}
非阻塞IO示例-UDP:
	@Test
	public void send() throws IOException{
		DatagramChannel dc = DatagramChannel.open();

		dc.configureBlocking(false);

		ByteBuffer buf = ByteBuffer.allocate(1024);

		Scanner scan = new Scanner(System.in);

		while(scan.hasNext()){
			String str = scan.next();
			buf.put((new Date().toString() + ":\n" + str).getBytes());
			buf.flip();
			dc.send(buf, new InetSocketAddress("127.0.0.1", 9898));
			buf.clear();
		}

		dc.close();
	}

	@Test
	public void receive() throws IOException{
		DatagramChannel dc = DatagramChannel.open();

		dc.configureBlocking(false);

		dc.bind(new InetSocketAddress(9898));

		Selector selector = Selector.open();

		dc.register(selector, SelectionKey.OP_READ);

		while(selector.select() > 0){
			Iterator<SelectionKey> it = selector.selectedKeys().iterator();

			while(it.hasNext()){
				SelectionKey sk = it.next();

				if(sk.isReadable()){
					ByteBuffer buf = ByteBuffer.allocate(1024);

					dc.receive(buf);
					buf.flip();
					System.out.println(new String(buf.array(), 0, buf.limit()));
					buf.clear();
				}
			}

			it.remove();
		}
	}


