其實很早之前我就已經瞭解了在winform下實現插件編程,原理很簡單,主要實現思路就是:先定一個插件介面作為插件樣式及功能的約定,然後具體的插件就去實現這個插件介面,最後宿主(應用程式本身)就利用反射動態獲取實現了插件介面的類型作為合法的插件,從而完成動態載入及宿主與插件之間的互動。因為之前一段時間 ...
其實很早之前我就已經瞭解了在winform下實現插件編程,原理很簡單,主要實現思路就是:先定一個插件介面作為插件樣式及功能的約定,然後具體的插件就去實現這個插件介面,最後宿主(應用程式本身)就利用反射動態獲取實現了插件介面的類型作為合法的插件,從而完成動態載入及宿主與插件之間的互動。因為之前一段時間一直搞B/S架構開發沒有時間去實踐,而恰好現在公司領導要求我對我公司原有的ERP系統架構進行重整,我們的ERP系統採用的基於分散式的三層架構,核心業務邏輯放在服務端,展示層與業務層之間採用基於WEB服務等技術進行通信與交互資源,而展示層則主要是由WINFORM的多個父子視窗構成。從業務與安全的角度來說,我們的ERP系統基於分散式的三層架構是合理的,也無需改動,其最大的核心問題是在三層中的展示層,前面也說了展示層是由許多的WINFORM父子視窗構成,而且全部都在一個程式集中(即一個項目文件中),每次只要有一個窗體發生更改,就需要整個項目重新編譯,由於文件太多,編譯也就比較慢,而且也不利於團隊合作,經常出現SVN更新衝突或團隊之間更新不及時,造成編譯報錯等各種問題。為瞭解決這個問題,我與公司領導首先想到的是拆分展示層,由一個程式集拆分成多個程式集,由單一文件結構變成主從文件結構,這樣就能大大的減少上述發生問題的機率,那麼如何實現呢?自然就是本文的主題:實現模塊化插件編程,有人可能不解,這個模塊化插件編程與插件編程有區別嗎?從原理上來講是沒有區別的,與本文開頭講的一樣,區別在於,普通的插件編程一般是基於單個類型來進行判斷且以單個類型進行操作,而我這裡的模塊化(也可以說是組件化)插件編程,是以程式集為單位進行判斷並通過方法回調的形式來被動收集符合插件的多個類型,好處是避免了每個類型都需要進行判斷,從而搞高運行效率。這種模塊化插件編程的思想,我參考了ASP.NET 路由註冊機制,如下麵的代碼:
    public static class WebApiConfig
    {
        public static void Register(HttpConfiguration config)
        {
            config.Routes.MapHttpRoute(
                name: "DefaultApi",
                routeTemplate: "api/{controller}/{id}",
                defaults: new { id = RouteParameter.Optional }
            );

        }
    }
這段代碼的好處是,讓你只關註config的事情,其它的都不用管。而我在代碼中也利用了這種實現原理,具體的步驟與代碼如下:
1.創建一個類庫項目文件(PlugIn),該類庫需主要是實現模塊化插件編程的規範(即:各種介面及通用類),到時候宿言主及其它組件都必需引用它。
IAppContext:應用程式上下文對象介面,作用:用於收集應用程式必備的一些公共信息並共用給整個應用程式所有模塊使用(含動態載入進來的組件)
using System;
using System.Collections.Generic;
using System.Linq;
using System.Text;
using System.Threading.Tasks;
using System.Windows.Forms;

namespace PlugIn
{
    /// <summary>
    /// 應用程式上下文對象介面
    /// 作用:用於收集應用程式必備的一些公共信息並共用給整個應用程式所有模塊使用(含動態載入進來的組件)
    /// 作者:Zuowenjun
    /// 2016-3-26
    /// </summary>
    public interface IAppContext
    {
        /// <summary>
        /// 應用程式名稱
        /// </summary>
        string AppName { get;}

        /// <summary>
        /// 應用程式版本
        /// </summary>
        string AppVersion { get; }

        /// <summary>
        /// 用戶登錄信息,這裡類型是STRING,真實項目中為一個實體類
        /// </summary>
        string SessionUserInfo { get; }

        /// <summary>
        /// 用戶登錄許可權信息,這裡類型是STRING,真實項目中為一個實體類
        /// </summary>
        string PermissionInfo { get; }

        /// <summary>
        /// 應用程式全局緩存,整個應用程式(含動態載入的組件)均可進行讀寫訪問
        /// </summary>
        Dictionary<string, object> AppCache { get; }

        /// <summary>
        /// 應用程式主界面窗體,各組件中可以訂閱或獲取主界面的相關信息
        /// </summary>
        Form AppFormContainer { get; }

        /// <summary>
        /// 動態創建在註冊列表中的插件窗體實例
        /// </summary>
        /// <param name="formType"></param>
        /// <returns></returns>
        Form CreatePlugInForm(Type formType);

        /// <summary>
        /// 動態創建在註冊列表中的插件窗體實例
        /// </summary>
        /// <param name="formTypeName"></param>
        /// <returns></returns>
        Form CreatePlugInForm(string formTypeName);

    }
}
ICompoent:組件信息描述介面,作用:描述該組件(或稱為模塊,即當前程式集)的一些主要信息,以便宿主(應用程式)可以動態獲取到
using System;
using System.Collections.Generic;
using System.Linq;
using System.Text;
using System.Threading.Tasks;

namespace PlugIn
{
    /// <summary>
    /// 組件信息描述介面
    /// 作用:描述該組件(或稱為模塊,即當前程式集)的一些主要信息,以便應用程式可以動態獲取到
    /// 作者:Zuowenjun
    /// 2016-3-26
    /// </summary>
    public interface ICompoent
    {
        /// <summary>
        /// 組件名稱
        /// </summary>
        string CompoentName { get;}

        /// <summary>
        /// 組件版本,可實現按組件更新
        /// </summary>
        string CompoentVersion { get; }

        /// <summary>
        /// 嚮應用程式預註冊的窗體類型列表
        /// </summary>
        IEnumerable<Type> FormTypes { get; }
    }
}
ICompoentConfig:組件信息註冊介面,作用:應用程式將會第一時間從程式集找到實現了該介面的類並調用其CompoentRegister方法,從而被動的收集該組件的相關信息
using System;
using System.Collections.Generic;
using System.Linq;
using System.Text;
using System.Threading.Tasks;

namespace PlugIn
{
    /// <summary>
    /// 組件信息註冊介面
    /// 作用:應用程式將會第一時間從程式集找到實現了該介面的類並調用其CompoentRegister方法,從而被動的收集該組件的相關信息
    /// 作者:Zuowenjun
    /// 2016-3-26
    /// </summary>
    public interface ICompoentConfig
    {
        void CompoentRegister(IAppContext context, out ICompoent compoent);
    }
}
Compoent:組件信息描述類(因為後續所有的插件模塊都需要實現ICompoent,故這裡直接統一實現,避免重覆實現)
using System;
using System.Collections.Generic;
using System.Linq;
using System.Text;
using System.Threading.Tasks;
using PlugIn;
using System.Windows.Forms;

namespace PlugIn
{
    /// <summary>
    /// 組件信息描述類
    /// 作者:Zuowenjun
    /// 2016-3-26
    /// </summary>
    public class Compoent : ICompoent
    {
        private List<Type> formTypeList = new List<Type>();

        public string CompoentName
        {
            get;
            private set;
        }

        public string CompoentVersion
        {
            get;
            private set;
        }

        public IEnumerable<Type> FormTypes
        {
            get
            {
                return formTypeList.AsEnumerable();
            }
        }

        public Compoent(string compoentName, string compoentVersion)
        {
            this.CompoentName = compoentName;
            this.CompoentVersion = compoentVersion;
        }

        public void AddFormTypes(params Type[] formTypes)
        {
            Type targetFormType = typeof(Form);
            foreach (Type formType in formTypes)
            {
                if (targetFormType.IsAssignableFrom(formType) && !formTypeList.Contains(formType))
                {
                    formTypeList.Add(formType);
                }
            }
        }
    }
}
2.宿主(主應用程式)需引用上述類庫,並同時實現IAppContext的實現類:AppContext
using PlugIn;
using System;
using System.Collections.Generic;
using System.Linq;
using System.Text;
using System.Threading.Tasks;
using System.Windows.Forms;

namespace WinFormPlugin
{
    /// <summary>
    /// 應用程式上下文對象類
    /// 作者:Zuowenjun
    /// 2016-3-26
    /// </summary>
    public class AppContext : IAppContext
    {

        internal static AppContext Current;

        internal Dictionary<string, Type> AppFormTypes
        {
            get;
            set;
        }

        public string AppName
        {
            get;
            private set;
        }

        public string AppVersion
        {
            get;
            private set;
        }

        public string SessionUserInfo
        {
            get;
            private set;
        }

        public string PermissionInfo
        {
            get;
            private set;
        }

        public Dictionary<string, object> AppCache
        {
            get;
            private set;
        }

        public System.Windows.Forms.Form AppFormContainer
        {
            get;
            private set;
        }


        public AppContext(string appName, string appVersion, string sessionUserInfo, string permissionInfo, Form appFormContainer)
        {
            this.AppName = appName;
            this.AppVersion = appVersion;
            this.SessionUserInfo = sessionUserInfo;
            this.PermissionInfo = permissionInfo;
            this.AppCache = new Dictionary<string, object>();
            this.AppFormContainer = appFormContainer;
        }

        public System.Windows.Forms.Form CreatePlugInForm(Type formType)
        {
            if (this.AppFormTypes.ContainsValue(formType))
            {
                return Activator.CreateInstance(formType) as Form;
            }
            else
            {
                throw new ArgumentOutOfRangeException(string.Format("該窗體類型{0}不在任何一個模塊組件窗體類型註冊列表中!", formType.FullName), "formType");
            }
        }

        public System.Windows.Forms.Form CreatePlugInForm(string formTypeName)
        {
            Type type = Type.GetType(formTypeName);
            return CreatePlugInForm(type);
        }
    }
}
實現了AppContext之後,那麼就需要來實例化並填充AppContext類,實例化的過程放在主窗體(父窗體)的Load事件中,如下:
        private void ParentForm_Load(object sender, EventArgs e)
        {

            AppContext.Current = new AppContext("文俊插件示常式序", "V16.3.26.1", "admin", "administrator", this);
            AppContext.Current.AppCache["loginDatetime"] = DateTime.Now;
            AppContext.Current.AppCache["baseDir"] = AppDomain.CurrentDomain.BaseDirectory;
            AppContext.Current.AppFormTypes = new Dictionary<string, Type>();
            LoadComponents();
            LoadMenuNodes();
        }


        private void LoadComponents()
        {
            string path = AppContext.Current.AppCache["baseDir"] + "com\\";
            Type targetFormType = typeof(Form);
            foreach (string filePath in Directory.GetFiles(path, "*.dll"))
            {
                var asy = Assembly.LoadFile(filePath);
                var configType = asy.GetTypes().FirstOrDefault(t => t.GetInterface("ICompoentConfig") != null);
                if (configType != null)
                {
                    ICompoent compoent=null;
                    var config = (ICompoentConfig)Activator.CreateInstance(configType);
                    config.CompoentRegister(AppContext.Current,out compoent);//關鍵點在這裡,得到組件實例化後的compoent
                    if (compoent != null)
                    {
                        foreach (Type formType in compoent.FormTypes)//將符合的窗體類型集合加到AppContext的AppFormTypes中
                        {
                            if (targetFormType.IsAssignableFrom(formType))
                            {
                                AppContext.Current.AppFormTypes.Add(formType.FullName, formType);
                            }
                        }
                    }
                }
            }
        }


        private void LoadMenuNodes() //實現情況應該是從資料庫及用戶許可權來進行動態創建菜單項
        {
            this.treeView1.Nodes.Clear();
            var root = this.treeView1.Nodes.Add("Root");

            foreach (var formType in AppContext.Current.AppFormTypes)
            {
                var node = new TreeNode(formType.Key) { Tag = formType.Value };
                root.Nodes.Add(node);
            }
        }
下麵是實現菜單雙擊並打開視窗,代碼如下:
        private void treeView1_NodeMouseDoubleClick(object sender, TreeNodeMouseClickEventArgs e)
        {
            if (e.Node.Nodes.Count <= 0)//當非父節點(即:實際的功能節點)
            {
                ShowChildForm(e.Node.Tag as Type);
            }
        }


        private void ShowChildForm(Type formType)
        {
            var childForm= Application.OpenForms.Cast<Form>().SingleOrDefault(f=>f.GetType()==formType);
            if (childForm == null)
            {
                childForm = AppContext.Current.CreatePlugInForm(formType);  //(Form)Activator.CreateInstance(formType);

                childForm.MdiParent = this;
                childForm.Name = "ChildForm - " + DateTime.Now.Millisecond.ToString();
                childForm.Text = childForm.Name;
                childForm.Show();
            }
            else
            {
                childForm.BringToFront();
                childForm.Activate();
            }

        }
3.實現一個插件模塊,創建一個類庫項目(可以先創建為WINDOWS應用程式項目,然後再將其屬性中的輸出類型改為:類庫,這樣就省得去引用一些FORM相關的組件)Com.First,同時引用前面的插件規範類庫(PlugIn),並實現ICompoentConfig介面的類:CompoentConfig
using System;
using System.Collections.Generic;
using System.Linq;
using System.Text;
using System.Threading.Tasks;
using PlugIn;

namespace Com.First
{
    /// <summary>
    /// 組件信息註冊類(每一個插件模塊必需實現一個ICompoentConfig)
    /// 作者:Zuowenjun
    /// 2016-3-26
    /// </summary>
    public class CompoentConfig : ICompoentConfig
    {
        public static IAppContext AppContext;

        public void CompoentRegister(IAppContext context,out ICompoent compoent)
        {
            AppContext = context;
            var compoentInfo = new Compoent("Com.First", "V16.3.26.1.1");
            compoentInfo.AddFormTypes(typeof(Form1), typeof(Form2));//將認為需要用到的窗體類型添加到預註冊列表中

            compoent = compoentInfo;//回傳Compoent的實例
        }
    }
}
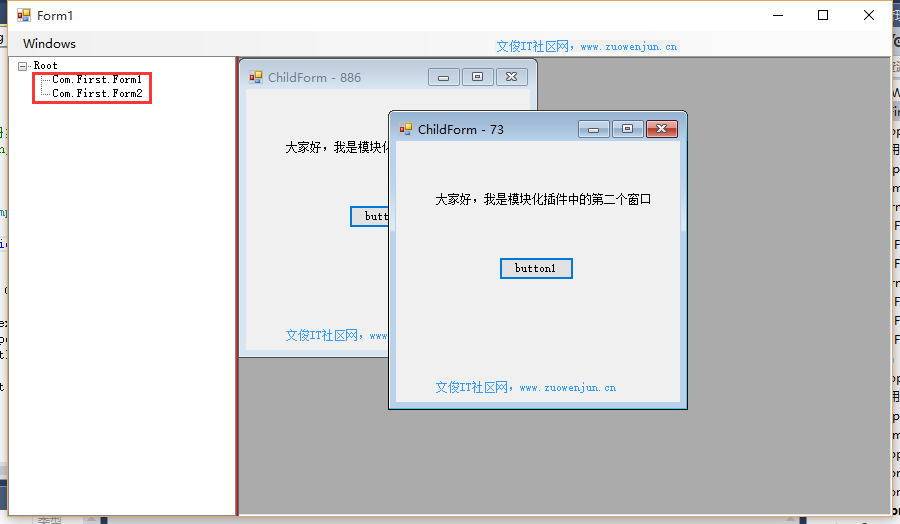
這樣三大步就完整了一個簡單的模塊化插件編程框架,運行前請先將上面的插件DLL(Com.First.Dll)放到調試應用程式目錄下的com目錄下,整體效果如下:(該主界面左右佈局實現方法可見我的博文:分享在winform下實現左右佈局多視窗界面-續篇)

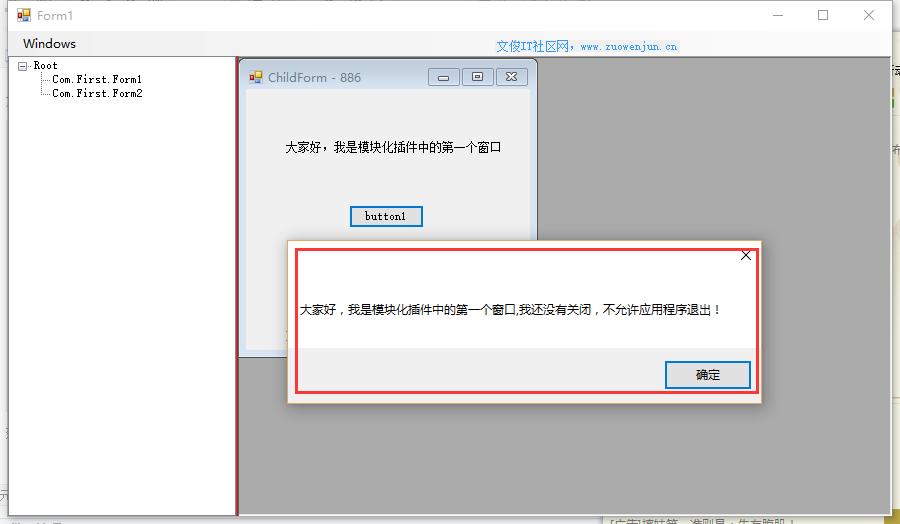
為了測試插件與主應用程式之前的交互性,我先對插件程式集(Com.First)中的第一個視窗Form1,增加實現若Form1處於打開狀態,那麼主程式就不能正常退出,代碼如下:
        private void Form1_Load(object sender, EventArgs e)
        {
            CompoentConfig.AppContext.AppFormContainer.FormClosing += AppFormContainer_FormClosing;
        }

        void AppFormContainer_FormClosing(object sender, FormClosingEventArgs e)
        {
            MessageBox.Show(label1.Text + ",我還沒有關閉,不允許應用程式退出!");
            e.Cancel = true;
        }

        private void Form1_FormClosed(object sender, FormClosedEventArgs e)
        {
            CompoentConfig.AppContext.AppFormContainer.FormClosing -= AppFormContainer_FormClosing;
        }
效果如下圖示:

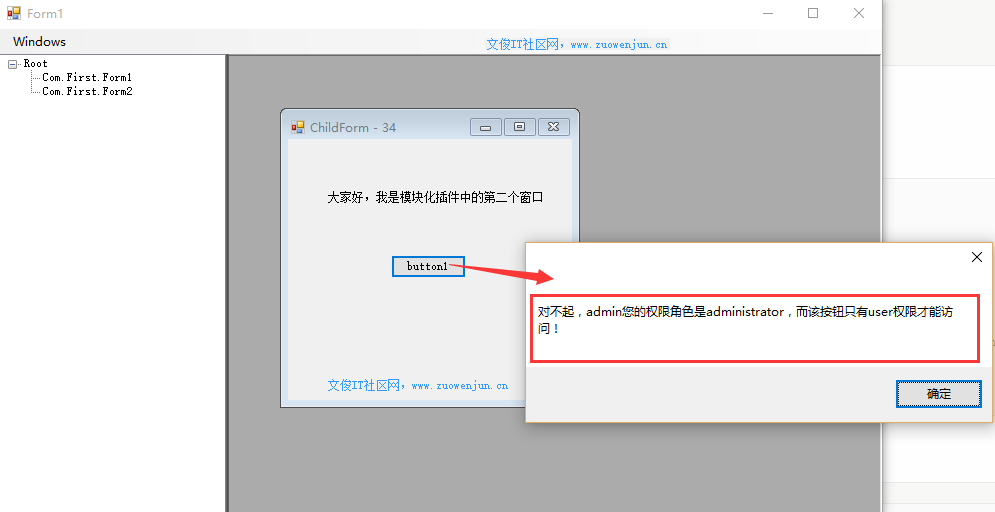
第二個測試,在第二個視窗Form2中,增加實現依據用戶登錄信息來限制某些功能(點擊按鈕)不能使用,代碼如下:
        private void button1_Click(object sender, EventArgs e)
        {
            if (CompoentConfig.AppContext.PermissionInfo.Equals("user",StringComparison.OrdinalIgnoreCase))
            {
                MessageBox.Show(this.Name);
            }
            else
            {
                MessageBox.Show("對不起," + CompoentConfig.AppContext.SessionUserInfo + "您的許可權角色是" + CompoentConfig.AppContext.PermissionInfo + ",而該按鈕只有user許可權才能訪問!");
            }
        }
效果如下圖示:

由於上述代碼僅供演示,故可能存在不完善甚至錯誤的地方,寫這篇文章的目的在於分享一下實現思路,大家也可以相互交流一下,謝謝!
附上源代碼,大家可以下載併進行測試與改時,同時也歡迎更好的實現思路在這裡交流一下。


