
零、創建一個.Net Core 2.0 的ConsoleApp 應用,建完就是這個樣子了。 添加Log4Net 的引用,(不想看可以不看,個人習慣)Install-Package log4net添加Config文件夾往文件夾裡面添加Log4net.xml(別忘記了設置Copy always)添加Lo ...
零、創建一個.Net Core 2.0 的ConsoleApp 應用,建完就是這個樣子了。
添加Log4Net 的引用,(不想看可以不看,個人習慣)
Install-Package log4net
添加Config文件夾
往文件夾裡面添加Log4net.xml(別忘記了設置Copy always)
添加Log4NetConfig.cs文件
往裡面寫幾行代碼


 1 /// <summary>
 2     /// log4net拓展
 3     /// </summary>
 4     public sealed class Log4netConfig
 5     {
 6         /// <summary>
 7         /// 配置預設數據
 8         /// </summary>
 9         public static void DefalutConfig()
10         {
11             var defalutResposity = LogManager.GetRepository(Assembly.GetCallingAssembly());
12             var path = Path.Combine(Directory.GetCurrentDirectory(), "Config", "Log4net.xml");
13             XmlConfigurator.Configure(defalutResposity, new FileInfo(path));
14         }
15     }
Log4netConfig
在Main函數加下麵幾行代碼
1 Environment.CurrentDirectory = AppContext.BaseDirectory;
2 Log4NetConfig.DefalutConfig();
3 var logger = LogManager.GetLogger(typeof(Program));
4 logger.Info("服務開始");
Main
得到的差不多就是這樣了

運行下,可以看到日誌基本就沒錯了。
一、windows服務的搭建
大概或許是看下了https://github.com/aspnet/Hosting/tree/dev/src/Microsoft.AspNetCore.Hosting,隨便亂寫的
1.引用
Install-Package System.ServiceProcess.ServiceController
Install-Package Install-Package System.Configuration.ConfigurationManager
2.添加appSettings.config
在Config文件夾下添加appSettings.config
添加內容
<appSettings>
  <!--服務名稱-->
  <add key="ServiceName" value="MyTestService"/>
</appSettings>
3.添加HostService.cs
然後寫上如下代碼
 1  /// <summary>
 2     /// 服務
 3     /// </summary>
 4     public class HostService : ServiceBase
 5     {
 6         private ILog Log = LogManager.GetLogger(typeof(HostService));
 7
 8         /// <summary>
 9         /// Creates an instance of <c>WebHostService</c> which hosts the specified web application.
10         /// </summary>
11         /// <param name="host">The configured web host containing the web application to host in the Windows service.</param>
12         public HostService()
13         {
14         }
15
16         public void Start()
17         {
18             Log.Info($"{base.ServiceName}服務開啟");
19             OnStart(null);
20         }
21
22         protected sealed override void OnStart(string[] args)
23         {
24             OnStarting(args);
25             //dosomthing
26             OnStarted();
27         }
28
29         protected sealed override void OnStop()
30         {
31             Log.Info($"{base.ServiceName}服務關閉");
32             OnStopping();
33             try
34             {
35             }
36             finally
37             {
38                 OnStopped();
39             }
40         }
41
42         /// <summary>
43         /// Executes before ASP.NET Core starts.
44         /// </summary>
45         /// <param name="args">The command line arguments passed to the service.</param>
46         protected virtual void OnStarting(string[] args) { }
47
48         /// <summary>
49         /// Executes after ASP.NET Core starts.
50         /// </summary>
51         protected virtual void OnStarted() { }
52
53         /// <summary>
54         /// Executes before ASP.NET Core shuts down.
55         /// </summary>
56         protected virtual void OnStopping() { }
57
58         /// <summary>
59         /// Executes after ASP.NET Core shuts down.
60         /// </summary>
61         protected virtual void OnStopped() { }
62     }
HostService
4. Main 改為如下代碼
 1 var serviceName = ConfigurationManager.AppSettings["ServiceName"];
 2             var hostService = new HostService { ServiceName = serviceName };
 3             logger.Info("服務開始");
 4 #if DEBUG
 5             //服務名稱賦值
 6             Console.WriteLine($"{serviceName}服務開啟...");
 7             hostService.Start();
 8
 9             Console.ReadKey(true);
10             hostService.Stop();
11             Console.WriteLine($"{serviceName}服務停止");
12 #else
13             logger.Info($"{serviceName}服務開啟...");
14             var servicesToRun = new ServiceBase[] { hostService };
15             ServiceBase.Run(servicesToRun);
16 #endif
17             Console.ReadLine();
Main
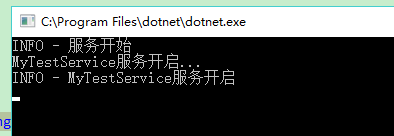
這個時候,運行,服務就可以啟動了。
大概就是這麼個效果
二、quart的使用
1.引用
添加引用
Install-Package Quartz
Install-Package Quartz.Plugins
2.添加TestQuartzService .cs 文件,寫入以下代碼
 1 public class TestQuartzService : IDisposable
 2     {
 3         private ILog Log = LogManager.GetLogger(typeof(TestQuartzService));
 4         public List<IScheduler> Schedulers = new List<IScheduler>();
 5         public void Start()
 6         {
 7             Log.Info("quartz開啟!");
 8             // 從工廠中獲取調度程式實例
 9             StdSchedulerFactory factory = new StdSchedulerFactory();
10             IScheduler scheduler = factory.GetScheduler().Result;
11             Schedulers.Add(scheduler);
12             scheduler.Start();
13             Log.Info("quartz開啟完成!");
14         }
15
16         public void Stop()
17         {
18             Log.Info("quartz關閉!");
19             foreach (var scheduler in Schedulers)
20             {
21                 scheduler.Shutdown().GetAwaiter().GetResult();
22             }
23             Log.Info("quartz關閉完成!");
24         }
25
26         public void Dispose()
27         {
28             foreach (var scheduler in Schedulers)
29             {
30                 if (scheduler.IsStarted)
31                 {
32                     scheduler.Shutdown().GetAwaiter().GetResult();
33                 }
34             }
35         }
36     }
TestQuartzService
3.添加TestJob.cs文件
寫入以下代碼
 1 public class TestJob : IJob
 2     {
 3         private ILog Log = LogManager.GetLogger(typeof(TestJob));
 4         public Task Execute(IJobExecutionContext context)
 5         {
 6             Log.Info("測試job啟動");
 7             Console.WriteLine("測試job啟動");
 8             return Task.CompletedTask;
 9         }
10     }
TestJob
4.添加 quartz.config
 1 # You can configure your scheduler in either <quartz> configuration section
 2 # or in quartz properties file
 3 # Configuration section has precedence
 4
 5 quartz.scheduler.instanceName = ServerScheduler
 6
 7 # configure thread pool info
 8 quartz.threadPool.type = Quartz.Simpl.SimpleThreadPool, Quartz
 9 quartz.threadPool.threadCount = 10
10 quartz.threadPool.threadPriority = Normal
11
12 # job initialization plugin handles our xml reading, without it defaults are used
13 quartz.plugin.xml.type = Quartz.Plugin.Xml.XMLSchedulingDataProcessorPlugin, Quartz.Plugins
14 quartz.plugin.xml.fileNames = ~/quartz_jobs.xml
quartz.config
5.添加quartz_jobs.xml
 1 <?xml version="1.0" encoding="UTF-8"?>
 2 <job-scheduling-data xmlns="http://quartznet.sourceforge.net/JobSchedulingData" xmlns:xsi="http://www.w3.org/2001/XMLSchema-instance" version="2.0">
 3   <processing-directives>
 4     <overwrite-existing-data>true</overwrite-existing-data>
 5   </processing-directives>
 6   <schedule>
 7     <job>
 8       <name>TestJob</name>
 9       <group>TestJobGroup</group>
10       <description>測試Job</description>
11       <job-type>TestQuartzService.TestJob,TestQuartzService</job-type>
12       <durable>true</durable>
13       <recover>false</recover>
14     </job>
15     <trigger>
16       <cron>
17         <name>TestJobJobTrigger</name>
18         <group>TestJobTriggerGroup</group>
19         <job-name>TestJob</job-name>
20         <job-group>TestJobGroup</job-group>
21         <misfire-instruction>DoNothing</misfire-instruction>
22         <cron-expression>0/3 * * * * ?</cron-expression>
23       </cron>
24     </trigger>
25   </schedule>
26 </job-scheduling-data>
quartz_job
6.HostService.cs改為
 1 /// <summary>
 2     /// 服務
 3     /// </summary>
 4     public class HostService : ServiceBase
 5     {
 6         private ILog Log = LogManager.GetLogger(typeof(HostService));
 7
 8         private TestQuartzService _testQuartzService;
 9         /// <summary>
10         /// Creates an instance of <c>WebHostService</c> which hosts the specified web application.
11         /// </summary>
12         /// <param name="host">The configured web host containing the web application to host in the Windows service.</param>
13         public HostService()
14         {
15             _testQuartzService = new TestQuartzService();
16         }
17
18         public void Start()
19         {
20             Log.Info($"{base.ServiceName}服務開啟");
21             OnStart(null);
22         }
23
24         protected sealed override void OnStart(string[] args)
25         {
26             OnStarting(args);
27             //dosomthing
28              _testQuartzService.Start();
29             OnStarted();
30         }
31
32         protected sealed override void OnStop()
33         {
34             Log.Info($"{base.ServiceName}服務關閉");
35             OnStopping();
36             try
37             {
38                 _testQuartzService.Stop();
39             }
40             finally
41             {
42                 OnStopped();
43             }
44         }
45
46         /// <summary>
47         /// Executes before ASP.NET Core starts.
48         /// </summary>
49         /// <param name="args">The command line arguments passed to the service.</param>
50         protected virtual void OnStarting(string[] args) { }
51
52         /// <summary>
53         /// Executes after ASP.NET Core starts.
54         /// </summary>
55         protected virtual void OnStarted() { }
56
57         /// <summary>
58         /// Executes before ASP.NET Core shuts down.
59         /// </summary>
60         protected virtual void OnStopping() { }
61
62         /// <summary>
63         /// Executes after ASP.NET Core shuts down.
64         /// </summary>
65         protected virtual void OnStopped() { }
66     }
HostService
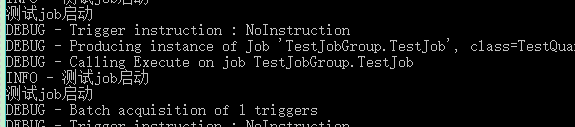
6.嘗試啟動
三、安裝為windows服務
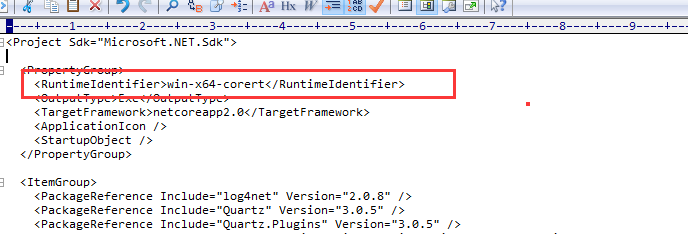
1.編輯TestQuartzService.csproj
添加 <RuntimeIdentifier>win-x64-corert</RuntimeIdentifier>
2.Main的引用添加(不添加release會報錯,因為使用了 var servicesToRun = new ServiceBase[] { hostService };)
using System.ServiceProcess;
3.點擊發佈

這下就會在 netcoreapp2.0\win-x64-corert 出現

有了這個exe就可以進行第四步了
4.管理員打開CMD
輸入以下
sc create TestQuartzService binpath=E:\liuyue\TestQuartzService\TestQuartzService\bin\Release\netcoreapp2.0\win-x64-corert\TestQuartzService.exe

看到

5、打開服務找到

點啟動
看到日誌有日誌不斷輸出

四、完結
值得註意一點就是,各種config、xml文件,記得copy always。
到這就弄完了。有什麼問自己,翻源碼去吧


