角色是網站中都有的一個功能,用來區分用戶的類型、劃分用戶的許可權,這次實現角色列表瀏覽、角色添加、角色修改和角色刪除。 目錄 奔跑吧,代碼小哥! MVC5網站開發之一 總體概述 MVC5 網站開發之二 創建項目 MVC5 網站開發之三 數據存儲層功能實現 MVC5 網站開發之四 業務邏輯層的架構和基本...
角色是網站中都有的一個功能,用來區分用戶的類型、劃分用戶的許可權,這次實現角色列表瀏覽、角色添加、角色修改和角色刪除。
目錄
MVC5 網站開發之六 管理員 2、添加、刪除、重置密碼、修改密碼、列表瀏覽
一、業務邏輯層
1、角色模型
Ninesky.Core【右鍵】->添加->類,輸入類名Role。
引用System.ComponentModel.DataAnnotations命名空間
using System.ComponentModel.DataAnnotations;

namespace Ninesky.Core
{
    /// <summary>
    /// 角色
    /// </summary>
    public class Role
    {
        [Key]
        public int RoleID { get; set; }

        /// <summary>
        /// 名稱
        /// </summary>
        [Required(ErrorMessage ="必須輸入{0}")]
        [StringLength(20,MinimumLength =2, ErrorMessage ="{0}長度為{2}-{1}個字元")]
        [Display(Name ="名稱")]
        public string Name { get; set; }

        /// <summary>
        /// 說明
        /// </summary>
        [StringLength(1000, ErrorMessage = "{0}必須少於{1}個字元")]
        [Display(Name = "說明")]
        public string Description { get; set; }

    }
}
2、添加表映射
打開Ninesky.Core/NineskyContext.cs,添加Role表映射
3、遷移數據
1)、啟用數據遷移
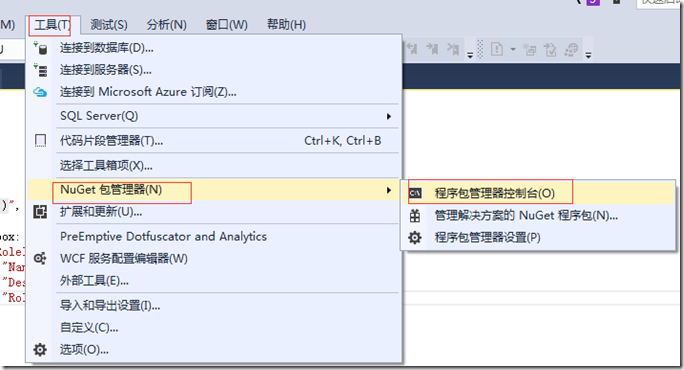
在【工具欄】->【工具】->NuGet包管理器->程式包管理器控制台。
輸入命令 Enable-Migrations 回車,為Ninesk.Core啟用數據遷移。
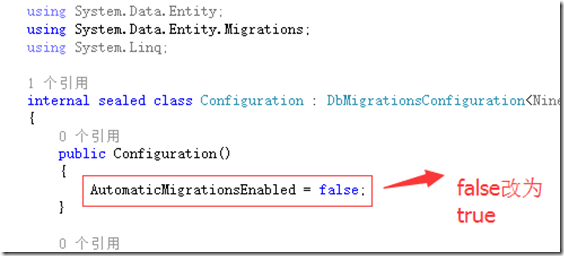
打開Ninesky.Core/Migrations/Configuration.cs文件
,將 AutomaticMigrationsEnabled = false;改為 AutomaticMigrationsEnabled = ture;來啟用自動遷移。
2)、更新數據表
運行命令Update-Database。提示錯誤:There is already an object named 'Administrators' in the database.
這是因為先生成了Administrators表後啟用的數據遷移。在更新表的時候視圖創建Administrators表失敗。
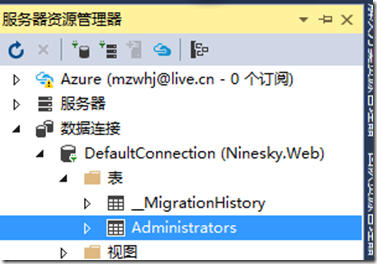
打開伺服器資源管理器,如圖選擇Administrators【右鍵】->刪除。
刪除成功後再次運行Update-Database,執行成功。
因為剛纔刪除表的時候把管理員賬號也刪掉了,記得打開Administrators表添加一個管理員賬號,記得密碼可以輸入jZae727K08KaOmKSgOaGzww/XVqGr/PKEgIMkjrcbJI= 這是123456加密後的字元串。
4、角色管理
Ninesky.Core【右鍵】->添加->類,輸入類名RoleManager,類繼承自BaseManager<Role>
using System;
using System.Collections.Generic;
using System.Linq;
using System.Text;
using System.Threading.Tasks;

namespace Ninesky.Core
{
    /// <summary>
    /// 角色管理
    /// </summary>
    public class RoleManager:BaseManager<Role>
    {
    }
}
二、展示層
Ninesky.Web/Areas/Control/Controllers【右鍵】->添加->控制器。選擇 MVC5 控制器 – 空, 輸入控制器名稱RoleController。
在控制器中引入命名空間Ninesky.Core;
添加變數private RoleManager roleManager = new RoleManager();
為控制器添加身份驗證[AdminAuthorize]
1、消息提示
在進行操作的時候經常會需要對操作成功、失敗、發生錯誤進行提示,所以專門做一個提示的模型類Prompt。
1)、添加類
Ninesky.Web/Models【右鍵】->添加->類 輸入類名Prompt
using System.Collections.Generic;

namespace Ninesky.Web.Models
{
    /// <summary>
    /// 提示
    /// </summary>
    public class Prompt
    {
        /// <summary>
        /// 標題
        /// </summary>
        public string Title { get; set; }

        /// <summary>
        /// 消息
        /// </summary>
        public string Message { get; set; }

        /// <summary>
        /// 按鈕組
        /// </summary>
        public List<string> Buttons { get; set; }
    }
}
2、在控制器中引入類的命名空間
在Rolecontroller中引用命名空間Ninesky.Web.Models。
3、添加視圖
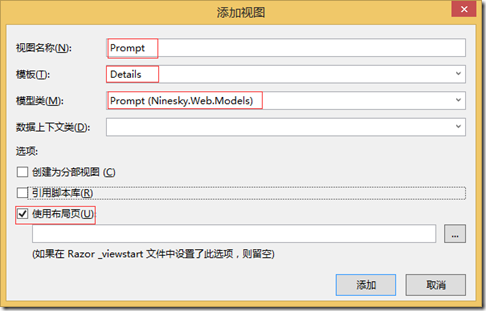
在Ninesky.Web/Areas/Control/Views/Shared【右鍵】->添加->視圖
@model Ninesky.Web.Models.Prompt @{ ViewBag.Title = Model.Title; } @section SideNav{@Html.Partial("SideNavPartialView")} <ol class="breadcrumb"> <li><span class="glyphicon glyphicon-home"></span> @Html.ActionLink("首頁", "Index", "Home")</li> <li class="active">@Model.Title</li> </ol> <div class="panel panel-default"> <div class="panel-heading"><div class="panel-title">@Model.Title</div></div> <div class="panel-body"> <p>@Html.Raw(Model.Message)</p> @if(Model.Buttons!=null && Model.Buttons.Count > 0) { <p> @foreach(var item in Model.Buttons) { @Html.Raw(item+ " ") } </p> } </div> </div>
2、管理員列表
1)、返回列表方法(Json方式)
在控制中添加方法 ListJson() ,返回類型 JsonResoult
/// <summary>
        ///  列表【Json】
        /// </summary>
        /// <returns></returns>
        public JsonResult ListJson()
        {
            return Json(roleManager.FindList());
        }
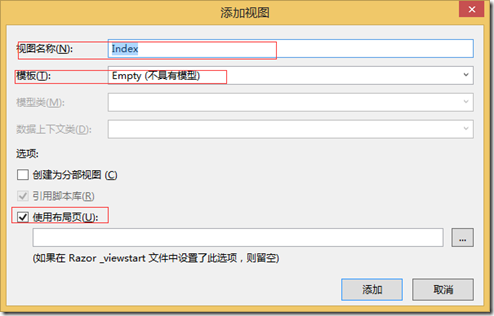
2、添加角色首頁視圖
在index()方法【右鍵】->添加視圖
@{
    ViewBag.Title = "角色管理";
}

@section SideNav{@Html.Partial("SideNavPartialView")}

<ol class="breadcrumb">
    <li><span class="glyphicon glyphicon-home"></span>  @Html.ActionLink("首頁", "Index", "Home")</li>
    <li>@Html.ActionLink("用戶管理", "Index", "User")</li>
    <li class="active">@Html.ActionLink("角色管理", "Index", "Role")</li>
</ol>

<table id="admingrid"></table>
@section style{
    @Styles.Render("~/Content/bootstrapplugincss")
}

@section scripts{
    @Scripts.Render("~/bundles/jqueryval")
    @Scripts.Render("~/bundles/bootstrapplugin")
    <script type="text/javascript">
        $(document).ready(function () {
            //表格
            var $table = $('#admingrid');
            $table.bootstrapTable({
                showRefresh: true,
                showColumns: true,
                showFooter: true,
                method: "post",
                url: "@Url.Action("ListJson")",
                columns: [
                    { title: "ID", field: "RoleID" },
                    { title: "名稱", field: "Name", formatter: function (value, row, index) { return "<a href='@Url.Action("Modify", "Role")/" + row.RoleID + "'>" + value + "</a>" } },
                    { title: "說明", field: "Description" },
                    { title: "操作", field: "RoleID", formatter: function (value) { return "<a class='btn btn-sm btn-danger' data-operation='deleterole' data-value='" + value + "'>刪除</a>" } }
                ],
                onLoadSuccess: function () {
                    //刪除按鈕
                    $("a[data-operation='deleterole']").click(function () {
                        var id = $(this).attr("data-value");
                        BootstrapDialog.confirm("你確定要刪除" + $(this).parent().parent().find("td").eq(1).text() + "嗎?", function (result) {
                            if (result) {
                                $.post("@Url.Action("DeleteJson", "Role")", { id: id }, function (data) {
                                    if (data.Code == 1) {
                                        BootstrapDialog.show({
                                            message: "刪除角色成功",
                                            buttons: [{
                                                icon: "glyphicon glyphicon-ok",
                                                label: "確定",
                                                action: function (dialogItself) {
                                                    $table.bootstrapTable("refresh");
                                                    dialogItself.close();
                                                }
                                            }]

                                        });
                                    }
                                    else BootstrapDialog.alert(data.Message);
                                }, "json");
                            }
                        });
                    });
                    //刪除按鈕結束
                }
            });
            //表格結束
        });
    </script>
}
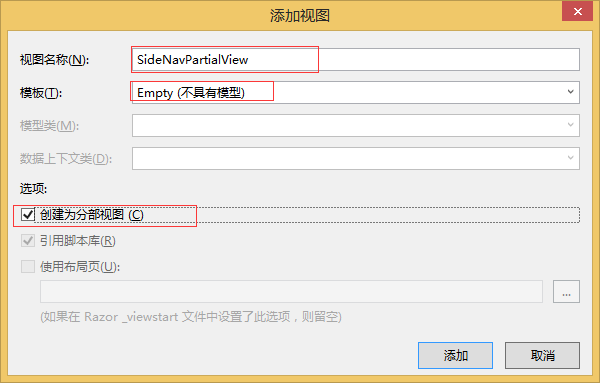
3、導航視圖
導航視圖顯示在視圖的左側,對該控制器下的功能進行導航
Ninesky.Web/Areas/Control/Views/Role【右鍵】->添加->視圖
<div class="panel panel-default">
    <div class="panel-heading">
        <div class="panel-title"><span class="glyphicon glyphicon-user"></span> 用戶管理</div>
    </div>
    <div class="panel-body">
        <div class="list-group">
            <div class="list-group-item"><span class="glyphicon glyphicon-plus"></span>  @Html.ActionLink("角色添加", "Add", "Role")</div>
            <div class="list-group-item"><span class="glyphicon glyphicon-list"></span>  @Html.ActionLink("角色管理", "Index", "Role")</div>
        </div>
    </div>
</div>
4、添加角色
1)、添加方法
在控制器中添加Add方法
/// <summary>
        ///  添加
        /// </summary>
        /// <returns></returns>
        public ActionResult Add()
        {
            return View();
        }
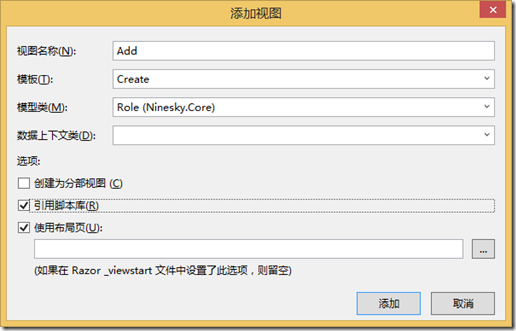
2)、添加視圖
在方法上右鍵添加視圖
@model Ninesky.Core.Role

@{
    ViewBag.Title = "添加角色";
}

@section SideNav{@Html.Partial("SideNavPartialView")}

<ol class="breadcrumb">
    <li><span class="glyphicon glyphicon-home"></span>  @Html.ActionLink("首頁", "Index", "Home")</li>
    <li>@Html.ActionLink("用戶管理", "Index", "User")</li>
    <li>@Html.ActionLink("角色管理", "Index", "Role")</li>
    <li class="active">添加角色</li>
</ol>

@using (Html.BeginForm())
{
    @Html.AntiForgeryToken()

    <div class="form-horizontal">
        @Html.ValidationSummary(true, "", new { @class = "text-danger" })
        <div class="form-group">
            @Html.LabelFor(model => model.Name, htmlAttributes: new { @class = "control-label col-md-2" })
            <div class="col-md-10">
                @Html.EditorFor(model => model.Name, new { htmlAttributes = new { @class = "form-control" } })
                @Html.ValidationMessageFor(model => model.Name, "", new { @class = "text-danger" })
            </div>
        </div>

        <div class="form-group">
            @Html.LabelFor(model => model.Description, htmlAttributes: new { @class = "control-label col-md-2" })
            <div class="col-md-10">
                @Html.EditorFor(model => model.Description, new { htmlAttributes = new { @class = "form-control" } })
                @Html.ValidationMessageFor(model => model.Description, "", new { @class = "text-danger" })
            </div>
        </div>

        <div class="form-group">
            <div class="col-md-offset-2 col-md-10">
                <input type="submit" value="保存" class="btn btn-default" />
            </div>
        </div>
    </div>
}

@section Scripts {
    @Scripts.Render("~/bundles/jqueryval")
}
3)、添加提交數據的接收處理方法
在控制器中添加Add方法的post方法
[HttpPost]
        [ValidateAntiForgeryToken]
        public ActionResult Add(Role role)
        {
            if (ModelState.IsValid)
            {
                if (roleManager.Add(role).Code == 1)
                {
                    return View("Prompt", new Prompt() { Title = "添加角色成功",
                        Message ="你已成功添加了角色【"+ role.Name+"】",
                        Buttons = new List<string>() { "<a href=\"" + Url.Action("Index", "Role") + "\" class=\"btn btn-default\">角色管理</a>", "<a href=\"" + Url.Action("Add", "Role") + "\" class=\"btn btn-default\">繼續添加</a>"}
                    });
                }
            }
            return View(role);
        }
5、管理員資料修改
1)、添加方法
在控制器中添加Modify方法。
/// <summary>
        /// 修改
        /// </summary>
        /// <param name="id">RoleID</param>
        /// <returns></returns>
        public ActionResult Modify(int id)
        {
            var _role = roleManager.Find(id);
            if(_role == null) return View("Prompt", new Prompt()
            {
                Title = "錯誤",
                Message = "ID為【" + id + "】的角色不存在",
                Buttons = new List<string>() { "<a href=\"" + Url.Action("Index", "Role") + "\" class=\"btn btn-default\">角色管理</a>"}
            });
            return View(_role);
        }
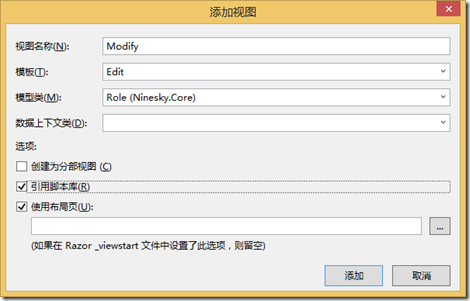
2)、添加視圖
在方法中右鍵添加視圖
代碼如下:
@model Ninesky.Core.Role

@{
    ViewBag.Title = Model.Name;
}

@section SideNav{@Html.Partial("SideNavPartialView")}

<ol class="breadcrumb">
    <li><span class="glyphicon glyphicon-home"></span>  @Html.ActionLink("首頁", "Index", "Home")</li>
    <li>@Html.ActionLink("用戶管理", "Index", "User")</li>
    <li>@Html.ActionLink("角色管理", "Index", "Role")</li>
    <li class="active">修改</li>
</ol>


@using (Html.BeginForm())
{
    @Html.AntiForgeryToken()

    <div class="form-horizontal">
        @Html.ValidationSummary(true, "", new { @class = "text-danger" })
        @Html.HiddenFor(model => model.RoleID)

        <div class="form-group">
            @Html.LabelFor(model => model.Name, htmlAttributes: new { @class = "control-label col-md-2" })
            <div class="col-md-10">
                @Html.EditorFor(model => model.Name, new { htmlAttributes = new { @class = "form-control" } })
                @Html.ValidationMessageFor(model => model.Name, "", new { @class = "text-danger" })
            </div>
        </div>

        <div class="form-group">
            @Html.LabelFor(model => model.Description, htmlAttributes: new { @class = "control-label col-md-2" })
            <div class="col-md-10">
                @Html.EditorFor(model => model.Description, new { htmlAttributes = new { @class = "form-control" } })
                @Html.ValidationMessageFor(model => model.Description, "", new { @class = "text-danger" })
            </div>
        </div>

        <div class="form-group">
            <div class="col-md-offset-2 col-md-10">
                <input type="submit" value="保存" class="btn btn-default" />
            </div>
        </div>
    </div>
}

@section Scripts {
    @Scripts.Render("~/bundles/jq


