自定義條形進度條(iOS) ViewController.m文件 #import "ViewController.h" @interface ViewController () @property(strong,nonatomic)UIButton *btnBegin; @property(stro
自定義條形進度條(iOS)
ViewController.m文件
#import "ViewController.h"
@interface ViewController ()
@property(strong,nonatomic)UIButton *btnBegin;
@property(strong,nonatomic)UIButton *btnStop;
@property(strong,nonatomic)UIButton *btnResert;
@property(strong,nonatomic)UITextField *shangx;
@property(strong,nonatomic)UIproessMy *proess;
@end
@implementation ViewController

- (void)viewDidLoad {


    self.proess=[[UIproessMy alloc]initWithFrame:CGRectMake(80, 100, 250, 20)];
    self.proess.backgroundColor=[UIColor clearColor];
    [self.view addSubview:self.proess];
    //設置值 百分比
    self.proess.index=80;
    [self setBtn];
}
//生成按鈕
-(void)setBtn{

    self.btnBegin=[[UIButton alloc]initWithFrame:CGRectMake(100, 500, 200, 50)];
    self.btnBegin.backgroundColor=[UIColor colorWithRed:0.294 green:1.000 blue:0.368 alpha:1.000];
    self.btnBegin.layer.cornerRadius=25;
    self.btnBegin.layer.masksToBounds=YES;
    [self.btnBegin setTitle:@"開始" forState:UIControlStateNormal];
    [self.btnBegin addTarget:self action:@selector(chang) forControlEvents:UIControlEventTouchUpInside];
    [self.view addSubview:self.btnBegin];

    self.btnStop=[[UIButton alloc]initWithFrame:CGRectMake(100, 600, 200, 50)];
    self.btnStop.backgroundColor=[UIColor colorWithRed:0.294 green:1.000 blue:0.368 alpha:1.000];
    self.btnStop.layer.cornerRadius=25;
    self.btnStop.layer.masksToBounds=YES;
    [self.btnStop setTitle:@"停止" forState:UIControlStateNormal];
    [self.btnStop addTarget:self action:@selector(stopBtn) forControlEvents:UIControlEventTouchUpInside];
    [self.view addSubview:self.btnStop];


    self.btnResert=[[UIButton alloc]initWithFrame:CGRectMake(100, 400, 200, 50)];
    self.btnResert.backgroundColor=[UIColor colorWithRed:0.294 green:1.000 blue:0.368 alpha:1.000];
    self.btnResert.layer.cornerRadius=25;
    self.btnResert.layer.masksToBounds=YES;
    [self.btnResert setTitle:@"重置" forState:UIControlStateNormal];
    [self.btnResert addTarget:self action:@selector(Resert) forControlEvents:UIControlEventTouchUpInside];
    [self.view addSubview:self.btnResert];

}
//停止
-(void)stopBtn{
    [self.proess stop];
}
//開始
-(void)chang{
    [self.proess begin];
}
//重置
-(void)Resert{
    [self.proess resert];
}
- (void)didReceiveMemoryWarning {
    [super didReceiveMemoryWarning];

}

@end
自定義類
UIproessMy.h
#import <UIKit/UIKit.h>

@interface UIproessMy : UIView
@property(strong,nonatomic)UIView *aView;
@property(strong,nonatomic)UIView *UIProess;
@property(strong,nonatomic)UILabel *label;
@property(strong,nonatomic)NSTimer *time;
@property(assign,nonatomic)float index;
-(void)change;
-(void)begin;
-(void)stop;
-(void)resert;
@end
UIproessMy.m文件
#import "UIproessMy.h"

@implementation UIproessMy
- (instancetype)initWithFrame:(CGRect)frame
{
    self = [super initWithFrame:frame];
    if (self) {
        //初始化
        self.aView=[[UIView alloc]initWithFrame:CGRectMake(0, 0, 250, 20)];
        self.aView.backgroundColor=[UIColor colorWithRed:0.841 green:0.848 blue:0.773 alpha:1.000];
        self.UIProess=[[UIView alloc]initWithFrame:CGRectMake(0, 1,0, 18)];
        self.aView.layer.cornerRadius=10;
        self.aView.layer.masksToBounds=YES;
        self.UIProess.layer.cornerRadius=10;
        self.UIProess.layer.masksToBounds=YES;
        self.UIProess.backgroundColor=[UIColor colorWithRed:0.327 green:0.816 blue:0.075 alpha:1.000];

        self.label=[[UILabel alloc]initWithFrame:CGRectMake(0, 50, 250, 200)];
        self.label.backgroundColor=[UIColor colorWithRed:0.457 green:0.889 blue:1.000 alpha:1.000];
        self.label.layer.cornerRadius=100;
        self.label.layer.masksToBounds=YES;
        self.label.textAlignment=NSTextAlignmentCenter;
        self.label.font=[UIFont boldSystemFontOfSize:50];
        self.label.text=[NSString stringWithFormat:@"0%%"];
        [self.aView addSubview:self.UIProess];
        [self addSubview:self.aView];
        [self addSubview:self.label];


    }
    return self;
}
//開始
-(void)begin{
    if (self.UIProess.frame.size.width<250*(self.index)*0.01) {
        self.time=[NSTimer scheduledTimerWithTimeInterval:0.01 target:self selector:@selector(change) userInfo:nil repeats:YES];
        [[NSRunLoop mainRunLoop] addTimer:self.time forMode:NSDefaultRunLoopMode];
    }else{
         [self.time invalidate];
    }

}
//重置
-(void)resert{
    [self initWithFrame:CGRectMake(0, 1, 0, 18)];
    self.label.text=[NSString stringWithFormat:@"0%%"];
    [self.time setFireDate:[NSDate distantFuture]];

}
//停止
-(void)stop{
    int a=1;
    if (a==1) {
        [self.time setFireDate:[NSDate distantFuture]];
        a=0;
    }else{
        [self.time setFireDate:[NSDate date]];
        a=1;
    }
  }
//變化 調用定時器

-(void)change{
    CGRect changeFrame=self.UIProess.frame;
    changeFrame.size.width+=0.25;
    self.UIProess.frame=changeFrame;
    if (self.UIProess.frame.size.width>=250*(self.index)*0.01) {
        [self.time invalidate];
//        [self initWithFrame:self.UIProess.frame];
    }
    self.label.text=[NSString stringWithFormat:@"%.1f%%",self.UIProess.frame.size.width/250*100];
}
@end
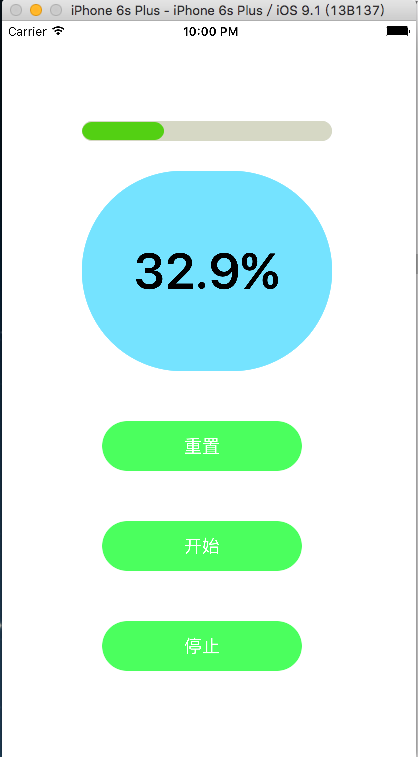
效果


