AOP:面向切麵編程,就是把除去業務部分以外的東西單獨模塊化,比如打日誌等,就像學生信息的增刪改查,可以把輸出日誌單獨模塊化出來,通過切麵對的方式進行編程。 在進行實例編寫之前先進行一些專業術語的瞭解 切麵aspect:是對象操作過程中的截面,是一段代碼,實現額外的模塊化功能 連接點join poi ...
AOP:面向切麵編程,就是把除去業務部分以外的東西單獨模塊化,比如打日誌等,就像學生信息的增刪改查,可以把輸出日誌單獨模塊化出來,通過切麵對的方式進行編程。
在進行實例編寫之前先進行一些專業術語的瞭解
切麵aspect:是對象操作過程中的截面,是一段代碼,實現額外的模塊化功能
連接點join point:是指對象操作過程中的某個階段的點,連接點實際上是對象的一個操作
切入點pointcut:切入點是連接點的集合,切麵與程式的交叉點就是程式的切入點。也就是切麵註入到程式中的位置。換句話說,切麵就是通過切入點被註入的。
通知advice:通知是摸個切入點被橫切後,所採取的處理邏輯。在切入點處攔截程式後,通過通知來執行切麵。
目標對象target:所有被通知的對象(也可以理解為被代理的對象)都是目標對象。目標對象被AOP所關註,隨時準備向目標對象註入切麵
織入Weaving:織入是將切麵功能應用到目標對象的過程。由代理工廠創建一個代理對象,這個代理對象可以為目標對象執行切麵功能,就是這個代理對象是根據目標對象織入切麵後生成的。
實例的實現如下所示:
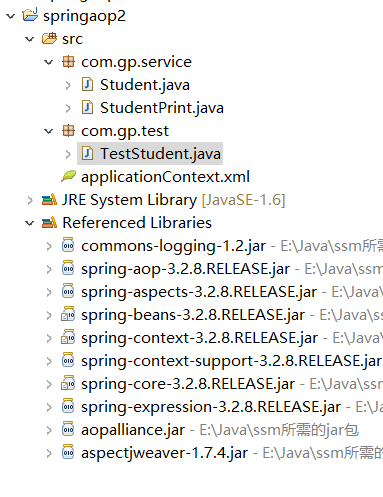
1.導入需要的jar包-這些是基本的包(可以看到整體結構)

2.編寫實例類,Student類和需要增加額外功能的列印文件StudentPrint類代碼如下所示:
 1 package com.gp.service;
 2
 3 public class Student {
 4    public void addStudent(){
 5        System.out.println("------添加學生信息-------");
 6    }
 7    public void updateStudent(){
 8        System.out.println("------修改學生信息-------");
 9    }
10    public void deleteStudent(){
11        System.out.println("------刪除學生信息-------");
12    }
13    public void selectStudent(){
14        System.out.println("------查詢學生信息-------");
15    }
16 }
 1 package com.gp.service;
 2
 3 public class StudentPrint {
 4    public void before(){
 5        System.out.println("執行學生功能前的準備工作----開始執行");
 6    }
 7    public void after(){
 8        System.out.println("學生功能實現後的列印工作----功能已實現,此處進行列印工作");
 9    }
10 }
3.實體類完成後,下麵進行配置文件的編寫:
 1 <?xml version="1.0" encoding="UTF-8"?>
 2 <beans xmlns="http://www.springframework.org/schema/beans"
 3        xmlns:xsi="http://www.w3.org/2001/XMLSchema-instance"
 4        xmlns:aop="http://www.springframework.org/schema/aop"
 5        xsi:schemaLocation="http://www.springframework.org/schema/beans
 6            http://www.springframework.org/schema/beans/spring-beans.xsd
 7            http://www.springframework.org/schema/aop
 8            http://www.springframework.org/schema/aop/spring-aop.xsd" >
 9
10
11    <bean id="student" class="com.gp.service.Student"/>
12    <bean id="myStudent" class="com.gp.service.StudentPrint"/>
13    <aop:config>
14       <aop:pointcut expression="execution(* com.gp.service.Student.*(..))" id="pointcut1"/>
15       <aop:aspect ref="myStudent">
16          <aop:before method="before" pointcut-ref="pointcut1" />
17          <aop:after-returning method="after" pointcut-ref="pointcut1"/>
18       </aop:aspect>
19    </aop:config>
20
21 </beans>
其中的部分說明:表達式中表示攔截Student類中的所有方法,唯一id為pointcut1,作為切入點,用作後面切麵的切入
4.測試類TestStudent類的文件:
 1 package com.gp.test;
 2
 3 import org.springframework.context.ApplicationContext;
 4 import org.springframework.context.support.ClassPathXmlApplicationContext;
 5
 6 import com.gp.service.Student;
 7
 8 public class TestStudent {
 9   public static void main(String[] args) {
10      ApplicationContext ct=new ClassPathXmlApplicationContext("applicationContext.xml");
11      Student student=(Student)ct.getBean("student");
12      student.addStudent();
13      student.deleteStudent();
14      student.updateStudent();
15      student.selectStudent();
16   }
17 }
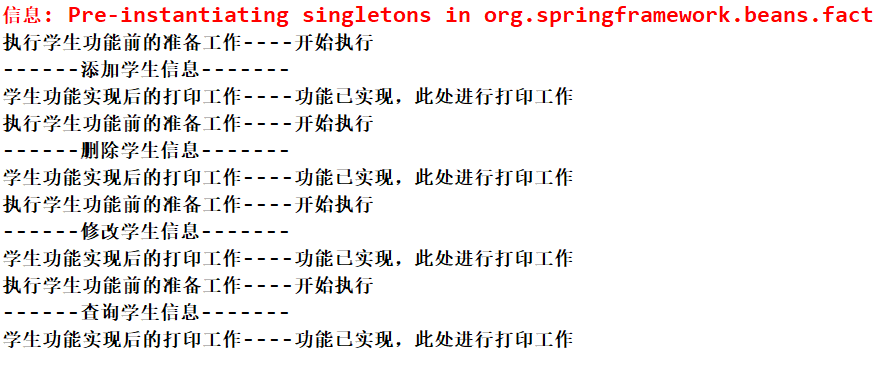
5.可以進行測試運行了,結果如下所示:

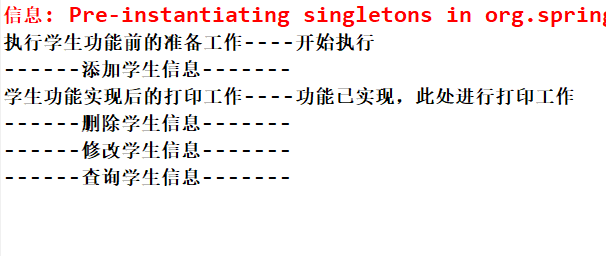
若是把配置文件中的表達式修改為:
<aop:pointcut expression="execution(* com.gp.service.Student.addStudent(..))" id="pointcut1"/>
則運行的結果為:

會根據匹配來決定對那些方法進行織入操作。
在運行的過程中遇到一些的問題,
1)JDK的版本和spring的版本問題,本人使用的是JDK1.6的,而spring使用5.0後的時,測試文件編譯不通過,
ApplicationContext ct=new ClassPathXmlApplicationContext("applicationContext.xml");
這行會提示報錯
2)jar包導入的不全時,aopalliance.jar包沒有在下載的spring的jar包中,沒有導入,結果運行時報如下錯誤:
java.lang.NoClassDefFoundError: org/aopalliance/aop/Advice,導入aopalliance.jar的jar包還不能解決,需導入一下兩個包:
aopalliance.jar ,aspectjweaver-1.7.4.jar即可
到此,AOP的簡單實例就完成了,下麵會附上相應的jar包的鏈接
https://pan.baidu.com/s/1b5IGRj4syjZoKFSjL7aRrw


