
Swagger 是一個規範和完整的框架,用於生成、描述、調用和可視化 RESTful 風格的 Web 服務。總體目標是使客戶端和文件系統作為伺服器以同樣的速度來更新。文件的方法,參數和模型緊密集成到伺服器端的代碼,允許API與介面方法,參數等保存同步,大大減少了介面開發人員的工作量.這個例子是我本地 ...
Swagger 是一個規範和完整的框架,用於生成、描述、調用和可視化 RESTful 風格的 Web 服務。總體目標是使客戶端和文件系統作為伺服器以同樣的速度來更新。文件的方法,參數和模型緊密集成到伺服器端的代碼,允許API與介面方法,參數等保存同步,大大減少了介面開發人員的工作量.這個例子是我本地運行正常的,完整demo在文章最後。
第一步:在pom.xml引入相關jar
<dependency>
            <groupId>io.springfox</groupId>
            <artifactId>springfox-swagger2</artifactId>
            <version>2.4.0</version>
        </dependency>
        <dependency>
            <groupId>io.springfox</groupId>
            <artifactId>springfox-swagger-ui</artifactId>
            <version>2.4.0</version>
        </dependency>

        <dependency>
            <groupId>com.fasterxml.jackson.core</groupId>
            <artifactId>jackson-core</artifactId>
            <version>2.8.0</version>
        </dependency>
        <dependency>
            <groupId>com.fasterxml.jackson.core</groupId>
            <artifactId>jackson-databind</artifactId>
            <version>2.6.3</version>
        </dependency>
        <dependency>
            <groupId>com.fasterxml.jackson.core</groupId>
            <artifactId>jackson-annotations</artifactId>
            <version>2.6.3</version>
        </dependency>
第二步:配置spring-servlet.xml
<!-- 激活@controller模式 -->
    <mvc:annotation-driven />
    <!-- 配置包掃描位置(會在此包下掃描@controller控制器) -->
    <context:component-scan base-package="com.scan,com.bean" />
<!--  swagger靜態文件路徑 -->
<mvc:resources mapping="/swagger/**" location="/WEB-INF/swagger/" cache-period="31556926"/>
    <mvc:default-servlet-handler />
    <bean class="com.scan.config.SwaggerConfig" />
第三步:編寫SwaggerConfig
package com.scan.config;

import com.google.common.base.Predicate;

import org.springframework.beans.factory.annotation.Autowired;
import org.springframework.context.annotation.Bean;
import org.springframework.context.annotation.ComponentScan;
import org.springframework.context.annotation.Configuration;
import org.springframework.web.servlet.config.annotation.EnableWebMvc;
import org.springframework.web.servlet.config.annotation.WebMvcConfigurationSupport;

import springfox.documentation.service.ApiInfo;
import springfox.documentation.service.Contact;
import springfox.documentation.spi.DocumentationType;
import springfox.documentation.spring.web.plugins.Docket;
import springfox.documentation.swagger2.annotations.EnableSwagger2;

import java.util.List;

import static com.google.common.base.Predicates.or;
import static com.google.common.collect.Lists.newArrayList;

@Configuration
@EnableSwagger2
@ComponentScan(basePackages = {"com.scan.controller"})
@EnableWebMvc
public class SwaggerConfig extends WebMvcConfigurationSupport {

    @Bean
    public Docket customDocket() {
        //
        return new Docket(DocumentationType.SWAGGER_2)
                .apiInfo(apiInfo());
    }

    private ApiInfo apiInfo() {
        Contact contact = new Contact("老王", "https://www.baidu.me", "[email protected]");
        return new ApiInfo("Blog前臺API介面",//大標題 title
                "Swagger測試demo",//小標題
                "0.0.1",//版本
                "www.baidu.com",//termsOfServiceUrl
                contact,//作者
                "Blog",//鏈接顯示文字
                "https://www.baidu.me"//網站鏈接
        );
    }


}
第四步:控制層的配置
@Controller
@RequestMapping("/userController")
@Api(tags = "二:用戶信息") //swagger分類標題註解
public class UserController {

    @RequestMapping(value = "/listCompound", method = RequestMethod.GET)
    @ResponseBody
  //swagger返回值註解
    @ApiResponses(value = {
            @ApiResponse(code = 500, message = "系統錯誤"),
            @ApiResponse(code = 200, message = "0 成功,其它為錯誤,返回格式:{code:0,data[{}]},data中的屬性參照下方Model", response = UserVo.class) })
    @ApiOperation(httpMethod = "GET", value = "個人信息")//swagger 當前介面註解
    public String listCompound(
            @ApiParam(required = true, name = "start", value = "start") int start,
            int limit,
            @ApiParam(required = false, name = "userName", value = "名稱模糊查詢") String userName) {
        List<UserVo> data = new ArrayList<UserVo>();
        String msg = data.size() > 0 ? "" : "沒有查詢到相關記錄";
        Result result = new Result();
        result.setMsg(msg);
        result.setCode(0);
        result.setData(data);
        return JSONObject.toJSONString(result);
    }
第五步:下載swaggerUi,將下載後的文件解壓,將dist目錄下的文件,複製到webapp下的swagger目錄中(這個目錄的名字自定義,但要和spring-servert.xml中(<mvc:resources mapping="/swagger/**" location="/WEB-INF/swagger/") 的名稱要一致,修改index.html中文檔載入的地址.
window.onload = function() {

  // Build a system
  const ui = SwaggerUIBundle({
    //url: "http://petstore.swagger.io/v2/swagger.json",
    url:"http://127.0.0.1:8080/swagger-spring/v2/api-docs.do",
    dom_id: '#swagger-ui',
    deepLinking: true,
    presets: [
      SwaggerUIBundle.presets.apis,
      SwaggerUIStandalonePreset
    ],
    plugins: [
      SwaggerUIBundle.plugins.DownloadUrl
    ],
    layout: "StandaloneLayout"
  })
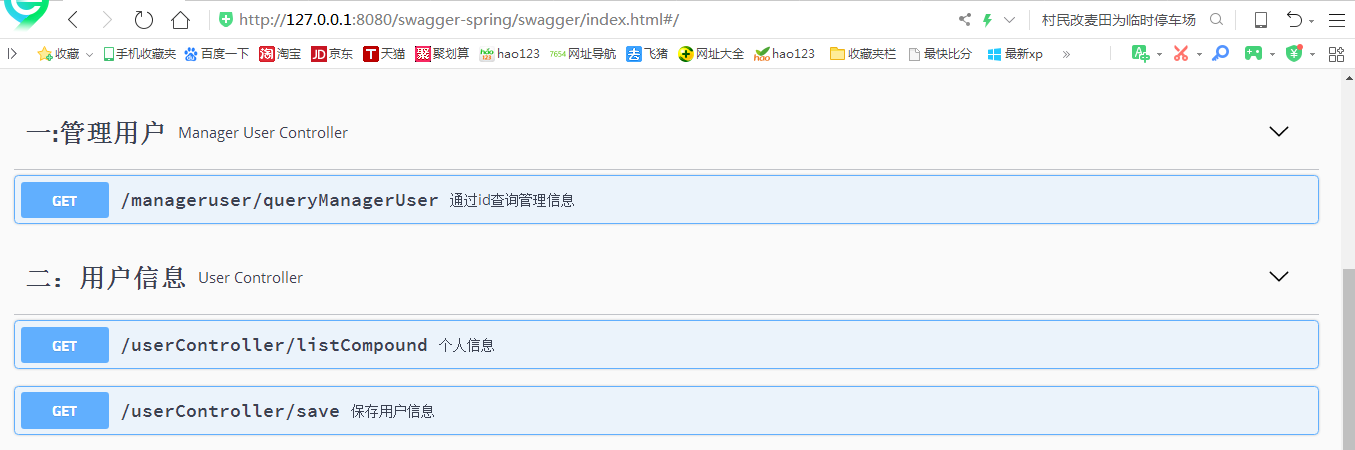
如果以上配置正確,在瀏覽器中輸入http://127.0.0.1:8080/swagger-spring/swagger/index.html,將會出現如下界面:
swagger註解說明
1、與模型相關的註解,用在bean上面
@ApiModel:用在bean上,對模型類做註釋;
@ApiModelProperty:用在屬性上,對屬性做註釋
2、與介面相關的註解
@Api:用在controller上,對controller進行註釋;
@ApiOperation:用在API方法上,對該API做註釋,說明API的作用;
@ApiImplicitParams:用來包含API的一組參數註解,可以簡單的理解為參數註解的集合聲明;
@ApiImplicitParam:用在@ApiImplicitParams註解中,也可以單獨使用,說明一個請求參數的各個方面,該註解包含的常用選項有:
paramType:參數所放置的地方,包含query、header、path、body以及form,最常用的是前四個。
name:參數名;
dataType:參數類型,可以是基礎數據類型,也可以是一個class;
required:參數是否必須傳;
value:參數的註釋,說明參數的意義;
defaultValue:參數的預設值;
@ApiResponses:通常用來包含介面的一組響應註解,可以簡單的理解為響應註解的集合聲明;
@ApiResponse:用在@ApiResponses中,一般用於表達一個響應信息
code:即httpCode,例如400
message:信息,例如"操作成功"
response = UserVo.class 這裡UserVo是一個配置了@ApiModel註解的對像,該是對像屬性已配置 @ApiModelProperty,swagger可以通過這些配置,生 成介面返回值
註意事項:
- 為了在swagger-ui上看到輸出,至少需要兩個註解:@Api和@ApiOperation
- 即使只有一個@ApiResponse,也需要使用@ApiResponses包住
- 對於@ApiImplicitParam的paramType:query、form域中的值需要使用@RequestParam獲取, header域中的值需要使用@RequestHeader來獲取,path域中的值需要使用@PathVariable來獲取,body域中的值使用@RequestBody來獲取,否則可能出錯;而且如果paramType是body,name就不能是body,否則有問題,與官方文檔中的“If paramType is "body", the name should be "body"不符。
完整demo下載地址:https://github.com/jlq023/spring_swaggerDemo


