
這一次要繪製出波浪效果,也是小白的我第一次還望輕噴。首先當然是展示效果圖啦: 一.首先來說說實現思路。 想到波浪效果,當然我第一反應是用正餘弦波來設計啦(也能通過貝塞爾曲線,這裡我不提及這個方法但是在demo里這種方法也實現了),肯定要繪製一個靜態的波,然後通過不斷的對它平移刷新,這樣最簡單的波浪效 ...
這一次要繪製出波浪效果,也是小白的我第一次還望輕噴。首先當然是展示效果圖啦:
一.首先來說說實現思路。
想到波浪效果,當然我第一反應是用正餘弦波來設計啦(也能通過貝塞爾曲線,這裡我不提及這個方法但是在demo里這種方法也實現了),肯定要繪製一個靜態的波,然後通過不斷的對它平移刷新,這樣最簡單的波浪效果就有了,如果再給它加一個比它提前一定周期的波一起平移,那不是波浪效果的層次就有了。
二.繪製。
首先要繪製一個靜態的波形圖,嗨呀說來簡單但是怎麼畫呢,不要慌先看下麵這張醜圖:

通過上面的圖我們發現曲線被切分成了無數的豎線,我們可以知道波浪的高低,就是波峰與波谷,根據函數公式,通過不斷的繪製豎線,就能得到一個靜態波形圖。代碼如下:
1  //在寬度以內繪製一條條豎線
2         while (drawPoint.x < mWidth) {
3             //第一條波的y坐標
4             drawPoint.y = (float) (waveHeight - waveDeep * Math.sin(drawPoint.x * anglenum));
5             canvas.drawLine(drawPoint.x, drawPoint.y, drawPoint.x, mHeight, mPaint);
6             //跳到下一個點繼續
7             drawPoint.x++;
8         }
這裡我們要註意繪製的預設坐標系如下圖:
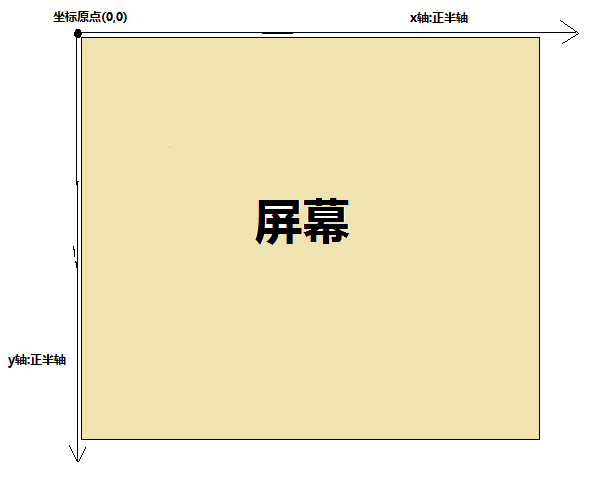
畫出靜態的波形圖之後,我們只要每次讓這個波向前或者向後移動一定周期再不斷刷新,就能出現波浪效果了。重寫view的ondraw方法就有如下:
 1 drawPoint.x = 0;//重置為0,從原點開始繪製
 2         Double rightperiod = Math.PI / 8 * count;//每次平移Math.PI/8個周期
 3         if (count == 16) {//每次平移Math.PI/8個周期,平移第16次,平移了一個完整的周期
 4             count = 0;//平移了一個完整周期歸零重新開始計數
 5         } else {
 6             count++;
 7         }
 8
 9         //在寬度以內繪製一條條豎線
10         while (drawPoint.x < mWidth) {
11             //第一條波的y坐標
12             drawPoint.y = (float) (waveHeight - waveDeep * Math.sin(drawPoint.x * anglenum - rightperiod));
13             //繪製最上面顯示主波的豎線
14             canvas.drawLine(drawPoint.x, drawPoint.y, drawPoint.x, mHeight, mPaint);
15             //跳到下一個點繼續
16             drawPoint.x++;
17         }
18         //定時更新
19         postInvalidateDelayed(17);
這樣一條會動的波浪就基本完成了,主體功能基本實現,之後再另外畫一個平移一定周期的波浪並且通過用屬性動畫ValueAnimator對波浪波峰波谷與水位變化的調控就能達到上面的效果。下麵是完整的代碼:


  1 public class WaveFunctionView extends View {
  2     private Path mPath;//路徑
  3     private Paint mPaint, mPaintMore;//畫筆
  4     private PointF drawPoint, drawPoint2;//繪製點
  5     private ValueAnimator animator, animatorh;
  6     private float mWidth, mHeight, waveHeight;//控制項寬,控制項高,水位
  7     private float waveDeepmin = 8f;//最小的波峰與波谷
  8     private float waveDeepMax = 20f;//最大的波峰與波谷
  9     private float waveDeep = 8f;//波峰與波谷
 10     private float arcRa = 0;//圓半徑
 11     private Boolean iscircle = true;//是否是圓形圖案
 12     private Boolean antiAlias = true;//是否開啟抗鋸齒
 13     public String MAINCOLOR_DEF = "#0000AA", NEXTCOLOR_DEF = "#0000FF";//預設顏色
 14     private int mainColor = Color.parseColor(MAINCOLOR_DEF), nextColor = Color.parseColor(NEXTCOLOR_DEF);//顏色
 15     private Double anglenum = Math.PI / 180;
 16     private int count = 0;//繪製次數
 17
 18     public WaveFunctionView(Context context) {
 19         super(context);
 20         init();
 21     }
 22
 23     public WaveFunctionView(Context context, AttributeSet attrs, int defStyleAttr) {
 24         super(context, attrs, defStyleAttr);
 25         init();
 26     }
 27
 28     public WaveFunctionView(Context context, AttributeSet attrs) {
 29         super(context, attrs);
 30         init();
 31     }
 32
 33     @Override
 34     protected void onSizeChanged(int w, int h, int oldw, int oldh) {
 35         mWidth = w;//獲得控制項寬度
 36         mHeight = h;//獲得控制項高度
 37         if (mWidth > mHeight) {//若要裁剪為圓形,以最短的長度為直徑
 38             arcRa = mHeight / 2;
 39             if (iscircle) {
 40                 mWidth = mHeight;
 41             }
 42         } else {
 43             arcRa = mWidth / 2;
 44             if (iscircle) {
 45                 mHeight = mWidth;
 46             }
 47         }
 48         waveHeight = mHeight;//初始化開始水位
 49         ChangeWaveLevel(5);
 50         super.onSizeChanged(w, h, oldw, oldh);
 51     }
 52
 53     //是否是圓形
 54     public void isCircle(Boolean iscircle) {
 55         this.iscircle = iscircle;
 56     }
 57
 58     //是否開啟抗鋸齒
 59     public void setAntiAlias(Boolean antiAlias) {
 60         this.antiAlias = antiAlias;
 61         mPaint.setAntiAlias(antiAlias);
 62         mPaintMore.setAntiAlias(antiAlias);
 63     }
 64
 65     //設置主波顏色
 66     public void setMainWaveColor(int color) {
 67         mainColor = color;
 68         mPaint.setColor(color);
 69     }
 70
 71     //設置被遮擋的副波顏色
 72     public void setSecondaryWaveColor(int color) {
 73         nextColor = color;
 74         mPaintMore.setColor(color);
 75     }
 76
 77     @Override
 78     protected void onDraw(Canvas canvas) {
 79         // TODO Auto-generated method stub
 80         super.onDraw(canvas);
 81         if (iscircle) {//判斷是否定義為圓形
 82             mPath.reset();//重置路徑
 83             mPath.addCircle(arcRa, arcRa, arcRa, Path.Direction.CW);//畫以(arcRa,arcRa),半徑為arcRa的順時針的圓
 84             canvas.clipPath(mPath);//裁剪
 85         }
 86         drawPoint.x = 0;//重置為0,從原點開始繪製
 87         Double rightperiod = Math.PI / 8 * count;//每次平移Math.PI/8個周期
 88         if (count == 16) {//每次平移Math.PI/8個周期,平移第16次,平移了一個完整的周期
 89             count = 0;//平移了一個完整周期歸零重新開始計數
 90         } else {
 91             count++;
 92         }
 93
 94         //在寬度以內繪製一條條豎線
 95         while (drawPoint.x < mWidth) {
 96             //第一條波的y坐標
 97             drawPoint.y = (float) (waveHeight - waveDeep * Math.sin(drawPoint.x * anglenum - rightperiod));
 98             //第二條波的y坐標,比第一條向右移動了Math.PI/2個周期
 99             drawPoint2.y = (float) (waveHeight - waveDeep * Math.sin(drawPoint.x * anglenum - rightperiod - Math.PI / 2));
100             //先繪製被遮擋的副波的豎線
101             canvas.drawLine(drawPoint.x, drawPoint2.y, drawPoint.x, mHeight, mPaintMore);
102             //繪製最上面顯示主波的豎線
103             canvas.drawLine(drawPoint.x, drawPoint.y, drawPoint.x, mHeight, mPaint);
104             //跳到下一個點繼續
105             drawPoint.x++;
106         }
107         //定時更新
108         postInvalidateDelayed(17);
109     }
110
111     private void init() {
112         mPath = new Path();
113         mPaint = new Paint();
114         mPaint.setColor(mainColor);//設置顏色
115         mPaint.setAntiAlias(antiAlias);//抗鋸齒(性能影響)
116         mPaint.setStyle(Paint.Style.FILL);
117         mPaint.setAlpha(50);
118         mPaintMore = new Paint();
119         mPaintMore.setAntiAlias(antiAlias);//抗鋸齒
120         mPaintMore.setStyle(Paint.Style.FILL);
121         mPaintMore.setColor(nextColor);//設置顏色
122         mPaintMore.setAlpha(30);
123         drawPoint = new PointF(0, 0);
124         drawPoint2 = new PointF(0, 0);
125     }
126
127     public void ChangeWaveLevel(int percent) {
128         animator = ValueAnimator.ofFloat(waveDeepmin, waveDeepMax);//設置屬性值變化範圍,最大波峰波谷與最小
129         animator.setDuration(1000);//設置動畫時間
130         animator.setInterpolator(new LinearInterpolator());//控制動畫的變化速率
131         animator.addUpdateListener(new ValueAnimator.AnimatorUpdateListener() {
132             @Override
133             public void onAnimationUpdate(ValueAnimator animation) {
134                 waveDeep = (float) animation.getAnimatedValue();
135             }
136         });
137         animator.setRepeatMode(ValueAnimator.REVERSE);//往返模式
138         animator.setRepeatCount(1);
139         animatorh = ValueAnimator.ofFloat(waveHeight, mHeight * (10 - percent) / 10);//水位變化
140         animatorh.setDuration(2000);//設置動畫時間
141         animatorh.setInterpolator(new DecelerateInterpolator());//控制動畫的變化速率
142
143         animatorh.addUpdateListener(new ValueAnimator.AnimatorUpdateListener() {
144             @Override
145             public void onAnimationUpdate(ValueAnimator animation) {
146                 waveHeight = (float) animation.getAnimatedValue();
147             }
148         });
149         animator.start();//開始動畫
150         animatorh.start();//開始動畫
151     }
152 }
完整代碼
GitHub:https://github.com/SteinsGateZero/Mybeisaierwavetest.git
雖然簡單,但是推薦還是得自己動手做一做。


