轉載博客:http://blog.csdn.net/i_lovefish/article/details/17719081 以下為異常捕捉處理代碼: import java.io.BufferedReader; import java.io.File; import java.io.FileInpu
轉載博客:http://blog.csdn.net/i_lovefish/article/details/17719081
以下為異常捕捉處理代碼:
import java.io.BufferedReader;
import java.io.File;
import java.io.FileInputStream;
import java.io.FileNotFoundException;
import java.io.FileOutputStream;
import java.io.IOException;
import java.io.InputStreamReader;
import java.io.PrintWriter;
import java.io.StringWriter;
import java.io.Writer;
import java.lang.Thread.UncaughtExceptionHandler;
import java.lang.reflect.Field;
import java.text.DateFormat;
import java.text.SimpleDateFormat;
import java.util.Date;
import java.util.HashMap;
import java.util.Map;

import android.content.Context;
import android.content.pm.PackageInfo;
import android.content.pm.PackageManager;
import android.content.pm.PackageManager.NameNotFoundException;
import android.os.Build;
import android.os.Environment;
import android.os.Looper;
import android.util.Log;
import android.widget.Toast;

/**
 * UncaughtException處理類,當程式發生Uncaught異常的時候,有該類來接管程式,並記錄發送錯誤報告.
 *
 *  需要在Application中註冊,為了要在程式啟動器就監控整個程式。
 */
public class CrashHandler implements UncaughtExceptionHandler {

    public static final String TAG = "CrashHandler";

    //系統預設的UncaughtException處理類
    private Thread.UncaughtExceptionHandler mDefaultHandler;
    //CrashHandler實例
    private static CrashHandler instance;
   //程式的Context對象
    private Context mContext;
    //用來存儲設備信息和異常信息
    private Map<String, String> infos = new HashMap<String, String>();

    //用於格式化日期,作為日誌文件名的一部分
    private DateFormat formatter = new SimpleDateFormat("yyyy-MM-dd-HH-mm-ss");

    /** 保證只有一個CrashHandler實例 */
    private CrashHandler() {}

    /** 獲取CrashHandler實例 ,單例模式 */
    public static CrashHandler getInstance() {
        if(instance == null)
            instance = new CrashHandler();
        return instance;
    }

    /**
     * 初始化
     */
    public void init(Context context) {
        mContext = context;
        //獲取系統預設的UncaughtException處理器
        mDefaultHandler = Thread.getDefaultUncaughtExceptionHandler();
        //設置該CrashHandler為程式的預設處理器
        Thread.setDefaultUncaughtExceptionHandler(this);
    }

    /**
     * 當UncaughtException發生時會轉入該函數來處理
     */
    @Override
    public void uncaughtException(Thread thread, Throwable ex) {
        if (!handleException(ex) && mDefaultHandler != null) {
            //如果用戶沒有處理則讓系統預設的異常處理器來處理
            mDefaultHandler.uncaughtException(thread, ex);
        } else {
            try {
                Thread.sleep(3000);
            } catch (InterruptedException e) {
                Log.e(TAG, "error : ", e);
            }
            //退出程式
            android.os.Process.killProcess(android.os.Process.myPid());
            System.exit(1);
        }
    }

    /**
     * 自定義錯誤處理,收集錯誤信息 發送錯誤報告等操作均在此完成.
     *
     * @param ex
     * @return true:如果處理了該異常信息;否則返回false.
     */
    private boolean handleException(Throwable ex) {
        if (ex == null) {
            return false;
        }
        //收集設備參數信息
        collectDeviceInfo(mContext);

        //使用Toast來顯示異常信息
        new Thread() {
            @Override
            public void run() {
                Looper.prepare();
                Toast.makeText(mContext, "很抱歉,程式出現異常,即將退出.", Toast.LENGTH_SHORT).show();
                Looper.loop();
            }
        }.start();
        //保存日誌文件
        saveCatchInfo2File(ex);
        return true;
    }

    /**
     * 收集設備參數信息
     * @param ctx
     */
    public void collectDeviceInfo(Context ctx) {
        try {
            PackageManager pm = ctx.getPackageManager();
            PackageInfo pi = pm.getPackageInfo(ctx.getPackageName(), PackageManager.GET_ACTIVITIES);
            if (pi != null) {
                String versionName = pi.versionName == null ? "null" : pi.versionName;
                String versionCode = pi.versionCode + "";
                infos.put("versionName", versionName);
                infos.put("versionCode", versionCode);
            }
        } catch (NameNotFoundException e) {
            Log.e(TAG, "an error occured when collect package info", e);
        }
        Field[] fields = Build.class.getDeclaredFields();
        for (Field field : fields) {
            try {
                field.setAccessible(true);
                infos.put(field.getName(), field.get(null).toString());
                Log.d(TAG, field.getName() + " : " + field.get(null));
            } catch (Exception e) {
                Log.e(TAG, "an error occured when collect crash info", e);
            }
        }
    }

    /**
     * 保存錯誤信息到文件中
     *
     * @param ex
     * @return  返迴文件名稱,便於將文件傳送到伺服器
     */
    private String saveCatchInfo2File(Throwable ex) {

        StringBuffer sb = new StringBuffer();
        for (Map.Entry<String, String> entry : infos.entrySet()) {
            String key = entry.getKey();
            String value = entry.getValue();
            sb.append(key + "=" + value + "\n");
        }

        Writer writer = new StringWriter();
        PrintWriter printWriter = new PrintWriter(writer);
        ex.printStackTrace(printWriter);
        Throwable cause = ex.getCause();
        while (cause != null) {
            cause.printStackTrace(printWriter);
            cause = cause.getCause();
        }
        printWriter.close();
        String result = writer.toString();
        sb.append(result);
        try {
            long timestamp = System.currentTimeMillis();
            String time = formatter.format(new Date());
            String fileName = "crash-" + time + "-" + timestamp + ".log";
            if (Environment.getExternalStorageState().equals(Environment.MEDIA_MOUNTED)) {
                String path = "/mnt/sdcard/crash/";
                File dir = new File(path);
                if (!dir.exists()) {
                    dir.mkdirs();
                }
                FileOutputStream fos = new FileOutputStream(path + fileName);
                fos.write(sb.toString().getBytes());
                //發送給開發人員
                sendCrashLog2PM(path+fileName);
                fos.close();
            }
            return fileName;
        } catch (Exception e) {
            Log.e(TAG, "an error occured while writing file...", e);
        }
        return null;
    }

    /**
     * 將捕獲的導致崩潰的錯誤信息發送給開發人員
     *
     * 目前只將log日誌保存在sdcard 和輸出到LogCat中,並未發送給後臺。
     */
    private void sendCrashLog2PM(String fileName){
        if(!new File(fileName).exists()){
            Toast.makeText(mContext, "日誌文件不存在!", Toast.LENGTH_SHORT).show();
            return;
        }
        FileInputStream fis = null;
        BufferedReader reader = null;
        String s = null;
        try {
            fis = new FileInputStream(fileName);
            reader = new BufferedReader(new InputStreamReader(fis, "GBK"));
            while(true){
                s = reader.readLine();
                if(s == null) break;
                //由於目前尚未確定以何種方式發送,所以先打出log日誌。
                Log.i("info", s.toString());
            }
        } catch (FileNotFoundException e) {
            e.printStackTrace();
        } catch (IOException e) {
            e.printStackTrace();
        }finally{   // 關閉流
            try {
                reader.close();
                fis.close();
            } catch (IOException e) {
                e.printStackTrace();
            }
        }
    }
}
針對異常的捕捉要進行全局監控整個項目,所以要將其在Application中註冊(也就是初始化):
import android.app.Application;

public class CrashApplication extends Application {

    @Override
    public void onCreate() {
        super.onCreate();
        CrashHandler catchHandler = CrashHandler.getInstance();
        catchHandler.init(getApplicationContext());
    }
}
現在模擬一個空指針異常:
import android.app.Activity;
import android.os.Bundle;

public class CatchExceptionLogActivity extends Activity {
    /** Called when the activity is first created. */
    private String s;
    @Override
    public void onCreate(Bundle savedInstanceState) {
        super.onCreate(savedInstanceState);
        setContentView(R.layout.main);
        System.out.println(s.equals("hello"));  // s沒有進行賦值,所以會出現NullPointException異常
    }
}
別忘了在配置文件中對Application進行註冊:
<?xml version="1.0" encoding="utf-8"?>
<manifest xmlns:android="http://schemas.android.com/apk/res/android"
    package="com.forms.catchlog"
    android:versionCode="1"
    android:versionName="1.0" >

    <uses-sdk android:minSdkVersion="8" />
    <uses-permission android:name="android.permission.WRITE_EXTERNAL_STORAGE"/>


    <application
        android:icon="@drawable/ic_launcher"
        android:label="@string/app_name"
        <span style="color:#ff0000;">android:name=".CrashApplication"></span>
        <activity
            android:label="@string/app_name"
            android:name=".CatchExceptionLogActivity" >
            <intent-filter >
                <action android:name="android.intent.action.MAIN" />

                <category android:name="android.intent.category.LAUNCHER" />
            </intent-filter>
        </activity>
    </application>

</manifest>
添加異常捕獲之後的日誌提示
由於Android設備各異,第三方定製的Android系統也非常多,我們不可能對所有的設備場景都進行測試,因而開發一款完全無bug的應用幾乎是不可能的任務,那麼當應用在用戶的設備上Force Close時,我們是不是可以捕獲這個錯誤,記錄用戶的設備信息,然後讓用戶選擇是否反饋這些堆棧信息,通過這種bug反饋方式,我們可以有針對性地對bug進行修複。
當我們的的應用由於運行時異常導致Force Close的時候,可以設置主線程的UncaughtExceptionHandler,實現捕獲運行時異常的堆棧信息。同時用戶可以把堆棧信息通過發送郵件的方式反饋給我們。下麵是實現的代碼:
代碼下載請按此
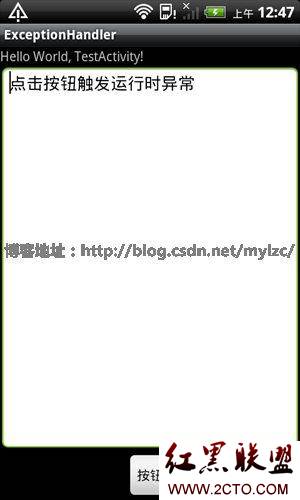
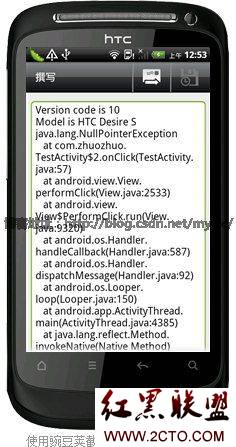
例子:點擊按鈕後,會觸發一個NullPointerException的運行時異常,這個例子實現了捕獲運行時異常,發送郵件反饋設備和堆棧信息的功能。
界面1(觸發運行時異常)

界面2(發送堆棧信息)

TestActivity.java
package com.zhuozhuo;

import java.io.PrintWriter;
import java.io.StringWriter;
import java.lang.Thread.UncaughtExceptionHandler;

import android.app.Activity;
import android.content.Intent;
import android.net.Uri;
import android.os.Build;
import android.os.Bundle;
import android.util.Log;
import android.view.View;
import android.view.View.OnClickListener;
import android.widget.EditText;
import android.widget.TextView;

public class TestActivity extends Activity {
    /** Called when the activity is first created. */


    @Override
    public void onCreate(Bundle savedInstanceState) {
        super.onCreate(savedInstanceState);
        setContentView(R.layout.main);
        Thread.setDefaultUncaughtExceptionHandler(new UncaughtExceptionHandler() {//給主線程設置一個處理運行時異常的handler

            @Override
            public void uncaughtException(Thread thread, final Throwable ex) {

                StringWriter sw = new StringWriter();
                PrintWriter pw = new PrintWriter(sw);
                ex.printStackTrace(pw);

                StringBuilder sb = new StringBuilder();

                sb.append("Version code is ");
                sb.append(Build.VERSION.SDK_INT + "\n");//設備的Android版本號
                sb.append("Model is ");
                sb.append(Build.MODEL+"\n");//設備型號
                sb.append(sw.toString());

                Intent sendIntent = new Intent(Intent.ACTION_SENDTO);
                sendIntent.setData(Uri.parse("mailto:[email protected]"));//發送郵件異常到[email protected]郵箱
                sendIntent.putExtra(Intent.EXTRA_SUBJECT, "bug report");//郵件主題
                sendIntent.putExtra(Intent.EXTRA_TEXT, sb.toString());//堆棧信息
                startActivity(sendIntent);
                finish();
            }
        });

        findViewById(R.id.button).setOnClickListener(new OnClickListener() {

            @Override
            public void onClick(View v) {
                Integer a = null;
                a.toString();//觸發nullpointer運行時錯誤

            }
        });

    }
}
main.xml
<?xml version="1.0" encoding="utf-8"?>
<LinearLayout xmlns:android="http://schemas.android.com/apk/res/android"
    android:orientation="vertical" android:layout_width="fill_parent"
    android:layout_height="fill_parent">
    <TextView android:layout_width="fill_parent"
        android:layout_height="wrap_content" android:text="@string/hello" />
    <EditText android:id="@+id/editText1" android:layout_width="match_parent"
        android:text="點擊按鈕觸發運行時異常" android:layout_height="wrap_content"
        android:layout_weight="1" android:gravity="top"></EditText>
    <Button android:text="按鈕" android:id="@+id/button"
        android:layout_width="wrap_content" android:layout_height="wrap_content"
        android:layout_gravity="center_horizontal"></Button>
</LinearLayout>


