
在日常工作中,我們往往會給前端(WEB端、IOS、Android)或者第三方提供介面,這個時候我們就需要給他們提供一份詳細的API說明文檔。但維護一份詳細的文檔可不是一件簡單的事情。首先,編寫一份詳細的文檔本身就是一件很費時費力的事情,另一方面,由於代碼和文檔是分離的,所以很容易導致文檔和代碼的不一... ...
一、Swagger簡介
上一篇文章中我們介紹了Spring Boot對Restful的支持,這篇文章我們繼續討論這個話題,不過,我們這裡不再討論Restful API如何實現,而是討論Restful API文檔的維護問題。
在日常的工作中,我們往往需要給前端(WEB端、IOS、Android)或者第三方提供介面,這個時候我們就需要給他們提供一份詳細的API說明文檔。但維護一份詳細的文檔可不是一件簡單的事情。首先,編寫一份詳細的文檔本身就是一件很費時費力的事情,另一方面,由於代碼和文檔是分離的,所以很容易導致文檔和代碼的不一致。這篇文章我們就來分享一種API文檔維護的方式,即通過Swagger來自動生成Restuful API文檔。
那什麼是Swagger?我們可以直接看下官方的描述:
THE WORLD'S MOST POPULAR API TOOLING
Swagger is the world’s largest framework of API developer tools for the OpenAPI Specification(OAS),
enabling development across the entire API lifecycle, from design and documentation, to test and deployment.
這段話首先告訴大家Swagger是世界上最流行的API工具,並且Swagger的目的是支撐整個API生命周期的開發,包括設計、文檔以及測試和部署。這篇文章中我們會用到Swagger的文檔管理和測試功能。
對Swagger的作用有了基本的認識後,我們現在來看看怎麼使用。
二、Swagger與Spring boot集成
第一步:引入對應jar包:
 <dependency>
    <groupId>io.springfox</groupId>
    <artifactId>springfox-swagger2</artifactId>
    <version>2.6.0</version>
</dependency>
<dependency>
    <groupId>io.springfox</groupId>
    <artifactId>springfox-swagger-ui</artifactId>
    <version>2.6.0</version>
</dependency>
第二步,基本信息配置:
@Configuration
@EnableSwagger2
public class Swagger2Config {
    @Bean
    public Docket createRestApi() {
        return new Docket(DocumentationType.SWAGGER_2)
                .apiInfo(apiInfo())
                .select()
                .apis(RequestHandlerSelectors.basePackage("com.pandy.blog.rest"))
                .paths(PathSelectors.regex("/rest/.*"))
                .build();
    }

    private ApiInfo apiInfo() {
        return new ApiInfoBuilder()
                .title("Blog系統Restful API")
                .description("Blog系統Restful API")
                .termsOfServiceUrl("http://127.0.0.1:8080/")
                .contact("liuxiaopeng")
                .version("1.0")
                .build();
    }

}
基礎的配置是對整個API文檔的描述以及一些全局性的配置,對所有介面起作用。這裡涉及到兩個註解:
@Configuration是表示這是一個配置類,是JDK自帶的註解,前面的文章中也已做過說明。
@EnableSwagger2的作用是啟用Swagger2相關功能。
在這個配置類裡面我麽實例化了一個Docket對象,這個對象主要包括三個方面的信息:
(1)整個API的描述信息,即ApiInfo對象包括的信息,這部分信息會在頁面上展示。
(2)指定生成API文檔的包名。
(3)指定生成API的路徑。按路徑生成API可支持四種模式,這個可以參考其源碼:
public class PathSelectors {
    private PathSelectors() {
        throw new UnsupportedOperationException();
    }

    public static Predicate<String> any() {
        return Predicates.alwaysTrue();
    }

    public static Predicate<String> none() {
        return Predicates.alwaysFalse();
    }

    public static Predicate<String> regex(final String pathRegex) {
        return new Predicate<String>() {
            public boolean apply(String input) {
                return input.matches(pathRegex);
            }
        };
    }

    public static Predicate<String> ant(final String antPattern) {
        return new Predicate<String>() {
            public boolean apply(String input) {
                AntPathMatcher matcher = new AntPathMatcher();
                return matcher.match(antPattern, input);
            }
        };
    }
}
從源碼可以看出,Swagger總共支持任何路徑都生成、任何路徑都不生成以及正則匹配和ant 模式匹配四種方式。大家可能比較熟悉的是前三種,最後一種ant匹配,如果不熟悉ant的話就直接忽略吧,前三種應該足夠大家在日常工作中使用了。
有了上面的配置我們就可以看到效果了,我在com.pandy.blog.rest這個包下麵有一個ArticleRestController這個類,源碼如下:
@RestController
public class ArticleRestController {

    @Autowired
    private ArticleService articleService;

    @RequestMapping(value = "/rest/article", method = POST, produces = "application/json")
    public WebResponse<Map<String, Object>> saveArticle(@RequestBody Article article) {
        article.setUserId(1L);
        articleService.saveArticle(article);
        Map<String, Object> ret = new HashMap<>();
        ret.put("id", article.getId());
        WebResponse<Map<String, Object>> response = WebResponse.getSuccessResponse(ret);
        return response;
    }

    @RequestMapping(value = "/rest/article/{id}", method = DELETE, produces = "application/json")
    public WebResponse<?> deleteArticle(@PathVariable Long id) {
        Article article = articleService.getById(id);
        article.setStatus(-1);
        articleService.updateArticle(article);
        WebResponse<Object> response = WebResponse.getSuccessResponse(null);
        return response;
    }

    @RequestMapping(value = "/rest/article/{id}", method = PUT, produces = "application/json")
    public WebResponse<Object> updateArticle(@PathVariable Long id, @RequestBody Article article) {
        article.setId(id);
        articleService.updateArticle(article);
        WebResponse<Object> response = WebResponse.getSuccessResponse(null);
        return response;
    }

    @RequestMapping(value = "/rest/article/{id}", method = GET, produces = "application/json")
    public WebResponse<Article> getArticle(@PathVariable Long id) {
        Article article = articleService.getById(id);
        WebResponse<Article> response = WebResponse.getSuccessResponse(article);
        return response;
    }

    @RequestMapping(value = "/test/{id}", method = GET, produces = "application/json")
    public WebResponse<?> getNoApi(){
        WebResponse<?> response = WebResponse.getSuccessResponse(null);
        return response;
    }
}
啟動Spring boot,然後訪問:http://127.0.0.1:8080/swagger-ui.html即可看到如下結果:
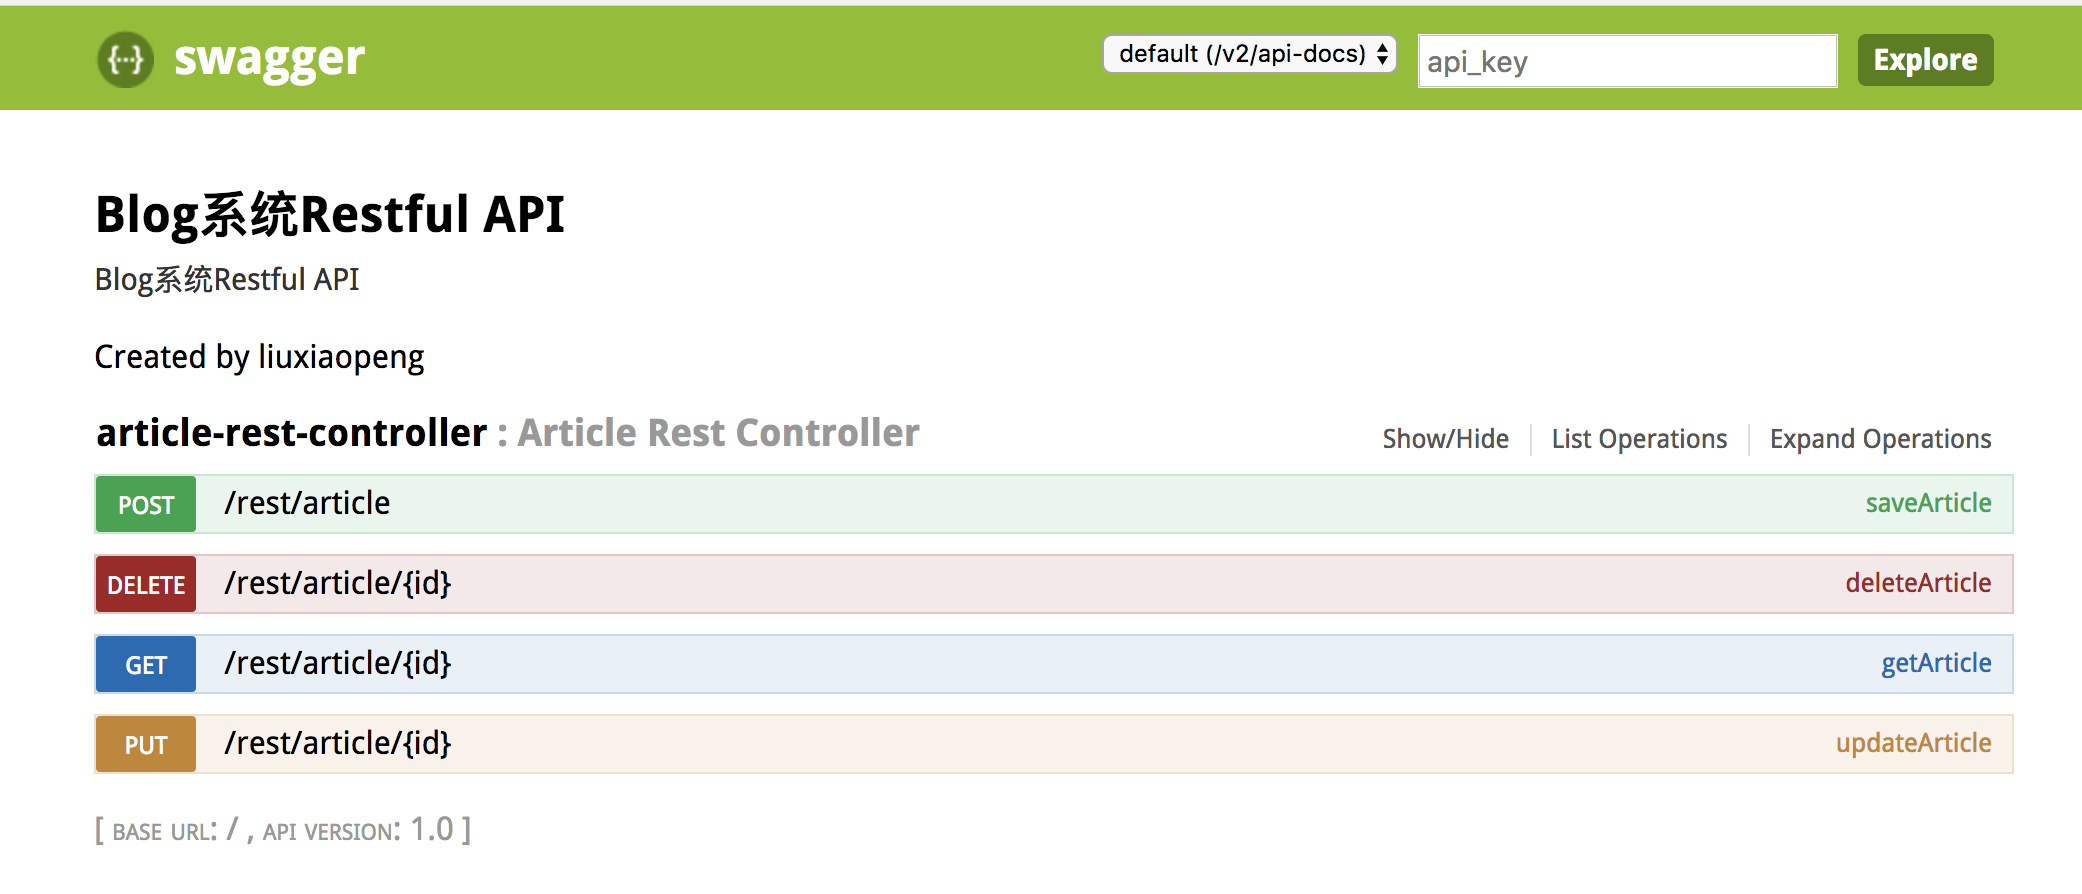
這個頁面上可以看到,除了最後一個介面/test/{id}外,其他介面都生成對應的文檔,最後一個介面因為不滿足我們配置的路徑——“/rest/.*”,所以沒有生成文檔。
我們還可以點進去看一下每一個具體的介面,我們這裡以“POST /rest/article”這個介面為例:

可以看到,Swagger為每一個介面都生成了返回結果和請求參數的示例,並且能直接通過下麵的"try it out"進行介面訪問,方面大家對介面進行測試。整體上感覺Swagger還是很強大的,配置也比較簡單。
三、Swagger API詳細配置
不過大家看到這裡肯定會有點疑問:
第一個問題:這個返回結果和請求參數都沒有文字性的描述,這個可不可以配置?
第二個問題:這個請求參應該是直接根據對象反射出來的結果,但是不是對象的每個屬性都是必傳的,另外參數的值也不一定滿足我們的需求,這個能否配置?
答案肯定是可以的,現在我們就來解決這兩個問題,直接看配置的代碼:
package com.pandy.blog.rest;

import com.pandy.blog.dto.WebResponse;
import com.pandy.blog.po.Article;
import com.pandy.blog.service.ArticleService;
import io.swagger.annotations.ApiImplicitParam;
import io.swagger.annotations.ApiImplicitParams;
import io.swagger.annotations.ApiOperation;
import io.swagger.annotations.ApiResponse;
import io.swagger.annotations.ApiResponses;
import org.springframework.beans.factory.annotation.Autowired;
import org.springframework.context.annotation.Profile;
import org.springframework.web.bind.annotation.PathVariable;
import org.springframework.web.bind.annotation.RequestBody;
import org.springframework.web.bind.annotation.RequestMapping;
import org.springframework.web.bind.annotation.RestController;

import java.util.HashMap;
import java.util.List;
import java.util.Map;

import static org.springframework.web.bind.annotation.RequestMethod.DELETE;
import static org.springframework.web.bind.annotation.RequestMethod.GET;
import static org.springframework.web.bind.annotation.RequestMethod.POST;
import static org.springframework.web.bind.annotation.RequestMethod.PUT;

@RestController
@RequestMapping("/rest")
public class ArticleRestController {

    @Autowired
    private ArticleService articleService;

    @RequestMapping(value = "/article", method = POST, produces = "application/json")
    @ApiOperation(value = "添加文章", notes = "添加新的文章", tags = "Article",httpMethod = "POST")
    @ApiImplicitParams({
            @ApiImplicitParam(name = "title", value = "文章標題", required = true, dataType = "String"),
            @ApiImplicitParam(name = "summary", value = "文章摘要", required = true, dataType = "String"),
            @ApiImplicitParam(name = "status", value = "發佈狀態", required = true, dataType = "Integer")
    })
    @ApiResponses({
            @ApiResponse(code=200,message="成功",response=WebResponse.class),
    })
    public WebResponse<Map<String,Object>> saveArticle(@RequestBody Article article){
        articleService.saveArticle(article);
        Map<String,Object> ret = new HashMap<>();
        ret.put("id",article.getId());
        WebResponse<Map<String,Object>> response = WebResponse.getSuccessResponse(ret);
        return response;
    }

    @ApiOperation(value = "刪除文章", notes = "根據ID刪除文章", tags = "Article",httpMethod = "DELETE")
    @ApiImplicitParams({
            @ApiImplicitParam(name = "id", value = "文章ID", required = true, dataType = "Long")
    })
    @RequestMapping(value = "/{id}",method = DELETE,produces = "application/json")
    public WebResponse<?>  deleteArticle(@PathVariable Long id){
        Article article = articleService.getById(id);
        article.setStatus(-1);
        articleService.saveArticle(article);
        return WebResponse.getSuccessResponse(new HashMap<>());
    }

    @ApiOperation(value = "獲取文章列表", notes = "可以根據標題進行模糊查詢", tags = "Article",httpMethod = "GET")
    @ApiImplicitParams({
            @ApiImplicitParam(name = "title", value = "文章標題", required = false, dataType = "String"),
            @ApiImplicitParam(name = "pageSize", value = "每頁文章數量", required = false, dataType = "Integer"),
            @ApiImplicitParam(name = "pageNum", value = "分頁的頁碼", required = false, dataType = "Integer")
    })
    @RequestMapping(value = "/article/list", method = GET, produces = "application/json")
    public WebResponse<?> listArticles(String title, Integer pageSize, Integer pageNum) {
        if (pageSize == null) {
            pageSize = 10;
        }
        if (pageNum == null) {
            pageNum = 1;
        }
        int offset = (pageNum - 1) * pageSize;
        List<Article> articles =  articleService.getArticles(title, 1L, offset, pageSize);
        return WebResponse.getSuccessResponse(articles);
    }


    @ApiOperation(value = "更新文章", notes = "更新文章內容", tags = "Article",httpMethod = "PUT")
    @ApiImplicitParams({
            @ApiImplicitParam(name = "id", value = "文章ID", required = true, dataType = "Long"),
            @ApiImplicitParam(name = "title", value = "文章標題", required = false, dataType = "String"),
            @ApiImplicitParam(name = "summary", value = "文章摘要", required = false, dataType = "String"),
            @ApiImplicitParam(name = "status", value = "發佈狀態", required = false, dataType = "Integer")
    })
    @RequestMapping(value = "/article/{id}", method = PUT, produces = "application/json")
    public WebResponse<?> updateArticle(@PathVariable Long id,@RequestBody Article article){
        article.setId(id);
        articleService.updateArticle(article);
        return WebResponse.getSuccessResponse(new HashMap<>());
    }

}
我們解釋一下代碼中幾個註解及相關屬性的具體作用:
@ApiOperation,整個介面屬性配置:
value:介面說明,展示在介面列表。
notes:介面詳細說明,展示在介面的詳情頁。
tags:介面的標簽,相同標簽的介面會在一個標簽頁下展示。
httpMethod:支持的HTTP的方法。
@ApiImplicitParams,@ApiImplicitParam的容器,可包含多個@ApiImplicitParam註解
@ApiImplicitParam,請求參數屬性配置:
name:參數名稱
value:參數說明
required:是否必須
dataType:數據類型
@ApiResponses,@ApiResponse容器,可以包含多個@ApiResponse註解
@ApiResponse,返回結果屬性配置:
code:返回結果的編碼。
message:返回結果的說明。
response:返回結果對應的類。
完成以上配置後,我們再看下頁面效果:
列表頁:
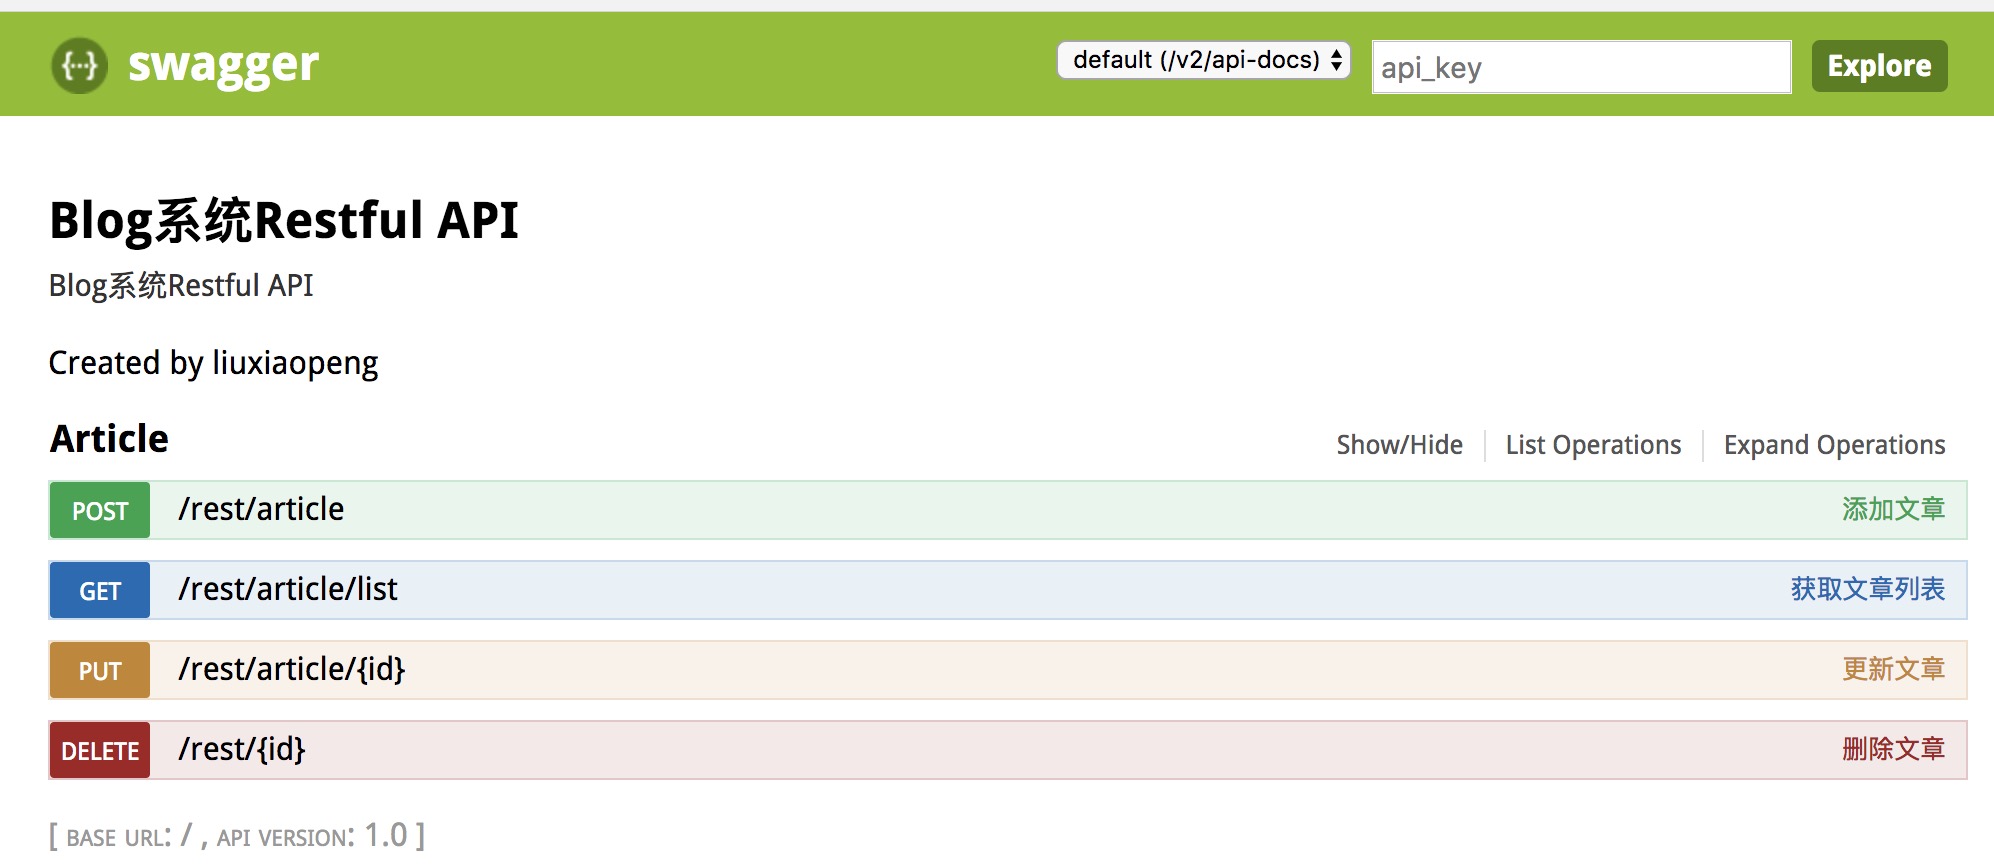
可以看到,現在介面都位於Article這個tag下,並且介面後面也有了我們配置好的說明。我們再看下”POST /rest/article“這個介面的詳情頁:
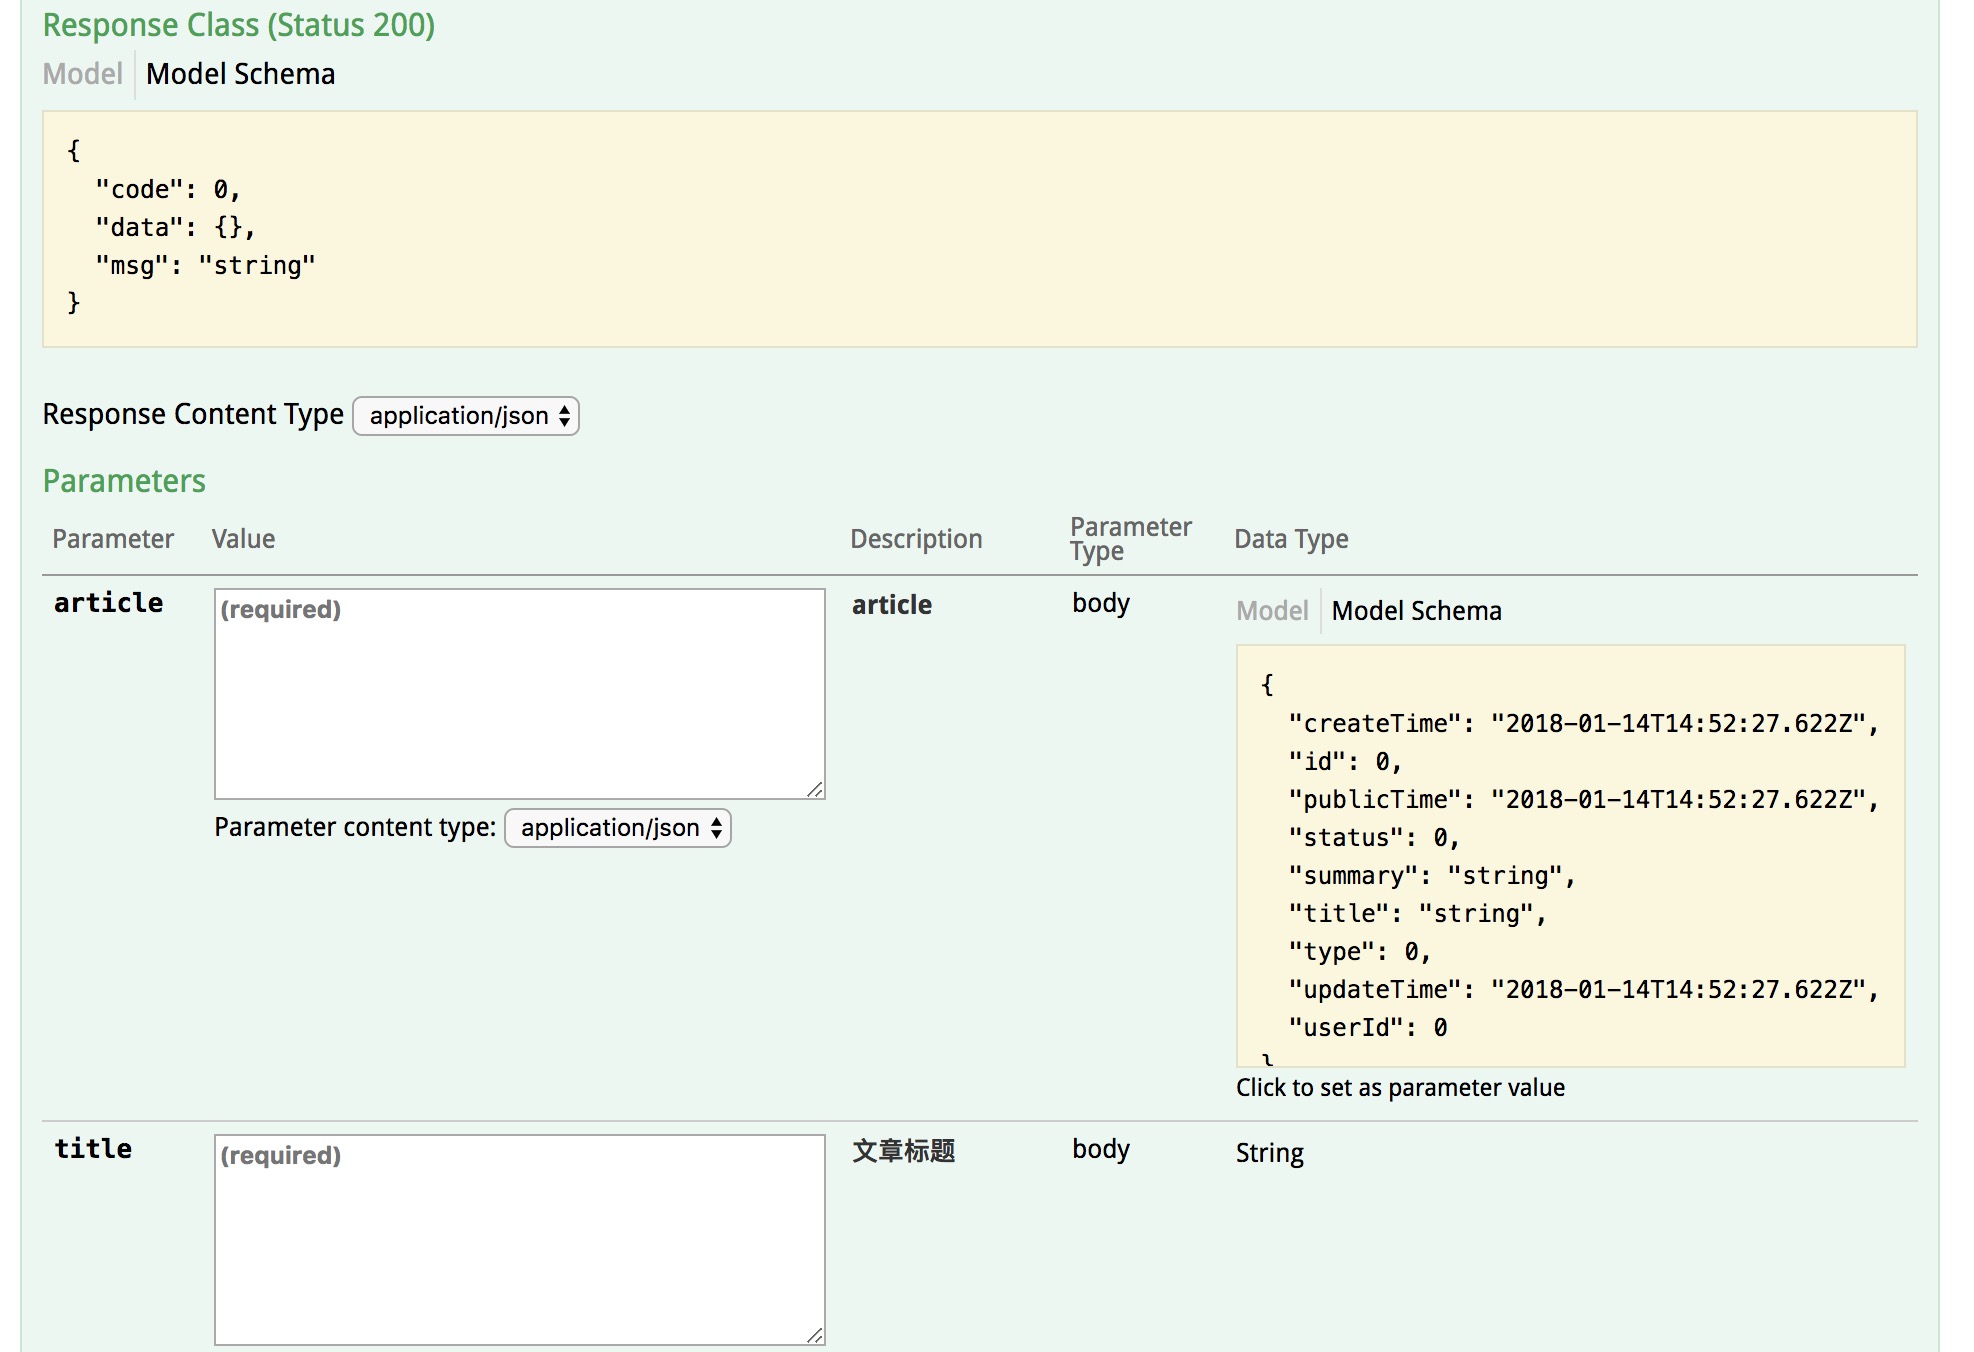
圖片太大,只截取了title屬性的展示,其他幾個參數的類似。我們可以從頁面上看到請求參數的說明是有的,不過這不是我們預期的效果,如果我們的參數僅僅是簡單類型,這種方式應該沒問題,但現在的問題是我們的請求參數是一個對象,那如何配置呢?這就涉及到另外兩個註解:@ApiModel和@ApiModelProperty,我們還是先看代碼,然後再解釋,這樣更容易理解:
@ApiModel(value="article對象",description="新增&更新文章對象說明")
public class Article {

    @Id
    @GeneratedValue
    @ApiModelProperty(name = "id",value = "文章ID",required = false,example = "1")
    private Long id;

    @ApiModelProperty(name = "title",value = "文章標題",required = true,example = "測試文章標題")
    private String title;

    @ApiModelProperty(name = "summary",value = "文章摘要",required = true,example = "測試文章摘要")
    private String summary;

    @ApiModelProperty(hidden = true)
    private Date createTime;

    @ApiModelProperty(hidden = true)
    private Date publicTime;

    @ApiModelProperty(hidden = true)
    private Date updateTime;

    @ApiModelProperty(hidden = true)
    private Long userId;

    @ApiModelProperty(name = "status",value = "文章發佈狀態",required = true,example = "1")
    private Integer status;

    @ApiModelProperty(name = "type",value = "文章分類",required = true,example = "1")
    private Integer type;
}
@ApiModel是對整個類的屬性的配置:
value:類的說明
description:詳細描述
@ApiModelProperty是對具體每個欄位的屬性配置:
name:欄位名稱
value:欄位的說明
required:是否必須
example:示例值
hidden:是否顯示
完成上面的配置後,我們再來看效果:
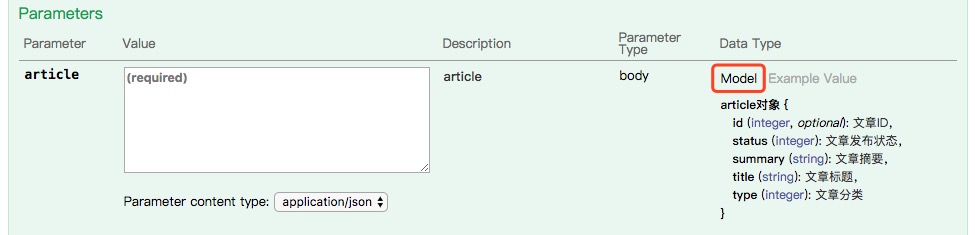
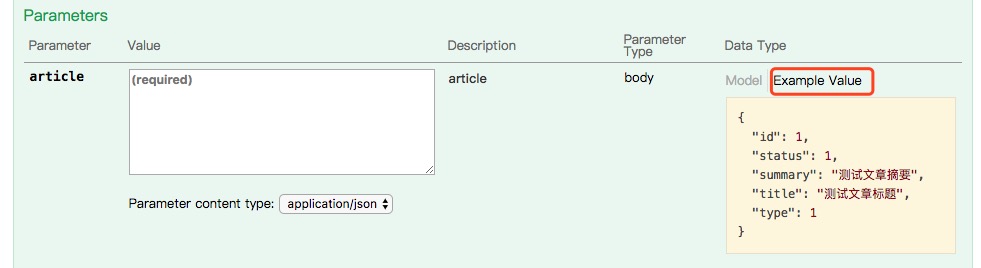
現在我們可以看到,欄位的說明都已經展示出來,並且,示例中欄位的值也變成了我們配置的example屬性對應的值了。這樣,一份完整的API文檔就生成了,並且該文檔與代碼緊密的聯繫在一起,而不是隔離的兩個部分。除此之外,我們還可以直接通過該文檔很方便的進行測試,我們只需要點擊Example Value下黃色的框,裡面的內容就會自動複製到article對應的value框中,然後在點擊“Try it out”就可以發起http請求了。
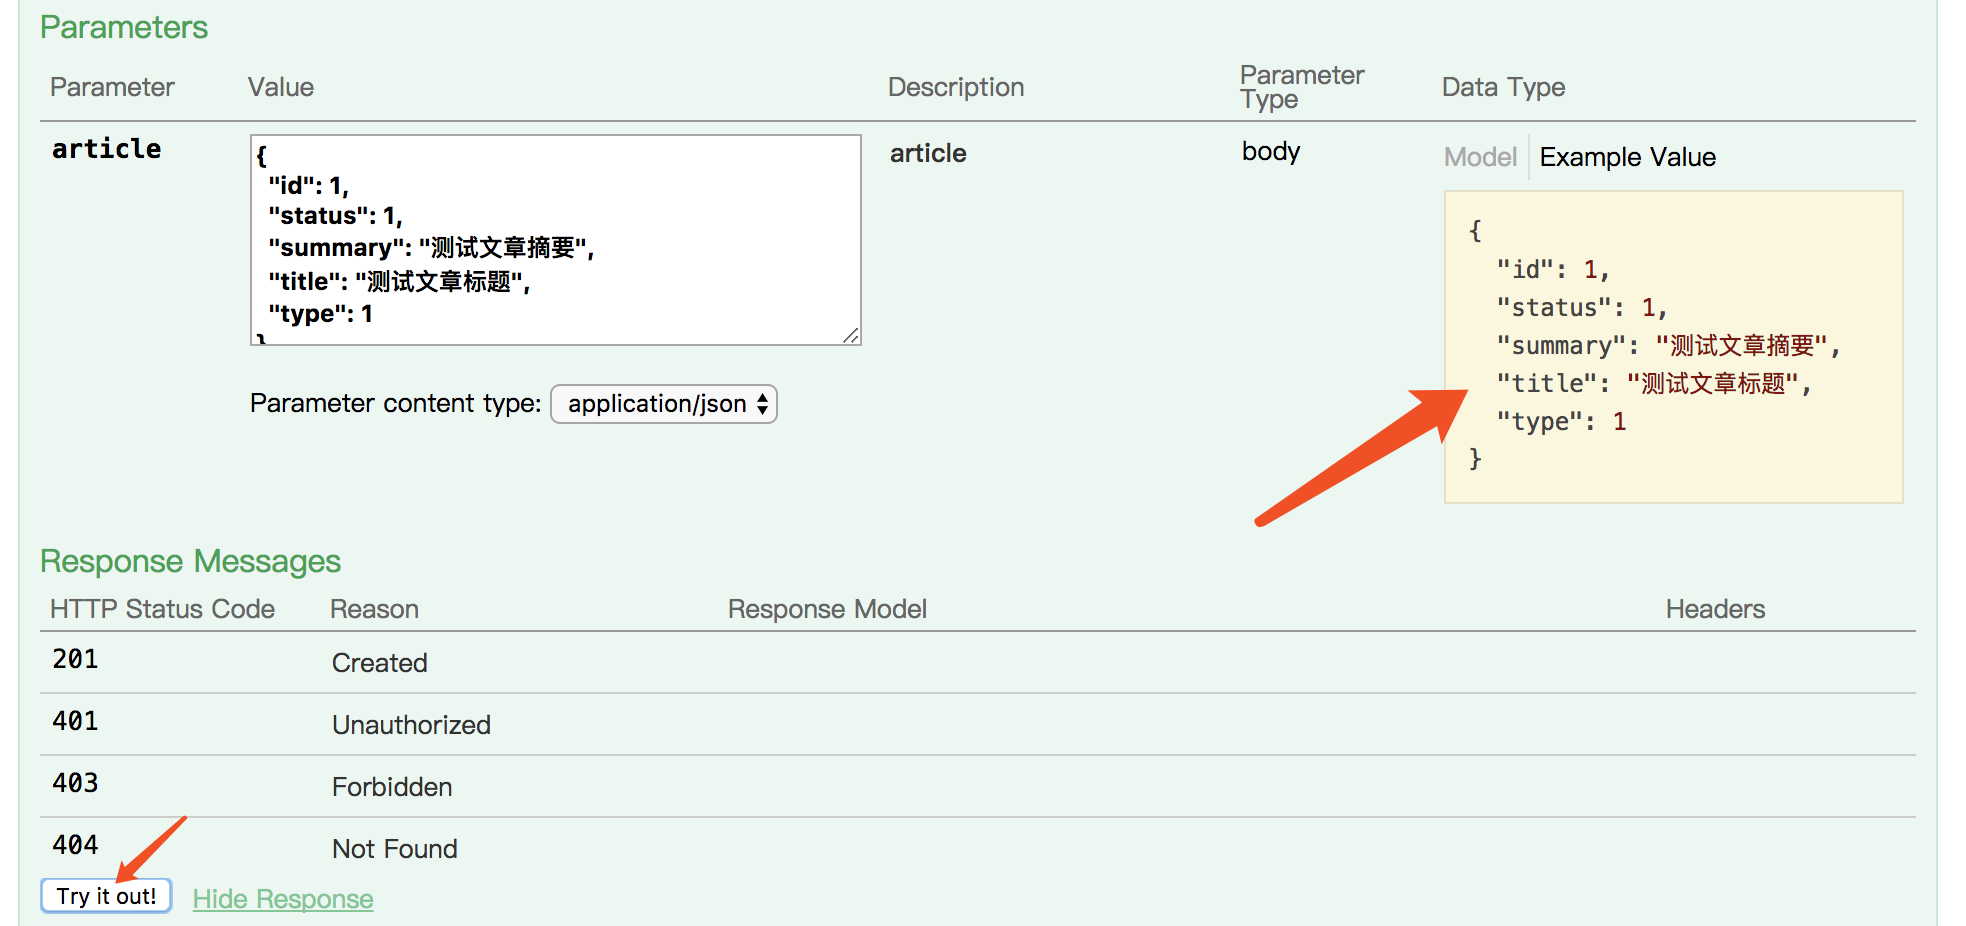
點擊Try it out後,我們就可以看到返回的結果:
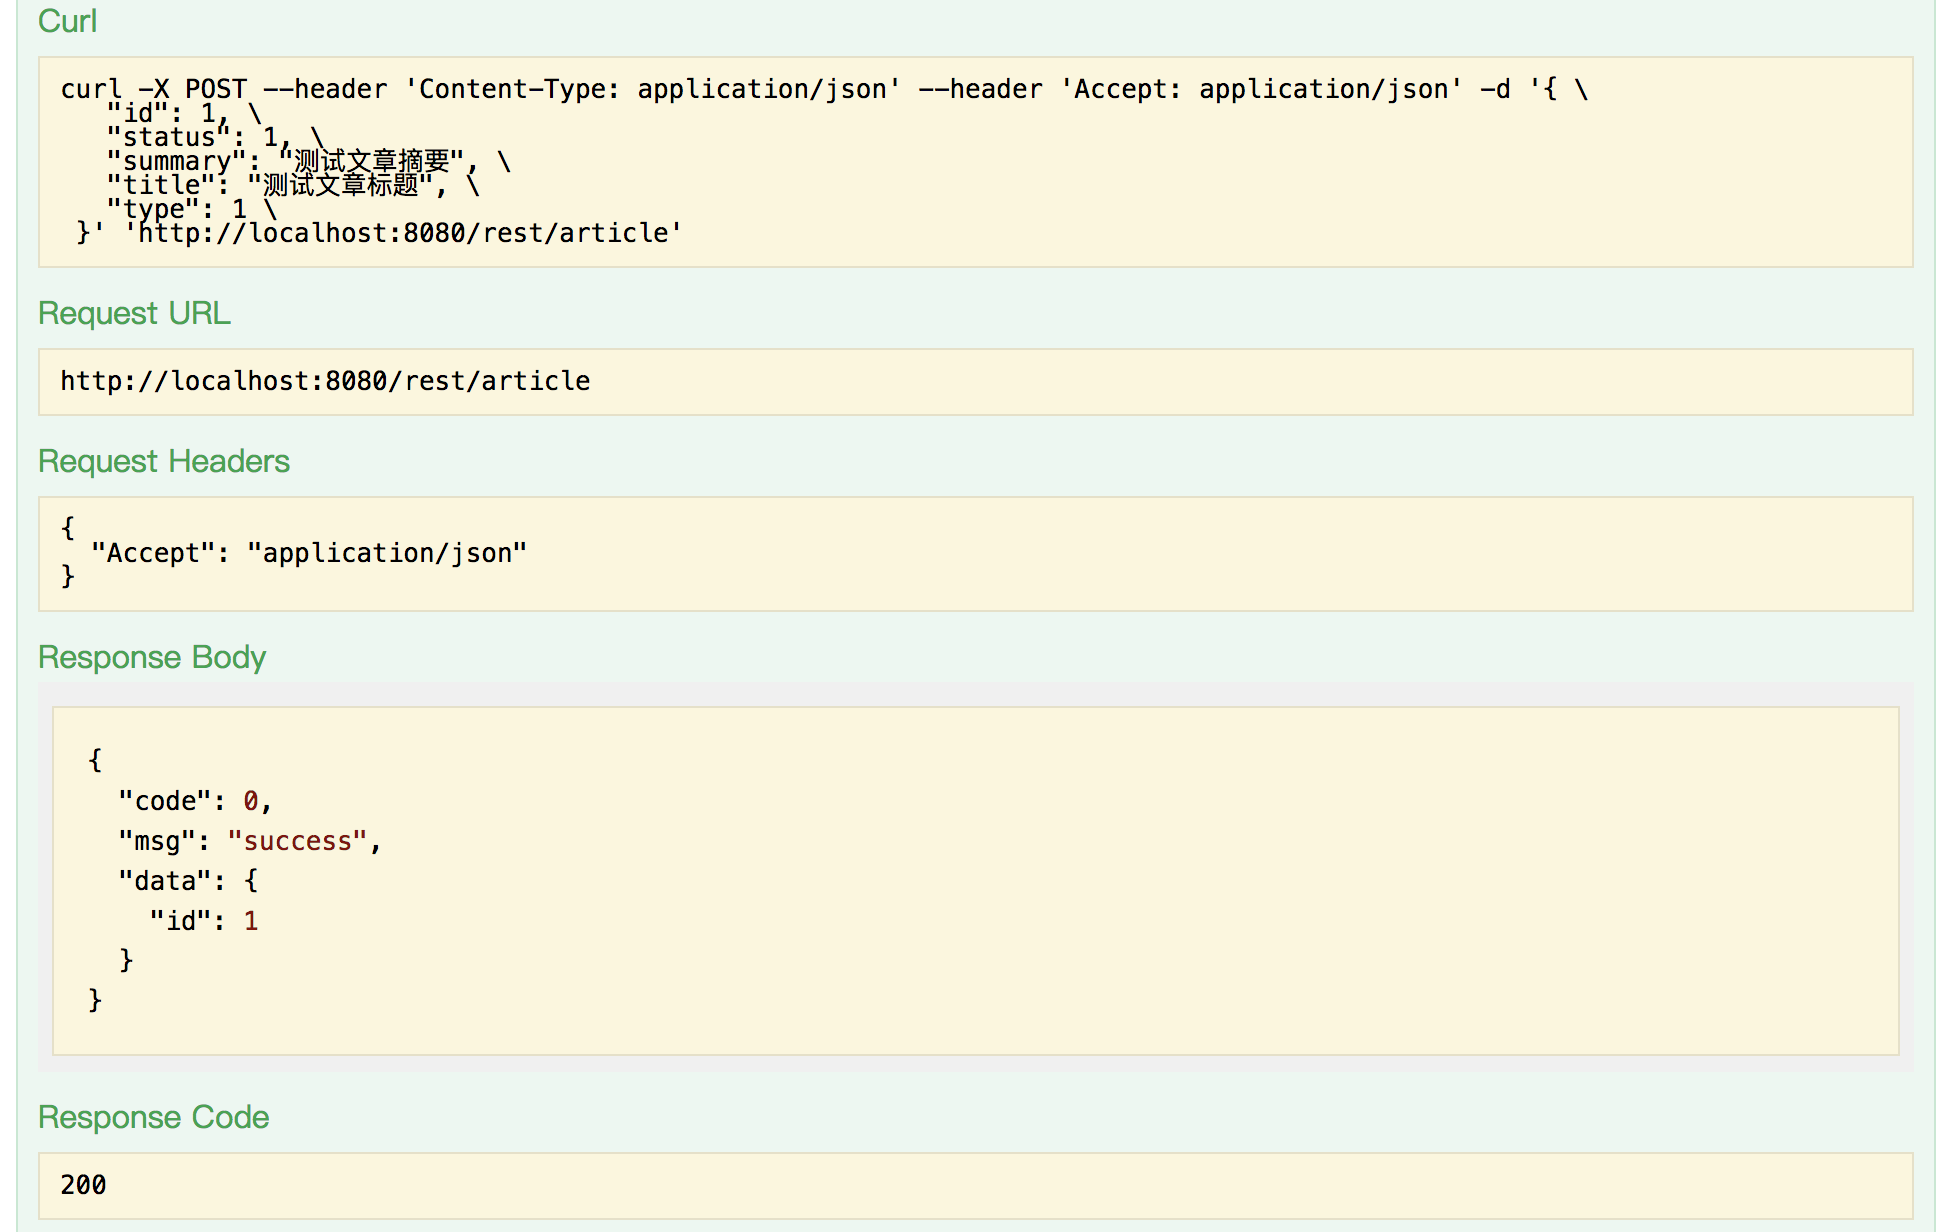
操作還是很方便的,相比Junit和postman,通過Swagger來測試會更加便捷,當然,Swagger的測試並不能代替單元測試,不過,在聯調的時候還是有非常大的作用的。
四、總結
總體上來說,Swagger的配置還是比較簡單的,並且Swagger能夠自動幫我們生成文檔確實為我們節省了不少工作,對後續的維護也提供了很大的幫助。除此之外,Swagger還能根據配置自動為我們生成測試的數據,並且提供對應的HTTP方法,這對我們的自測和聯調工作也有不少的幫助,所以我還是推薦大家在日常的開發中去使用Swagger,應該可以幫助大家在一定程度上提高工作效率的。最後,留一個問題給大家思考吧,就是該文檔是可以直接通過頁面來訪問的,那我們總不能把介面直接暴露在生產環境吧,尤其是要對外提供服務的系統,那我們怎麼才能在生產環節中關閉這個功能呢?方法有很多,大家可以自己嘗試一下。

