一、axios Vue更新到2.0之後宣告不再對vue-resource更新,推薦使用axios,axios是一個用於客戶端與伺服器通信的組件,axios 是一個基於Promise 用於瀏覽器和 nodejs 的 HTTP 客戶端javaScript工具。通俗來說可以實現客戶端請求伺服器端提供的服務 ...
一、axios
Vue更新到2.0之後宣告不再對vue-resource更新,推薦使用axios,axios是一個用於客戶端與伺服器通信的組件,axios 是一個基於Promise 用於瀏覽器和 nodejs 的 HTTP 客戶端javaScript工具。通俗來說可以實現客戶端請求伺服器端提供的服務獲得數據。
源碼與幫助:https://github.com/axios/axios
伺服器端跨域支持請查看:http://www.cnblogs.com/best/p/6196202.html#_label2
1.1、特點
- 從瀏覽器中創建 XMLHttpRequest
- 從 node.js 發出 http 請求
- 支持 Promise API
- 攔截請求和響應
- 轉換請求和響應數據
- 取消請求
- 自動轉換JSON數據
- 客戶端支持防止 CSRF/XSRF
1.2、瀏覽器相容性

1.3、依賴辦法
$ npm install axios
$ cnpm install axios //taobao
$ bower install axios
或者使用cdn:
<script src="https://unpkg.com/axios/dist/axios.min.js"></script>
瀏覽器可以引入js文件
1.4、快速入門
1.4.0、伺服器端
控制器:
package com.zhangguo.springmvc08.controller;

import com.zhangguo.springmvc08.entity.User;
import com.zhangguo.springmvc08.service.UserService;
import org.springframework.beans.factory.annotation.Autowired;
import org.springframework.web.bind.annotation.*;

import javax.servlet.http.HttpServletRequest;
import javax.servlet.http.HttpServletResponse;
import java.util.List;

@RestController
@RequestMapping(path = "/emps")
public class EmpController extends BaseController {

    @Autowired
    UserService userService;

    @RequestMapping(path = "")
    public AjaxState getAllEmps(HttpServletRequest request, HttpServletResponse response) {
        List<User> users=userService.queryAllUsers();
        boolean result=users!=null;
        return new AjaxState(result?"success":"error",users,result?"獲得數據成功!":"獲得數據失敗!");
    }

    @RequestMapping(path = "/{id}", method = RequestMethod.GET)
    public AjaxState getEmpById(@PathVariable int id) {
        User user=userService.getUserById(id);
        boolean result=user!=null;
        return new AjaxState(result?"success":"error",user,result?"獲得數據成功!":"獲得數據失敗!");
    }

    @RequestMapping(path = "/getEmpById", method = RequestMethod.GET)
    public AjaxState getEmpById(HttpServletRequest request) {
        int id=Integer.parseInt(request.getParameter("id"));
        User user=userService.getUserById(id);
        boolean result=user!=null;
        return new AjaxState(result?"success":"error",user,result?"獲得數據成功!":"獲得數據失敗!");
    }

    @RequestMapping(path = "", method = RequestMethod.POST)
    public AjaxState addEmp(@RequestBody User user) {
        boolean result=userService.addUser(user);
        return new AjaxState(result?"success":"error",user,result?"添加成功!":"添加失敗");
    }

    @RequestMapping(path = "", method = RequestMethod.PUT)
    public AjaxState updateEmp(@RequestBody User user) {
        boolean result=userService.editUser(user);
        return new AjaxState(result?"success":"error",user,result?"修改成功!":"修改失敗");
    }

    @RequestMapping(path = "/{id}", method = RequestMethod.DELETE)
    public AjaxState deleteEmpById(@PathVariable int id) {
        Boolean result=userService.deleteUser(id);
        return new AjaxState(result?"success":"error",id,result?"刪除成功!":"刪除失敗");
    }

}

class  AjaxState{
    public String state;
    public Object data;
    public String message;

    public AjaxState(String state, Object data, String message) {
        this.state = state;
        this.data = data;
        this.message = message;
    }

    public AjaxState(){}
}
跨域設置(任選一種):
方法1:Servlet,MVC都可以,Web.xml
    <filter>
        <filter-name>CORS</filter-name>
        <filter-class>com.thetransactioncompany.cors.CORSFilter</filter-class>
        <init-param>
            <param-name>cors.allowOrigin</param-name>
            <param-value>http://127.0.0.1:8020</param-value>
        </init-param>
        <init-param>
            <param-name>cors.supportedMethods</param-name>
            <param-value>POST,GET,OPTIONS,DELETE,PUT</param-value>
        </init-param>
        <init-param>
            <param-name>cors.supportedHeaders</param-name>
            <param-value>Content-Type,Accept,Origin,XRequestedWith,ContentType,LastModified</param-value>
        </init-param>
        <init-param>
            <param-name>cors.exposedHeaders</param-name>
            <param-value>SetCookie</param-value>
        </init-param>
        <init-param>
            <param-name>cors.supportsCredentials</param-name>
            <param-value>true</param-value>
        </init-param>
    </filter>

    <filter-mapping>
        <filter-name>CORS</filter-name>
        <url-pattern>/*</url-pattern>
    </filter-mapping>
方法2:Spring MVC,修改Spring 配置文件,低Spring版本不支持
    <mvc:cors>
        <mvc:mapping path="/**"
                     allowed-origins="http://127.0.0.1:8020"
                     allowed-methods="POST,GET, OPTIONS,DELETE,PUT"
                     allowed-headers="Content-Type,ContentType,Access-Control-Allow-Headers, Authorization, X-Requested-With"
                     allow-credentials="true"/>
    </mvc:cors>
1.4.1、發送Get請求
//向具有指定ID的用戶發出請求
axios.get('/user?ID=123')
.then(function (response) {
console.log(response);
})
.catch(function (error) {
  console.log(error);
});

//也可以通過 params 對象傳遞參數
axios.get('/user', {
params: {
  ID: 12345
}
})
.then(function (response) {
  console.log(response);
})
.catch(function (error) {
  console.log(error);
});
示例:
<!DOCTYPE html>
<html>
    <head>
        <meta charset="UTF-8">
        <title>axios</title>
    </head>
    <body>
        <div id="vm">
            <button type="button" @click="get">Get請求</button>
            <button type="button" @click="getParam">Get請求帶參數</button>
            <h3>{{msg}}</h3>
        </div>
        <script src="../js/vue.js" type="text/javascript" charset="utf-8"></script>
        <script src="../js/axios/axios.min.js" type="text/javascript" charset="utf-8"></script>
        <script type="text/javascript">
            var vm = new Vue({
                el: "#vm",
                data: {
                    msg: ""
                },
                methods: {
                    get: function() {
                        var that = this;
                        axios.get("http://localhost:8080/mvc08/emps").then(function(response) {
                            console.log(response);
                            //this.msg=JSON.stringify(response.data);  //錯誤this指向window
                            vm.msg = JSON.stringify(response.data);
                            that.msg = JSON.stringify(response.data);
                        }).catch(function(error) {
                            console.log(error);
                        })
                    },
                    getParam: function() {
                        axios.get("http://localhost:8080/mvc08/emps/getEmpById", {
                            params: {
                                id: 1
                            }
                        }).then(function(response) {
                            vm.msg = JSON.stringify(response.data);
                        }).catch(function(error) {
                            console.log(error);
                        })
                    }
                }
            });
        </script>
    </body>
</html>
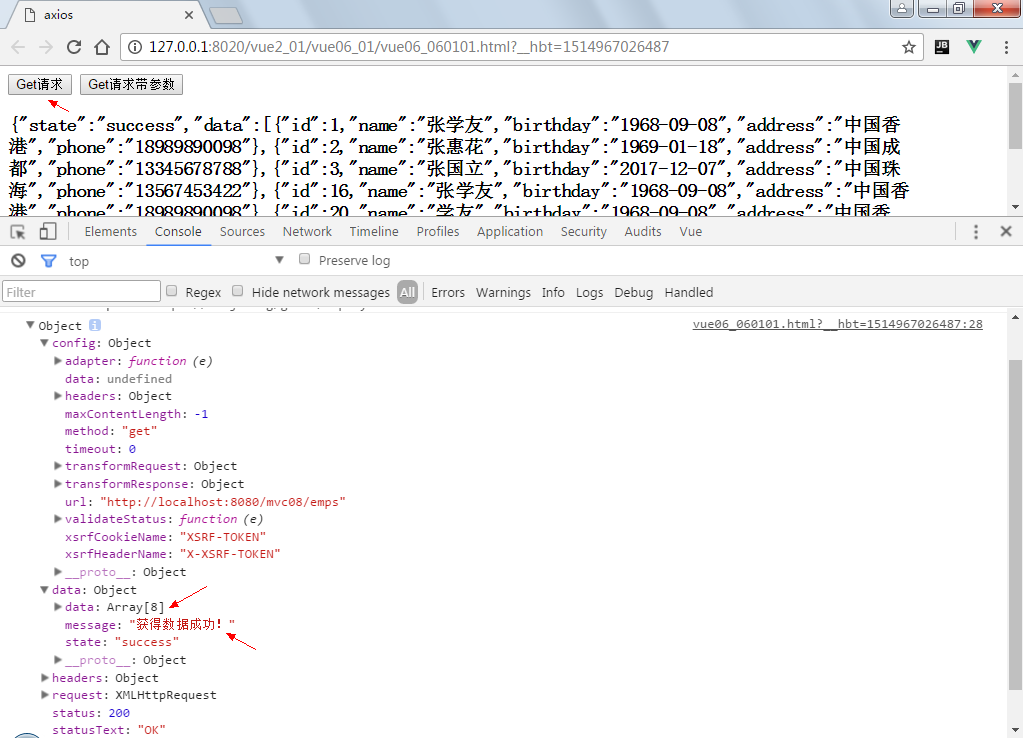
結果:
get請求

帶參數:

預設的content-type為:application/json;charset=UTF-8
1.4.2、發送Post請求
axios.post('/user', {
    firstName: 'Fred',
    lastName: 'Flintstone'
  })
  .then(function (response) {
    console.log(response);
  })
  .catch(function (error) {
    console.log(error);
  });
示例(添加一個用戶):

<!DOCTYPE html>
<html>

    <head>
        <meta charset="UTF-8">
        <title>axios</title>
    </head>

    <body>
        <div id="vm">
            <button type="button" @click="get">Get請求</button>
            <button type="button" @click="getParam">Get請求帶參數</button>
            <button type="button" @click="post">Post請求帶參數</button>
            <h3>{{msg}}</h3>
        </div>
        <script src="../js/vue.js" type="text/javascript" charset="utf-8"></script>
        <script src="../js/axios/axios.min.js" type="text/javascript" charset="utf-8"></script>
        <script type="text/javascript">
            var vm = new Vue({
                el: "#vm",
                data: {
                    msg: ""
                },
                methods: {
                    get: function() { //get請求
                        var that = this;
                        axios.get("http://localhost:8080/mvc08/emps").then(function(response) {
                            console.log(response);
                            //this.msg=JSON.stringify(response.data);  //錯誤this指向window
                            vm.msg = JSON.stringify(response.data);
                            that.msg = JSON.stringify(response.data);
                        }).catch(function(error) {
                            console.log(error);
                        })
                    },
                    getParam: function() { //帶參數的get
                        axios.get("http://localhost:8080/mvc08/emps/getEmpById", {
                            params: {
                                id: 1
                            }
                        }).then(function(response) {
                            vm.msg = JSON.stringify(response.data);
                            console.log(response);
                        }).catch(function(error) {
                            console.log(error);
                        })
                    },
                    post: function() { //post
                        var user = {
                            "id": 1,
                            "name": "張一三",
                            "birthday": "1998-09-08",
                            "address": "中國北京",
                            "phone": "18989891122"
                        };

                        axios
                        .post("http://localhost:8080/mvc08/emps", user)
                        .then(function(response) {
                            vm.msg=response.data.data;
                            console.log(response);
                        })
                        .catch(function(error){
                            console.log(error);
                        });
                    }
                }
            });
        </script>
    </body>

</html>
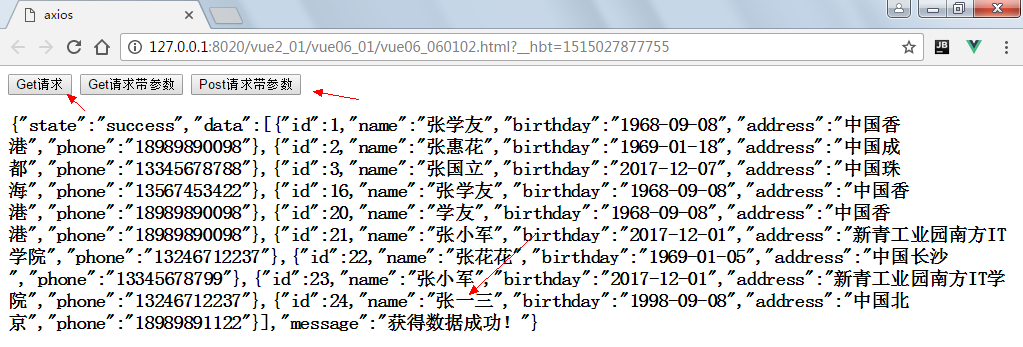
View Code
結果:

1.4.3、發送多個併發請求
function getUserAccount() {
return axios.get('/user/12345');
}

function getUserPermissions() {
return axios.get('/user/12345/permissions');
}

axios.all([getUserAccount(), getUserPermissions()])
.then(axios.spread(function (acct, perms) {
//兩個請求現已完成
}));
示例(同時獲得編號為1與編號為2的學生,通過兩個請求完成):
<!DOCTYPE html>
<html>
    <head>
        <meta charset="UTF-8">
        <title>axios</title>
    </head>
    <body>
        <div id="vm">
            <button type="button" @click="all">all請求(併發請求)</button>
            <h3>{{msg}}</h3>
        </div>
        <script src="../js/vue.js" type="text/javascript" charset="utf-8"></script>
        <script src="../js/axios/axios.min.js" type="text/javascript" charset="utf-8"></script>
        <script type="text/javascript">
            var vm = new Vue({
                el: "#vm",
                data: {
                    msg: ""
                },
                methods: {
                    all:function(){
                        //獲得用戶對象1
                        var getUser1=function(){
                            return axios.get("http://localhost:8080/mvc08/emps/1");
                        };
                        //獲得用戶對象2
                        var getUser2=function(){
                            return axios.get("http://localhost:8080/mvc08/emps/2");
                        };
                        //併發請求處理結果
                        axios.all([getUser1(),getUser2()])
                        .then(axios.spread(function(response1,response2){
                            var result="";
                            result+=JSON.stringify(response1.data.data);
                            result+=JSON.stringify(response2.data.data);
                            vm.msg=result;
                        }))
                        .catch(function(error){
                            console.log(error);
                        });
                    }
                }
            });
        </script>
    </body>
</html>
結果:

1.4.4、發送Put請求
示例(修改編號為1的用戶信息):
<!DOCTYPE html>
<html>

    <head>
        <meta charset="UTF-8">
        <title>axios</title>
    </head>

    <body>
        <div id="vm">
            <button type="button" @click="all">all請求(併發請求)</button>
            <button type="button" @click="put">put請求(修改數據)</button>
            <h3>{{msg}}</h3>
        </div>
        <script src="../js/vue.js" type="text/javascript" charset="utf-8"></script>
        <script src="../js/axios/axios.min.js" type="text/javascript" charset="utf-8"></script>
        <script type="text/javascript">
            var vm = new Vue({
                el: "#vm",
                data: {
                    msg: ""
                },
                methods: {
                    all: function() {
                        //獲得用戶對象1
                        var getUser1 = function() {
                            return axios({
                                url:"http://localhost:8080/mvc08/emps/1",
                                method:"get"
                            });
                        };
                        //獲得用戶對象2
                        var getUser2 = function() {
                            return axios.get("http://localhost:8080/mvc08/emps/2");
                        };
                        //併發請求處理結果
                        axios.all([getUser1(), getUser2()])
                            .then(axios.spread(function(response1, response2) {
                                var result = "";
                                result += JSON.stringify(response1.data.data);
                                result += JSON.stringify(response2.data.data);
                                vm.msg = result;
                            }))
                            .catch(function(error) {
                                console.log(error);
                            });
                    },
                    put: function() {
                        var user = {
                            "id": 1,
                            "name": "張學霸",
                            "birthday": "1988-09-08",
                            "address": "中國珠海",
                            "phone": "13223456786"
                        };
                        axios.put("http://localhost:8080/mvc08/emps",user)
                        .then(r=>vm.msg=r.data.data)
                        .catch(e=>console.log(e));
                    }
                }
            });


