
Spring Data JPA是依附於Spring Boot的,學習Spring Data JPA之前得先把Spring Boot的環境搭建起來。 先附上一個Spring Data JPA的官方鏈接:https://docs.spring.io/spring-data/jpa/docs/curren ...
Spring Data JPA是依附於Spring Boot的,學習Spring Data JPA之前得先把Spring Boot的環境搭建起來。
先附上一個Spring Data JPA的官方鏈接:https://docs.spring.io/spring-data/jpa/docs/current/reference/html/
以下學習自:https://segmentfault.com/a/1190000006717969 Spring Data JPA 多數據源+異構資料庫實踐
1.建立一個maven項目,在pom.xml中添加依賴:
<properties>
    <project.build.sourceEncoding>UTF-8</project.build.sourceEncoding>
    <maven.compiler.source>1.8</maven.compiler.source>
    <maven.compiler.target>1.8</maven.compiler.target>
</properties>


<parent>
    <groupId>org.springframework.boot</groupId>
    <artifactId>spring-boot-starter-parent</artifactId>
    <version>1.5.8.RELEASE</version>
</parent>

<dependencies>
    <dependency>
        <groupId>junit</groupId>
        <artifactId>junit</artifactId>
        <version>3.8.1</version>
        <scope>test</scope>
    </dependency>

    <dependency>
        <groupId>mysql</groupId>
        <artifactId>mysql-connector-java</artifactId>
    </dependency>

    <dependency>
        <groupId>org.springframework.boot</groupId>
        <artifactId>spring-boot-devtools</artifactId>
    </dependency>

    <dependency>
        <groupId>org.springframework.boot</groupId>
        <artifactId>spring-boot-starter-web</artifactId>
    </dependency>

    <dependency>
        <groupId>org.springframework.boot</groupId>
        <artifactId>spring-boot-starter-data-jpa</artifactId>
    </dependency>

    <dependency>
        <groupId>org.springframework.boot</groupId>
        <artifactId>spring-boot-starter-test</artifactId>
    </dependency>
</dependencies>

<build>
    <finalName>jpa</finalName>
    <plugins>
        <plugin>
            <groupId>org.springframework.boot</groupId>
            <artifactId>spring-boot-maven-plugin</artifactId>
        </plugin>
    </plugins>
</build>
說明:
(1)spring-boot-devtools 是用於當修改了Java文件時,伺服器重新啟動編譯。
(2)spring-boot-starter-test是用於進行單元測試。
(3)spring-boot-starter-data-jpa是用於支持JPA。
保存pom.xml文件之後會自動下載jar包。如果在下載過程中因為某些原因中斷,可能會導致jar下載不完全,到jar包的存放位置將相應的jar刪除,再maven-->update project下載。
2.連接資料庫。在src/main/resources下建立application.yml文件,內容如下:
spring:
  datasource:
    terminal:
      driver-class-name: com.mysql.jdbc.Driver
      url: jdbc:mysql://127.0.0.1:3306/terminal?useUnicode=true&characterEncoding=utf-8&useSSL=false
      username: root
      password: xxxx
  jpa:
    show-sql: true
    database-platform: org.hibernate.dialect.MySQL5Dialect
    hibernate:
      ddl-auto: update
註意:在":"之後需要加一個空格。上面的terminal是連接的名稱。在url後面內容加了一個useSSL=false,如果不加,會出現下麵這個報錯:
Establishing SSL connection without server's identity verification is not recommended. According to MySQL 5.5.45+, 5.6.26+ and 5.7.6+ requirements SSL connection must be established by default if explicit option isn't set. For compliance with existing applications not using SSL the verifyServerCertificate property is set to 'false'. You need either to explicitly disable SSL by setting useSSL=false, or set useSSL=true and provide truststore for server certificate verification.
這裡選擇的JPA實現是Hibernate。
3.指定使用的資料庫連接和事務管理
@Configuration
@EnableTransactionManagement
@EnableJpaRepositories(entityManagerFactoryRef="terminalEntityManagerFactory",
        transactionManagerRef="terminalTransactionManager",basePackages= { "gdut.ff.terminal"})
public class DataSourceConfiguration {

    @Autowired
    private JpaProperties jpaProperties;

    @Bean
    @Primary
    @ConfigurationProperties(prefix = "spring.datasource.terminal")
    public DataSource terminalDataSource(){
        return DataSourceBuilder.create().build();
    }

    @Bean(name = "terminalEntityManagerFactory")
    @Primary
    public LocalContainerEntityManagerFactoryBean terminalEntityManagerFactory(EntityManagerFactoryBuilder builder){
        LocalContainerEntityManagerFactoryBean em = builder.dataSource(terminalDataSource())
                                                           .packages("gdut.ff.terminal")
                                                           .persistenceUnit("terminal")
                                                           .properties(getVendorProperties(terminalDataSource()))
                                                           .build();
        return em;
    }

    @Primary
    @Bean(name = "entityManagerTerminal")
    public EntityManager entityManagerDefault(EntityManagerFactoryBuilder builder) {
        return terminalEntityManagerFactory(builder).getObject().createEntityManager();
    }

    private Map<String, String> getVendorProperties(DataSource dataSource) {
        return jpaProperties.getHibernateProperties(dataSource);
    }

    @Bean(name = "terminalTransactionManager")
    @Primary
    PlatformTransactionManager terminalTransactionManager(EntityManagerFactoryBuilder builder){
        return new JpaTransactionManager(terminalEntityManagerFactory(builder).getObject());
    }

}
註意:
(1)entityManagerFactoryRef="terminalEntityManagerFactory"要與LocalContainerEntityManagerFactoryBean註冊的@Bean(name = "terminalEntityManagerFactory")名稱相同。
(2)transactionManagerRef="terminalTransactionManager"要與new JpaTransactionManager()註冊的@Bean(name = "terminalTransactionManager")名稱一致。
(3)basePackages= { "gdut.ff.terminal"}表示這個數據源作用在哪些包。也可以寫做basePackages={"gdut.ff.terminal.**"},但是不能寫做basePackages={"gdut.ff.terminal.*"}
(4)@Primary表示預設。
(5)@ConfigurationProperties(prefix = "spring.datasource.terminal")表示使用的數據源的首碼是"spring.datasource.terminal"。
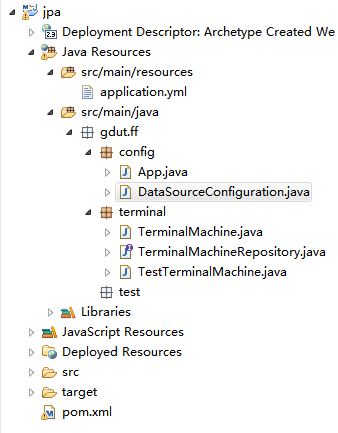
(6)貼一下我的包圖:
4.建立一個實體Bean和對應的Dao介面
import java.util.List;

import org.springframework.data.repository.CrudRepository;

public interface TerminalMachineRepository extends CrudRepository<TerminalMachine,String>{

    List<TerminalMachine> findByName(String name);
}
CrudRepository<>里的是Bea實體和對應的主鍵類型。這裡還可以繼承其他的Repository介面,如JpaRepository和PagingAndSortingRepository等等。
5.設置啟動類App.class
package gdut.ff.config;

import org.springframework.boot.SpringApplication;
import org.springframework.boot.autoconfigure.SpringBootApplication;
import org.springframework.context.annotation.ComponentScan;

@SpringBootApplication
@ComponentScan({"gdut.ff.terminal.**","gdut.ff.config.**"})
public class App {

    public static void main(String[] args) throws Exception {

        SpringApplication.run(App.class, args);

    }
}
啟動類App.class啟動,掃描包gdut.ff.terminal和gdut.ff.config下的類
6.做一個單元測試
import java.util.Iterator;

import org.junit.Test;
import org.junit.runner.RunWith;
import org.springframework.beans.factory.annotation.Autowired;
import org.springframework.boot.test.context.SpringBootTest;
import org.springframework.test.context.junit4.SpringRunner;

import gdut.ff.config.App;

@RunWith(SpringRunner.class)
@SpringBootTest(classes=App.class)
public class TestTerminalMachine {

    @Autowired
    private TerminalMachineRepository terminalMachineRepository;

    @Test
    public void testFindAll(){
        Iterable<TerminalMachine> list = terminalMachineRepository.findAll();
        Iterator<TerminalMachine> iterator = list.iterator();
        while(iterator.hasNext()){
            TerminalMachine machine = iterator.next();
            System.out.println(machine.getName());
        }
    }

}

