面完成了ssm的整合, 整個過程可以說很繁雜, 各種配置, 很容易讓人暈掉. 這裡使用spring boot 的方式來實現 ssm(1) 中的功能. 一. 建項目 1. 使用 idea 來創建 spring boot 項目, 是比較簡單的, 如果使用eclipse的話, 要裝插件, 比較麻煩, 那這 ...
面完成了ssm的整合, 整個過程可以說很繁雜, 各種配置, 很容易讓人暈掉.
這裡使用spring boot 的方式來實現 ssm(1) 中的功能.
一. 建項目
1. 使用 idea 來創建 spring boot 項目, 是比較簡單的, 如果使用eclipse的話, 要裝插件, 比較麻煩, 那這裡, 就直接使用idea來做吧
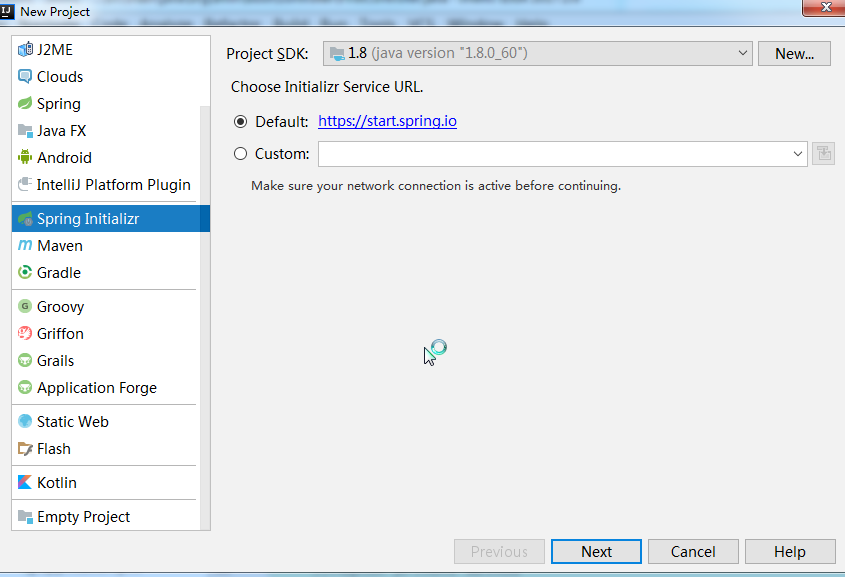
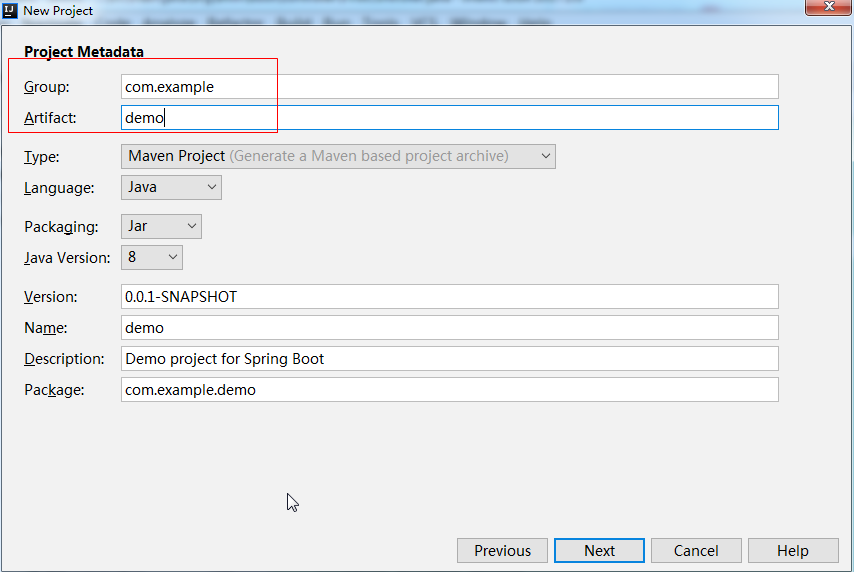
2. 這裡只需要修改下麵圈出來的部分. Java Version最好使用>=8.
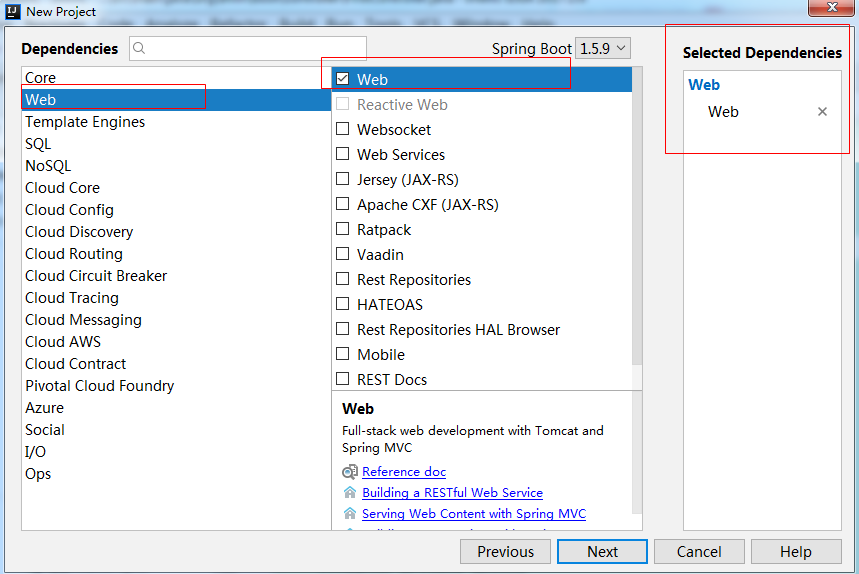
3. 這裡直接選擇web就可以了, 缺什麼, 可以在後面加就好
4. 選擇路徑
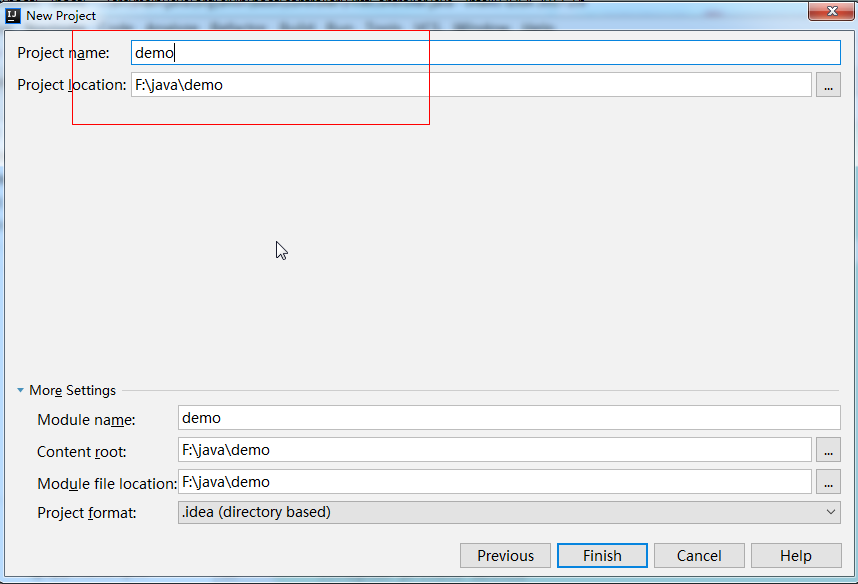
經過這麼幾步操作, 就完成了基本的新建工作.
在新建的過程中, 可能會非常的慢, 因為第一次建, 要下載很多jar包. 而且可能下載還比較慢.
這裡可以在maven 的 setting.xml文件中, 加入一個阿裡雲的鏡像, 對於下載更新jar包, 是有幫助的.
<mirrors>
    <mirror>
            <id>nexus-aliyun</id>
            <mirrorOf>*</mirrorOf>
            <name>Nexus aliyun</name>
            <url>http://maven.aliyun.com/nexus/content/groups/public</url>
    </mirror>
  </mirrors>
二. 目錄結構
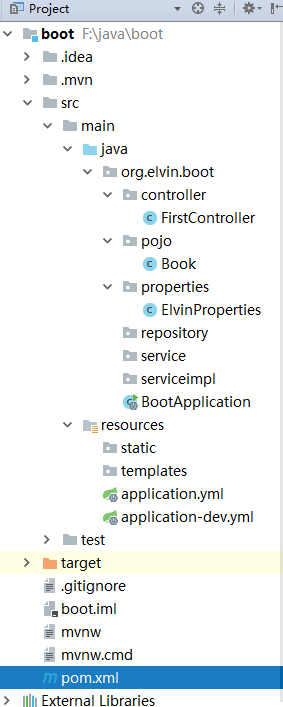
拿到剛建的項目後, 我在裡面新增了幾個package. 在這裡, 除了controller要建之外, 別的都可以先空著.
三. 配置文件 -- 這一步直接跳過, 也是能正常運行的. 不急的話, 就先看看這裡把
預設的配置文件是 application.properties, 這裡我並沒有使用這個格式的文件, 而是使用了 yml 格式的文件, 配置起來, 更加的簡潔, 且效果是一樣的.
先來看一下application.yml文件
#標明引入那個配置文件
spring:
  profiles:
    active: dev

#自定義屬性
elvin:
  name: elvinle
  age: 28
  birthday: 1990-12-02

#自定義屬性
content: "elvin's name is ${elvin.name} and age is ${elvin.age} and birthday is ${elvin.birthday}"
開發的過程中, 可能會部署到好幾個環境, 比如開發環境, 測試環境, 那麼這裡的spring.profiles.active就起作用了, 可以新建多個文件, 這裡配置, 後面使用哪個文件的配置.
再來看看application-dev.yml文件
#配置項目埠和根路徑
server:
  port: 8080
  context-path: /boot

spring:
  #配置項目的資料庫鏈接信息
  datasource:
    driver-class-name: com.mysql.jdbc.Driver
    url: jdbc:mysql:///test?useUnicode=true&characterEncoding=utf-8
    username: root
    password: root
  jpa:
    hibernate:
      ddl-auto: update
    show-sql: true
server.port 和 server.context-path 分別表示埠和根路徑. 它們都是可以不配置的. 後面的配置, 暫時不用看
在這兩個文件中, 可以看到, 我定義了自己的屬性. 那麼他們怎麼接收呢
在目錄中, 有個properties的文件夾, 我在裡面建了個類來接收
package org.elvin.boot.properties;

import org.springframework.boot.context.properties.ConfigurationProperties;
import org.springframework.stereotype.Component;

/**
 * author: Elvin
 * Date: 2017/12/4 15:10
 * Description:
 */
@Component
@ConfigurationProperties(prefix = "elvin")
public class ElvinProperties {

    private String name;

    private Integer age;

    private String birthday;

    public String getName() {
        return name;
    }

    @Override
    public String toString() {
        return "Elvin{" +
                "name='" + name + '\'' +
                ", age=" + age +
                ", birthday='" + birthday + '\'' +
                '}';
    }

    public void setName(String name) {
        this.name = name;
    }

    public Integer getAge() {
        return age;
    }

    public void setAge(Integer age) {
        this.age = age;
    }

    public String getBirthday() {
        return birthday;
    }

    public void setBirthday(String birthday) {
        this.birthday = birthday;
    }
}
使用的地方在controller中.
四. 實體類
package org.elvin.boot.pojo;

/**
 * author: Elvin
 * Date: 2017/12/4 15:37
 * Description:
 */

public class Book {

    private Integer id;

    private String name;

    private String publishTime;

    private Integer price;

    @Override
    public String toString() {
        return "Book{" +
                "id=" + id +
                ", name='" + name + '\'' +
                ", publishTime='" + publishTime + '\'' +
                ", price=" + price +
                '}';
    }

    public Integer getId() {
        return id;
    }

    public void setId(Integer id) {
        this.id = id;
    }

    public String getName() {
        return name;
    }

    public void setName(String name) {
        this.name = name;
    }

    public String getPublishTime() {
        return publishTime;
    }

    public void setPublishTime(String publishTime) {
        this.publishTime = publishTime;
    }

    public Integer getPrice() {
        return price;
    }

    public void setPrice(Integer price) {
        this.price = price;
    }
}
這裡實體類就隨便建一下了, 這裡還不是他的完全體, 在下一篇, 會進行部分修改
五. controller
package org.elvin.boot.controller;

import org.elvin.boot.pojo.Book;
import org.elvin.boot.properties.ElvinProperties;
import org.joda.time.DateTime;
import org.springframework.beans.factory.annotation.Autowired;
import org.springframework.beans.factory.annotation.Value;
import org.springframework.web.bind.annotation.GetMapping;
import org.springframework.web.bind.annotation.PostMapping;
import org.springframework.web.bind.annotation.RequestMapping;
import org.springframework.web.bind.annotation.RestController;

import java.util.*;

/**
 * author: Elvin
 * Date: 2017/12/4 15:08
 * Description:
 */
@RestController
@RequestMapping("first")
public class FirstController {

    @Autowired
    private ElvinProperties elvinProperties;

    //接收配置文件中,自定義的content屬性
    @Value("${content}")
    private String content;

    @GetMapping("properties")
    public Map<String, Object> properties(){
        Map<String, Object> map = new HashMap<>();
        map.put("content", content);
        map.put("elvinProperties", elvinProperties);
        return map;
    }

    @PostMapping("all")
    public List<Book> all() {
        return getBookList();
    }

    //region private method
    private List<Book> getBookList() {
        List<Book> bookList = new ArrayList<>();
        String[] nameStrs = {"吳", "一", "雪", "動", "額", "阿", "前", "里", "排"};
        Random r = new Random();
        String timeStr = new DateTime().toString("yyyy-MM-dd HH:mm:ss");
        for (int i = 0; i < 10; i++) {
            Book b = new Book();
            b.setId(i + 1);
            b.setName(nameStrs[r.nextInt(5)] + nameStrs[r.nextInt(9)]);
            b.setPublishTime(timeStr);
            b.setPrice(r.nextInt(100));
            bookList.add(b);
        }
        return bookList;
    }
    //endregion
}
如果是做前後端分離的話, 那麼到這裡, 就告一段落了. 先來看看訪問結果吧.
六. 結果(前後端分離)
1. 使用postman發送get請求
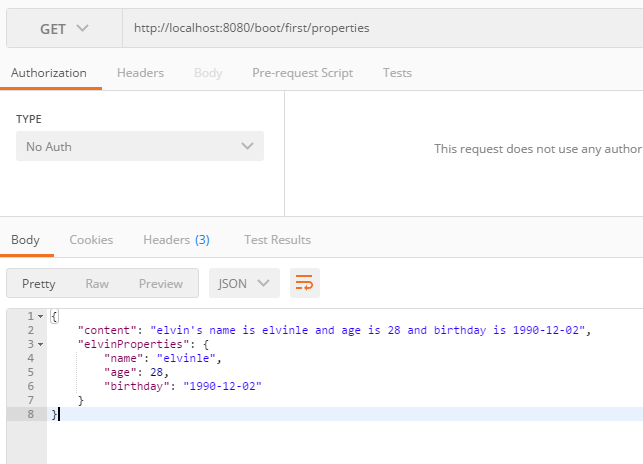
這裡可以看到, 自定義配置, 都能夠正常獲取到
2. 使用postman來發送post請求.
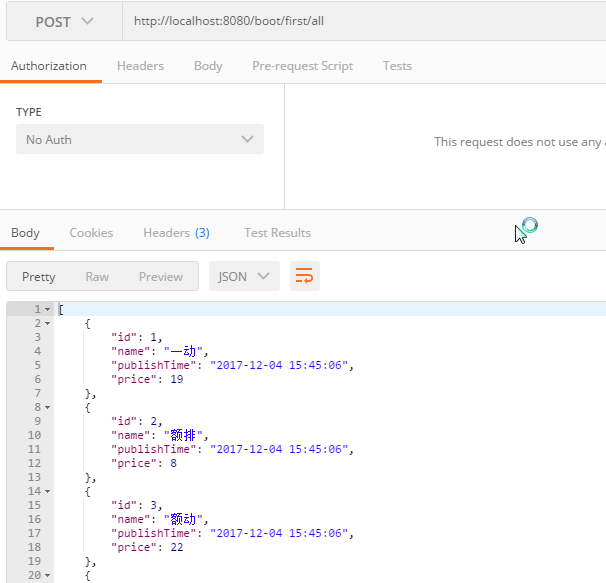
如果還是希望使用返回頁面數據的方式, 則還要繼續一步配置.
個人還是推薦使用前後端分離的開發方式的. 怎麼說呢, 大家都知道, mvc中的v指的就是視圖, 在mvc中, 是需要讀取視圖, 然後解析視圖, 最後返回解析完的視圖數據的. 過程還是比較複雜和繁瑣的, 而且這部分的邏輯處理, 全都在伺服器端完成, 即使這裡使用了緩存, 對伺服器還是有性能損耗的. 如果把這部分損耗轉嫁到客戶端的瀏覽器中去, 可以節省不少的性能和空間.
七. view
1. 在pom.xml中, 加入一個配置.
<dependency>
    <groupId>org.springframework.boot</groupId>
    <artifactId>spring-boot-starter-thymeleaf</artifactId>
</dependency>
這裡引入的是 Spring boot 推薦使用的 thymeleaf 模板, 和freemarker, jsp 功能是差不多的
2. 開髮狀態下, 去yml文件中, 修改下緩存配置
spring:
  thymeleaf:
    cache: false
    #以下都是預設配置,可以不寫
    prefix: /templates/
    suffix: .html
    mode: HTML5
    encoding: UTF-8
    content-type: text/html
3. controller

在包裡面重新建一個控制器文件 TwoController.
package org.elvin.boot.controller;

import org.elvin.boot.pojo.Book;
import org.joda.time.DateTime;
import org.springframework.stereotype.Controller;
import org.springframework.ui.Model;
import org.springframework.web.bind.annotation.GetMapping;
import org.springframework.web.bind.annotation.RequestMapping;

/**
 * author: Elvin
 * Date: 2017/12/4 16:35
 * Description:
 */
@Controller
@RequestMapping("two")
public class TwoController {
    @GetMapping("hello")
    public String hello(Model model){
        model.addAttribute("hello", "TwoController.hello()");
        return "hello";
    }

    @GetMapping("index")
    public String index(){
        return "/two/index";
    }

    @GetMapping("detail")
    public String detail(Model model){
        Book book = new Book();
        book.setName("book");
        book.setId(1);
        book.setPrice(110);
        book.setPublishTime(new DateTime().toString("yyyy-MM-dd"));
        model.addAttribute("book", book);
        return "two/detail";
    }
}
4. view
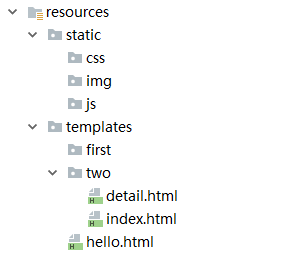
我這裡建了三個 html 文件, hello和index就不看了, 裡面沒有什麼內容, 主要看detail.html文件
<!DOCTYPE html>
<html xmlns:th="http://www.thymeleaf.org">
<head>
    <title>detail</title>
</head>
<body>
<h1 th:inline="text">two/detail.html</h1>
<p th:text="${book.id}"></p>
<p th:text="${book.name}"></p>
<p th:text="${book.price}"></p>
<p th:text="${book.publishTime}"></p>
</body>
</html>
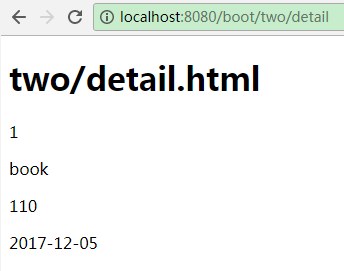
5. 結果
八. 配置文件
做完了這麼多, 來看看pom.xml文件吧
<?xml version="1.0" encoding="UTF-8"?>
<project xmlns="http://maven.apache.org/POM/4.0.0" xmlns:xsi="http://www.w3.org/2001/XMLSchema-instance"
    xsi:schemaLocation="http://maven.apache.org/POM/4.0.0 http://maven.apache.org/xsd/maven-4.0.0.xsd">
    <modelVersion>4.0.0</modelVersion>

    <groupId>org.elvin</groupId>
    <artifactId>boot</artifactId>
    <version>0.0.1-SNAPSHOT</version>
    <packaging>jar</packaging>

    <name>boot</name>
    <description>Demo project for Spring Boot</description>

    <parent>
        <groupId>org.springframework.boot</groupId>
        <artifactId>spring-boot-starter-parent</artifactId>
        <version>1.5.9.RELEASE</version>
        <relativePath/> <!-- lookup parent from repository -->
    </parent>

    <properties>
        <project.build.sourceEncoding>UTF-8</project.build.sourceEncoding>
        <project.reporting.outputEncoding>UTF-8</project.reporting.outputEncoding>
        <java.version>1.8</java.version>
    </properties>

    <dependencies>
        <dependency>
            <groupId>org.springframework.boot</groupId>
            <artifactId>spring-boot-starter-web</artifactId>
        </dependency>

        <dependency>
            <groupId>joda-time</groupId>
            <artifactId>joda-time</artifactId>
            <version>2.6</version>
        </dependency>

        <dependency>
            <groupId>org.springframework.boot</groupId>
            <artifactId>spring-boot-starter-test</artifactId>
            <scope>test</scope>
        </dependency>

        <dependency>
            <groupId>org.springframework.boot</groupId>
            <artifactId>spring-boot-starter-thymeleaf</artifactId>
        </dependency>
    </dependencies>

    <build>
        <plugins>
            <plugin>
                <groupId>org.springframework.boot</groupId>
                <artifactId>spring-boot-maven-plugin</artifactId>
            </plugin>
        </plugins>
    </build>


</project>
本身就不多的pom文件裡面, 絕大部分都是spring boot 自己生成的, 只有 joda-time 和 thymeleaf 是我手動添加的.
從這裡的pom文件上看, 少了絕大部分的jar包引用, 十分的方便.
而項目中的yml配置, 如果只是使用最基本的功能, 可以一個都不配置, 照樣跑的好好的.


