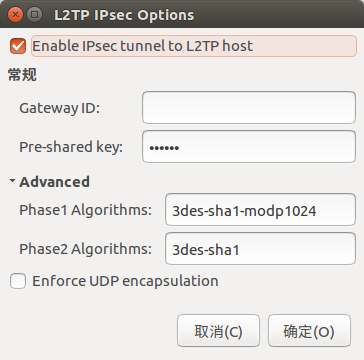
基本思路就是安裝這個工具:network-manager-l2tp 安裝方法:Ctrl+Alt+T打開Terminal: 安裝完成之後,重啟電腦進行配置,如下圖: 點擊:IPsec設置: 另外,也可以自己編譯:可參考:Enabling L2TP over IPSec on Ubuntu 16.04。 ...
基本思路就是安裝這個工具:network-manager-l2tp
Ubuntu has stopped shipping L2TP over IPSec support for Ubuntu since Precise. A workaround for this exists using network-manager-l2tp
安裝方法:Ctrl+Alt+T打開Terminal:
sudo add-apt-repository ppa:nm-l2tp/network-manager-l2tp
sudo apt-get update
sudo apt-get install network-manager-l2tp
安裝完成之後,重啟電腦進行配置,如下圖:

點擊:IPsec設置:

另外,也可以自己編譯:可參考:Enabling L2TP over IPSec on Ubuntu 16.04。但是需要註意的是:貌似是Python2.7的環境才能編譯成功,當然編譯過程中可能出報錯,提示缺少某些工具,根據錯誤提示安裝相應的“工具”後,再重新編譯即可。
額外推薦一個Python的版本管理工具:Pyenv。 關於pyenv的一篇使用示例:可參考:Python 多版本共存之 pyenv
配置好後,VPN連接時提示:VPN連接已斷開,VPN服務已停止。tail -f /var/log/syslog 發現如下錯誤:
g_dbus_method_invocation_take_error: assertion 'error != NULL' failed
解決方法:
$ sudo systemctl stop strongswan
$ sudo ike-scan vpn.xxx.cn
其中 vpn.xxx.cn 是你的網關地址。查看其中的輸出結果 ,找到 Enc 、Hash、Group 三個欄位的值,填入上圖中顯示的:
-
Phase1 Algorithms : 3des-sha1-modp1024
-
Phase2 Algorithms : 3des-sha1
SA=(Enc=3DES Hash=SHA1 Auth=PSK Group=2:modp1024 LifeType=Seconds LifeDuration(4)=0x00007080)
然後,再次連接vpn,輸入動態密碼即可。
參考資料:
Enabling L2TP over IPSec on Ubuntu 16.04
VPN L2TP/IPSec client on Ubuntu 16.04 VPN service failed to start
原文:http://www.cnblogs.com/hapjin/p/7732014.html


