
1》Nginx概述: 很多人對apache非常熟悉,Nginx與Apache類似,屬於WEB容器,同時也是一款高性能的HTTP和反向代理軟體,它們之間最大的差別是Apache的處理速 度很慢,而且占用很多記憶體資源,而Nginx卻恰恰相反,在功能實現上,Apache的所有模塊都是支持動靜態編譯,而Ng ...
1》Nginx概述:
很多人對apache非常熟悉,Nginx與Apache類似,屬於WEB容器,同時也是一款高性能的HTTP和反向代理軟體,它們之間最大的差別是Apache的處理速 度很慢,而且占用很多記憶體資源,而Nginx卻恰恰相反,在功能實現上,Apache的所有模塊都是支持動靜態編譯,而Nginx模塊都是靜態編譯的,同時Apache對 Fcgi的支持不好,而Nginx對Fcgi支持非常好,在處理連接方式上,Nginx支持epoll,而Apache卻不支持,Nginx安裝包只有幾百K,而Apache絕對是個龐然大 物;
Nginx其優勢如下:
Ø 作為WEB伺服器, Nginx處理靜態文件、索引文件,自動索引的效率非常高;
Ø 作為代理伺服器,Nginx可以實現無緩存的反向代理加速,提高網站運行速度;
Ø 作為負載均衡伺服器、Nginx可以在內部直接支持Redis和PHP,可以支持HTTP代理伺服器對外進行服務,同時還支持簡單的容錯和利用演算法進行 負載;
Ø 在性能方面,Nginx是專門為性能優化開發的,採用Poll模型,最大支持5萬併發連接,而且占用很少一部分記憶體資源;
Ø 在穩定方面採取了分階資源分配技術,使CPU占用資源非常的低,官方表示Nginx保持1萬個沒有活動的鏈接,只占用2.5M的記憶體,DDOS攻擊對 Nginx來說基本上無效;
Ø 在高可用性方面,Nginx支持熱部署,啟動速度特別迅速,因此可以不間斷服務情況下,對軟體版本或者配置升級,即使運行數月也無需啟動,幾 乎可以做到7*24小時不間斷運行;
2》Nginx的模塊與工作原理
Nginx由內核與模塊組成,內核設計非常小巧和簡潔,完成的工作非常簡單,通過配置文件將客戶端請求映射到一個location block,而通過這個localtion中的配 置每一個指定都回啟動不同模塊,從而完成相應的工作;
Nginx的模塊從結構上分為
核心模塊包含:http模塊、event模塊和mail模塊;
基礎模塊包含; HTTP Access模塊,Http FastCGI模塊 HTTP Proxy模型和HTTP Rewrite模塊;
第三方模塊包含:HTTP upstream request模塊,Notice模塊和HTTP Access key 模塊屬於第三方模塊;
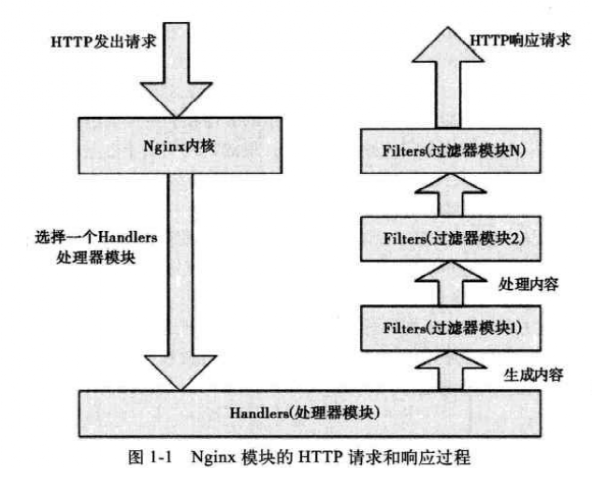
Nginx的模塊從功能上分3類
Ø Handerls(處理模塊):此類模塊直接請求,併進行輸出內容和修改headers信心操作,Handlers處理器模塊一般只能有一個;
Ø Filters(過濾器模塊):此類模塊主要針對其他處理器模塊輸出內容進行修改操作,最後由Nginx輸出;
Ø Proxies(代理類模塊) :此類模塊式Nginx的HTTP Upstream之類的模塊,這些模塊後端一些伺服器比如:FastCGI等進行交互,實現服務代理和負 載均衡等功能;
nginx 可以單個進程工作,也可以 master+ worker模式工作,所以當使用前者模式啟動的時候,進程就是NGX_PROCESS_SINGLE ; 當使用後者的時 候,那麼父進程就是 NGX_PROCESS_MASTER,而子進程就是 NGX_PROCESS_WORKER。使用哪種模式可以在配置文件中設置,預設使用後者,如 果配置文件中 masterprocess off 開啟,那麼就使用了前者;
master進程主要用來管理worker進程,具體包括如下4個主要功能:
(1)接收來自外界的信號;
(2)向各worker進程發送信號;
(3)監控woker進程的運行狀態;
(4)當woker進程退出後(異常情況下),會自動重新啟動新的woker進程;
woker進程主要用來處理網路事件,各個woker進程之間是對等且相互獨立的,它們同等競爭來自客戶端的請求,一個請求只可能在一個woker進程中處 理,woker進程個數一般設置為機器CPU核數;
3》進程式控制制
對Nginx進程的控制主要是通過master進程來做到的,主要有兩種方式:
1)手動發送信號
master接收信號以管理眾woker進程,那麼,可以通過kill向master進程發送信號,比如kill -HUP pid用以通知Nginx從容重啟。所謂從容重啟就是不中 斷服務:master進程在接收到信號後,會先重新載入配置,然後再啟動新進程開始接收新請求, 並向所有老進程發送信號告知不再接收新請求併在處理完 所有未處理完的請求後自動退出;
2)自動發送信號
可以通過帶命令行參數啟動新進程來發送信號給master進程,比如./nginx -s reload用以啟動一個新的Nginx進程,而新進程在解析到reload參數後會向 master進程發送信號(新進程會幫我們把手動發送信號中的動作自動完成)。當然也可以這樣./nginx -s stop來停止Nginx;
4》Nginx的安裝與配置
1>安裝依賴庫
# yum -y install gcc openssl-devel zlib-devel
2>安裝pcre-delvel庫
# cd /soft/
# tar xf pcre-8.01.tar.gz -C tmp/
# cd tmp/pcre-8.01/
#./configure && make && make install
3>安裝libmd5
# cd /soft/
#tar xf libmd5-0.8.2b.tar.gz -C tmp/
4>安裝Nginx
# cd /soft/
# tar nginx-0.8.55.tar.gz -C tmp/
# cd tmp/nginx-0.8.55/
#CONFOPTS="
--user=user_00 \
--group=users \
--with-http_realip_module \
--with-http_stub_status_module \
--with-http_gzip_static_module \
--with-md5=/soft/md5/ \
--with-sha1=auto/lib/sha1 \
--with-pcre=/soft/pcre-8.01 \
--without-select_module \
--without-poll_module \
--without-http_ssi_module \
--without-http_userid_module \
--without-http_geo_module \
--without-http_map_module \
--without-http_memcached_module \
--without-mail_pop3_module \
--without-mail_imap_module \
--without-mail_smtp_module \
--prefix=/usr/local/services/nginx-0.8.55 \
"
#./configure $ CONFOPTS >/dev/null
# make >/dev/null && make install >/dev/null
#chown user_00.users /data/www/pvp.fanhougame.net –R
編譯參數詳解:
--with-http_realip_module
此模塊支持顯示真實來源IP地址,主要用於NGINX做前端負載均衡伺服器使用。
-with-http_stub_status_module
這個模塊可以取得一些nginx的運行狀態,
--with-http_gzip_static_module
這個模塊在一個預壓縮文件傳送到開啟Gzip壓縮的客戶端之前檢查是否已經存在以“.gz”結尾的壓縮文件,這樣可以防止文件被重覆壓縮。
--with-md5=/soft/md5/
設定md5庫文件路徑
--with-sha1=auto/lib/sha1
設定sha1庫文件路徑
--with-pcre=/soft/pcre-8.01
設定PCRE庫路徑
--without-select_module
標準連接模式。預設情況下自動編譯方式。您可以啟用或禁用通過使用-select_module和不帶- select_module配置參數這個模塊
--without-poll_module
不使用poll模塊
--without-http_ssi_module
不使用ngx_http_ssi_module模塊,此模塊處理伺服器端包含文件(ssi)的處理.
--without-http_userid_module
不使用ngx_http_userid_module模塊
--without-http_geo_module
這個模塊基於客戶端的IP地址創建一些ngx_http_geoip_module變數,並與MaxMindGeoIP文件進行匹配,該模塊僅用於 0.7.63和0.8.6版本之後。但效果不太 理想,對於城市的IP記錄並不是特別準確,不過對於網站的來源訪問區域的分析大致有一定參考性;
--without-http_map_module
不使用ngx_http_map_module模塊
--without-http_memcached_module
不使用ngx_http_memcached_module模塊
--without-mail_pop3_module
不允許ngx_mail_pop3_module模塊
--without-mail_imap_module
不允許ngx_mail_imap_module模塊
--without-mail_smtp_module
不允許ngx_mail_smtp_module模塊
5>配置說明
配置文件位置:/usr/local/nginx/conf/nginx.conf
1. Nginx配置文件分為4個部分
2. main(全局設置)
3. server(主機設置)
4. upstream(負載均衡設置)
5. localtion(URL匹配特定位置的設置)
這四個 server繼承main location繼承server upstream即不會繼承其它設置也不會被繼承.
主配置文件Nginx.conf內容如下:
#==================================一全局配置#========================
user user_00 users; #這個模塊指令,指Nginx Worker 運用的用戶和組,預設為nobody
worker_processes 8; #指定了要開啟的進程數,每進程占用10M~12M的記憶體,建議和CPU的核心數量一樣多的進程就行了。
error_log logs/error.log; #全局錯誤日誌
#error_log logs/error.log notice;
#error_log logs/error.log info;
pid logs/nginx.pid; #:用來指定進程ID的存儲位置.
#Specifies the value for maximum file descriptors that can be opened by this process.
#events 用來指定Nginx工作模式以及連接數上限
events {
use epoll; #使用epoll高效模式,適用於Linux,Unix使用kqueue
worker_connections 100000; #定義Ningx沒個進程最大的連接數。預設為1024,受到文件句柄的約束。
}
worker_rlimit_nofile 100000; #打開的文件句柄數量最高為10萬
#==================================二、HTTP配置========================
http {
include mime.types; #實現對配置文件所包含的文件設定
default_type application/octet-stream; #屬於HTTP核心模塊,預設設定為二進位流
server_tokens off; #禁止錯誤頁面里顯示nginx的版本號
# 定義日誌處理的格式
#log_format main '$remote_addr - $remote_user [$time_local] "$request" '
# '$status $body_bytes_sent "$http_referer" '
# '"$http_user_agent" "$http_x_forwarded_for"';
# 定義它的hash表為128K
server_names_hash_bucket_size 128;
client_header_buffer_size 32k; #客戶端請求頭部的緩衝區大小,一般一個請求頭的大小不會超過1k
large_client_header_buffers 4 32k; #客戶請求頭緩衝大小 nginx預設會用client_header_buffer_size這個buffer來讀取header值
client_max_body_size 8m; #設定通過nginx上傳文件的大小
#sendfile指令指定 nginx 是否調用sendfile 函數(zero copy 方式)來輸出文件,
#對於普通應用,必須設為on。
#如果用來進行下載等應用磁碟IO重負載應用,可設置為off,以平衡磁碟與網路IO處理速度,降低系統uptime。
sendfile on;
tcp_nopush on; #此選項允許或禁止使用socke的TCP_CORK的選項,此選項僅在使用sendfile的時候使用
tcp_nodelay on;
#keepalive_timeout 0;
keepalive_timeout 60; #keepalive超時時間。連接保持活動時間超過這個,將被關閉掉
#===================重要位置============
fastcgi_connect_timeout 300; #指定連接到後端FastCGI的超時時間。
fastcgi_send_timeout 300; #向FastCGI傳送請求的超時時間,這個值是指已經完成兩次握手後向FastCGI傳送請求的超時時間。
fastcgi_read_timeout 300; #接收FastCGI應答的超時時間,這個值是指已經完成兩次握手後接收FastCGI應答的超時時間。
fastcgi_buffer_size 254k; #指定讀取FastCGI應答第一部分需要用多大的緩衝區
fastcgi_buffers 16 256k; #指定本地需要用多少和多大的緩衝區來緩衝FastCGI的應答。
fastcgi_busy_buffers_size 512k; #這個指令我也不知道是做什麼用,只知道預設值是fastcgi_buffers的兩倍。
fastcgi_temp_file_write_size 512k; #在寫入fastcgi_temp_path時將用多大的數據塊,預設值是fastcgi_buffers的兩倍。
gzip on; #該指令用於開啟或關閉gzip模塊(on/off)
gzip_min_length 1k; #設置允許壓縮的頁面最小位元組數,頁面位元組數從header頭得content-length中進行獲取
gzip_buffers 4 16k; #設置系統獲取幾個單位的緩存用於存儲gzip的壓縮結果數據流
gzip_http_version 1.0; #識別http的協議版本
gzip_comp_level 2; #gzip壓縮比,1壓縮比最小處理速度最快
#匹配mime類型進行壓縮,無論是否指定,”text/html”類型總是會被壓縮的
gzip_types text/plain application/x-javascript text/css application/xml text/javascript;
gzip_vary on; #和http頭有關係,加個vary頭,給代理伺服器用的
charset utf-8; #字元集為utf-8
access_log off; # 日常日誌關閉
log_not_found off; # 日常日誌關閉
error_page 400 403 405 408 /40x.html; # 錯誤返回頁面
error_page 500 502 503 504 /50x.html; # 錯誤返回頁面
#===================Server虛擬機配置保持預設============
server {
listen 80 default; #預設監聽埠號為80
server_name _;
return 444;
}
#===================自定義虛擬機配置文件===========
include vhost/vhost.www.fanhougame.com;
}
主配虛擬Server配置文件如下:
server {
listen 80 ; #監聽埠號
#功能變數名稱為
server_name 10.0.0.201;
# 指定網站的目錄
root /data/www/oa.com/www.fanhougame.com ;
# localtion模塊指定網站首頁名稱
location / {
index index.php index.html index.htm;
if (!-e $request_filename) {
return 444;
}
}
#:返回的錯誤信息
error_page 500 502 503 504 /50x.html;
location = /50x.html {
root /usr/local/nginx/html;
}
#可以指定多個localtion進行不同的指令處理,這裡是指定php的sock
location ~ \.php$ {
fastcgi_pass unix:/tmp/php-cgi-5313-web.sock;
fastcgi_index index.php;
include fastcgi_params;
fastcgi_param SCRIPT_FILENAME $document_root$fastcgi_script_name;
fastcgi_param SERVER_NAME $http_host;
fastcgi_ignore_client_abort on;
}
#指定對網頁圖片格式進行緩存max表示10年,也可以是30d(天)
location ~ \.(swf|js|css|xml|gif|jpg|jpeg|png|bmp)$ {
error_log off;
access_log off;
#expires 30d;
expires max;
}
}
5》啟動與平滑重啟
# cd /usr/local/services/nginx-0.8.55/sbin/
# ./nginx –t 檢測配置文件是否有錯誤
# ./nginx 啟動nginx
# ./nginx -s reload
6》 Nginx常用配置實例
1>負載均衡配置實例
Master:10.0.0.201
Master Web 10.0.0.201:81
Slave1 Web 10.0.0.202:80
Slave2 Web 10.0.0.203:80
Master Nginx和WEB基本上和4.5配置相同
Master 負載均衡配置如下:
在Nginx.cnf增加如下:
include vhost/vhost.aatest.com;
在conf/vhost/vhost.aatest.com 編輯內容為;
upstream www.aatest.com {
server 10.0.0.201:81 weight=1 max_fails=3 fail_timeout=20s;
server 10.0.0.202:80 weight=1 max_fails=3 fail_timeout=20s;
server 10.0.0.203:80 weight=1 max_fails=3 fail_timeout=20s;
}
server{
listen 80;
server_name www.aatest.com;
location / {
proxy_pass http://www.aatest.com;
proxy_set_header Host $host;
proxy_set_header X-Real-IP $remote_addr;
proxy_set_header X-Forwarded-For $proxy_add_x_forwarded_for;
}
}
~
Slave1 Web 10.0.0.202:80和Slave2 Web 10.0.0.203:80
配置如下:
server {
listen 80 ; #監聽埠號
#功能變數名稱為
server_name www.aatest.com;
# 指定網站的目錄
root /opt/zeng ;
# localtion模塊指定網站首頁名稱
location / {
index index.php index.html index.htm;
if (!-e $request_filename) {
return 444;
}
}
#:返回的錯誤信息
error_page 500 502 503 504 /50x.html;
location = /50x.html {
root /usr/local/nginx/html;
}
#可以指定多個localtion進行不同的指令處理,這裡是指定php的sock
location ~ \.php$ {
fastcgi_pass unix:/tmp/php-cgi-5313-web.sock;
fastcgi_index index.php;
include fastcgi_params;
fastcgi_param SCRIPT_FILENAME $document_root$fastcgi_script_name;
fastcgi_param SERVER_NAME $http_host;
fastcgi_ignore_client_abort on;
}
#指定對網頁圖片格式進行緩存max表示10年,也可以是30d(天)
location ~ \.(swf|js|css|xml|gif|jpg|jpeg|png|bmp)$ {
error_log off;
access_log off;
#expires 30d;
expires max;
}
}
7》 Nginx與PHP(FastCGI)的安裝
1>什麼是FastCGI?
FastCGI是一個可伸縮、高速在HTTPserver和動態腳本語言間通信的介面,多數的HTTPserver 都支持FastCGI,包括Apache、Nginx和lighttpd等, FastCGI被許多腳本語言支持,其中就有PHP;
2>Nginx+FastCGI運行原理
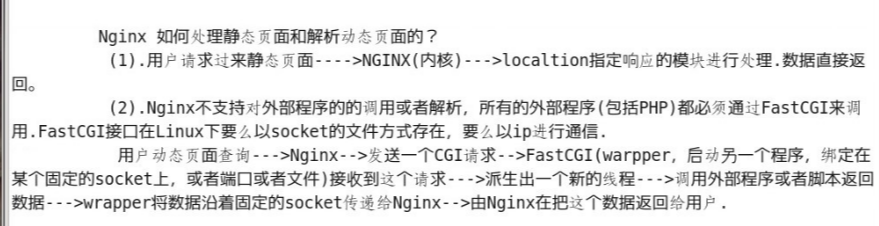
Nginx不支持對外部程式的的調用或者解析,所有的外部程式(包括PHP)都必須通過FastCGI來調用 ,FastCGI介面 在 Linux下是socket文件(這個 socket文件可以socket,也可是ip) ,為了調用CGI程式,還需要一個FastCGI的wrapper,當 Nginx發送將CGI請求發送給這個socket的時候,通g過 FastCGI介面,wrapper接收到請求,然後派生出一個新的線程,這個線程調用外部程式或者腳本並且讀取返回數據,然後wrapper在將返回的數據通過 FastCGI介面,沿著固定的socket傳遞給Nginx,然後將返回的數據發送給客戶端;
Nginx-->發送一個CGI請求-->FastCGI(warpper)接收到這個請求--->派生出一個新的線程--->調用外部程式或者腳本返回數據--->wrapper將數據沿著固定的 socket傳遞給Nginx-->由Nginx在把這個數據返回給用戶.
靜態請求:Nginx直接返回.
動態請求:
A用戶發一起一個 cgi請求—→Nginx→內核接受-->處理模塊→FastCGI→warpper→線程→php腳本收集所需要的數據.-→FastCGI(固定文件存在)或者 ip:port存在→Nginx---用戶.
3>PHP與PHP-FPM的安裝及優化
PHP-FPM也是一個第三方的FastCGI進程管理。它作為的PHP補丁一起開發,編譯的時候跟著一起編譯安裝被編譯到PHP內核當中。PHP-FPM在處理 高併發方面是非常優秀的,它的一個優點就是把動態語言和HTTP server分離開來,Http server處理靜態請求。PHP-FPM處理動態請求,所有呢PHP/PHP- FPM 和Nginx組合的時候兩者經常會安裝到一臺機器上面;
4>安裝Mysql
資料庫層,說明:php在編譯時要mysql的配置,這樣PHP遠程連接mysql才有用;
# cd /data/soft/
# tar xf mysql-5.1.49.tar.gz -C tmp/
# cd tmp/mysql-5.1.49/
#CONFOPTS=" \
--with-charset=utf8 \
--with-plugins=partition,federated,innobase,myisam \
--enable-static \
--enable-assembler \
--enable-thread-safe-client \
--with-client-ldflags=-all-static-ltinfo \
--with-mysqld-ldflags=-all-static-ltinfo \
--with-big-tables \
--with-mysqld-user=mysql \
--without-debug \
--without-ndb-debug \
--localstatedir=/usr/local/services/mysql-5.1.49/var \
--prefix=/usr/local/services/mysql-5.1.49 \
"
#./configure $CONFOPTS >/dev/null
# make >/dev/null && make install >/dev/null
5>安裝PHP依賴庫
①libxml2-2.7.7.tar.gz
# cd /data/soft/
#tar xf libxml2-2.7.7.tar.gz –C tmp/
# cd tmp/libxml2-2.7.7/
#./configure --prefix=/usr/local/services >/dev/null
#make >/dev/null && make install >/dev/null
②curl-7.21.4.tar.gz
# cd /data/soft/
# tar xf curl-7.21.4.tar.gz -C tmp/
# cd tmp/curl-7.21.4/
#./configure --prefix=/usr/local/services >/dev/null
#make >/dev/null && make install >/dev/null
③jpegsrc.v8b.tar.gz
# cd /data/soft/
#tar xf jpegsrc.v8b.tar.gz –C tmp/
#cd tmp/jpeg-8b/
#./configure --prefix=/usr/local/services >/dev/null
#make >/dev/null && make install >/dev/null
④libpng-1.4.3.tar.gz
# cd /data/soft/
# tar xf libpng-1.4.3.tar.gz -C tmp/
# cd tmp/libpng-1.4.3/
#./configure --prefix=/usr/local/services >/dev/null
#make >/dev/null && make install >/dev/null
⑤freetype-2.4.1.tar.gz
# cd /data/soft/
# tar xf freetype-2.4.1.tar.gz -C tmp/
# cd tmp/freetype-2.4.1/
#./configure --prefix=/usr/local/services >/dev/null
#make >/dev/null && make install >/dev/null
⑥libevent-2.0.10-stable.tar.gz
# cd /data/soft/
# tar xf libevent-2.0.10-stable.tar.gz –C tmp/
# cd tmp/libevent-2.0.10-stable/
#./configure --prefix=/usr/local/services --disable-debug-mode >/dev/null
#make >/dev/null && make install >/dev/null
⑦re2c-0.13.5.tar.gz
# cd /data/soft/
# tar xf re2c-0.13.5.tar.gz -C tmp/
# cd tmp/re2c-0.13.5/
#./configure --prefix=/usr/local/services >/dev/null
#make >/dev/null && make install >/dev/null
⑧libmcrypt-2.5.8.tar.gz
# cd /data/soft/
# tar xf libmcrypt-2.5.8.tar.bz2 -C tmp/
# cd tmp/libmcrypt-2.5.8/
#./configure --prefix=/usr/local/services >/dev/null
#make >/dev/null && make install >/dev/null
# cd libltdl/
# ./configure --prefix=/usr/local/services --enable-ltdl-install >/dev/null
#make >/dev/null && make install >/dev/null
6>安裝PHP
wget http://php.net/distributions/php-5.3.13.tar.gz
php-5.3.13.tar.gz
# cd /data/soft/
# tar xf php-5.3.13.tar.gz -C tmp/
#cd tmp/php-5.3.13/
#CONFOPTS="
--enable-zend-multibyte \
--enable-mbstring \
--enable-sockets \
--enable-pdo \
--enable-zip \
--enable-fpm \
--with-gd \
--with-fpm-user=user_00 \
--with-fpm-group=user_00 \
--with-zlib \
--with-config-file-path=/usr/local/services/php-5.3.13/etc \
--with-libxml-dir=/usr/local/services \
--with-curl=/usr/local/services \
--with-png-dir=/usr/local/services \
--with-jpeg-dir=/usr/local/services \
--with-freetype-dir=/usr/local/services \
--with-mysql=/usr/local/services/mysql-5.1.49 \
--with-pdo-mysql=/usr/local/services/mysql-5.1.49 \
--with-mysqli=/usr/local/services/mysql-5.1.49/bin/mysql_config \
--prefix=/usr/local/services/php-5.3.13 \
"
# ./configure $CONFOPTS
# make >/dev/null && make install >/dev/null
編譯錯誤解決:
/var/lib/mysql/mysql.sock
configure: error: Cannot find libmysqlclient under /usr.
Note that the MySQL client library is not bundled anymore!
解決方法:
cp -rp /usr/lib64/mysql/libmysqlclient.so.16.0.0 /usr/lib/libmysqlclient.so
7>安裝PHP擴展
①eaccelerator-0.9.6.1.tar.bz2
# cd /data/soft/
#tar xf eaccelerator-0.9.6.1.tar.bz2 -C tmp/
#cd tmp/eaccelerator-0.9.6.1/
#/usr/local/services/php-5.3.13/bin/phpize
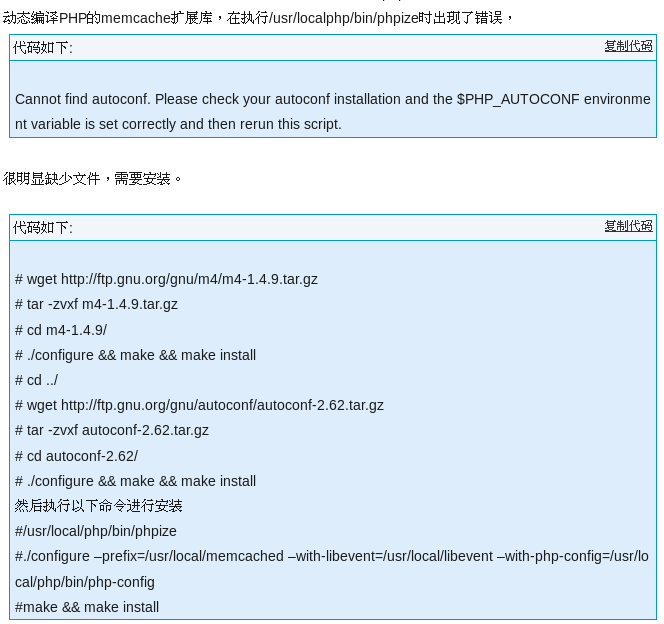
直接用yum 安裝 yum install m4* autoconf*
#./configure --prefix=/usr/local/services/eaccelerator-0.9.6.1 --enable-eaccelerator --with-php-config=/usr/local/services/php-5.3.13/bin/php-config > /dev/null
#make >/dev/null && make install >/dev/null
#mkdir /tmp/eaccelerator
#chmod 777 /tmp/eaccelerator
②memcached-1.4.13.tar.gz
(伺服器端要前安裝,下麵的編譯擴展模塊要用到)
# cd /data/soft/
#tar xf memcached-1.4.13.tar.gz -C tmp/
# cd tmp/memcached-1.4.13/
#./configure --enable-64bit --with-libevent=/usr/local/services --prefix=/usr/local/services/memcached-1.4.13 >/dev/null
# make >/dev/null && make install >/dev/null
③libmemcached-0.48.tar.gz
# cd /data/soft/
#tar xf libmemcached-0.48.tar.gz -C tmp/
#cd tmp/libmemcached-0.48/
#CONFOPTS="
--disable-libinnodb
--without-libinnodb-prefix
--with-libevent-prefix=/usr/local/services
--with-memcached=/usr/local/services/memcached-1.4.13/bin/memcached
--prefix=/usr/local/services
"
#./configure $CONFOPTS >/dev/null
#make >/dev/null && make install >/dev/null
④igbinary-1.0.2.tgz
# cd /data/soft/
# tar xf igbinary-1.0.2.tar.gz -C tmp/
#cd tmp/igbinary-1.0.2/
#/usr/local/services/php-5.3.13/bin/phpize
#./configure --enable-igbinary --with-php-config=/usr/local/services/php-5.3.13/bin/php-config >/dev/null
#make >/dev/null && make install >/dev/null
⑤memcache-3.0.5.tgz
# cd /data/soft/
# tar xf memcache-3.0.5.tgz -C tmp/
#cd tmp/memcache-3.0.5/
#/usr/local/services/php-5.3.13/bin/phpize
#CONFOPTS=" \
--enable-memcache \
--with-php-config=/usr/local/services/php-5.3.13/bin/php-config \
"
#./configure $CONFOPTS >/dev/null
#make >/dev/null && make install >/dev/null
⑥memcached-1.0.2.tgz(註意安裝的順序,igbinary-1.1.1.tgz是依賴庫)
# cd /data/soft/
# tar xf memcached-1.0.2.tgz -C tmp/
# cd tmp/memcached-1.0.2/
#/usr/local/services/php-5.3.13/bin/phpize
#CONFOPTS=" \
--enable-memcached \
--enable-memcached-igbinary \
--enable-memcached-json \
--with-libmemcached-dir=/usr/local/services \
--with-php-config=/usr/local/services/php-5.3.13/bin/php-config \
--prefix=/usr/local/services \
"
#./configure $CONFOPTS >/dev/null
#make >/dev/null && make install >/dev/null
⑦owlient-phpredis-2.1.1-1-g90ecd17.tar.gz
# cd /data/soft/
#tar xf owlient-phpredis-2.1.1-1-g90ecd17.tar.gz -C tmp/
# cd tmp/owlient-phpredis-90ecd17/
#/usr/local/services/php-5.3.13/bin/phpize
#./configure --with-php-config=/usr/local/services/php-5.3.13/bin/php-config >/dev/null
#make >/dev/null && make install >/dev/null
8>拷貝配置文件:
# cd /usr/local/services/php-5.3.13/etc
# cp php-fpm.conf.default php-fpm.conf
# cp /soft/php/php-5.3.13/php.ini-production php.ini
8》PHP配置文件優化與調整
1>在php-fpm.conf 裡面調整
;listen = 127.0.0.1:9000
listen = /tmp/php-cgi.tuge.sock #以socke的方式訪問.註視掉.ip埠的方式.
; Default Value: log/php-fpm.log
error_log = /data/php_log/tuge.php.error #根據不同的項目名.定義不同的.sock 和日誌.
# 調整進程數量
pm.max_children:靜態方式下開啟的php-fpm進程數量。
pm.start_servers:動態方式下的起始php-fpm進程數量。
pm.min_spare_servers:動態方式下的最小php-fpm進程數量。
pm.max_spare_servers:動態方式下的最大php-fpm進程數量。
2>在php.ini 加入擴展模塊.
在尾部添加:
[eaccelerator]
zend_extension="/usr/local/services/php-5.3.20/lib/php/extensions/eaccelerator.so"
eaccelerator.shm_size="16"
eaccelerator.cache_dir="/tmp/eaccelerator"
eaccelerator.enable="1"
eaccelerator.optimizer="1"
eaccelerator.check_mtime="1"
eaccelerator.debug="0"
eaccelerator.filter=""
eaccelerator.shm_max="0"
eaccelerator.shm_ttl="0"
eaccelerator.shm_prune_period="0"
eaccelerator.shm_only="0"
eaccelerator.compress="1"
eaccelerator.compress_level="9"
擴展模塊增加
extension_dir = "/usr/local/services/php-5.3.13/lib/php/extensions"
extension = memcached.so
extension = redis.so
extension = memcache.so
extension = igbinary.so
移動擴展模塊位置
# cd /usr/local/services/php-5.3.13/lib/php/extensions/no-debug-non-zts-20090626/
# mv /usr/local/services/php-5.3.13/lib/php/extensions/no-debug-non-zts-20090626/* /usr/local/services/php-5.3.13/lib/php/extensions
9》啟動PHP
修改Nginx的虛擬主機的sock位置
fastcgi_pass unix:/tmp/php-cgi.gongda.sock;
啟動PHP
# cd /usr/local/services/php-5.3.13/sbin
# ./php-fpm
==================================
php下的nginx配置文件nginx.conf
#user nobody;
worker_processes 1;
#error_log logs/error.log;
#error_log logs/error.log notice;
#error_log logs/error.log info;
#pid logs/nginx.pid;
events {
worker_connections 1024;
}
http {
include mime.types;
default_type application/octet-stream;
#log_format main '$remote_addr - $remote_user [$time_local] "$request" '
# '$status $body_bytes_sent "$http_referer" '
# '"$http_user_agent" "$http_x_forwarded_for"';
#access_log logs/access.log main;
sendfile on;
#tcp_nopush on;
#keepalive_timeout 0;
keepalive_timeout 65;
#gzip on;
server {
listen 80;
server_name 10.0.2.159;
root /data/www;
#charset koi8-r;
#access_log logs/host.access.log main;
location / {
index index.php index.html;
}
#error_page 404 /404.html;
# redirect server error pages to the static page /50x.html
#
error_page 500 502 503 504 /50x.html;
location = /50x.html {
root html;
}
# proxy the PHP scripts to Apache listening on 127.0.0.1:80
#
#location ~ \.php$ {
# proxy_pass http://127.0.0.1;
#}
# pass the PHP scripts to FastCGI server listening on 127.0.0.1:9000
#
location ~ \.php$ {
root html;
# fastcgi_pass 127.0.0.1:9000;
#
fastcgi_pass unix:/lianlian/lnmp/tmp/chw.sock;
fastcgi_index index.php;
fastcgi_param SCRIPT_FILENAME /data/www$fastcgi_script_name;
include fastcgi_params;
}
# deny access to .htaccess files, if Apache's document root
# concurs with nginx's one
#
#location ~ /\.ht {
# deny all;
#}
}
# another virtual host using mix of IP-, name-, and port-based configuration
#
#server {
# listen 8000;
# listen somename:8080;
# server_name somename alias another.alias;
# location / {
# root html;
# index index.html index.htm;
# }
#}
# HTTPS server
#
#server {
# listen 443 ssl;
# server_name localhost;
# ssl_certificate cert.pem;
# ssl_certificate_key cert.key;
# ssl_session_cache shared:SSL:1m;
# ssl_session_timeout 5m;
# ssl_ciphers HIGH:!aNULL:!MD5;
# ssl_prefer_server_ciphers on;
# location / {
# root html;
# index index.html index.htm;
# }
#}
}
================================================

