
GREENPLUM總體結構: 資料庫由Master Severs和Segment Severs通過Interconnect互聯組成。 Master主機負責:建立與客戶端的連接和管理;SQL的解析並形成執行計劃;執行計劃向Segment的分發收集Segment的執行結果;Master不存儲業務數據,只 ...
GREENPLUM總體結構:
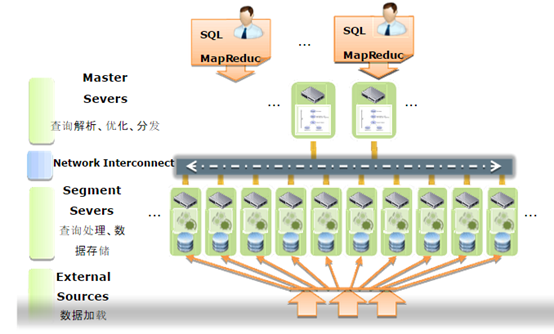
資料庫由Master Severs和Segment Severs通過Interconnect互聯組成。
Master主機負責:建立與客戶端的連接和管理;SQL的解析並形成執行計劃;執行計劃向Segment的分發收集Segment的執行結果;Master不存儲業務數據,只存儲數據字典。
Segment主機負責:業務數據的存儲和存取;用戶查詢SQL的執行。
master node高可用,類似於hadoop的namenode和second namenode,實現主備的高可用。
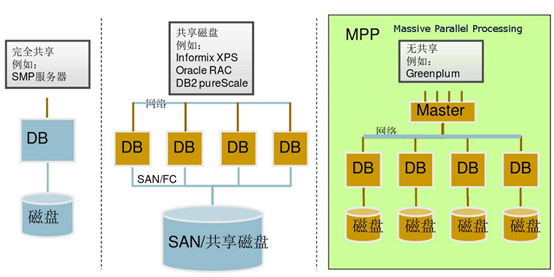
Greenplum使用MPP架構:
1、準備
這裡準備了4台伺服器,1台做master,1台做standby,4台都做存儲
OS: Red Hat Enterprise Linux Server release 6.5 (Santiago)
GP: greenplum-db-4.3.8.2-build-1-RHEL5-x86_64.zip
JDK:1.8
192.168.244.110 node01
#master node
192.168.244.111 node02 #standby node
192.168.244.112 node03 #segment node
192.168.244.113 node04 #segment node
2、系統參數配置
系統參數配置的修改需要在每個節點伺服器上執行
2.1.修改Linux內核參數
[root@node01 ~]# vi /etc/sysctl.conf
# Kernel sysctl configuration file for Red Hat Linux
#
# For binary values, 0 is disabled, 1 is enabled. See sysctl(8) and
# sysctl.conf(5) for more details.
#
# Use '/sbin/sysctl -a' to list all possible parameters.
# Controls IP packet forwarding
net.ipv4.ip_forward = 0
# Controls source route verification
net.ipv4.conf.default.rp_filter = 1
# Do not accept source routing
net.ipv4.conf.default.accept_source_route = 0
# Controls the System Request debugging functionality of the kernel
kernel.sysrq = 1
# Controls whether core dumps will append the PID to the core filename.
# Useful for debugging multi-threaded applications.
kernel.core_uses_pid = 1
# Controls the use of TCP syncookies
net.ipv4.tcp_syncookies = 1
# Disable netfilter on bridges
#net.bridge.bridge-nf-call-ip6tables = 0
#net.bridge.bridge-nf-call-iptables = 0
#net.bridge.bridge-nf-call-arptables = 0
# Controls the default maxmimum size of a mesage queue
kernel.msgmnb = 65536
# Controls the maximum size of a message, in bytes
kernel.msgmax = 65536
kernel.msgmni = 2048
kernel.sem = 250 512000 100 2048
# Controls the maximum shared segment size, in bytes
#kernel.shmmax = 68719476736
kernel.shmmax = 500000000
kernel.shmmni = 4096
# Controls the maximum number of shared memory segments, in pages
#kernel.shmall = 4294967296
kernel.shmall = 4000000000
net.ipv4.tcp_tw_recycle=1
net.ipv4.tcp_max_syn_backlog=4096
net.ipv4.ip_local_port_range = 1025 65535
net.core.netdev_max_backlog=10000
vm.overcommit_memory=2
net.ipv4.conf.all.arp_filter = 1
net.core.rmem_max = 2097152
net.core.wmem_max = 2097152
2.2.修改Linux最大限制
[root@node01 ~]# vi /etc/security/limits.conf
#greenplum configs
* soft nofile 65536
* hard nofile 65536
* soft nproc 131072
* hard nproc 131072
2.3.I/O調整優化
[root@node01 ~]# vi /boot/grub/menu.lst
#greenplum configs
elevator=deadline
2.4.添加所有節點到HOST
[root@node01 ~]# vi /etc/hosts
192.168.244.110 node01
192.168.244.111 node02
192.168.244.112 node03
192.168.244.113 node04
2.5.關閉防火牆
[root@node01 ~]# chkconfig --list iptables
[root@node01 ~]# chkconfig --level 0123456 iptables off
2.6.設置SELINUX
[root@node01 ~]# vi /etc/selinux/config
SELINUX=disabled
2.7.重啟系統使配置生效
[root@node01 ~]# reboot
3、GP安裝
GP的安裝操作都是在主節點master上執行的
3.1.創建gpadmin用戶
所有節點創建gpadmin用戶
[root@node01 ~]# useradd gpadmin
[root@node01 ~]# passwd gpadmin
3.2.設置gpadmin用戶環境
[gpadmin@node01 ~]$ cd /home/gpadmin
[gpadmin@node01 ~]$ vi .bashrc
[gpadmin@node01 ~]$ vi .bash_profile
.bashrc和.bash_profile最後都添加下麵兩行
source
/usr/local/greenplum-db/greenplum_path.sh
export MASTER_DATA_DIRECTORY=/data1/gpdata/master/gpseg-1
/etc/profile也添加上面兩行內容
設置完後記得source一下使其立即生效
3.3.上傳並解壓安裝包
將greenplum-db-4.3.8.2-build-1-RHEL5-x86_64.zip上傳至master的/opt/目錄下
[root@node01 opt]# unzip greenplum-db-4.3.8.2-build-1-RHEL5-x86_64.zip
[root@node01 opt]#/bin/bash greenplum-db-4.3.8.2-build-1-RHEL5-x86_64.bin
按提示輸入回車或yes 這一步會將安裝包解壓到/usr/local/下,並建立軟連接greenplum-db
3.4.準備節點伺服器信息文件
後面的批量安裝會用到這兩個文件,如果all_host和all_segment內容一樣,可以只創建一個文件
[root@node01 greenplum-db]# mkdir -p /opt/gpinst/ [root@node01 gpinst]# touch all_host
[root@node01 gpinst]# touch all_segment
all_host和all_segment內容:
node01
node02
node03
node04
3.5.建立節點伺服器間的信任
[root@node01 gpinst]# gpssh-exkeys -f /opt/gpinst/all_host
[STEP 1 of 5] create local ID and authorize on local host
[STEP 2 of 5] keyscan all hosts and update known_hosts file
[STEP 3 of 5] authorize current user on remote hosts
... send to node02
***
*** Enter password for node02:
... send to node03
... send to node04
[STEP 4 of 5] determine common authentication file content
[STEP 5 of 5] copy authentication files to all remote hosts
... finished key exchange with node02
... finished key exchange with node03
... finished key exchange with node04
[INFO] completed successfully
按照提示輸入root密碼,記住這一步不能輸入gpadmin的密碼,因為批量安裝時需要在/usr/local下創建目錄,需要root許可權
3.6.批量安裝
[root@node01 gpinst]# gpseginstall -f /opt/gpinst/all_host -u gpadmin -p gpadmin
20170717:13:13:51:026424 gpseginstall:node01:root-[INFO]:-Installation Info:
link_name greenplum-db
binary_path /usr/local/greenplum-db-4.3.8.2
binary_dir_location /usr/local
binary_dir_name greenplum-db-4.3.8.2
20170717:13:13:51:026424 gpseginstall:node01:root-[INFO]:-check cluster password access
。。。。。。
20170717:13:16:39:026424 gpseginstall:node01:root-[INFO]:-SUCCESS -- Requested commands completed
這一步其實就是將master上的greenplum打包通過scp命令傳到all_host中的主機上,並賦予目錄gpadmin的許可權
3.7.檢查批量安裝情況
[root@node01 local]# gpssh -f /opt/gpinit/all_host -e ls -l $GPHOME
[root@node01 gpinst]# gpssh -f /opt/gpinst/all_host -e ls -l $GPHOME
[node01] ls -l /usr/local/greenplum-db/.
[node01] total 276
[node01] drwxr-xr-x 4 gpadmin gpadmin 4096 May 10 2016 bin
[node01] drwxr-xr-x 2 gpadmin gpadmin 4096 May 10 2016 demo
[node01] drwxr-xr-x 5 gpadmin gpadmin 4096 May 10 2016 docs
[node01] drwxr-xr-x 2 gpadmin gpadmin 4096 May 10 2016 etc
[node01] drwxr-xr-x 3 gpadmin gpadmin 4096 May 10 2016 ext
[node01] -rw-r--r-- 1 gpadmin gpadmin 43025 May 10 2016 GPDB-LICENSE.txt
[node01] -rw-r--r-- 1 gpadmin gpadmin 735 Jul 17 13:06 greenplum_path.sh
[node01] drwxr-xr-x 6 gpadmin gpadmin 4096 May 10 2016 include
[node01] drwxr-xr-x 9 gpadmin gpadmin 4096 May 10 2016 lib
[node01] -rw-r--r-- 1 gpadmin gpadmin 192912 May 10 2016 LICENSE.thirdparty
[node01] drwxr-xr-x 2 gpadmin gpadmin 4096 May 10 2016 sbin
[node01] drwxr-xr-x 4 gpadmin gpadmin 4096 May 10 2016 share
[node02] ls -l /usr/local/greenplum-db/.
[node02] total 276
[node02] drwxr-xr-x 4 gpadmin gpadmin 4096 May 10 2016 bin
[node02] drwxr-xr-x 2 gpadmin gpadmin 4096 May 10 2016 demo
[node02] drwxr-xr-x 5 gpadmin gpadmin 4096 May 10 2016 docs
返回結果中各節點目錄一致則成功
3.8.創建存儲目錄
master
[root@node01 gpinst]# mkdir -p /data/gpdata/master
[root@node01 gpinst]# chown gpadmin:gpadmin /data/gpdata/master
segment
[root@node01 gpinst]# gpssh -f /opt/gpinst/all_host -e 'mkdir -p /data/gpdata/primary'
[node04] mkdir -p /data/gpdata/primary
[node02] mkdir -p /data/gpdata/primary
[node01] mkdir -p /data/gpdata/primary
[node03] mkdir -p /data/gpdata/primary
[root@node01 gpinst]# gpssh -f /opt/gpinst/all_host -e 'chown gpadmin:gpadmin /data/gpdata/primary'
[node01] chown gpadmin:gpadmin /data/gpdata/primary
[node02] chown gpadmin:gpadmin /data/gpdata/primary
[node04] chown gpadmin:gpadmin /data/gpdata/primary
[node03] chown
gpadmin:gpadmin /data/gpdata/primary
mirror
[root@node01 local]# gpssh -f /opt/gpinit/all_segment -e 'mkdir -p
/data1/gpdata/mirror'
[root@node01 local]# gpssh -f /opt/gpinit/all_segment -e 'chown
gpadmin:gpadmin /data1/gpdata/mirror'
#3.9.設置時鐘同步
vi /etc/ntp.conf 在server第一行添加下麵兩行
server 192.168.244.110
重啟ntpd服務 /etc/init.d/ntpd restart
查看ntp同步情況 ntpq -p
使ntpd服務重啟伺服器後也啟動 chkconfig --level 0123456 ntpd on
3.10.創建並修改GP初始化文件
[root@node01 gpadmin]# su - gpadmin
[gpadmin@node01 ~]$ mkdir /home/gpadmin/gpconfigs
[gpadmin@node01 ~]$ ll
total 4
drwxrwxr-x 2 gpadmin gpadmin 4096 Jul 17 13:30 gpconfigs
[gpadmin@node01 ~]$ cp /usr/local/greenplum-db/docs/cli_help/gpconfigs/gpinitsystem_config /home/gpadmin/gpconfigs/
[gpadmin@node01 ~]$ chmod 775 /home/gpadmin/gpconfigs/gpinitsystem_config
修改GP初始化文件
[gpadmin@node01 ~]$ vi gpconfigs/gpinitsystem_config
declare -a DATA_DIRECTORY=(/data/gpdata/primary /data/gpdata/primary /data1/prim# FILE NAME: gpinitsystem_config
# Configuration file needed by the gpinitsystem
################################################
#### REQUIRED PARAMETERS
################################################
#### Name of this Greenplum system enclosed in quotes.
ARRAY_NAME="HX Greenplum DW"
#### Naming convention for utility-generated data directories.
SEG_PREFIX=gpseg
#### Base number by which primary segment port numbers
#### are calculated.
PORT_BASE=40000
#### File system location(s) where primary segment data directories
#### will be created. The number of locations in the list dictate
#### the number of primary segments that will get created per
#### physical host (if multiple addresses for a host are listed in
#### the hostfile, the number of segments will be spread evenly across
#### the specified interface addresses).
declare -a DATA_DIRECTORY=(/data/gpdata/primary /data/gpdata/primary)
#### OS-configured hostname or IP address of the master host.
MASTER_HOSTNAME=node01
#### File system location where the master data directory
#### will be created.
MASTER_DIRECTORY=/data/gpdata/master
#### Port number for the master instance.
MASTER_PORT=5432
#### Shell utility used to connect to remote hosts.
TRUSTED_SHELL=ssh
#### Maximum log file segments between automatic WAL checkpoints.
CHECK_POINT_SEGMENTS=8
#### Default server-side character set encoding.
# FILE NAME: gpinitsystem_config
# Configuration file needed by the gpinitsystem
################################################
#### REQUIRED PARAMETERS
################################################
#### Name of this Greenplum system enclosed in quotes.
ARRAY_NAME="HX Greenplum DW"
#### Naming convention for utility-generated data directories.
SEG_PREFIX=gpseg
#### Base number by which primary segment port numbers
#### are calculated.
PORT_BASE=40000
#### File system location(s) where primary segment data directories
#### will be created. The number of locations in the list dictate
#### the number of primary segments that will get created per
#### physical host (if multiple addresses for a host are listed in
#### the hostfile, the number of segments will be spread evenly across
#### the specified interface addresses).
declare -a DATA_DIRECTORY=(/data/gpdata/primary /data/gpdata/primary)
#### OS-configured hostname or IP address of the master host.
MASTER_HOSTNAME=node01
#### File system location where the master data directory
#### will be created.
MASTER_DIRECTORY=/data/gpdata/master
#### Port number for the master instance.
MASTER_PORT=5432
#### Shell utility used to connect to remote hosts.
TRUSTED_SHELL=ssh
#### Maximum log file segments between automatic WAL checkpoints.
CHECK_POINT_SEGMENTS=8
#### Default server-side character set encoding.
ENCODING=UNICODE
################################################
#### OPTIONAL MIRROR PARAMETERS
################################################
#### Base number by which mirror segment port numbers
#### are calculated.
MIRROR_PORT_BASE=50000
#### Base number by which primary file replication port
#### numbers are calculated.
REPLICATION_PORT_BASE=41000
#### Base number by which mirror file replication port
#### numbers are calculated.
MIRROR_REPLICATION_PORT_BASE=51000
#### File system location(s) where mirror segment data directories
#### will be created. The number of mirror locations must equal the
#### number of primary locations as specified in the
#### DATA_DIRECTORY parameter.
declare -a MIRROR_DATA_DIRECTORY=(/data/gpdata/mirror /data/gpdata/mirror)
################################################
#### OTHER OPTIONAL PARAMETERS
################################################
#### Create a database of this name after initialization.
DATABASE_NAME=hx_gp
#### Specify the location of the host address file here instead of
#### with the the -h option of gpinitsystem.
MACHINE_LIST_FILE=/home/gpadmin/gpconfigs/hostfile_gpinitsystem
"gpconfigs/gpinitsystem_config" 78L, 2560C written
3.11.初始化GP
[gpadmin@node01 ~]$ gpinitsystem -c /home/gpadmin/gpconfigs/gpinitsystem_config -h /opt/gpinst/all_host
20170717:13:37:48:027877 gpinitsystem:node01:gpadmin-[INFO]:-Checking configuration parameters, please wait...
20170717:13:37:48:027877 gpinitsystem:node01:gpadmin-[INFO]:-Reading Greenplum configuration file /home/gpadmin/gpconfigs/gpinitsystem_config
20170717:13:37:48:027877 gpinitsystem:node01:gpadmin-[INFO]:-Locale has not been set in /home/gpadmin/gpconfigs/gpinitsystem_config, will set to default value
20170717:13:37:48:027877 gpinitsystem:node01:gpadmin-[INFO]:-Locale set to en_US.utf8
20170717:13:37:49:027877 gpinitsystem:node01:gpadmin-[INFO]:-MASTER_MAX_CONNECT not set, will set to default value 250
20170717:13:37:49:027877 gpinitsystem:node01:gpadmin-[INFO]:-Checking configuration parameters, Completed
20170717:13:37:49:027877 gpinitsystem:node01:gpadmin-[INFO]:-Commencing multi-home checks, please wait...
中間需要輸入一次:Y
Continue with Greenplum creation Yy/Nn>
y
20170717:13:38:24:027877 gpinitsystem:node01:gpadmin-[INFO]:-Building the Master instance database, please wait...
如果沒有報ERROR,GP資料庫就安裝好了。
查看資料庫名稱:hx_gp
[gpadmin@node01 ~]$ psql -l
List of databases
Name | Owner | Encoding | Access privileges
-----------+---------+----------+---------------------
hx_gp | gpadmin | UTF8 |
postgres | gpadmin | UTF8 |
template0 | gpadmin | UTF8 | =c/gpadmin
: gpadmin=CTc/gpadmin
template1 | gpadmin | UTF8 | =c/gpadmin
: gpadmin=CTc/gpadmin
(4 rows)
3.12 增加standby
一個gp集群只有一個master肯定會讓人不放心,還好有備用,當master宕掉後,會自動啟用standby作為master
在standby伺服器上執行
[root@node02 ~]# mkdir /data1/gpdata/master
[root@node02 ~]# chown gpadmin:gpadmin
/data1/gpdata/master
在master伺服器上執行
[gpadmin@node01 ~]$ gpinitstandby -s node02
中間輸入一次Y
20170717:16:29:14:025010 gpinitstandby:node01:gpadmin-[INFO]:-Validating environment and parameters for standby initialization...
20170717:16:29:14:025010 gpinitstandby:node01:gpadmin-[INFO]:-Checking for filespace directory /data/gpdata/master/gpseg-1 on node02
20170717:16:29:14:025010 gpinitstandby:node01:gpadmin-[INFO]:------------------------------------------------------
。。。。。。
。。。。。。
20170717:16:29:31:025010 gpinitstandby:node01:gpadmin-[INFO]:-Backup files of pg_hba.conf cleaned up successfully.
20170717:16:29:31:025010 gpinitstandby:node01:gpadmin-[INFO]:-Successfully created standby master on node02
查看狀態:gpstate
3.13增加mirror
mirror就是鏡像,也叫數據備份。mirror對於數據存儲來說很重要,因為我們的伺服器指不定什麼時候出毛病,有mirror就好很多了,因為兩台存儲節點同時宕掉的幾率還是很小的。如果前面在GP初始化文件里忘記配置mirror了,請按照下麵的方法添加
[gpadmin@node01 ~]$ gpaddmirrors -p 1000
運行過程中需要輸入兩次mirror路徑:/data1/gpdata/mirror
3.14.設置訪問許可權
打開/data1/gpdata/master/gpseg-1/pg_hba.conf 按照最下麵的格式添加客戶端ip或網段
#user define
host all all 192.168.1.0/24 trust
host all all 127.0.0.1/28 trust
3.15.訪問方式
可以通過gpAdmin桌面客戶端來訪問,也可以用命令行來訪問,下麵來說一下命令行訪問的方式,loach是後面添加的用戶
[gpadmin@node01 ~]$ psql -d hx_gp -h node01 -p 5432 -U gpadmin
[gpadmin@node01 ~]$ psql -d hx_gp -h node01 -p 5432 -U loach
3.16.創建用戶
通過命令行登錄以後,執行下麵的命令
CREATE ROLE loach WITH LOGIN;
ALTER ROLE loach WITH PASSWORD 'loach';


