最近有接觸到關於visual studio 2017 擴展的開發,特此記錄,也是為了督促自己去深入瞭解其原理。 開始開發Visual Studio 擴展,在這裡我安裝了visual studio 2017, 在安裝的時候記得勾選上visual studio 擴展開發。 創建一個項目 我們打開編譯器, ...
最近有接觸到關於visual studio 2017 擴展的開發,特此記錄,也是為了督促自己去深入瞭解其原理。
開始開發Visual Studio 擴展,在這裡我安裝了visual studio 2017, 在安裝的時候記得勾選上visual studio 擴展開發。
創建一個項目
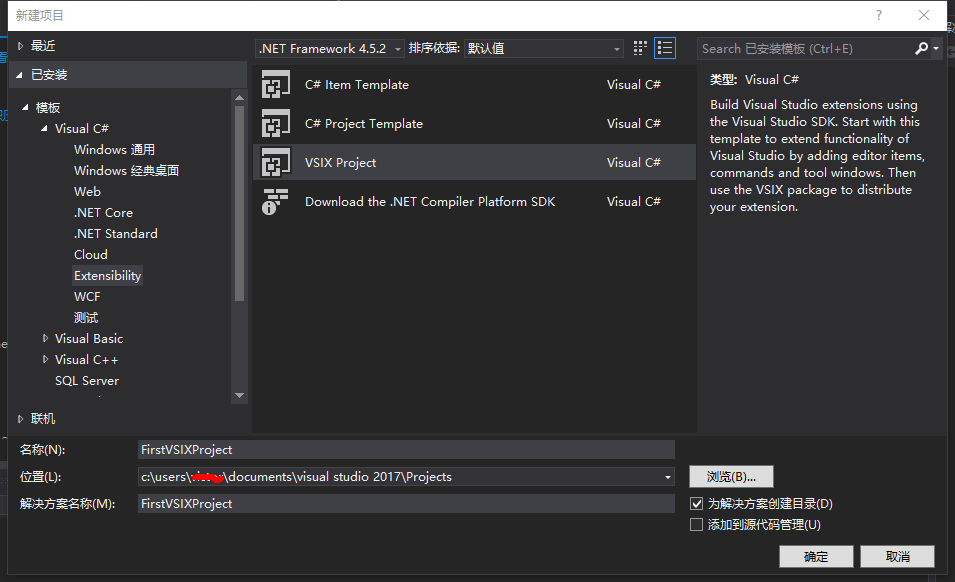
我們打開編譯器,文件→新建項目,模板→Visual C#→Extensibility 選擇 VSIX Project.創建一個項目。

添加自定義命令
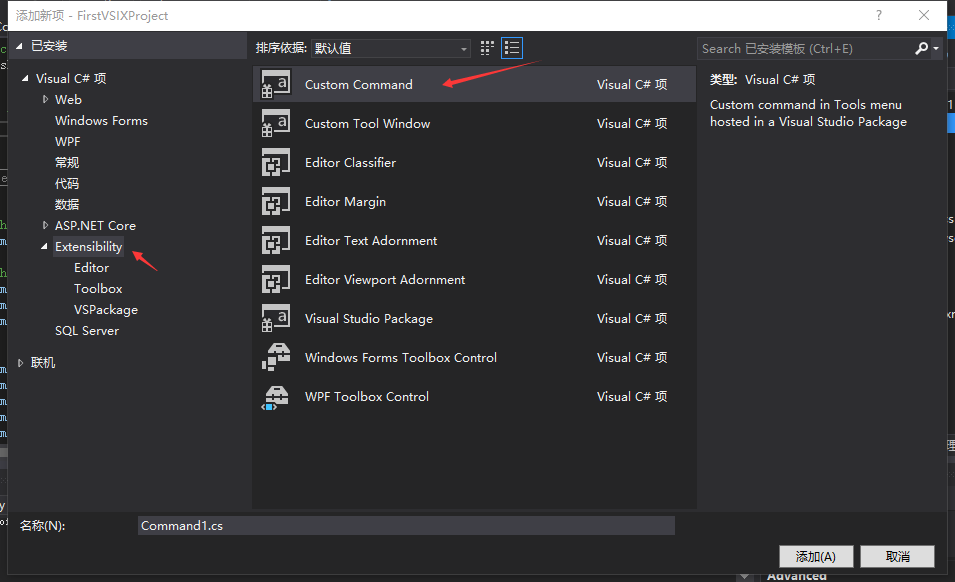
右鍵項目,添加新項。Visual C#項→Extensibility→Custom Command

我們找到CommandPackage.vsct文件 修改菜單名。
在Commands節點下的Buttons。
<Buttons>
      <!--To define a menu group you have to specify its ID, the parent menu and its display priority.
          The command is visible and enabled by default. If you need to change the visibility, status, etc, you can use
          the CommandFlag node.
          You can add more than one CommandFlag node e.g.:
              <CommandFlag>DefaultInvisible</CommandFlag>
              <CommandFlag>DynamicVisibility</CommandFlag>
          If you do not want an image next to your command, remove the Icon node /> -->
      <Button guid="guidCommandPackageCmdSet" id="CommandId" priority="0x0100" type="Button">
        <Parent guid="guidCommandPackageCmdSet" id="MyMenuGroup" />
        <Icon guid="guidImages" id="bmpPic1" />
        <Strings>
          <ButtonText>測試菜單</ButtonText>
        </Strings>
      </Button>
    </Buttons>
再打開Command.cs文件。下拉到最後。
        private void MenuItemCallback(object sender, EventArgs e)
        {
            string message = "Hello Word";
            string title = "測試";

            // Show a message box to prove we were here
            VsShellUtilities.ShowMessageBox(
                this.ServiceProvider,
                message,
                title,
                OLEMSGICON.OLEMSGICON_INFO,
                OLEMSGBUTTON.OLEMSGBUTTON_OK,
                OLEMSGDEFBUTTON.OLEMSGDEFBUTTON_FIRST);
        }
結果
運行,會打開一個新的Visual Studio,這是調試模式。
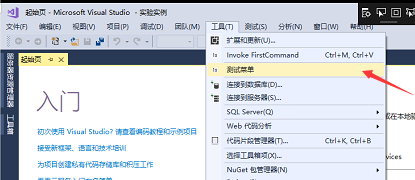
點開工具 我們可以看到我們擴展的那個菜單。

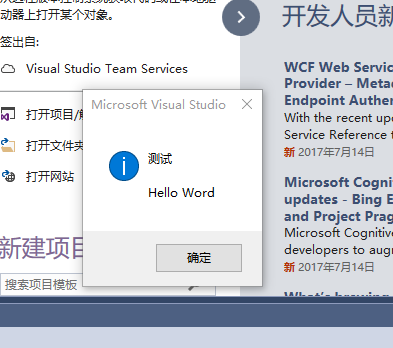
點擊測試菜單

此隨筆僅是本人學習記錄,後續應該會繼續寫,如果對你有幫助,動動你的滑鼠,右下方給我來個贊。你的支持是我最大的動力。


