ngrx 是 Angular框架的狀態容器,提供可預測化的狀態管理。 1.首先創建一個可路由訪問的模塊 這裡命名為:DemopetModule。 包括文件:demopet.html、demopet.scss、demopet.component.ts、demopet.routes.ts、demopet ...
ngrx 是 Angular框架的狀態容器,提供可預測化的狀態管理。
1.首先創建一個可路由訪問的模塊 這裡命名為:DemopetModule。
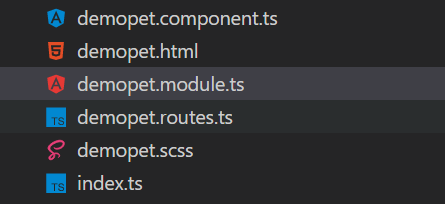
包括文件:demopet.html、demopet.scss、demopet.component.ts、demopet.routes.ts、demopet.module.ts
代碼如下:
demopet.html
<!--暫時放一個標簽-->
<h1>Demo</h1>
demopet.scss
h1{
    color:#d70029;
}
demopet.component.ts
import { Component} from '@angular/core';

@Component({
  selector: 'demo-pet',
  styleUrls: ['./demopet.scss'],
  templateUrl: './demopet.html'
})
export class DemoPetComponent {
    //nothing now...
}
demopet.routes.ts
import { DemoPetComponent } from './demopet.component';

export const routes = [
  {
    path: '', pathMatch: 'full', children: [
      { path: '', component: DemoPetComponent }
    ]
  }
];
demopet.module.ts
import { CommonModule } from '@angular/common';
import { FormsModule } from '@angular/forms';
import { NgModule } from '@angular/core';
import { RouterModule } from '@angular/router';
import { routes } from './demopet.routes';

@NgModule({
  declarations: [
    DemoPetComponent,
  ],
  imports: [
    CommonModule,
    FormsModule,
    RouterModule.forChild(routes)
  ],
  providers: [
  ]
})
export class DemoPetModule {


}
整體代碼結構如下:
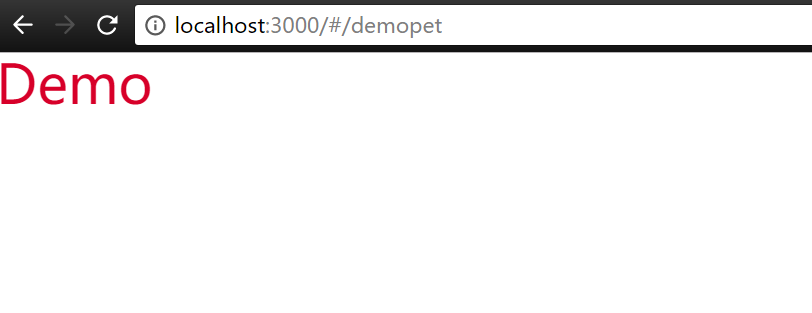
運行效果如下:只是為了學習方便,能夠有個運行的模塊
2.安裝ngrx
npm install @ngrx/core --save
npm install @ngrx/store --save
npm install @ngrx/effects --save
@ngrx/store是一個旨在提高寫性能的控制狀態的容器
3.使用ngrx
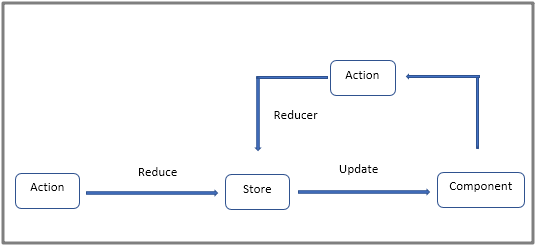
首先瞭解下單向數據流形式
代碼如下:
pet-tag.actions.ts
import { Injectable } from '@angular/core';
import { Action } from '@ngrx/store';

@Injectable()
export class PettagActions{
    static LOAD_DATA='Load Data';
    loadData():Action{
        return {
            type:PettagActions.LOAD_DATA
        };
    }

    static LOAD_DATA_SUCCESS='Load Data Success';
    loadDtaSuccess(data):Action{
        return {
            type:PettagActions.LOAD_DATA_SUCCESS,
            payload:data
        };
    }


    static LOAD_INFO='Load Info';
    loadInfo():Action{
        return {
            type:PettagActions.LOAD_INFO
        };
    }

    static LOAD_INFO_SUCCESS='Load Info Success';
    loadInfoSuccess(data):Action{
        return {
            type:PettagActions.LOAD_INFO_SUCCESS,
            payload:data
        };
    }
}
pet-tag.reducer.ts
import { Action } from '@ngrx/store';
import { Observable } from 'rxjs/Observable';
import { PettagActions } from '../action/pet-tag.actions';

export function petTagReducer(state:any,action:Action){
    switch(action.type){

        case PettagActions.LOAD_DATA_SUCCESS:{

            return action.payload;
        }

        // case PettagActions.LOAD_INFO_SUCCESS:{

        //     return action.payload;
        // }

        default:{

            return state;
        }
    }
}

export function infoReducer(state:any,action:Action){
    switch(action.type){

        case PettagActions.LOAD_INFO_SUCCESS:{

            return action.payload;
        }

        default:{

            return state;
        }
    }
}
NOTE:Action中定義了我們期望狀態如何發生改變 Reducer實現了狀態具體如何改變
Action與Store之間添加ngrx/Effect 實現action非同步請求與store處理結果間的解耦
pet-tag.effect.ts
import { Injectable } from '@angular/core';
import { Effect,Actions } from '@ngrx/effects';
import { PettagActions } from '../action/pet-tag.actions';
import { PettagService }  from '../service/pet-tag.service';

@Injectable()
export class PettagEffect {

    constructor(
        private action$:Actions,
        private pettagAction:PettagActions,
        private service:PettagService
    ){}


    @Effect() loadData=this.action$
                .ofType(PettagActions.LOAD_DATA)
                .switchMap(()=>this.service.getData())
                .map(data=>this.pettagAction.loadDtaSuccess(data))


    @Effect() loadInfo=this.action$
                .ofType(PettagActions.LOAD_INFO)
                .switchMap(()=>this.service.getInfo())
                .map(data=>this.pettagAction.loadInfoSuccess(data));
}
4.修改demopet.module.ts 添加 ngrx支持
import { StoreModule } from '@ngrx/store';
import { EffectsModule } from '@ngrx/effects';
import { PettagActions } from './action/pet-tag.actions';
import { petTagReducer,infoReducer } from './reducer/pet-tag.reducer';
import { PettagEffect } from './effect/pet-tag.effect';
@NgModule({
  declarations: [
    DemoPetComponent,
  ],
  imports: [
    CommonModule,
    FormsModule,
    RouterModule.forChild(routes),
    //here new added
    StoreModule.provideStore({
      pet:petTagReducer,
      info:infoReducer
    }),
    EffectsModule.run(PettagEffect)
  ],
  providers: [
    PettagActions,
    PettagService
  ]
})
export class DemoPetModule {  }
5.調用ngrx實現數據列表獲取與單個詳細信息獲取
demopet.component.ts
import { Component, OnInit, ViewChild, AfterViewInit } from '@angular/core';
import { Observable } from "rxjs";
import { Store } from '@ngrx/store';
import { Subscription } from 'rxjs/Subscription';
import { HttpService } from '../shared/services/http/http.service';
import { PetTag } from './model/pet-tag.model';
import { PettagActions } from './action/pet-tag.actions';

@Component({
  selector: 'demo-pet',
  styleUrls: ['./demopet.scss'],
  templateUrl: './demopet.html'
})
export class DemoPetComponent {

  private sub: Subscription;
  public dataArr: any;
  public dataItem: any;
  public language: string = 'en';
  public param = {value: 'world'};

  constructor(
    private store: Store<PetTag>,
    private action: PettagActions
  ) {

    this.dataArr = store.select('pet');
  }

  ngOnInit() {

    this.store.dispatch(this.action.loadData());
  }

  ngOnDestroy() {

    this.sub.unsubscribe();
  }

  info() {

    console.log('info');
    this.dataItem = this.store.select('info');
    this.store.dispatch(this.action.loadInfo());
  }

}
demopet.html
<h1>Demo</h1>


<pre>
   <ul>
        <li *ngFor="let d of dataArr | async">
            DEMO :  {{ d.msg }}
            <button (click)="info()">info</button>
        </li>
    </ul>

    {{ dataItem | async | json }}

    <h1 *ngFor="let d of dataItem | async"> {{ d.msg }} </h1>
</pre>
6.運行效果
初始化時候獲取數據列表
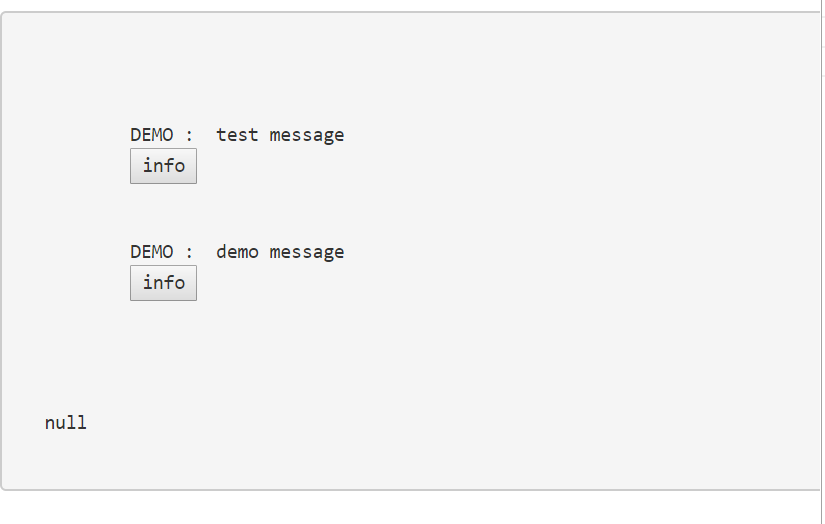
點擊info按鈕 獲取詳細詳細
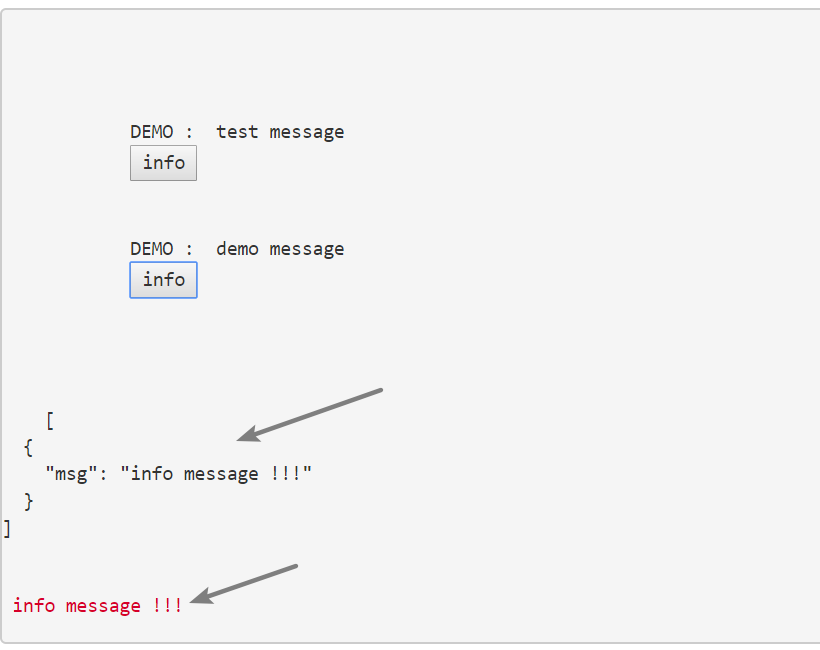
7.以上代碼是從項目中取出的部分代碼,其中涉及到HttpService需要自己封裝,data.json demo.json兩個測試用的json文件,名字隨便取的當時。
http.service.ts
import { Inject, Injectable } from '@angular/core';
import { Http, Response, Headers, RequestOptions, URLSearchParams } from '@angular/http';
import { Observable } from "rxjs";
import 'rxjs/add/operator/map';
import 'rxjs/operator/delay';
import 'rxjs/operator/mergeMap';
import 'rxjs/operator/switchMap';
import 'rxjs/add/operator/catch';
import 'rxjs/add/observable/throw';
import { handleError } from './handleError';
import { rootPath } from './http.config';

@Injectable()
export class HttpService {

    private _root: string="";

    constructor(private http: Http) {

        this._root=rootPath;
    }

    public get(url: string, data: Map<string, any>, root: string = this._root): Observable<any> {
        if (root == null) root = this._root;

        let params = new URLSearchParams();
        if (!!data) {
            data.forEach(function (v, k) {
                params.set(k, v);
            });

        }
        return this.http.get(root + url, { search: params })
                        .map((resp: Response) => resp.json())
                        .catch(handleError);
    }


}
8.模塊源代碼 下載
9.我的微信公眾號。


