一、下載Spring的jar包 通過http://repo.spring.io/release/org/springframework/spring/地址下載最新的Spring的zip包,當然,如果你是在使用maven工程的話,可以不用下載Zip包,可以直接在maven工程的pom.xml文件中添加 ...
一、下載Spring的jar包
通過http://repo.spring.io/release/org/springframework/spring/地址下載最新的Spring的zip包,當然,如果你是在使用maven工程的話,可以不用下載Zip包,可以直接在maven工程的pom.xml文件中添加Spring的依賴即可。
二、創建工程導入jar包
第一篇的內容記錄一些入門知識點,所以只需要導入幾個必要的基礎包則可,這裡項目只導入Spring的以下幾個包:
spring-core-4.3.9.RELEASE.jar
spring-beans-4.3.9.RELEASE.jar
spring-context-4.3.9.RELEASE.jar
spring-expression-4.3.9.RELEASE.jar
除此之外,還需要導入兩個日誌jar包:
log4j-1.2.15.jar
commons-logging-1.1.3.jar
三、創建測試工程
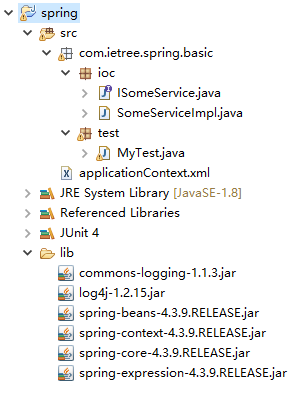
整個工程目錄如下圖所示:

3.1 編寫ISomeService介面類
package com.ietree.spring.basic.ioc;

/**
 * 介面類
 *
 * @author Root
 */
public interface ISomeService {

    void doSomeThing();

}
3.2 編寫SomeServiceImpl類,實現ISomeService
package com.ietree.spring.basic.ioc;

/**
 * 實現類
 *
 * @author Root
 */
public class SomeServiceImpl implements ISomeService {

    public SomeServiceImpl() {
        System.out.println("執行無參構造器,創建SomeServiceImpl對象");
    }

    @Override
    public void doSomeThing() {
        System.out.println("執行doSomeThing()方法...");
    }

}
3.3 編寫applicationContext.xml配置文件
其中xml中的schema配置可以直接從Spring官方文檔中複製(spring-framework-4.3.9.RELEASE\docs\spring-framework-reference\html\xsd-configuration.html)

所以將schema複製之後需要配置對應的bean,這裡的id可以隨便命名,只需要對應需要創建的類即可,之後需要根據配置的bean的id值來獲取對象,不要再通過最早的那種通過new Object()的方式獲取了。
<?xml version="1.0" encoding="UTF-8"?>
<beans xmlns="http://www.springframework.org/schema/beans"
    xmlns:xsi="http://www.w3.org/2001/XMLSchema-instance"
    xsi:schemaLocation="
        http://www.springframework.org/schema/beans
        http://www.springframework.org/schema/beans/spring-beans.xsd">

    <!--
           註冊Service
           這裡相當於容器做了SomeServiceImpl myService = new SomeServiceImpl();
     -->
    <bean id="myService" class="com.ietree.spring.basic.ioc.SomeServiceImpl"/>


</beans>
以上步驟配置完成之後,Spring的環境就算簡單搭建完成了,現在來測試一下。
四、獲取對象的幾種方式
1、通過new Object();方式獲取對象
@Test
public void test01() {
    ISomeService service = new SomeServiceImpl();
    service.doSomeThing();
}
2、通過ClassPathXmlApplicationContext對象載入Spring的配置文件,採用getBean的方式獲取對象
@Test
public void test02() {

    // 創建容器對象,載入Spring配置文件
    // ClassPathXmlApplicationContext會從類路徑下查找配置文件
    ApplicationContext ac = new ClassPathXmlApplicationContext("applicationContext.xml");

    ISomeService service = (ISomeService) ac.getBean("myService");
    service.doSomeThing();
}
3、通過FileSystemXmlApplicationContext對象載入Spring的配置文件,採用getBean的方式獲取對象
@Test
public void test03() {

    // FileSystemXmlApplicationContext會從項目的根下查找配置文件,或者從當前系統的D盤根目錄下查找配置文件
    ApplicationContext ac = new FileSystemXmlApplicationContext("applicationContext.xml");

    ISomeService service = (ISomeService) ac.getBean("myService");
    service.doSomeThing();
}
4、通過BeanFactory對象載入Spring的配置文件,採用getBean的方式獲取對象
   // ApplicationContext與BeanFactory容器的區別:
    // 1)ApplicationContext容器在進行初始化時,會將其中的所有Bean(對象)進行創建。
    //        缺點:占用系統資源(記憶體、CPU等)
    //        優點:響應速度快
    // 2)BeanFactory容器中的對象,在容器初始化時並不會被創建,而是在真正獲取該對象時才被創建。
    //        缺點:響應速度慢
    //        優點:不多占用系統資源(記憶體、CPU等)
    @Test
    public void test04() {

        // 創建容器對象,載入Spring配置文件
        BeanFactory bf = new XmlBeanFactory(new ClassPathResource("applicationContext.xml"));

        ISomeService service = (ISomeService) bf.getBean("myService");
        service.doSomeThing();
    }


