轉載請標明原文地址:http://www.cnblogs.com/zhangyukof/p/6785258.html 一、準備工作 已搭建好的SSH框架工程一個,如果沒有,請參考我的上一篇文章《SSH框架搭建詳細圖文教程》。 二、登陸功能 1.打開MyEclipse切換到MyEclipse Data ...
轉載請標明原文地址:http://www.cnblogs.com/zhangyukof/p/6785258.html
一、準備工作
已搭建好的SSH框架工程一個,如果沒有,請參考我的上一篇文章《SSH框架搭建詳細圖文教程》。
二、登陸功能
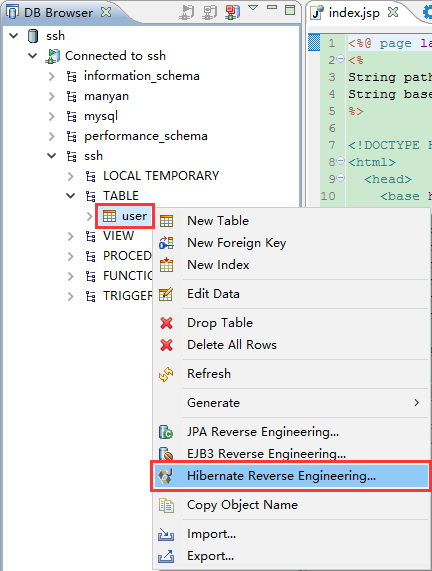
1.打開MyEclipse切換到MyEclipse DataBase Explorer視圖,右鍵user表選擇"Hibernate Reverse Engineering",通過Spring框架的逆向工程功能把user表逆向生成Java實體類。

2.在彈出視窗中Java src folder 選擇SSH項目下的src文件夾。Java package 填寫“com.ssh.spring.user”。
勾選前三個選項:Create POJO、Java Data Obect和Java Data Access Object。POJO類是資料庫表格所對應的Java類,JDO類是MyEclipse自動生成的對資料庫的一些操作,這裡會封裝一些常用的操作,基本上可以滿足我們的各種需要了,填寫後選擇“下一步”。

3.Id Generator 選擇“native”,點擊完成。

4.此時的目錄結構如下,我們可以看到系統生成了3個類,一個配置文件。
User 繼承自AbstractUser,是User表的實體類。
UserDAO 封裝了一些對資料庫的常用操作。
User.hbm.xml 是hibernate-mapping映射配置文件,配置了哪個實體類映射哪個表,配置了實體類的哪個屬性映射表裡的哪列。

5.現在來寫測試頁。打開WEB-INF文件夾下的struts-config.xml文件,切換到設計視圖(design)。在空白處右鍵 > New > Form Action and JSP。

6.填寫Form表單屬性:
Use case: login
在下方Form Properties中點擊“Add”添加兩個屬性
username: JSP input type選擇“text”
password: JSP input type選擇“password”

7.切換到JSP選項,勾選“Create JSP form”選項讓系統自動生成login.jsp頁,點擊“完成”。

8.完成後項目結構如下,Struts幫我們建立了邏輯關係並生成了login.jsp、LoginForm.java、LoginAction.java三個文件。這正是我們在設計視圖裡選擇Form,Action and JSP所配置的信息。

9.把struts-config.xml切換到source源代碼視圖,可以看到struts的配置文件里也相應的添加了這3個文件的映射配置信息。

Struts處理請求的流程:

10.新建一個loginSuccess.jsp登陸成功頁,實現登陸後的跳轉。右鍵項目的WebRoot/form文件夾 選擇“新建” > “JSP(Advanced Templates)”。

11.在彈出視窗中“File Name”處填寫:loginSuccess.jsp。

12.打開loginSuccess.jsp修改頁面代碼如下:
<%@ page language="java" import="java.util.*" pageEncoding="UTF-8"%>
<%
String path = request.getContextPath();
String basePath = request.getScheme()+"://"+request.getServerName()+":"+request.getServerPort()+path+"/";
%>

<!DOCTYPE HTML PUBLIC "-//W3C//DTD HTML 4.01 Transitional//EN">
<html>
  <head>
    <base href="<%=basePath%>">

    <title>登陸成功頁</title>

    <meta http-equiv="pragma" content="no-cache">
    <meta http-equiv="cache-control" content="no-cache">
    <meta http-equiv="expires" content="0">
    <meta http-equiv="keywords" content="keyword1,keyword2,keyword3">
    <meta http-equiv="description" content="This is my page">
    <!--
    <link rel="stylesheet" type="text/css" href="styles.css">
    -->

  </head>

  <body>
  <% Object nickname = request.getAttribute("nickname"); %>
    登陸成功!歡迎您:<% out.print(nickname); %><br>
  </body>
</html>
13.把登錄頁、登錄成功跳轉、登錄失敗跳轉關聯到一起。
切換到struts-config.xml的設計視圖。在視圖中右鍵選擇 New->Forward。

14.在彈出視窗中配置如下信息:
(1)選擇Local Action Forward
(2)瀏覽Action Path:/login
(3)填寫name:loginSuccess
(4)瀏覽Path:/form/loginSuccess.jsp
(5)點擊“完成”

15.添加一個登陸失敗跳轉。在設計視圖中的右鍵選擇 New->Forward。在彈出視窗中配置如下信息:
(1)選擇Local Action Forward
(2)瀏覽Action Path:/login
(3)填寫name:loginFail
(4)瀏覽Path:/form/login.jsp
(5)點擊“完成”

添加跳轉後struts-config.xml結構如下:

16.切換到struts-config.xml的source視圖,可以看到在aciton下多了兩行跳轉信息。
<?xml version="1.0" encoding="UTF-8"?>
<!DOCTYPE struts-config PUBLIC "-//Apache Software Foundation//DTD Struts Configuration 1.2//EN" "http://struts.apache.org/dtds/struts-config_1_2.dtd">

<struts-config>
  <data-sources />
  <form-beans >
    <form-bean name="loginForm" type="com.ssh.struts.form.LoginForm" />

  </form-beans>

  <global-exceptions />
  <global-forwards />
  <action-mappings >
    <action
      attribute="loginForm"
      input="/form/login.jsp"
      name="loginForm"
      path="/login"
      scope="request"
      type="com.ssh.struts.action.LoginAction">
      <set-property property="cancellable" value="true" />
      <forward name="loginSuccess" path="/form/loginSuccess.jsp" />
      <forward name="loginFail" path="/form/login.jsp" />
    </action>

  </action-mappings>

  <message-resources parameter="com.ssh.struts.ApplicationResources" />
</struts-config>
17.寫具體的處理代碼。打開struts/aciton包下的LoginAction.java。修改代碼如下,先不連資料庫測一下是否能夠正確跳轉。
package com.ssh.struts.action;

import javax.servlet.http.HttpServletRequest;
import javax.servlet.http.HttpServletResponse;
import org.apache.struts.action.Action;
import org.apache.struts.action.ActionForm;
import org.apache.struts.action.ActionForward;
import org.apache.struts.action.ActionMapping;
import com.ssh.struts.form.LoginForm;

public class LoginAction extends Action {

    public ActionForward execute(ActionMapping mapping, ActionForm form,
            HttpServletRequest request, HttpServletResponse response) {

        LoginForm loginForm = (LoginForm) form;
        //獲取帳號密碼
        String username = loginForm.getUsername();
        String password = loginForm.getPassword();
        //帳號密碼匹配跳轉到登錄成功頁並顯示昵稱
        if("asd".equals(username) && "123".equals(password)){
            request.setAttribute("nickname", "冰封百度");
            return mapping.findForward("loginSuccess");
        }
        //不匹配,跳轉到登錄失敗頁並顯示提示信息
        request.setAttribute("message", "賬號或密碼錯誤");
        return mapping.findForward("loginFail");
    }
}
18.頁面準備完畢。啟動Tomcat伺服器,在瀏覽器中訪問登陸頁地址:http://127.0.0.1:8080/SSH/form/login.jsp

19.漢化界面。打開login.jsp,代碼如下:
<%@ page language="java" pageEncoding="UTF-8"%>
<%@ taglib uri="http://struts.apache.org/tags-bean" prefix="bean"%>
<%@ taglib uri="http://struts.apache.org/tags-html" prefix="html"%>

<html>
    <head>
        <title>JSP for LoginForm form</title>
    </head>
    <body>
        <html:form action="/login">
            username : <html:text property="username"/><html:errors property="username"/><br/>
            password : <html:password property="password"/><html:errors property="password"/><br/>
            <html:submit/><html:cancel/>
        </html:form>
    </body>
</html>
註意:頭部引用的文件位置是"http://struts.apache.org/",路徑地址是國外apache的官網文件,這個地址經常會訪問不到,導致頁面打開失敗,所以這裡要改成自己工程下的文件路徑。
頁面代碼修改如下:
<%@ page language="java" pageEncoding="UTF-8"%>
<%@ taglib uri="/WEB-INF/struts-bean.tld" prefix="bean" %>
<%@ taglib uri="/WEB-INF/struts-html.tld" prefix="html" %>

<html>
    <head>
        <title>登陸頁</title>
    </head>
    <body>
        <html:form action="/login">
            用戶名 : <html:text property="username"/><html:errors property="username"/><br/>
            密 碼 : <html:password property="password"/><html:errors property="password"/><br/>
            <html:submit value="登陸" /><html:cancel value="取消"/>
        </html:form>
        <% Object message = request.getAttribute("message"); %>
        <% if(message != null) out.print(message); %>
    </body>
</html>
刷新頁面可以看到如下效果:

20.直接點擊登陸。因為沒填賬號密碼,應該跳轉到登陸失敗頁面。

21.用戶名填寫“asd”,密碼填寫“123”。點擊登錄,帳號密碼和後臺設置的匹配,這時候應該跳轉到登錄成功頁面。

22.測試完成,下麵我們連接一下資料庫,從資料庫里取出user數據進行匹配。
想操作資料庫我們要先獲取DAO(data access object),我們的UserDAO是hibernate生成的,關於UserDAO的配置信息寫在了applicationContext.xml里。所以在用UserDAO之前要先獲取applicationContext.xml。
百度上查找了一下相關代碼,找到了一個獲取applicationContext.xml的方法。Spring框架里的
ClassPathXmlApplicationContext 通過這個類可以獲取到我們需要的DAO。名字和applicationContext非常像,看起來就是這個類了,測試一下這個類是否好用,修改LoginAction.java代碼如下:
package com.ssh.struts.action;

import javax.servlet.http.HttpServletRequest;
import javax.servlet.http.HttpServletResponse;

import org.apache.struts.action.Action;
import org.apache.struts.action.ActionForm;
import org.apache.struts.action.ActionForward;
import org.apache.struts.action.ActionMapping;
import org.springframework.context.support.ClassPathXmlApplicationContext;

import com.ssh.struts.form.LoginForm;

public class LoginAction extends Action {

    public ActionForward execute(ActionMapping mapping, ActionForm form,
            HttpServletRequest request, HttpServletResponse response) {

        LoginForm loginForm = (LoginForm) form;
        //獲取帳號密碼
        String username = loginForm.getUsername();
        String password = loginForm.getPassword();
        //獲取用戶信息
        ClassPathXmlApplicationContext beans = new ClassPathXmlApplicationContext("applicationContext.xml");
        System.out.println(beans);
        //帳號密碼匹配跳轉到登錄成功頁並顯示昵稱
        if("asd".equals(username) && "123".equals(password)){
            request.setAttribute("nickname", "冰封百度");
            return mapping.findForward("loginSuccess");
        }
        //不匹配,跳轉到登錄失敗頁並顯示提示信息
        request.setAttribute("message", "賬號或密碼錯誤");
        return mapping.findForward("loginFail");
    }
}
23.重啟Tomcat伺服器,訪問登錄頁http://127.0.0.1:8080/SSH/form/login.jsp,點擊登錄。
javax.servlet.ServletException: org.springframework.beans.factory.BeanDefinitionStoreException: IOException parsing XML document from class path resource [applicationContext.xml]
出現了一個錯誤,意思為找不到applicationContext.xml。看來我們填寫的路徑有問題,這個配置文件應該是從我們項目classes的根目錄開始查找的,先看一下我們的項目發佈後classes的路徑,右鍵SSH項目 > 屬性 > Java構建路徑 > 源代碼。

可以看到我們項目發佈後classes的根目錄是SSH/WebRoot/WEB-INF/classes。 applicationContext.xml是這個位置的上一級,那麼相對於這個路徑的位置就是"../applicationContext.xml"。現在把LoginAction里的路徑修改一下:
ClassPathXmlApplicationContext beans = new ClassPathXmlApplicationContext("../applicationContext.xml");
重新啟動Tomcat伺服器,訪問登錄頁http://127.0.0.1:8080/SSH/form/login.jsp,點擊登錄:
頁面不再報錯,正常跳轉,控制台也輸出了:
org.springframework.context.support.ClassPathXmlApplicationContext@14bb075: startup date [Mon Apr 22 14:26:58 CST 2017]; root of context hierarchy]
如果頁面還是出錯,出現以下信息,則有可能Java EE庫的版本低了,請刪除項目里的Java EE庫重新添加Java EE 6.0庫
org.springframework.beans.factory.BeanCreationException: Error creating bean with name 'sessionFactory' defined in class path resource [config/applicationContext.xml]: Instantiation of bean failed; nested exception is org.springframework.beans.BeanInstantiationException: Could not instantiate bean class [org.springframework.orm.hibernate3.LocalSessionFactoryBean]: Constructor threw exception; nested exception is java.lang.NoClassDefFoundError: org/hibernate/cfg/Configuration
24.路徑的問題解決了,正確的獲取到了配置信息,這個配置信息我們以後要經常用,沒必要每次用的時候都把它創建出來,寫一個全局變數保存它吧。在src下新建一個包com.ssh.common,在包里新建一個類Global.java。輸入代碼如下:

package com.ssh.common;

import org.springframework.context.support.ClassPathXmlApplicationContext;

public class Global {

    public static ClassPathXmlApplicationContext beans = new ClassPathXmlApplicationContext("../applicationContext.xml");

    public static Object getDao(String daoName){
        return beans.getBean(daoName);
    }
}
26.現在來獲取資料庫里的數據,上一篇文章中建的user表中已經插入了一條數據,就用這個用戶信息來測試。

把LoginAction.java代碼修改如下:
package com.ssh.struts.action;

import java.util.List;

import javax.servlet.http.HttpServletRequest;
import javax.servlet.http.HttpServletResponse;

import org.apache.struts.action.Action;
import org.apache.struts.action.ActionForm;
import org.apache.struts.action.ActionForward;
import org.apache.struts.action.ActionMapping;

import com.ssh.common.Global;
import com.ssh.spring.user.User;
import com.ssh.spring.user.UserDAO;
import com.ssh.struts.form.LoginForm;

public class LoginAction extends Action {

    public ActionForward execute(ActionMapping mapping, ActionForm form,
            HttpServletRequest request, HttpServletResponse response) {

        LoginForm loginForm = (LoginForm) form;
        //獲取帳號密碼
        String username = loginForm.getUsername();
        String password = loginForm.getPassword();
        //檢查該用戶是否存在
        User instance = new User();
        instance.setUsername(username);
        instance.setPassword(password);
        UserDAO userDAO = (UserDAO)Global.getDao("UserDAO");
        List<?> list = userDAO.findByExample(instance);
        //如果用戶存在,跳轉到登錄成功頁並顯示昵稱
        if(list.size() > 0){
            User user = (User)list.get(0);
            String nickname = user.getNickname();
            request.setAttribute("nickname", nickname);
            return mapping.findForward("loginSuccess");
        }
        //用戶不存在,跳轉到登錄失敗頁並顯示提示信息
        request.setAttribute("message", "賬號或密碼錯誤");
        return mapping.findForward("loginFail");
    }
}
重新啟動Tomcat伺服器,訪問登錄頁http://127.0.0.1:8080/SSH/form/login.jsp,用戶名:admin,密碼:1234,點擊登錄。可以看到,跳轉到登陸成功頁並顯示了正確的昵稱。

登錄功能完成,因為只是個測試頁,這些功能就儘量簡單了,大家別介意,下麵來做註冊功能。
三、註冊功能
1.切換到struts-config.xml的設計視圖,空白處右鍵選擇 New > Form,Action and JSP。

2.在彈出視窗中配置如下信息:
Use case填寫“register”
Form Properties點擊“Add”添加三個屬性
(1)username type:text
(2)password type:password
(3)nickname type:text

3.點擊JSP選項,勾選Create JSP form,點擊“完成”。

4.關聯測試頁和登陸頁。右鍵struts-config.xml設計視圖中的regiser.jsp 選擇 New > Forward。

5.添加註冊成功跳轉。在彈出視窗中配置如下信息:
(1)選擇Local Action Forward
(2)Action Path:/register
(3)Name:registerSuccess
(4)Path:/form/login.jsp
點擊“完成”。

6.添加註冊失敗跳轉。右鍵struts-config.xml設計視圖中的regiser.jsp 選擇 New > Forward。在彈出視窗中配置如下信息:
(1)選擇Local Action Forward
(2)Action Path:/register
(3)Name:registerFail
(4)Path:/form/register.jsp
點擊“完成”。

關聯成功後struts-config.xml代碼如下:
<?xml version="1.0" encoding="UTF-8"?>
<!DOCTYPE struts-config PUBLIC "-//Apache Software Foundation//DTD Struts Configuration 1.2//EN" "http://struts.apache.org/dtds/struts-config_1_2.dtd">

<struts-config>
  <data-sources />
  <form-beans >
    <form-bean name="loginForm" type="com.ssh.struts.form.LoginForm" />
    <form-bean name="registerForm" type="com.ssh.struts.form.RegisterForm" />

  </form-beans>

  <global-exceptions />
  <global-forwards />
  <action-mappings >
    <action
      attribute="loginForm"
      input="/form/login.jsp"
      name="loginForm"
      path="/login"
      scope="request"
      type="com.ssh.struts.action.LoginAction">
      <set-property property="cancellable" value="true" />
      <forward name="loginSuccess" path="/form/loginSuccess.jsp" />
      <forward name="loginFail" path="/form/login.jsp" />
    </action>
    <action
      attribute="registerForm"
      input="/form/register.jsp"
      name="registerForm"
      path="/register"
      scope="request"
      type="com.ssh.struts.action.RegisterAction">
      <set-property property="cancellable" value="true" />
      <forward name="registerSuccess" path="/form/login.jsp" />
      <forward name="registerFail" path="/form/register.jsp" />
    </action>

  </action-mappings>

  <message-resources parameter="com.ssh.struts.ApplicationResources" />
</struts-config>
7.漢化註冊頁。register.jsp修改後代碼如下:
<%@ page language="java" pageEncoding="UTF-8"%>
<%@ taglib uri="/WEB-INF/struts-bean.tld" prefix="bean" %>
<%@ taglib uri="/WEB-INF/struts-html.tld" prefix="html" %>

<html>
    <head>
        <title>註冊頁</title>
    </head>
    <body>
        <html:form action="/register">
            昵 稱 : <html:text property="nickname"/><html:errors property="nickname"/><br/>
            用戶名 : <html:text property="username"/><html:errors property="username"/><br/>
            密 碼 : <html:password property="password"/><html:errors property="password"/><br/>
            <html:submit value="確定"/><html:cancel value="取消"/>
        </html:form>
        <% Object message = request.getAttribute("message"); %>
        <% if(message != null) out.print(message); %>
    </body>
</html>
8.把註冊信息插入資料庫。打開RegisterAction.java文件,修改代碼如下:
package com.ssh.struts.action;

import java.util.List;

import javax.servlet.http.HttpServletRequest;
import javax.servlet.http.HttpServletResponse;

import org.apache.struts.action.Action;
import org.apache.struts.action.ActionForm;
import org.apache.struts.action.ActionForward;
import org.apache.struts.action.ActionMapping;

import com.ssh.common.Global;
import com.ssh.spring.user.User;
import com.ssh.spring.user.UserDAO;
import com.ssh.struts.form.RegisterForm;

public class RegisterAction extends Action {

    public ActionForward execute(ActionMapping mapping, ActionForm form,
            HttpServletRequest request, HttpServletResponse response) {

        //獲取註冊信息
        RegisterForm registerForm = (RegisterForm) form;
        String nickname = registerForm.getNickname();
        String username = registerForm.getUsername();
        String password = registerForm.getPassword();

        //檢查表單值是否有效
        if(nickname.length() == 0 || username.length() == 0 || password.length() == 0){
            request.setAttribute(


