參考老師的博客: 金角:http://www.cnblogs.com/alex3714/articles/5143440.html 銀角:http://www.cnblogs.com/wupeiqi/articles/4963027.html 一、常用函數說明: ★ lamba python lam
參考老師的博客:
金角:http://www.cnblogs.com/alex3714/articles/5143440.html
銀角:http://www.cnblogs.com/wupeiqi/articles/4963027.html
一、常用函數說明:
★ lamba
python lambda是在python中使用lambda來創建匿名函數,而用def創建的方法是有名稱的,除了從錶面上的方法名不一樣外,python lambda還有哪些和def不一樣呢?
1 python lambda會創建一個函數對象,但不會把這個函數對象賦給一個標識符,而def則會把函數對象賦值給一個變數。
2 python lambda它只是一個表達式,而def則是一個語句。
lambda語句中,冒號前是參數,可以有多個,用逗號隔開,冒號右邊的返回值。lambda語句構建的其實是一個函數對象。
例:
m = lambda x,y,z: (x-y)*z
print m(234,122,5)
也經常用於生成列表,例:
list = [i ** i for i in range(10)]
print(list)
list_lambda = map(lambda x:x**x,range(10))
print(list_lambda)
★ enumerate(iterable,[start]) iterable為一個可迭代的對象;
enumerate(iterable[, start]) -> iterator for index, value of iterable Return an enumerate object. iterable must be another object that supports iteration. The enumerate object yields pairs containing a count (from start, which defaults to zero) and a value yielded by the iterable
argument. enumerate is useful for obtaining an indexed list: (0, seq[0]), (1, seq[1]), (2, seq[2]), ...
例:
for k,v in enumerate(['a','b','c',1,2,3],10):
print k,v
★S.format(*args, **kwargs) -> string 字元串的格式輸出,類似於格式化輸出%s
Return a formatted version of S, using substitutions from args and kwargs.
The substitutions are identified by braces ('{' and '}').
s = 'i am {0},{1}'
print(s.format('wang',1))
★map(function,sequence) 將squence每一項做為參數傳給函數,並返回值
例:
def add(arg):
return arg + 101
print(map(add,[12,23,34,56]))
★filter(function or None, sequence) -> list, tuple, or string 返還true的序列
Return those items of sequence for which function(item) is true. If
function is None, return the items that are true. If sequence is a tuple
or string, return the same type, else return a list.
例:
def comp(arg):
if arg < 8:
return True
else:
return False
print(filter(comp,[1,19,21,8,5]))
print(filter(lambda x:x % 2,[1,19,20,8,5]))
print(filter(lambda x:x % 2,(1,19,20,8,5)))
print(filter(lambda x:x > 'a','AbcdE'))
★reduce(function, sequence[, initial]) -> value 對二個參數進行計算
Apply a function of two arguments cumulatively to the items of a sequence,
from left to right, so as to reduce the sequence to a single value.For example, reduce(lambda x, y: x+y, [1, 2, 3, 4, 5]) calculates((((1+2)+3)+4)+5). If initial is present, it is placed before the
items of the sequence in the calculation, and serves as a default when the sequence is empty.
例:
print(reduce(lambda x,y:x*y,[22,11,8]))
print(reduce(lambda x,y:x*y,[3],10))
print(reduce(lambda x,y:x*y,[],5))
★zip(seq1 [, seq2 [...]]) -> [(seq1[0], seq2[0] ...), (...)] 將多個序列轉化為新元祖的序列
Return a list of tuples, where each tuple contains the i-th element from each of the argument sequences. The returned list is truncated in length to the length of the shortest argument sequence.
例:
a = [1,2,3,4,5,6]
b = [11,22,33,44,55]
c = [111,222,333,444]
print(zip(a,b,c))
★eval(source[, globals[, locals]]) -> value 將表達式字元串執行為值,其中globals為全局命名空間,locals為局部命名空間,從指字的命名空間中執行表達式,
Evaluate the source in the context of globals and locals. The source may be a string representing a Python expression or a code object as returned by compile(). The globals must be a dictionary and locals can be any mapping, defaulting to the current globals and locals. If only globals is given, locals defaults to it.
例:
a = '8*(8+20-5%12*23'
print(eval(a))
d = {'a':5,'b':4}
print(eval('a*b',d))
★exec(source[, globals[, locals]]) 語句用來執行儲存在字元串或文件中的Python語句
例:
a = 'print("nihao")'
b = 'for i in range(10): print i'
exec(a)
exec(b)
★execfile(filename[, globals[, locals]])
Read and execute a Python script from a file.The globals and locals are dictionaries, defaulting to the currentglobals and locals. If only globals is given, locals defaults to it.
二、模塊 paramiko
paramiko是一個用於做遠程式控制制的模塊,使用該模塊可以對遠程伺服器進行命令或文件操作,值得一說的是,fabric和ansible內部的遠程管理就是使用的paramiko來現實。
1、下載安裝(pycrypto,由於 paramiko 模塊內部依賴pycrypto,所以先下載安裝pycrypto)
2、使用模塊

#!/usr/bin/env python
#coding:utf-8

import paramiko

ssh = paramiko.SSHClient()
ssh.set_missing_host_key_policy(paramiko.AutoAddPolicy())
ssh.connect('192.168.1.108', 22, 'alex', '123')
stdin, stdout, stderr = ssh.exec_command('df')
print stdout.read()
ssh.close();
通過用戶名和密碼連接伺服器

import paramiko

private_key_path = '/home/auto/.ssh/id_rsa'
key = paramiko.RSAKey.from_private_key_file(private_key_path)

ssh = paramiko.SSHClient()
ssh.set_missing_host_key_policy(paramiko.AutoAddPolicy())
ssh.connect('主機名 ', 埠, '用戶名', key)

stdin, stdout, stderr = ssh.exec_command('df')
print stdout.read()
ssh.close()
過密鑰鏈接伺服器

import os,sys
import paramiko

t = paramiko.Transport(('182.92.219.86',22))
t.connect(username='wupeiqi',password='123')
sftp = paramiko.SFTPClient.from_transport(t)
sftp.put('/tmp/test.py','/tmp/test.py')
t.close()


import os,sys
import paramiko

t = paramiko.Transport(('182.92.219.86',22))
t.connect(username='wupeiqi',password='123')
sftp = paramiko.SFTPClient.from_transport(t)
sftp.get('/tmp/test.py','/tmp/test2.py')
t.close()
上傳或者下載文件 - 通過用戶名和密碼

import paramiko

pravie_key_path = '/home/auto/.ssh/id_rsa'
key = paramiko.RSAKey.from_private_key_file(pravie_key_path)

t = paramiko.Transport(('182.92.219.86',22))
t.connect(username='wupeiqi',pkey=key)

sftp = paramiko.SFTPClient.from_transport(t)
sftp.put('/tmp/test3.py','/tmp/test3.py')

t.close()

import paramiko

pravie_key_path = '/home/auto/.ssh/id_rsa'
key = paramiko.RSAKey.from_private_key_file(pravie_key_path)

t = paramiko.Transport(('182.92.219.86',22))
t.connect(username='wupeiqi',pkey=key)

sftp = paramiko.SFTPClient.from_transport(t)
sftp.get('/tmp/test3.py','/tmp/test4.py')

t.close()
上傳或下載文件 - 通過密鑰
三、其他常用模塊:
1、random模塊:
★random 生成隨機數
print random.random() 生成0-1之間的小數
print random.randint(1,3) 生成整數,包含endpoint
print random.randrange(1,3,2) 生成整數,不包含endpoint
randrange(self, start, stop=None, step=?)
生成5位隨機數,例:
import random
a = []
for i in range(5):
if i == random.randint(1,5):
a.append(str(i))
else:
a.append(chr(random.randint(65,90)))
else:
print(''.join(a))
2、MD5、sha、hashlib模塊
★生成MD5碼
例:
一. 使用md5包
import md5
src = 'this is a md5 test.'
m1 = md5.new()
m1.update(src)
print m1.hexdigest()
二、使用sha包
import sha
hash = sha.new()
hash.update('admin')
print hash.hexdigest()
三. 使用hashlib
用於加密相關的操作,代替了md5模塊和sha模塊,主要提供 SHA1, SHA224, SHA256, SHA384, SHA512 ,MD5 演算法
import hashlib
hash = hashlib.md5()
hash.update('this is a md5 test.')
hash.update('admin')
print(hash.digest())
print(hash.hexdigest())

import hashlib

# ######## md5 ########

hash = hashlib.md5()
hash.update('admin')
print hash.hexdigest()

# ######## sha1 ########

hash = hashlib.sha1()
hash.update('admin')
print hash.hexdigest()

# ######## sha256 ########

hash = hashlib.sha256()
hash.update('admin')
print hash.hexdigest()


# ######## sha384 ########

hash = hashlib.sha384()
hash.update('admin')
print hash.hexdigest()

# ######## sha512 ########

hash = hashlib.sha512()
hash.update('admin')
print hash.hexdigest()
hashlib
推薦使用第三種方法。
對以上代碼的說明:
1.首先從python直接導入hashlib模塊
2.調用hashlib里的md5()生成一個md5 hash對象
3.生成hash對象後,就可以用update方法對字元串進行md5加密的更新處理
4.繼續調用update方法會在前面加密的基礎上更新加密
5.加密後的二進位結果
6.十六進位結果
如果只需對一條字元串進行加密處理,也可以用一條語句的方式:
print(hashlib.new("md5", "Nobody inspects the spammish repetition").hexdigest())
以上加密演算法雖然依然非常厲害,但時候存在缺陷,即:通過撞庫可以反解。所以,有必要對加密演算法中添加自定義key再來做加密
| 1 2 3 4 5 6 7 |
import hashlib
# ######## md5 ########
hash = hashlib.md5('898oaFs09f')
hash.update('admin')
print hash.hexdigest()
|
還不夠弔?python 還有一個 hmac 模塊,它內部對我們創建 key 和 內容 再進行處理然後再加密
| 1 2 3 4 |
import hmac
h = hmac.new('wueiqi')
h.update('hellowo')
print h.hexdigest()
|
不能再牛逼了!!!
3、pickle和json模塊:
★python對象與文件之間的序列化和反序列化(pickle和json)
用於序列化的兩個模塊
- json,用於字元串 和 python數據類型間進行轉換
- pickle,用於python特有的類型 和 python的數據類型間進行轉換
Json模塊提供了四個功能:dumps、dump、loads、load
pickle模塊提供了四個功能:dumps、dump、loads、load
pickle模塊用來實現python對象的序列化和反序列化。通常地pickle將python對象序列化為二進位流或文件。
python對象與文件之間的序列化和反序列化:
pickle.dump()
pickle.load()
如果要實現python對象和字元串間的序列化和反序列化,則使用:
pickle.dumps()
pickle.loads()
可以被序列化的類型有:
* None,True 和 False;
* 整數,浮點數,複數;
* 字元串,位元組流,位元組數組;
* 包含可pickle對象的tuples,lists,sets和dictionaries;
* 定義在module頂層的函數:
* 定義在module頂層的內置函數;
* 定義在module頂層的類;
* 擁有__dict__()或__setstate__()的自定義類型;
註意:對於函數或類的序列化是以名字來識別的,所以需要import相應的module。
例:
import pickle
data = {
'a': [1, 2.0, 3, 4+6j],
'b': ("character string", "byte string"),
'c': set([None, True, False])
}
du = pickle.dumps(data)
print(pickle.loads(du))
print(du)
with open('data.pickle', 'wb') as f:
pickle.dump(data, f)
with open('data.pickle', 'rb') as f:
data = pickle.load(f)
print(str(data))
★JSON(JavaScript Object Notation):一種輕量級數據交換格式,相對於XML而言更簡單,也易於閱讀和編寫,機器也方便解析和生成,Json是JavaScript中的一個子集。
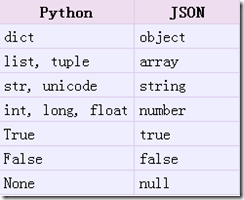
Python的Json模塊序列化與反序列化的過程分別是 encoding和 decoding
encoding:把一個Python對象編碼轉換成Json字元串
decoding:把Json格式字元串解碼轉換成Python對象
具體的轉化對照如下:

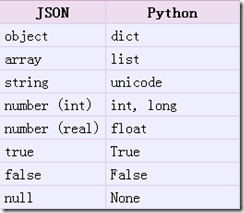
loads方法返回了原始的對象,但是仍然發生了一些數據類型的轉化。比如,上例中‘abc’轉化為了unicode類型。從json到python的類型轉化對照如下:

例:
import json
data = { 'a': [1, 2.0, 3, 4], 'b': ("character string", "byte string"), 'c': 'abc'}
du = json.dumps(data)
print(du)
print(json.loads(du,encoding='ASCII'))
with open('data.json','wb') as f:
json.dump(data,f)
with open('data.json','rb') as f:
data = json.load(f)
print(repr(data))
經測試,2.7版本導出的json文件,3.4版本導入會報錯:TypeError: the JSON object must be str, not 'bytes'
4、正則表達式模塊:
re模塊用於對python的正則表達式的操作。
字元:
. 匹配除換行符以外的任意字元
\w 匹配字母或數字或下劃線或漢字
\s 匹配任意的空白符
\d 匹配數字
\b 匹配單詞的開始或結束
^ 匹配字元串的開始
$ 匹配字元串的結束
次數:
* 重覆零次或更多次
+ 重覆一次或更多次
? 重覆零次或一次
{n} 重覆n次
{n,} 重覆n次或更多次
{n,m} 重覆n到m次
IP:
^(25[0-5]|2[0-4]\d|[0-1]?\d?\d)(\.(25[0-5]|2[0-4]\d|[0-1]?\d?\d)){3}$
手機號:
^1[3|4|5|8][0-9]\d{8}$
★re.match的函數原型為:re.match(pattern, string, flags)
第一個參數是正則表達式,這裡為"(\w+)\s",如果匹配成功,則返回一個Match,否則返回一個None;
第二個參數表示要匹配的字元串;
第三個參數是標緻位,用於控制正則表達式的匹配方式,如:是否區分大小寫,多行匹配等等。
★re.search的函數原型為: re.search(pattern, string, flags)
每個參數的含意與re.match一樣。
re.match與re.search的區別:re.match只匹配字元串的開始,如果字元串開始不符合正則表達式,則匹配失敗,函數返回None;而re.search匹配整個字元串,直到找到一個匹配。
★re.findall可以獲取字元串中所有匹配的字元串。如:re.findall(r'\w*oo\w*', text);獲取字元串中,包含'oo'的所有單詞。
★re.sub的函數原型為:re.sub(pattern, repl, string, count)
其中第二個函數是替換後的字元串;本例中為'-'
第四個參數指替換個數。預設為0,表示每個匹配項都替換。
re.sub還允許使用函數對匹配項的替換進行複雜的處理。如:re.sub(r'\s', lambda m: '[' + m.group(0) + ']', text, 0);將字元串中的空格' '替換為'[ ]'。
★re.split可以使用re.split來分割字元串,如:re.split(r'\s+', text);將字元串按空格分割成一個單詞列表。
根據指定匹配進行分組
content = "'1 - 2 * ((60-30+1*(9-2*5/3+7/3*99/4*2998+10*568/14))-(-4*3)/(16-3*2) )'"
new_content = re.split('\*', content)
# new_content = re.split('\*', content, 1)
print new_content
content = "'1 - 2 * ((60-30+1*(9-2*5/3+7/3*99/4*2998+10*568/14))-(-4*3)/(16-3*2) )'"
new_content = re.split('[\+\-\*\/]+', content)
# new_content = re.split('\*', content, 1)
print new_content
inpp = '1-2*((60-30 +(-40-5)*(9-2*5/3 + 7 /3*99/4*2998 +10 * 568/14 )) - (-4*3)/ (16-3*2))'
inpp = re.sub('\s*','',inpp)
new_content = re.split('\(([\+\-\*\/]?\d+[\+\-\*\/]?\d+){1}\)', inpp, 1)
print new_content
★re.compile可以把正則表達式編譯成一個正則表達式對象。可以把那些經常使用的正則表達式編譯成正則表達式對象,這樣可以提高一定的效率。下麵是一個正則表達式對象的一個例子:
例:
import re
r = re.compile('\d+')
r1 = r.match('adfaf123asdf1asf1123aa')
if r1:
print(r1.group())
else:
print('no match')
r2 = r.search('adfaf123asdf1asf1123aa')
if r2:
print(r2.group())
print(r2.groups())
else:
print('no match')
r3 = r.findall('adfaf123asdf1asf1123aa')
if r3:
print(r3)
else:
print('no match')
r4 = r.sub('###','adfaf123asdf1asf1123aa')
print(r4)
r5 = r.subn('###','adfaf123asdf1asf1123aa')
print(r5)
r6 = r.split('adfaf123asdf1asf1123aa',maxsplit=2)
print(r6)
註:re執行分二步:首先編譯,然後執行。故先使用re.compile進行查詢的字元串進行編譯,之後的操作無需在次編譯,可以提高效率。
匹配IP具體實例:
ip = '12aa13.12.15aasdfa12.32aasdf192.168.12.13asdfafasf12abadaf12.13'
res = re.findall('(\d{1,3}\.\d{1,3}\.\d{1,3}\.\d{1,3})',ip)
print(res)
res1 = re.findall('(?:\d{1,3}\.){3}\d{1,3}',ip)
print(res1)
而group,groups 主要是針對查詢的字元串是否分組,一般只是針對search和match,即'\d+' 和('\d+') 輸出結果為:
123 和('123',)。
import re
a = 'Oldboy School,Beijing Changping shahe:010-8343245'

match = re.search(r'(\D+),(\D+):(\S+)',a)
print(match.group(1))
print(match.group(2))
print(match.group(3))

print("##########################")

match2 = re.search(r'(?P<name>\D+),(?P<address>\D+):(?P<phone>\S+)',a)
print(match2.group('name'))
print(match2.group('address'))
print(match2.group('phone'))
5、time模塊
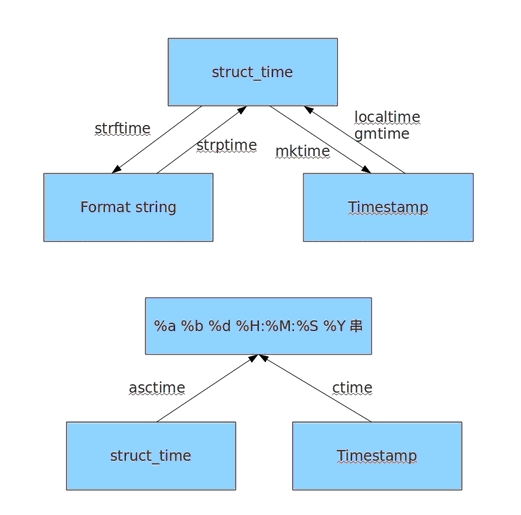
time模塊提供各種操作時間的函數
import time
#1、時間戳 1970年1月1日之後的秒
#3、元組 包含了:年、日、星期等... time.struct_time
#4、格式化的字元串 2014-11-11 11:11

print time.time()
print time.mktime(time.localtime())
print time.gmtime() #可加時間戳參數
print time.localtime() #可加時間戳參數
print time.strptime('2014-11-11', '%Y-%m-%d')
print time.strftime('%Y-%m-%d') #預設當前時間
print time.strftime('%Y-%m-%d',time.localtime()) #預設當前時間
print time.asctime()
print time.asctime(time.localtime())
print time.ctime(time.time())
import datetime
'''
datetime.date:表示日期的類。常用的屬性有year, month, day
datetime.time:表示時間的類。常用的屬性有hour, minute, second, microsecond
datetime.datetime:表示日期時間
datetime.timedelta:表示時間間隔,即兩個時間點之間的長度
timedelta([days[, seconds[, microseconds[, milliseconds[, minutes[, hours[, weeks]]]]]]])
strftime("%Y-%m-%d")
'''
import datetime
print datetime.datetime.now()
print datetime.datetime.now() - datetime.timedelta(days=5)
6、shutil模塊
高級的 文件、文件夾、壓縮包 處理模塊
shutil.copyfileobj(fsrc, fdst[, length])
將文件內容拷貝到另一個文件中,可以部分內容
shutil.copyfile(src, dst) 拷貝文件
shutil.copymode(src, dst)
僅拷貝許可權。內容、組、用戶均不變
shutil.copystat(src, dst)
拷貝狀態的信息,包括:mode bits, atime, mtime, flags
shutil.copy(src, dst)
拷貝文件和許可權
shutil.copy2(src, dst)
拷貝文件和狀態信息
shutil.ignore_patterns(*patterns)
shutil.copytree(src, dst, symlinks=False, ignore=None)
遞歸的去拷貝文件
例如:copytree(source, destination, ignore=ignore_patterns('*.pyc', 'tmp*'))
shutil.rmtree(path[, ignore_errors[, onerror]])
遞歸的去刪除文件
shutil.move(src, dst)
遞歸的去移動文件
shutil.make_archive(base_name, format,...)
創建壓縮包並返迴文件路徑,例如:zip、tar
- base_name: 壓縮包的文件名,也可以是壓縮包的路徑。只是文件名時,則保存至當前目錄,否則保存至指定路徑,
如:www =>保存至當前路徑
如:/Users/wupeiqi/www =>保存至/Users/wupeiqi/ - format: 壓縮包種類,“zip”, “tar”, “bztar”,“gztar”
- root_dir: 要壓縮的文件夾路徑(預設當前目錄)
- owner: 用戶,預設當前用戶
- group: 組,預設當前組
- logger: 用於記錄日誌,通常是logging.Logger對象
| 1 2 3 4 5 6 7 8 9 |
#將 /Users/wupeiqi/Downloads/test 下的文件打包放置當前程式目錄
import shutil
ret = shutil.make_archive("wwwwwwwwww", 'gztar', root_dir='/Users/wupeiqi/Downloads/test')
#將 /Users/wupeiqi/Downloads/test 下的文件打包放置 /Users/wupeiqi/目錄
import shutil
ret = shutil.make_archive("/Users/wupeiqi/wwwwwwwwww", 'gztar', root_dir='/Users/wupeiqi/Downloads/test')
|
shutil 對壓縮包的處理是調用 ZipFile 和 TarFile 兩個模塊來進行的,
7、ConfigParser
用於對特定的配置進行操作,當前模塊的名稱在 python 3.x 版本中變更為 configparser。
1.基本的讀取配置文件
-read(filename) 直接讀取ini文件內容
-sections() 得到所有的section,並以列表的形式返回
-options(section) 得到該section的所有option
-items(section) 得到該section的所有鍵值對
-get(section,option) 得到section中option的值,返回為string類型
-getint(section,option) 得到section中option的值,返回為int類型,還有相應的getboolean()和getfloat() 函數。
2.基本的寫入配置文件
-add_section(section) 添加一個新的section
-set( section, option, value) 對section中的option進行設置,需要調用write將內容寫入配置文件。
3.Python的ConfigParser Module中定義了3個類對INI文件進行操作。
分別是RawConfigParser、ConfigParser、 SafeConfigParser。
RawCnfigParser是最基礎的INI文件讀取類;
ConfigParser、 SafeConfigParser支持對%(value)s變數的解析。
設定配置文件test.conf
[portal]
url = http://%(host)s:%(port)s/Portal
host = localhost
port = 8080
使用RawConfigParser:
import ConfigParser
file1 = ConfigParser.RawConfigParser()
file1.read('aa.txt')
print(file1.get('portal','url'))
得到終端輸出:
http://%(host)s:%(port)s/Portal
使用ConfigParser:
import ConfigParser
file2 = ConfigParser.ConfigParser()
file2.read('aa.txt')
print(file2.get('portal','url'))
得到終端輸出:
http://localhost:8080/Portal
使用SafeConfigParser:
import ConfigParser
cf = ConfigParser.SafeConfigParser()
file3 = ConfigParser.SafeConfigParser()
file3.read('aa.txt')
print(file3.get('portal','url'))
得到終端輸出(效果同ConfigParser):
http://localhost:8080/Portal
舉例說明:

# 註釋1
; 註釋2

[section1]
k1 = v1
k2:v2

[section2]
k1 = v1

import ConfigParser

config = ConfigParser.ConfigParser()
config.read('i.cfg')

# ########## 讀 ##########
#secs = config.sections()
#print secs
#options = config.options('group2')
#print options

#item_list = config.items('group2')
#print item_list

#val = config.get('group1','key')
#val = config.getint('group1','key')

# ########## 改寫 ##########
#sec = config.remove_section('group1')
#config.write(open('i.cfg', "w"))

#sec = config.has_section('wupeiqi')
#sec = config.add_section('wupeiqi')
#config.write(open('i.cfg', "w"))


#config.set('group2','k1',11111)
#config.write(open('i.cfg', "w"))

#config.remove_option('group2','age')
#config.write(open('i.cfg', "w"))
configparser
8、logging模塊:
用於便捷記錄日誌且線程安全的模塊
| 1 2 3 4 5 6 7 8 9 10 11 12 13 14 |
import logging
logging.basicConfig(filename='log.log',
format='%(asctime)s - %(name)s - %(levelname)s -%(module)s: %(message)s',
datefmt='%Y-%m-%d %H:%M:%S %p',
level=10)
logging.debug('debug')
logging.info('info')
logging.warning('warning')
logging.error('error')
logging.critical('critical')
logging.log(10,'log')
|
對於等級:
| 1 2 3 4 5 6 7 8 |
CRITICAL = 50
FATAL = CRITICAL
ERROR = 40
WARNING = 30
WARN = WARNING
INFO = 20
DEBUG = 10
NOTSET = 0
|
只有大於當前日誌等級的操作才會被記錄。
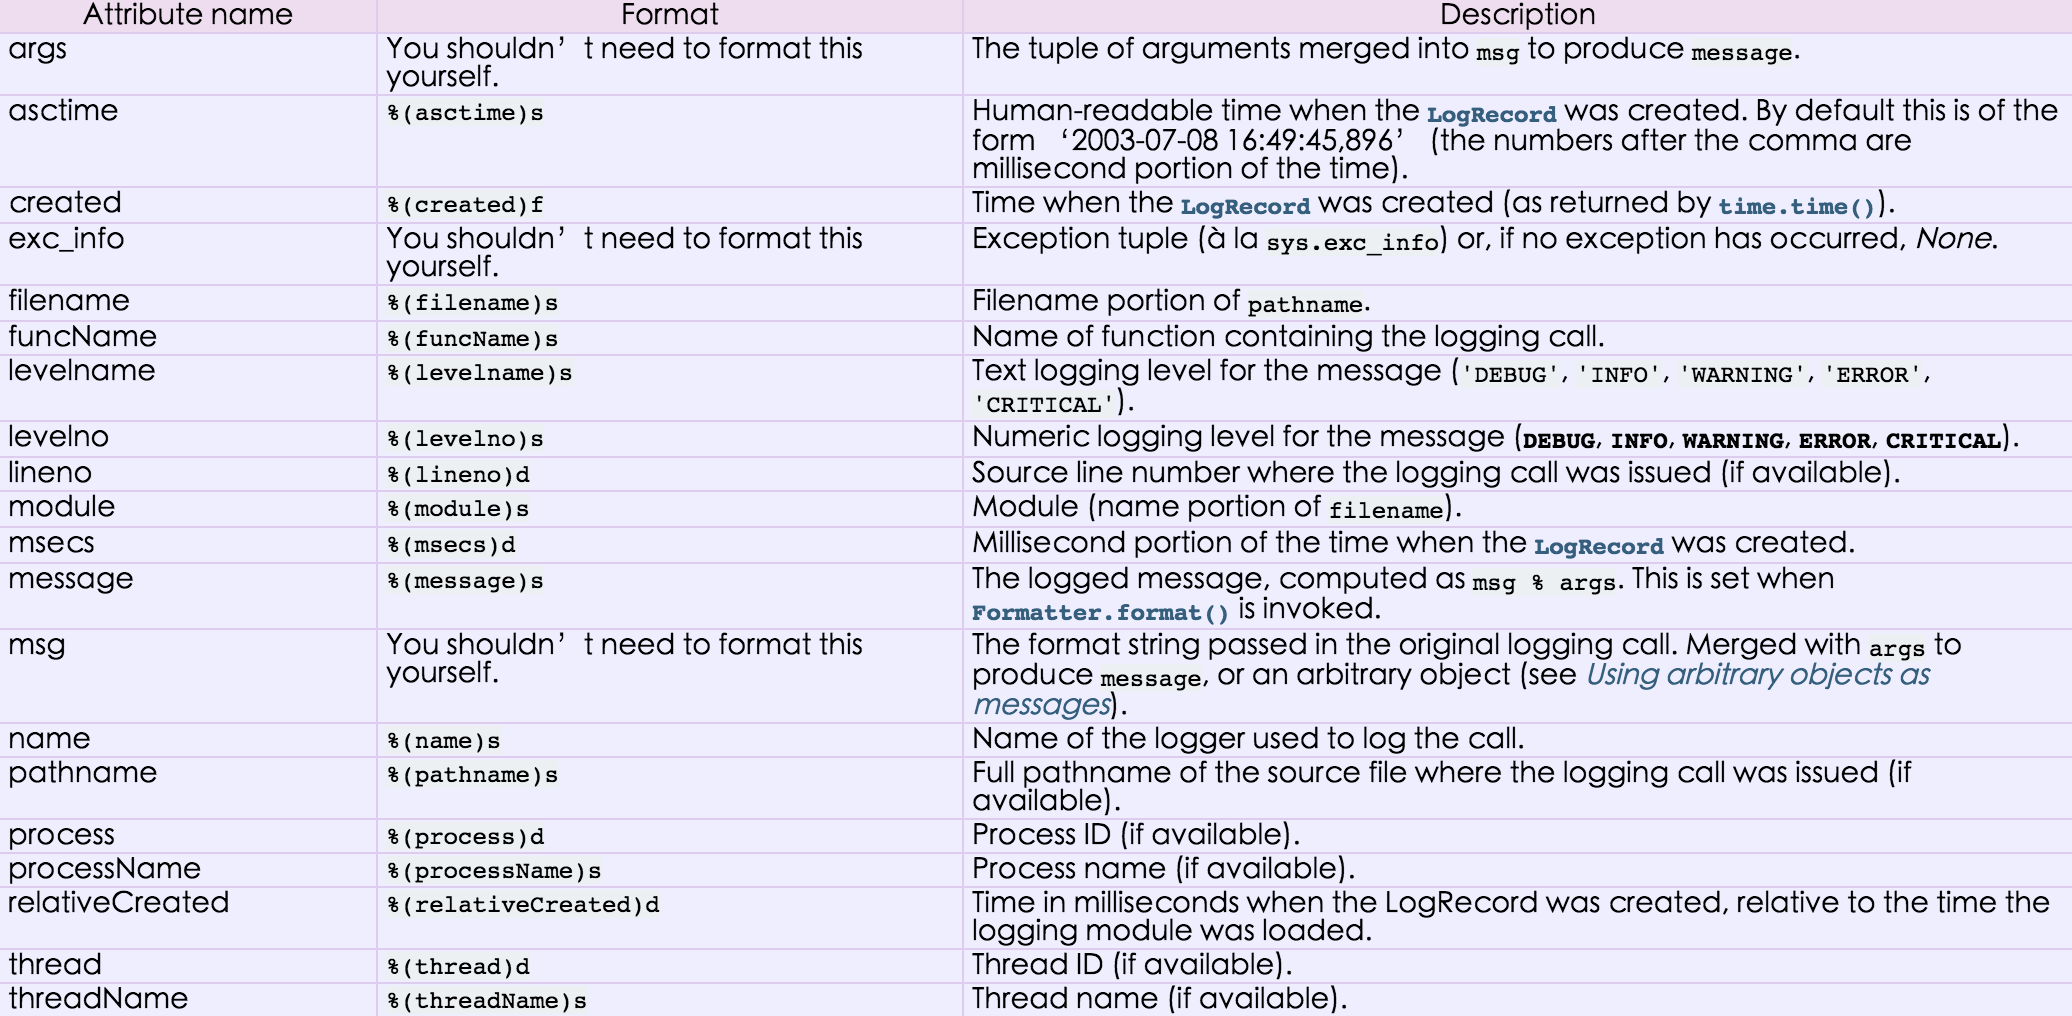
對於格式,有如下屬性可是配置:


