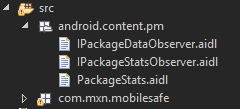
CleanCacheActivity.java 我們需要導入aidl文件,如下圖 導入。 aidl是為了進程間通信.為了學習aidl,我們可以參考 http://www.open-open.com/lib/view/open1469494852171.html activity_clean_cach ...
CleanCacheActivity.java
/**
 * 緩存清理*/
public class CleanCacheActivity extends Activity {

    private PackageManager packageManager;
    private List<CacheInfo> cacheLists;
    private ListView list_view;
    @Override
    protected void onCreate(Bundle savedInstanceState) {
        // TODO Auto-generated method stub
        super.onCreate(savedInstanceState);
        initUI();
    }

    private void initUI() {
        setContentView(R.layout.activity_clean_cache);
        list_view = (ListView) findViewById(R.id.list_view);
        //垃圾的集合
        cacheLists = new ArrayList<CacheInfo>();


        packageManager = getPackageManager();


        new Thread(){
            public void run(){
                //安裝到手機上所有的應用程式
                List<PackageInfo> installedPackages = packageManager.getInstalledPackages(0);
                //獲取應用程式的緩存大小
                for (PackageInfo packageInfo : installedPackages) {
                    getCacheSize(packageInfo);
                }
                handler.sendEmptyMessage(0);
            };
        }.start();
    }

    private Handler handler = new Handler(){
        public void handleMessage(android.os.Message msg) {
            CacheAdapter adapter = new CacheAdapter();
            list_view.setAdapter(adapter);

        };

    };


    private class CacheAdapter extends BaseAdapter{

        private ViewHolder holder;

        @Override
        public int getCount() {
            // TODO Auto-generated method stub
            return cacheLists.size();
        }

        @Override
        public Object getItem(int arg0) {
            // TODO Auto-generated method stub
            return cacheLists.get(arg0);
        }

        @Override
        public long getItemId(int arg0) {
            // TODO Auto-generated method stub
            return arg0;
        }

        @Override
        public View getView(int position, View convertView, ViewGroup parent) {
            // TODO Auto-generated method stub
            View view = null;
            if(convertView == null){
                view = View.inflate(CleanCacheActivity.this, R.layout.item_clean_cache, null);
                holder = new ViewHolder();

                System.out.println("111111111111");
                holder.iv_icon = (ImageView) view.findViewById(R.id.iv_icon);
                holder.appname = (TextView) view.findViewById(R.id.tv_name);
                holder.cachesize = (TextView) view.findViewById(R.id.tv_cachesize);
                view.setTag(holder);
            }else{
                view = convertView;
                holder = (ViewHolder) view.getTag();
            }

            System.out.println("222222222222");

            holder.iv_icon.setImageDrawable(cacheLists.get(position).icon);
            holder.appname.setText(cacheLists.get(position).appname);
            holder.cachesize.setText("緩存大小:"+Formatter.formatFileSize(CleanCacheActivity.this, cacheLists.get(position).cachesize));
            return view;
        }

    }

    static  class ViewHolder{
        ImageView iv_icon;
        TextView appname;
        TextView cachesize;
    }


    private void getCacheSize(PackageInfo packageInfo) {
        try {
            //Class<?> clazz = getClassLoader().loadClass("packageManager");
            //通過反射得到緩存的大小,第三個參數是aidl對象,我們導入的包
            Method method = PackageManager.class.getDeclaredMethod("getPackageSizeInfo", String.class,IPackageStatsObserver.class);
            /*
             * 第一個參數:當前這個方法由誰調用的,誰去調用當前這個方法
             * 第二個參數:包名
             */
            method.invoke(packageManager, packageInfo.applicationInfo.packageName,new MyIPackageStatusObserver(packageInfo));
        } catch (Exception e) {
            // TODO Auto-generated catch block
            e.printStackTrace();
        }

    }
    //aidl對象
    private class MyIPackageStatusObserver extends IPackageStatsObserver.Stub{
        private PackageInfo packageInfo;
        public MyIPackageAtatusObserver(PackageInfo packageInfo) {
            this.packageInfo = packageInfo;
            // TODO Auto-generated constructor stub
        }

        @Override
        public void onGetStatsCompleted(PackageStats pStats, boolean succeeded) throws RemoteException {
            // TODO Auto-generated method stub
            //獲取到當前手機應用的緩存大小
            long cachesize = pStats.cacheSize;

            if(cachesize>0){
                //有緩存
                System.out.println("當前應用的名字:"+packageInfo.applicationInfo.loadLabel(packageManager)+"緩存的大小:"+cachesize);
                CacheInfo cacheInfo = new CacheInfo();
                Drawable icon =  packageInfo.applicationInfo.loadIcon(packageManager);
                cacheInfo.icon = icon;
                String appname = packageInfo.applicationInfo.loadLabel(packageManager).toString();
                cacheInfo.appname = appname;
                cacheInfo.cachesize = cachesize;

                cacheLists.add(cacheInfo);
            }
        }


    }


     static class CacheInfo{
        Drawable icon;
        long cachesize;
        String appname ;

    }

     //全部清除
     public void cleanAll(View view) {
         //獲取到當前應用程式所有的方法
         Method[]  methods = packageManager.getClass().getMethods();
         for(Method method:methods){
             //判斷當前的方法名
             if(method.getName().equals("freeStorageAndNotify")){

                 try {
                    method.invoke(packageManager, Integer.MAX_VALUE,new MyIPackageDataObserver());
                } catch (IllegalAccessException e) {
                    // TODO Auto-generated catch block
                    e.printStackTrace();
                } catch (IllegalArgumentException e) {
                    // TODO Auto-generated catch block
                    e.printStackTrace();
                } catch (InvocationTargetException e) {
                    // TODO Auto-generated catch block
                    e.printStackTrace();
                }
             }

         }

         UIUtils.showToast(CleanCacheActivity.this, "全部清除");
     }

     private class MyIPackageDataObserver extends IPackageDataObserver.Stub{

        @Override
        public void onRemoveCompleted(String packageName, boolean succeeded) throws RemoteException {
            // TODO Auto-generated method stub

        }

     }
}
我們需要導入aidl文件,如下圖 導入。 aidl是為了進程間通信.為了學習aidl,我們可以參考 http://www.open-open.com/lib/view/open1469494852171.html

activity_clean_cache.xml
<?xml version="1.0" encoding="utf-8"?>
<LinearLayout xmlns:android="http://schemas.android.com/apk/res/android"
    android:layout_width="match_parent"
    android:layout_height="match_parent"
    android:orientation="vertical" >

<TextView
    style="@style/TitleStyle"
    android:text="緩存清理"
    />

<ListView
    android:id="@+id/list_view"
    android:layout_width="match_parent"
    android:layout_height="match_parent"
    android:layout_weight="111"
    ></ListView>
<!-- 讓listview後渲染出來,就這樣做 -->
<Button
    android:layout_width="match_parent"
    android:layout_height="wrap_content"
    android:text="全部清除"
    android:onClick="cleanAll"
    android:background="@drawable/btn_green_selector"
    />
</LinearLayout>
item_clean_cache.xml
<?xml version="1.0" encoding="utf-8"?>
<LinearLayout xmlns:android="http://schemas.android.com/apk/res/android"
    android:layout_width="match_parent"
    android:layout_height="match_parent"
    android:orientation="horizontal" >

    <ImageView
        android:id="@+id/iv_icon"
        android:layout_width="50dp"
        android:layout_height="50dp"
        android:src="@drawable/ic_launcher" />

    <LinearLayout
        android:layout_width="174dp"
        android:layout_height="wrap_content"
        android:layout_weight="0.85"
        android:orientation="vertical" >

        <TextView
            android:id="@+id/tv_name"
            android:layout_width="match_parent"
            android:layout_height="wrap_content"
            android:layout_marginTop="5dp"
            android:text="應用的名字"
            android:textSize="20dp" />

        <TextView
            android:id="@+id/tv_cachesize"
            android:layout_width="match_parent"
            android:layout_height="wrap_content"
            android:layout_marginTop="5dp"
            android:text="緩存的大小" />
    </LinearLayout>

    <ImageView
        android:layout_width="50dp"
        android:layout_height="50dp"
        android:src="@drawable/list_button_clean_default" />

</LinearLayout>


