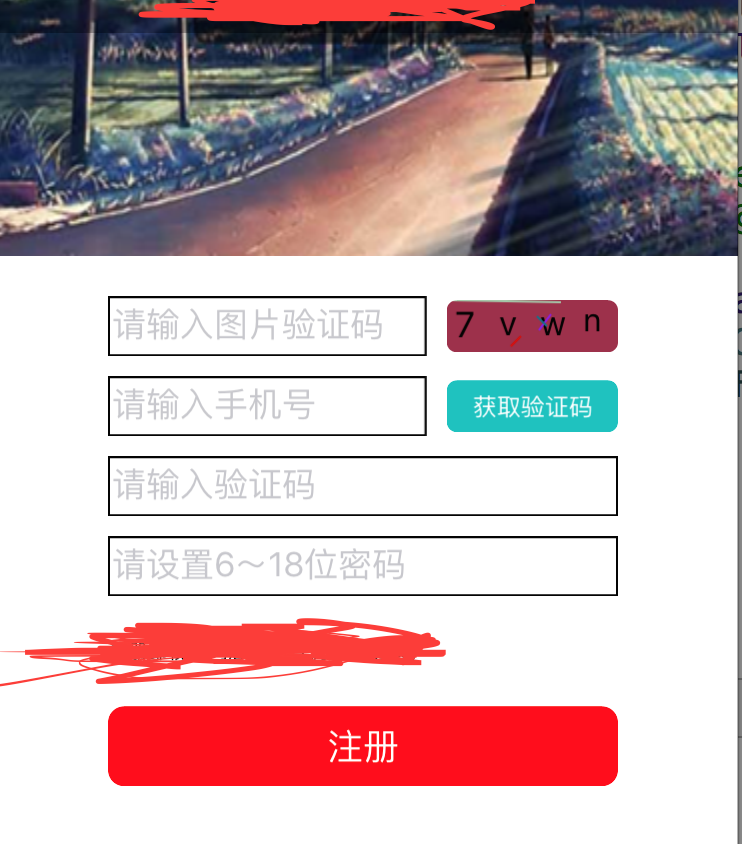
在一些公司的項目中,為了避免刷註冊量等,大多數人會採取繪製本地圖片驗證碼來減少這些操作。這樣註冊時,不僅需要判斷手機驗證碼,還要判斷一次本地的圖片驗證碼。首先展示下效果圖:點擊獲取手機驗證碼時或者填寫完基本信息點擊註冊按鈕時,都會判斷圖片驗證碼是否正確,不正確的話晃動驗證碼,改變圖片內容。其實圖案內...
在一些公司的項目中,為了避免刷註冊量等,大多數人會採取繪製本地圖片驗證碼來減少這些操作。
這樣註冊時,不僅需要判斷手機驗證碼,還要判斷一次本地的圖片驗證碼。
首先展示下效果圖:

點擊獲取手機驗證碼時或者填寫完基本信息點擊註冊按鈕時,都會判斷圖片驗證碼是否正確,不正確的話晃動驗證碼,改變圖片內容。
其實圖案內容和那幾個線都是繪製出來的,圖案內容,線的長度,背景顏色,線的顏色都是隨機變化的。
實現繪製驗證碼的方法是:
#import <UIKit/UIKit.h>
@interface CaptchaView : UIView
@property (nonatomic, retain) NSArray *changeArray; //字元素材數組
@property (nonatomic, retain) NSMutableString *changeString; //驗證碼的字元串
-(void)changeCaptcha;
- (void)drawRect:(CGRect)rect;
@end
在.h文件中首先定義幾個實例變數以及方法;
.m文件實現方法:
#import "CaptchaView.h"
#define kRandomColor [UIColor colorWithRed:arc4random() % 256 / 256.0 green:arc4random() % 256 / 256.0 blue:arc4random() % 256 / 256.0 alpha:1.0];
#define kLineCount 4
#define kLineWidth 1.0
#define kCharCount 4
#define kFontSize [UIFont systemFontOfSize:arc4random() % 5 + 15]
@implementation CaptchaView
@synthesize changeString,changeArray;
- (instancetype)initWithFrame:(CGRect)frame
{
if (self = [super initWithFrame:frame]) {
self.layer.cornerRadius = 5.0; //設置layer圓角半徑
self.layer.masksToBounds = YES; //隱藏邊界
self.backgroundColor = kRandomColor;
//顯示一個隨機驗證碼
[self changeCaptcha];
}
return self;
}
#pragma mark 更換驗證碼,得到更換的驗證碼的字元串
-(void)changeCaptcha
{
//<一>從字元數組中隨機抽取相應數量的字元,組成驗證碼字元串
//數組中存放的是全部可選的字元,可以是字母,也可以是中文
self.changeArray = [[NSArray alloc] initWithObjects:@"0",@"1",@"2",@"3",@"4",@"5",@"6",@"7",@"8",@"9",@"a",@"b",@"c",@"d",@"e",@"f",@"g",@"h",@"i",@"j",@"k",@"l",@"m",@"n",@"o",@"p",@"q",@"r",@"s",@"t",@"u",@"v",@"w",@"x",@"y",@"z",nil];
//如果能確定最大需要的容量,使用initWithCapacity:來設置,好處是當元素個數不超過容量時,添加元素不需要重新分配記憶體
NSMutableString *getStr = [[NSMutableString alloc] initWithCapacity:kCharCount];
self.changeString = [[NSMutableString alloc] initWithCapacity:kCharCount];
//隨機從數組中選取需要個數的字元,然後拼接為一個字元串
for(int i = 0; i < kCharCount; i++)
{
NSInteger index = arc4random() % ([self.changeArray count] - 1);
getStr = [self.changeArray objectAtIndex:index];
self.changeString = (NSMutableString *)[self.changeString stringByAppendingString:getStr];
}
//<2>從網路獲取字元串,然後把得到的字元串在本地繪製出來(網路獲取步驟在這省略)
// self.changeString = [NSMutableString stringWithString:@"傑瑞教育"];
}
#pragma mark 點擊view時調用,因為當前類自身就是UIView,點擊更換驗證碼可以直接寫到這個方法中,不用再額外添加手勢
-(void)touchesBegan:(NSSet *)touches withEvent:(UIEvent *)event
{
//點擊界面,切換驗證碼
[self changeCaptcha];
//setNeedsDisplay調用drawRect方法來實現view的繪製
[self setNeedsDisplay];
}
#pragma mark 繪製界面(1.UIView初始化後自動調用; 2.調用setNeedsDisplay方法時會自動調用)
- (void)drawRect:(CGRect)rect {
// 重寫父類方法,首先要調用父類的方法
[super drawRect:rect];
//設置隨機背景顏色
self.backgroundColor = kRandomColor;
//獲得要顯示驗證碼字元串,根據長度,計算每個字元顯示的大概位置
NSString *text = [NSString stringWithFormat:@"%@",self.changeString];
CGSize cSize = [@"S" sizeWithAttributes:@{NSFontAttributeName:[UIFont systemFontOfSize:20]}];
int width = rect.size.width / text.length - cSize.width;
int height = rect.size.height - cSize.height;
CGPoint point;
//依次繪製每一個字元,可以設置顯示的每個字元的字體大小、顏色、樣式等
float pX, pY;
for (int i = 0; i < text.length; i++)
{
pX = arc4random() % width + rect.size.width / text.length * i;
pY = arc4random() % height;
point = CGPointMake(pX, pY);
unichar c = [text characterAtIndex:i];
NSString *textC = [NSString stringWithFormat:@"%C", c];
[textC drawAtPoint:point withAttributes:@{NSFontAttributeName:kFontSize}];
}
//調用drawRect:之前,系統會向棧中壓入一個CGContextRef,調用UIGraphicsGetCurrentContext()會取棧頂的CGContextRef
CGContextRef context = UIGraphicsGetCurrentContext();
//設置畫線寬度
CGContextSetLineWidth(context, kLineWidth);
//繪製干擾的彩色直線
for(int i = 0; i < kLineCount; i++)
{
//設置線的隨機顏色
UIColor *color = kRandomColor;
CGContextSetStrokeColorWithColor(context, [color CGColor]);
//設置線的起點
pX = arc4random() % (int)rect.size.width;
pY = arc4random() % (int)rect.size.height;
CGContextMoveToPoint(context, pX, pY);
//設置線終點
pX = arc4random() % (int)rect.size.width;
pY = arc4random() % (int)rect.size.height;
CGContextAddLineToPoint(context, pX, pY);
//畫線
CGContextStrokePath(context);
}
}


