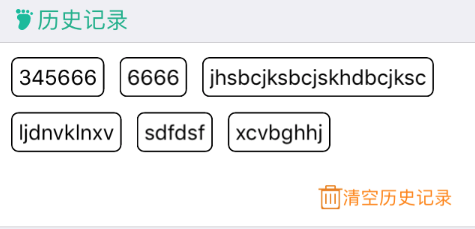
做項目的時候經常會用到標簽,比如說現在很多項目中搜索歷史用標簽展示 和 選擇某個產品的不同屬性用標簽展示...。網上的有很多封裝好的標簽,但是作為一個上進的程式員,都希望能有一個自己寫的。其實也是一種積累知識的過程。現在的這個標簽是根據你的標簽的搜字母來排序的。先來看下效果: 下麵的是代碼說明和代碼 ...
做項目的時候經常會用到標簽,比如說現在很多項目中搜索歷史用標簽展示 和 選擇某個產品的不同屬性用標簽展示...。網上的有很多封裝好的標簽,但是作為一個上進的程式員,都希望能有一個自己寫的。其實也是一種積累知識的過程。現在的這個標簽是根據你的標簽的搜字母來排序的。先來看下效果:

下麵的是代碼說明和代碼:
(1)包括兩個部分:LGLTagsFrame(計算標簽的frame) LGLTagsView(標簽的展示的view)
(2)使用註意:請先把標簽數組輸入LGLTagsFrame計算出標簽的總高度 再來利用創建LGLTagsView。
LGLTagsFrame.h
 展開
展開
//  Created by 李國良 on 2016/10/15.
//  Copyright © 2016年 李國良. All rights reserved.
//

#import <Foundation/Foundation.h>
#import <UIKit/UIKit.h>

@interface LGLTagsFrame : NSObject

/*
 *  @params tagsArray 標簽名稱數組
 */
@property (nonatomic, strong) NSArray * tagsArray;

/*
 *  @params tagsTotalHeight 標簽的總高度
 */
@property (nonatomic, assign) CGFloat tagsTotalHeight;

/*
 *  @params tagsFrames 每個標簽的frame數組
 */
@property (nonatomic, strong) NSMutableArray *tagsFrames;

/*
 *  @params tagsMargin 標簽左右之間的間隔 預設是10  (請在給tagsArray賦值之前設置)
 */
@property (nonatomic, assign) CGFloat tagsMargin;

/*
 *  @params tagdPadding 標簽上下之間的間隔 預設是10 (請在給tagsArray賦值之前設置)
 */
@property (nonatomic, assign) CGFloat tagsLineMargin;

/*
 *  @params tagdPadding 標簽內部的上下左右的間隔 (預設是10) (請在給tagsArray賦值之前設置)
 */
@property (nonatomic, assign) CGFloat tagdPadding;

@end
LGLTagsFrame.m

//  Created by 李國良 on 2016/10/15.
//  Copyright © 2016年 李國良. All rights reserved.
//

#import "LGLTagsFrame.h"
#define WIDTH  ([UIScreen mainScreen].bounds.size.width)
#define HEIGHT  ([UIScreen mainScreen].bounds.size.height)

@interface LGLTagsFrame ()

@property (nonatomic, strong) UIButton * startButton;

@end

@implementation LGLTagsFrame

- (instancetype)init {
    self = [super init];
    if (self) {
        self.tagsFrames = [NSMutableArray array];
        self.tagsMargin = 10;
        self.tagsLineMargin = 10;
        self.tagdPadding = 10;
    }
    return self;
}

- (void)setTagsArray:(NSArray *)tagsArray {
    _tagsArray = tagsArray;
    // 去掉重覆的title
    NSSet * set = [NSSet setWithArray:tagsArray];
    NSArray * titleArray = [set  allObjects];
    NSArray *sortDesc = @[[[NSSortDescriptor alloc] initWithKey:nil ascending:YES]];
    NSArray *sort1Array = [titleArray sortedArrayUsingDescriptors:sortDesc];
    CGFloat tagsWidth = 0;
    CGFloat tagY = 10;
    NSMutableArray * frameA = [NSMutableArray array];
    for (NSString * title in sort1Array) {                     //計算出每個標題的Size
        CGSize titleSize = [self sizeWithText:title font:[UIFont systemFontOfSize:14] maxW:0];
        [frameA addObject:NSStringFromCGSize(titleSize)];
    }
    for (NSInteger i = 0; i < frameA.count; i ++) {
        CGSize size = CGSizeFromString(frameA[i]);
        CGFloat width = size.width + self.tagdPadding;
        CGFloat height = size.height + self.tagdPadding;
        if ((WIDTH - tagsWidth - self.tagsMargin) < (width)) {
            tagY = tagY + height + self.tagsLineMargin;
            tagsWidth = 0;
        }
        UIButton * btn = [UIButton buttonWithType:UIButtonTypeCustom];
        btn.frame = CGRectMake(self.tagsMargin + tagsWidth, tagY, width, height);
        [btn setTitle:sort1Array[i] forState:UIControlStateNormal];
        [btn setTitleColor:[UIColor blackColor] forState:UIControlStateNormal];
        [btn setTitleColor:[UIColor whiteColor] forState:UIControlStateSelected];
        btn.titleLabel.font = [UIFont systemFontOfSize:14];
        btn.layer.masksToBounds = YES;
        btn.layer.cornerRadius = 5;
        btn.layer.borderWidth = 1;
        btn.layer.borderColor = [UIColor blackColor].CGColor;
        [self.tagsFrames addObject:btn];
        tagsWidth = CGRectGetMaxX(btn.frame);
        if (i == frameA.count - 1) {
            self.tagsTotalHeight = CGRectGetMaxY(btn.frame) + self.tagsLineMargin;
        }
    }
}

//計算文字的大小 maxW限制最大寬度 maxW 傳MAXFLOAT,沒有限制最大的寬度
- (CGSize)sizeWithText:(NSString *)text font:(UIFont *)font maxW:(CGFloat)maxW
{
    NSMutableDictionary *attrs = [NSMutableDictionary dictionary];
    attrs[NSFontAttributeName] = font;
    CGSize maxSize = CGSizeMake(maxW, MAXFLOAT);

    return [text boundingRectWithSize:maxSize options:NSStringDrawingUsesLineFragmentOrigin attributes:attrs context:nil].size;
}

- (void)setTagsMargin:(CGFloat)tagsMargin {
    _tagsMargin = tagsMargin;
}

- (void)setTagsLineMargin:(CGFloat)tagsLineMargin {
    _tagsLineMargin = tagsLineMargin;
}

- (void)setTagdPadding:(CGFloat)tagdPadding {
    _tagdPadding = tagdPadding;
}

@end
展開
LGLTagsView.h

//  Created by 李國良 on 2016/10/17.
//  Copyright © 2016年 李國良. All rights reserved.
//

#import <UIKit/UIKit.h>

typedef void(^TagSelectBlock)(NSString * tagName);

@interface LGLTagsView : UIView

/**
 *  @params frame 高度請傳 LGLTagsFrame的  tagsTotalHeight
 *  @params tagsFrame 請傳 LGLTagsFrame 的 tagsFrames
 */
- (instancetype)initWithFrame:(CGRect)frame tagsFrame:(NSMutableArray *)tagsFrame selectTagBlock:(TagSelectBlock)block;

/*
 *  @params isSelected 是是否要有選中的效果 預設有選中的效果
 */
@property (nonatomic, assign) BOOL isSelected;

/*
 *  @params tagsSelectedColor 是修改選中tag的背景色顏色(預設 orange) 在沒有選中效果的時候設置無效
 */
@property (nonatomic, strong) UIColor * tagsSelectedColor;

@end
展開
LGLTagsView.m

//  Created by 李國良 on 2016/10/17.
//  Copyright © 2016年 李國良. All rights reserved.
//

#import "LGLTagsView.h"
@interface LGLTagsView ()

@property (nonatomic, strong) NSMutableArray * tagsFrame;
@property (nonatomic, strong) UIButton * startButton;
@property (nonatomic, copy) TagSelectBlock block;

@end

@implementation LGLTagsView

- (instancetype)initWithFrame:(CGRect)frame tagsFrame:(NSMutableArray *)tagsFrame selectTagBlock:(TagSelectBlock)block {
    self = [super initWithFrame:frame];
    if (self) {
        self.tagsFrame = tagsFrame;
        self.isSelected = YES;
        self.tagsSelectedColor = [UIColor orangeColor];
        self.block = block;
        [self createTagsView];
    }
    return self;
}

- (void)createTagsView {
    for (UIButton * tags in self.tagsFrame) {
        [tags addTarget:self action:@selector(tagsClink:) forControlEvents:UIControlEventTouchUpInside];
        [self addSubview:tags];
    }
}

- (void)tagsClink:(UIButton *)button {
    if (self.isSelected) {
        if(button !=self.startButton){
            self.startButton.selected = NO;
            [self.startButton setBackgroundColor:[UIColor whiteColor]];
            self.startButton.layer.borderColor = [UIColor blackColor].CGColor;
            self.startButton = button;
        }
        self.startButton.selected=YES;
        if (self.startButton.selected) {
            [self.startButton setBackgroundColor:self.tagsSelectedColor];
            self.startButton.layer.borderColor = [UIColor whiteColor].CGColor;
        }
    }
    self.block(button.titleLabel.text);
}

- (void)setIsSelected:(BOOL)isSelected {
    _isSelected = isSelected;
}

- (void)setTagsSelectedColor:(UIColor *)tagsSelectedColor {
    _tagsSelectedColor = tagsSelectedColor;
}


- (NSMutableArray *)tagsFrame {
    if (!_tagsFrame ) {
        _tagsFrame = [NSMutableArray array];
    }
    return _tagsFrame;
}
@end
展開
文件到此結束
下麵說明一下具體使用的方法:
 LGLTagsFrame * frame = [[LGLTagsFrame alloc] init];
    frame.tagsArray = [dataSource copy];
    LGLTagsView  * tagView = [[LGLTagsView alloc] initWithFrame:CGRectMake(0, 0, WIDTH, frame.tagsTotalHeight) tagsFrame:frame.tagsFrames selectTagBlock:^(NSString *tagName) {
        // 在這裡獲得標簽的點擊回調的值
        }
    }];
[self.view addSubview:tagView];
有修改意見的歡迎來騷擾!


