Day2401 TCP上傳圖片02 客戶端併發上傳圖片03 客戶端併發登錄04 瀏覽器客戶端-自定義服務端05 瀏覽器客戶端-Tomcat服務端01 TCP上傳圖片 1 import java.net.*; 2 import java.io.*; 3 class PicClient 4 { 5 .....
Day24
01 TCP上傳圖片
02 客戶端併發上傳圖片
03 客戶端併發登錄
04 瀏覽器客戶端-自定義服務端
05 瀏覽器客戶端-Tomcat服務端
01 TCP上傳圖片

 1 import java.net.*;
 2 import java.io.*;
 3 class PicClient
 4 {
 5     public static void main(String[] args) throws Exception
 6     {
 7         Socket s=new Socket("127.0.0.1",10007);
 8         FileInputStream fis=new FileInputStream("E:\\圖\\素材\\頭像.jpg");
 9         OutputStream os=s.getOutputStream();
10         byte[] buf=new byte[1024*16];
11         int len;
12         while((len=fis.read(buf))!=-1)
13         {
14             os.write(buf,0,len);
15         }
16         //告訴伺服器數據寫入完畢
17         s.shutdownOutput();
18         InputStream is=s.getInputStream();
19         byte[] bufIn=new byte[1024];
20         int num=is.read(bufIn);
21         System.out.println(new String(bufIn,0,num));
22
23         fis.close();
24         s.close();
25
26     }
27 }
28 class  PicServer
29 {
30     public static void main(String[] args) throws Exception
31     {
32         ServerSocket ss=new ServerSocket(10007);
33         Socket s=ss.accept();
34         System.out.println(s.getInetAddress().getHostAddress()+"......connected");
35         InputStream in=s.getInputStream();
36         byte[] buf=new byte[1024*16];
37         FileOutputStream fos=new FileOutputStream("touxiang.jpg");
38         int len;
39         while((len=in.read())!=-1)
40         {
41             fos.write(buf,0,len);
42         }
43         PrintWriter out=new PrintWriter(s.getOutputStream(),true);
44         out.println("圖片上傳成功!");
45
46         fos.close();
47         s.close();
48         ss.close();
49
50     }
51 }
View Code
02 客戶端併發上傳圖片
服務端如果只有當為一個客戶端服務完成後,才能為別的客戶端服務,效率就太低了,所以服務端需要採用多線程。
一個客戶端請求連接,服務端就開啟一個線程為他服務。這樣可以實現客戶端併發上傳圖片。
實現代碼如下:

  1 /*
  2
  3 */
  4 import java.net.*;
  5 import java.io.*;
  6 class PicClient
  7 {
  8     public static void main(String[] args) throws Exception
  9     {
 10         //判斷要上傳的文件是否符合要求,不符合則結束運行
 11         File file=new File(args[0]);
 12         if(args.length!=1)
 13         {
 14             System.out.println("請上傳一個文件,而不是多個!");
 15             return;
 16         }
 17         if(!(file.exists() && file.isFile()))
 18         {
 19             System.out.println("文件不存在,或者文件有問題。");
 20             return;
 21         }
 22         if(!(file.getName().endsWith(".png")))
 23         {
 24             System.out.println("請上傳一個png格式的文件。");
 25             return;
 26         }
 27         if(file.length()>1024*9)
 28         {
 29             System.out.println("上傳文件大小超過允許範圍!");
 30             return;
 31         }
 32
 33         //建立Socket服務
 34         Socket s=new Socket("172.29.115.1",10008);
 35         //讀取一個圖片文件
 36         FileInputStream fis=new FileInputStream(file);
 37         byte[] buf=new byte[1024*9];
 38         OutputStream out=s.getOutputStream();
 39         int len=0;
 40         //寫入socket輸出流中
 41         while((len=fis.read(buf))!=-1)
 42         {
 43             out.write(buf,0,len);
 44
 45         }
 46         //給服務端一個信號,客戶端輸出結束
 47         s.shutdownOutput();
 48
 49         //接受服務端的回饋信息
 50         InputStream in=s.getInputStream();
 51         byte[] b=new byte[1024];
 52         int num=in.read(b);
 53         System.out.println("server:"+new String(b,0,num));
 54
 55         //關閉資源
 56         fis.close();
 57         s.close();
 58
 59
 60     }
 61 }
 62 class  PicServerThread implements Runnable
 63 {
 64     private Socket s;
 65     public PicServerThread(Socket s)
 66     {
 67         this.s=s;
 68     }
 69     public void run()
 70     {
 71         try
 72         {
 73             int count=1;
 74         String ip=new String(s.getInetAddress().getHostAddress()+"");
 75         System.out.println(ip+"......connected");
 76         File file=new File(ip+"("+count+")");
 77         //如果文件名已經存在,通過增加序號,定義新名字
 78         //迴圈進行判斷,直到找到沒用過的文件名
 79         while(file.exists())
 80             file=new File(ip+"("+(count++)+")"+".png");
 81
 82         InputStream in=s.getInputStream();
 83         FileOutputStream fos=new FileOutputStream(file);
 84
 85         byte[] buf=new byte[1024*9];
 86         int len;
 87         //讀取數據並寫入到文件中
 88         while((len=in.read(buf))!=-1)
 89         {
 90             fos.write(buf,0,len);
 91         }
 92
 93         //向客戶端發送提示信息
 94         PrintWriter pw=new PrintWriter(s.getOutputStream(),true);
 95         pw.println("上傳成功!");
 96
 97         //關閉資源
 98         fos.close();
 99         s.close();
100
101
102
103         }
104         catch (Exception e)
105         {
106             throw new RuntimeException("服務建立失敗!");
107         }
108
109     }
110
111
112 }
113 class  PicServer
114 {
115     public static void main(String[] args) throws Exception
116     {
117
118         //建立服務
119         ServerSocket ss=new ServerSocket(10008);
120         while(true)
121         {
122             //接收客戶端埠
123         Socket s=ss.accept();
124         new Thread(new PicServerThread(s)).start();
125
126         }
127
128     }
129 }
View Code
03 客戶端併發登錄
客戶端通過鍵盤錄入用戶名,服務端對這個用戶名進行校驗。
如果該用戶存在,在服務端顯示XXX,已登錄。
併在客戶端顯示,XXX歡迎登陸。
如果該用戶不存在,在服務端顯示XXX,嘗試登陸。
併在客戶端顯示,XXX,該用戶不存在。
最多只能嘗試登陸三次。

  1 import java.net.*;
  2 import java.io.*;
  3 class LoginClient
  4 {
  5     public static void main(String[] args)throws Exception
  6     {
  7         //建立服務
  8         Socket s=new Socket("127.0.0.1",10008);
  9         //獲得鍵盤錄入
 10         BufferedReader bufr=
 11             new BufferedReader(new InputStreamReader(System.in));
 12         //獲得socket對應的輸出流,設置為自動刷新
 13         PrintWriter out=new PrintWriter(s.getOutputStream(),true);
 14
 15         //獲得socket對應的輸入流
 16         BufferedReader in=
 17             new BufferedReader(new InputStreamReader(s.getInputStream()));
 18         //最多只能嘗試登陸三次
 19         for(int x=0;x<3;x++)
 20         {
 21             String name=bufr.readLine();
 22             //如果鍵盤錄入為空(按下CTRL+C),迴圈結束
 23             if(name==null)
 24                 break;
 25             out.println(name);
 26             String info=in.readLine();
 27             System.out.println("server:"+info);
 28             //如果驗證成功,迴圈結束
 29             if(info.contains("歡迎"))
 30                 break;
 31         }
 32         //關閉資源
 33         bufr.close();
 34         s.close();
 35
 36     }
 37 }
 38 class  UserThread implements Runnable
 39 {
 40     private Socket s;
 41     public UserThread(Socket s)
 42     {
 43         this.s=s;
 44     }
 45     public void run()
 46     {
 47         try
 48         {
 49             //獲取客戶端ip
 50             String ip=s.getInetAddress().getHostAddress();
 51             System.out.println(ip+"......connected.");
 52             //伺服器最多提供三次驗證服務
 53             for(int i=0;i<3;i++)
 54             {
 55                 BufferedReader in=
 56                     new BufferedReader(new InputStreamReader(s.getInputStream()));
 57                 //為讀取伺服器端的用戶文件,建立輸入流
 58                 BufferedReader bufr=new BufferedReader(new FileReader("user.txt"));
 59                 PrintWriter out=new PrintWriter(s.getOutputStream(),true);
 60                 //設置標誌位,以便確定伺服器需做出什麼樣的的動作
 61                 boolean flag=false;
 62                 String line=null;
 63                 String name=in.readLine();
 64                 if(name==null)
 65                     break;
 66                 while((line=bufr.readLine())!=null)
 67                 {
 68                     if(name.equals(line))
 69                     {
 70                         //如果在伺服器的用戶文件中找到客戶輸入的登錄名
 71                         //改變標誌位,結束迴圈
 72                         flag=true;
 73                         break;
 74                     }
 75                 }
 76                 //根據標誌位不同,伺服器做出不同動作
 77                 if(flag)
 78                 {
 79                     System.out.println(name+"已經登錄");
 80                     out.println(name+"歡迎登陸!");
 81                     break;
 82                 }
 83                 else
 84                 {
 85                     System.out.println(name+"嘗試登錄");
 86                     out.println(name+",抱歉,用戶名不存在!");
 87                 }
 88
 89
 90             }
 91             //關閉資源
 92             s.close();
 93         }
 94         catch (Exception e)
 95         {
 96             e.printStackTrace();
 97         }
 98     }
 99
100
101 }
102 class  LoginServer
103 {
104     public static void main(String[] args)throws Exception
105     {
106         //建立伺服器端
107         ServerSocket ss=new ServerSocket(10008);
108         while(true)
109         {
110             //迴圈接收客戶請求
111             Socket s=ss.accept();
112             //為客戶開啟一個線程
113             new Thread(new UserThread(s)).start();
114         }
115
116     }
117 }
View Code
04 瀏覽器客戶端-自定義服務端
演示客戶端和服務端
客戶端:瀏覽器
伺服器:自定義

 1 import java.net.*;
 2 import java.io.*;
 3 class  ServerDemo
 4 {
 5     public static void main(String[] args) throws Exception
 6     {
 7         ServerSocket ss=new ServerSocket(11000);
 8         Socket s=ss.accept();
 9         System.out.println(s.getInetAddress().getHostAddress());
10         PrintWriter out=new PrintWriter(s.getOutputStream(),true);
11         out.println("<font color='blue' size=8>客戶端你好!</font>");
12         s.close();
13         ss.close();
14     }
15 }
View Code
不過用telnet當做客戶端實驗時,我電腦可能沒用這個應用,就沒有成功。
運行顯示:
D:\abc>telnet 127.0.0.1 11000
'telnet' 不是內部或外部命令,也不是可運行的程式
或批處理文件。
05 瀏覽器客戶端-Tomcat服務端
客戶端:瀏覽器
服務端:Tomcat
Tomcat 伺服器是一個免費的開放源代碼的Web 應用伺服器,屬於輕量級應用伺服器,
在中小型系統和併發訪問用戶不是很多的場合下被普遍使用,是開發和調試JSP 程式的首選。
對於一個初學者來說,可以這樣認為,當在一臺機器上配置好Apache 伺服器,
可利用它響應HTML(標準通用標記語言下的一個應用)頁面的訪問請求。
實際上Tomcat 部分是Apache 伺服器的擴展,但它是獨立運行的,
所以當你運行tomcat 時,它實際上作為一個與Apache 獨立的進程單獨運行的。
簡要介紹我安裝Tomcat的過程。
1.下載。
官方下載網址為:http://tomcat.apache.org/
選擇DownLoad--Tomcat6.0-32-bit/64-bit Windows Service Installer(pgp,md5)
這個版本直接點擊就可以安裝。如果不需要改變安裝路徑,直接選擇下一步就可以了。
2.環境設置。
變數名:JAVA-HOME
變數值:SDK路徑。
3.啟動
啟動Tomcat我們可以直接運行bin目錄下的 Tomcat6.exe 可執行文件。
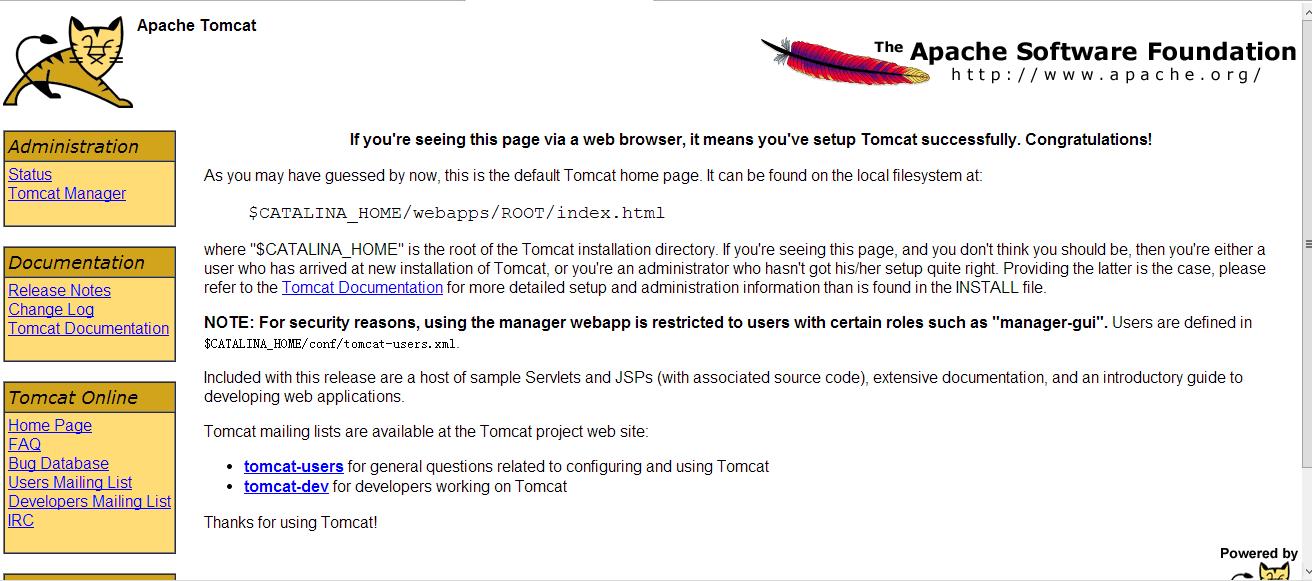
在啟動完成以後在瀏覽器中輸入:http://127.0.0.1:8080 .顯示如下

在D:\tomcat\webapps路徑下新建文件夾myWeb,再在此文件夾中新建文件Demo.html.
文件內容:

 1 <html>
 2   <body>
 3       <h1>這是我的主頁</h1>
 4       <font size=8 color=blue>歡迎登陸</font>
 5       <div>
 6           錦瑟無端五十弦,</br>
 7           一弦一柱思華年。</br>
 8           莊生曉夢迷蝴蝶,</br>
 9           望帝春心托杜鵑。</br>
10           滄海月明珠有淚。</br>
11           藍田日暖玉生煙,</br>
12           此情可待成追憶。</br>
13           只是當時已惘然。</br>
14
15
16       </div>
17   </body>
18 </html>
View Code
在瀏覽器中輸入http://127.0.0.1:8080/myWeb/Demo.html,顯示如下:


