先看效果圖吧 我們要實現一個自定義的再一個圓形中繪製一個弧形的自定義View,思路是這樣的: 先要創建一個類ProgressView,繼承自View類,然後重寫其中的兩個構造方法,一個是一個參數的,一個是兩個參數的,因為我們要在xml文件中使用該自定義控制項,所以必須要定義這個兩個參數的構造函數。創建 ...
先看效果圖吧

我們要實現一個自定義的再一個圓形中繪製一個弧形的自定義View,思路是這樣的:
先要創建一個類ProgressView,繼承自View類,然後重寫其中的兩個構造方法,一個是一個參數的,一個是兩個參數的,因為我們要在xml文件中使用該自定義控制項,所以必須要定義這個兩個參數的構造函數。創建完了這個類後,我們先不去管它,先考慮我們實現的這個自定義View,我們想讓它的哪些部分可以由使用者自己指定,比如說這個Demo中我們讓他的外面圓的外邊框顏色和寬度,還有扇形部分的顏色,扇形增長的速度等等屬性,這時候我們要在項目工程目錄的res/values目錄下創建一個資源文件命名為attrs(註意,名字隨意,只是大多數情況下都這麼叫而已),然後我們在這個資源文件中添加我們想要的屬性,如下:
 1 <?xml version="1.0" encoding="utf-8"?>
 2 <resources>
 3     <declare-styleable name="ProgressView">
 4         <!--circleColor 設置圓形邊框的顏色  sweepColor設置扇形變換的顏色
 5          startAngle 設置起始角度 sweepStep 設置變換的步長-->
 6         <attr name="circleColor" format="color|reference"></attr>
 7         <attr name="sweepColor" format="color|reference"></attr>
 8         <attr name="startAngle" format="integer"></attr>
 9         <attr name="sweepStep" format="integer"></attr>
10         <attr name="padding" format="integer"></attr>
11     </declare-styleable>
12 </resources>
可以看到,<declare-styleable>標簽中的name屬性是為了方便我們獲取AttributeSet時候使用,而<attr>標簽中name,則是我們希望控制項可以自定義的屬性部分,類似於xml文件中的android:name=""等標簽的使用。format屬性是設置該屬性可以接受什麼類型的參數。
定義好了自定義資源類,我們開始寫ProgressView中的主要代碼:
  1 package com.yztc.customprogressview;
  2
  3 import android.content.Context;
  4 import android.content.res.TypedArray;
  5 import android.graphics.Canvas;
  6 import android.graphics.Color;
  7 import android.graphics.Paint;
  8 import android.graphics.RectF;
  9 import android.util.AttributeSet;
 10 import android.view.View;
 11
 12 /**
 13  * 自定義的
 14  */
 15 public class ProgressView extends View {
 16     private int sweepStep = 10;//扇形變換的步長(就是角度)
 17     private int padding = 40;//外邊框距離扇形的距離 填充
 18     private int circleColor = Color.GRAY;//邊框的顏色
 19     private int sweepColor = Color.BLUE;//扇形顏色
 20     private int startAngle = 90;//起始角度
 21     //設置外邊框圓的邊框粗細
 22     private int storke = 20;
 23
 24     private int sweepAngle = 0;//掃過的角度
 25
 26     private static final int DEFAULT_WIDTH = 200;
 27     private static final int DEFAULT_HEIGHT = 200;
 28
 29     public ProgressView(Context context) {
 30         super(context);
 31     }
 32
 33     //如果要在xml文件中使用該自定義控制項,則必須重寫兩個參數的構造函數
 34     //因為我們使用自定義的屬性的時候,會預設傳遞過來一個AttributeSet集合
 35     public ProgressView(Context context, AttributeSet attrs) {
 36         super(context, attrs);
 37         TypedArray array = context.obtainStyledAttributes(attrs, R.styleable.ProgressView);
 38         if (array != null) {
 39             //獲取我們在xml中設置的各個自定義屬性
 40             sweepStep = array.getInteger(R.styleable.ProgressView_sweepStep, sweepStep);
 41             padding = array.getInteger(R.styleable.ProgressView_padding, padding);
 42             circleColor = array.getColor(R.styleable.ProgressView_circleColor, circleColor);
 43             sweepColor = array.getColor(R.styleable.ProgressView_sweepColor, sweepColor);
 44             startAngle = array.getInteger(R.styleable.ProgressView_startAngle, startAngle);
 45
 46             //回收TypeArray資源
 47             array.recycle();
 48         }
 49     }
 50
 51     /**
 52      * 先繪製外邊框 --內部扇形
 53      *
 54      * @param canvas
 55      */
 56     @Override
 57     protected void onDraw(Canvas canvas) {
 58         Paint mPaint = new Paint();
 59         mPaint.setAntiAlias(true);  //設置抗鋸齒
 60         //繪製外層的圓框
 61         mPaint.setColor(circleColor);
 62         mPaint.setStrokeWidth(storke);
 63         mPaint.setStyle(Paint.Style.STROKE);//設置圓形為空心的圓
 64         //這裡我們得到控制項的Height和Width,根據Heigh和Width來確定圓心的位置,來繪製外層圓
 65         canvas.drawCircle(getWidth() / 2, getWidth() / 2, getWidth() / 2 - storke / 2, mPaint);
 66 //        Log.d("tag", "onDraw: "+getWidth());
 67         invalidate();//請求重新繪製view
 68
 69         //繪製內部的扇形
 70         mPaint.setStyle(Paint.Style.FILL_AND_STROKE);
 71         mPaint.setColor(sweepColor);
 72         /*
 73         drawArc(RectF oval, float startAngle, float sweepAngle, boolean useCenter,Paint paint)
 74         RectF oval 指定扇形的矩形容器對象 指定圓弧的外輪廓的矩形
 75         float startAngle 表示圓弧的起始角度
 76         float sweepAngle 表示圓弧走過掃過的角度 順時針方向
 77         boolean useCenter 如果設置為true 在繪製圓弧時將圓心包括在內,是指以一個固定的圓心來繪製弧形(扇形),
 78         如果指定為false,則不規則繪製扇形
 79         Paint paint 畫筆 顏色 填充
 80
 81          public RectF(float left, float top, float right, float bottom)
 82          float left 矩形的左邊點(左切點)的x坐標
 83          float top 矩形上邊點(上切點)的y軸坐標
 84          float right, 矩形的右邊點(右切點)的x坐標
 85          float bottom 矩形的下邊點(下切點)的y坐標
 86          */
 87         //RectF中的四個參數,分別對應其內切圓的四個切點的坐標
 88         RectF rectF = new RectF(padding + storke, padding + storke, getWidth() - padding - storke, getWidth() - padding - storke);
 89         canvas.drawArc(rectF, startAngle, sweepAngle, true, mPaint);
 90
 91         sweepAngle += sweepStep;//根據步長更新掃過的角度
 92         sweepAngle = sweepAngle > 360 ? 0 : sweepAngle;
 93         invalidate();//重繪view
 94     }
 95
 96     //因為我們是繼承的View來自定義的View,所以onMeasure()方法要重寫
 97     @Override
 98     protected void onMeasure(int widthMeasureSpec, int heightMeasureSpec) {
 99         int wMode = MeasureSpec.getMode(widthMeasureSpec);
100         int hMode = MeasureSpec.getMode(heightMeasureSpec);
101         int wSize = MeasureSpec.getSize(widthMeasureSpec);
102         int hSize = MeasureSpec.getSize(heightMeasureSpec);
103
104         //因為繪製的是圓,所以判斷一下高度或者寬度中的一個就可以。
105         switch (wMode) {
106             case MeasureSpec.AT_MOST://android:layout_width="warp_content"
107                 //獲取屏幕像素
108                 float density = getResources().getDisplayMetrics().density;
109                 wSize = (int) (DEFAULT_WIDTH * density);
110                 hSize = (int) (DEFAULT_HEIGHT * density);
111                 break;
112             //當在xml中指定控制項的寬高為match_parent或者指定數值的寬高時,回調以下代碼
113             case MeasureSpec.EXACTLY://android:layout_width="match_parent" android:layout_width="40dp"
114                 wSize = hSize = Math.min(wSize, hSize);
115                 break;
116         }
117         //只要重寫onMeasure()方法,一定要調用以下方法,不然會報錯
118         setMeasuredDimension(wSize, hSize);
119     }
120 }
我們先畫一個外部的圓,也就是都用drawCircle()方法,這裡我們調用getWidth(),getHeight()表示得到佈局中設置的控制項的尺寸,因為是圓,所以可以使用getWidth()/2來表示圓心位置。而畫內部弧形的時候,確定其圓心位置,左部點的坐標是外面圓的邊框加上弧形與原的間距padding來確定,右側點的x坐標則是getWidth()得到總長度,減去邊框寬度,再減去padding得到,上邊距和下邊距同樣,不明白的畫一個圖立馬明白。大部分不好理解的地方都有註釋,只要認真看不會看不明白的~
然後就是在佈局中引入我們的自定義View了:
 1 <?xml version="1.0" encoding="utf-8"?>
 2 <RelativeLayout
 3     xmlns:android="http://schemas.android.com/apk/res/android"
 4     xmlns:tools="http://schemas.android.com/tools"
 5     xmlns:app="http://schemas.android.com/apk/res-auto"
 6     android:layout_width="match_parent"
 7     android:layout_height="match_parent"
 8     android:paddingBottom="@dimen/activity_vertical_margin"
 9     android:paddingLeft="@dimen/activity_horizontal_margin"
10     android:paddingRight="@dimen/activity_horizontal_margin"
11     android:paddingTop="@dimen/activity_vertical_margin"
12     tools:context="com.yztc.customprogressview.MainActivity">
13
14     <com.yztc.customprogressview.ProgressView
15         android:id="@+id/pv"
16         android:layout_width="match_parent"
17         android:layout_height="match_parent"
18         android:background="#0000ff"
19         app:padding="20"
20         app:circleColor="#aa0000"
21         app:sweepColor="#00aa00"
22         app:sweepStep="1"
23         app:startAngle="180"
24         />
25 </RelativeLayout>
需要註意的是我們需要在佈局的跟標簽下麵加上這麼一段代碼:xmlns:app="http://schemas.android.com/apk/res-auto"
用來指定我們可以使用自己再attrs中自定義的屬性啦~,使用的形式就是app:你定義的屬性。當然,這個app也不是固定的寫法,只要跟上面你加的那段代碼的xmlns後面的欄位一致就可以了~
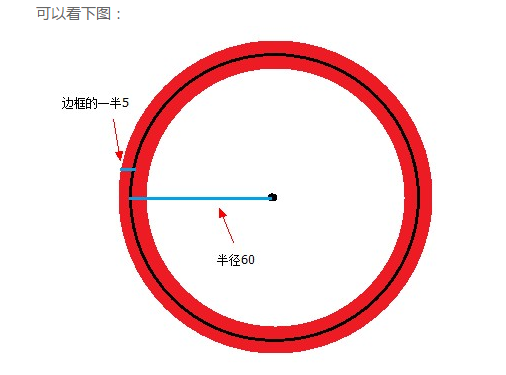
還有需要註意的是:
預設使用Canvas類的drawCircle()方法來畫圓的時候,圓的半徑是你指定的半徑,再加上一半的邊長,比如你的邊框size=10,radius=50,則實際空心部分的半徑為55.註意這點,否則畫出來的圓的四個切點位置會與其他位置有些不一樣,類似出現鋸齒的效果。具體請看drawCircle()的Rect邊框問題。


