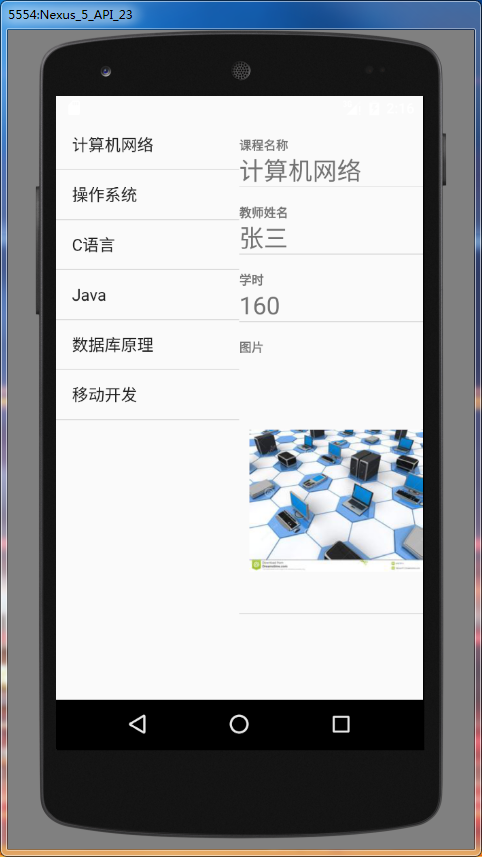
ListFragment繼承了Fragment,顧名思義,ListFragment是一種特殊的Fragment,它包含了一個ListView,在ListView裡面顯示數據。 1. MainActivity Java類文件: xml佈局文件: 可見MainActivity是比較簡單的,在佈局裡面放了 ...
ListFragment繼承了Fragment,顧名思義,ListFragment是一種特殊的Fragment,它包含了一個ListView,在ListView裡面顯示數據。
1. MainActivity
Java類文件:
package com.example.hzhi.fragmentdemo;

import android.app.Activity;
import android.os.Bundle;
import android.app.FragmentManager;
import android.app.FragmentTransaction;


public class MainActivity extends Activity {
    private FragmentManager manager;
    private FragmentTransaction transaction;

    @Override
    protected void onCreate(Bundle savedInstanceState) {
        super.onCreate(savedInstanceState);
        setContentView(R.layout.activity_main);

        manager = getFragmentManager();
        transaction = manager.beginTransaction();
        ListFragmentImpl frgImpl = new ListFragmentImpl();
        ListFragmentSelf frgSelf = new ListFragmentSelf();
        transaction.add(R.id.fragment1, frgImpl, "frgImpl");
        transaction.add(R.id.fragment2, frgSelf, "frgSelf");
        transaction.commit();
    }

}
xml佈局文件:
<LinearLayout xmlns:android="http://schemas.android.com/apk/res/android"
    xmlns:tools="http://schemas.android.com/tools"
    android:layout_width="match_parent"
    android:layout_height="match_parent"
    android:orientation="horizontal" >

    <LinearLayout
        android:id="@+id/fragment1"
        android:layout_weight="1"
        android:layout_width="match_parent"
        android:layout_height="match_parent"
        android:orientation="vertical"/>

    <LinearLayout
        android:id="@+id/fragment2"
        android:layout_weight="1"
        android:layout_width="match_parent"
        android:layout_height="match_parent"
        android:orientation="vertical"/>

</LinearLayout>
可見MainActivity是比較簡單的,在佈局裡面放了左右兩個ListFragment。
2. ListFragment
2.1 左邊的ListFragment
Java類文件:
package com.example.hzhi.fragmentdemo;

import android.app.ListFragment;
import android.widget.ListView;
import android.os.Bundle;
import android.view.LayoutInflater;
import android.view.View;
import android.view.ViewGroup;
import android.widget.ArrayAdapter;
import android.util.Log;
import android.widget.Toast;
import android.widget.SimpleAdapter;

import java.util.Map;
import java.util.HashMap;
import java.util.List;
import java.util.ArrayList;

public class ListFragmentImpl extends ListFragment{
    private static final String TAG = "ListFragmentImpl";

    private ListView selfList;

    String[] classes = {
            "電腦網路",
            "操作系統",
            "C語言",
            "Java",
            "資料庫原理",
            "移動開發",
    };

    @Override
    public View onCreateView(LayoutInflater inflater, ViewGroup container,
                             Bundle savedInstanceState) {
        Log.d(TAG, "onCreateView");
        return inflater.inflate(R.layout.list_fragment_impl, container, false);
    }


    @Override
    public void onCreate(Bundle savedInstanceState) {
        Log.d(TAG, "onCreate");
        super.onCreate(savedInstanceState);
        // 設置ListFragment預設的ListView,即@id/android:list
        this.setListAdapter(new ArrayAdapter<String>(getActivity(),
                android.R.layout.simple_list_item_1, classes));

    }

    public void onListItemClick(ListView parent, View v,
                                int position, long id) {
        Log.d(TAG, "onListItemClick");
        // 找到ListFragmentSelf
        ListFragmentSelf listFragmentSelf = (ListFragmentSelf) getFragmentManager().
                findFragmentByTag("frgSelf");
        listFragmentSelf.flushData(position);

    }

}
佈局文件:
<?xml version="1.0" encoding="utf-8"?>
<LinearLayout xmlns:android="http://schemas.android.com/apk/res/android"
    android:layout_width="match_parent"
    android:layout_height="match_parent"
    android:orientation="vertical" >

    <!-- ListFragment對應的android:id值固定為"@id/android:list" -->
    <ListView
        android:id="@id/android:list"
        android:layout_width="match_parent"
        android:layout_height="match_parent"
        android:drawSelectorOnTop="false"
        />

</LinearLayout>
2.2 右邊的ListFragment
Java類文件:
package com.example.hzhi.fragmentdemo;

import android.app.ListFragment;
import android.widget.ListView;
import android.os.Bundle;
import android.view.LayoutInflater;
import android.view.View;
import android.view.ViewGroup;
import android.util.Log;
import android.widget.SimpleAdapter;

import java.util.Map;
import java.util.HashMap;
import java.util.List;
import java.util.ArrayList;

public class ListFragmentSelf extends ListFragment{
    private static final String TAG = "ListFragmentImpl";

    private ListView selfList;

    final String[] from = new String[] {"name", "title", "info", "picture"};
    final int[] to = new int[] {R.id.text0, R.id.text1, R.id.text2, R.id.picture};
    private String[] tname = new String[]{"電腦網路", "操作系統", "C語言", "Java", "資料庫原理", "移動開發"};
    private String[] ttitle = new String[]{"張三", "李四", "王五", "Tom", "Mike", "Peter"};
    private String[] ttime = new String[]{"160", "50", "40", "200", "180", "150"};
    private int[] pic = new int[]{R.drawable.jsjwl, R.drawable.czxt, R.drawable.cyy,
            R.drawable.java, R.drawable.sjkyl, R.drawable.ydkf};

    @Override
    public View onCreateView(LayoutInflater inflater, ViewGroup container,
                             Bundle savedInstanceState) {
        Log.d(TAG, "onCreateView");
        return inflater.inflate(R.layout.list_fragment_self, container, false);
    }


    @Override
    public void onCreate(Bundle savedInstanceState) {

        Log.d(TAG, "onCreate");
        super.onCreate(savedInstanceState);
        flushData(0);

    }

    public void onListItemClick(ListView parent, View v,
                                int position, long id) {
        Log.d(TAG, "onListItemClick");

    }

    public void flushData(int p){
        // 建立SimpleAdapter,將from和to對應起來
        SimpleAdapter adapter = new SimpleAdapter(
                this.getActivity(), getSimpleData(p),
                R.layout.list_item, from, to);
        this.setListAdapter(adapter);
    }

    private List<Map<String, Object>> getSimpleData(int p) {
        List<Map<String, Object>> list = new ArrayList<Map<String, Object>>();

        Map<String, Object> map = new HashMap<String, Object>();
        map.put("title", "課程名稱");
        map.put("info", tname[p]);
        list.add(map);

        map = new HashMap<String, Object>();
        map.put("title", "教師姓名");
        map.put("info", ttitle[p]);
        list.add(map);

        map = new HashMap<String, Object>();
        map.put("title", "學時");
        map.put("info", ttime[p]);
        list.add(map);

        map = new HashMap<String, Object>();
        map.put("title", "圖片");
        map.put("picture", pic[p]);
        list.add(map);

        return list;
    }
}
佈局文件:
<?xml version="1.0" encoding="utf-8"?>
<LinearLayout xmlns:android="http://schemas.android.com/apk/res/android"
    android:layout_width="match_parent"
    android:layout_height="match_parent"
    android:orientation="vertical" >

    <!-- ListFragment對應的android:id值固定為"@id/android:list" -->
    <ListView
        android:id="@id/android:list"
        android:layout_width="match_parent"
        android:layout_height="match_parent"
        android:drawSelectorOnTop="false"
        />

</LinearLayout>
行佈局文件:
<?xml version="1.0" encoding="utf-8"?>
<LinearLayout xmlns:android="http://schemas.android.com/apk/res/android"
    android:layout_width="match_parent"
    android:layout_height="match_parent"
    android:orientation="vertical" >

    <TextView android:id="@+id/text0"
        android:textSize="12sp"
        android:textStyle="bold"
        android:layout_width="match_parent"
        android:layout_height="wrap_content"/>

    <TextView android:id="@+id/text1"
        android:textSize="12sp"
        android:textStyle="bold"
        android:layout_width="match_parent"
        android:layout_height="wrap_content"/>

    <TextView android:id="@+id/text2"
        android:textSize="24sp"
        android:layout_width="match_parent"
        android:layout_height="wrap_content"/>

    <ImageView
        android:id="@+id/picture"
        android:layout_width="wrap_content"
        android:layout_height="wrap_content"
        android:paddingLeft="10dp" />

</LinearLayout>
最重要的方法是,當點擊左邊ListFragment的某一行時,取得改行的position,然後根據Tag找到右邊的ListFragment,並調用flushData()方法,使右邊的ListFragment刷新數據。
3. 運行結果


