我是一年經驗的web程式員,想學習一下wpf,比較喜歡做項目來學習,所以在網上找了一些項目,分析代碼,儘量能夠做到自己重新敲出來 第一個項目是 中間的方塊會不停的旋轉。 第一步,新建wpf項目 第二步,為xaml窗體佈局 下麵是源代碼(不是我寫的) 先給grid設置背景顏色: Background= ...
我是一年經驗的web程式員,想學習一下wpf,比較喜歡做項目來學習,所以在網上找了一些項目,分析代碼,儘量能夠做到自己重新敲出來
第一個項目是

中間的方塊會不停的旋轉。
第一步,新建wpf項目

第二步,為xaml窗體佈局
下麵是源代碼(不是我寫的)

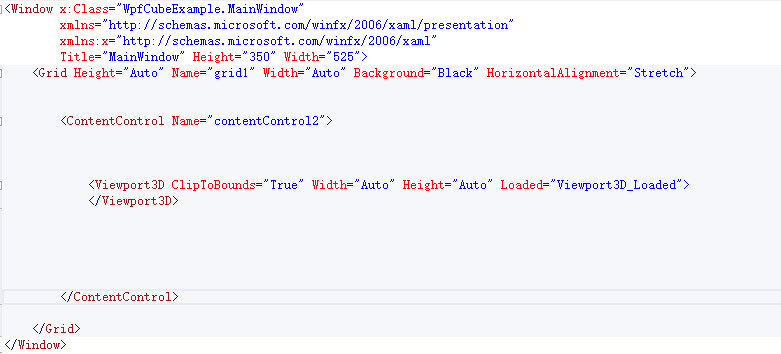
先給grid設置背景顏色: Background="Black"
然後拖一個ContentControl到窗體上,預設的contentcontrol為


刪掉這些屬性後後,寬高就自動變成100%了。然後將單標簽改為雙標簽。
contentcontrol中間有個Viewport3D標簽,在工具箱里找了下,納尼,沒有?這不科學!

只能百度一下,關於Viewport3D的教程還是很多,但是沒有人告訴我他們是怎麼拖進去的,只能,手寫了

納尼,又報錯!!仔細找了找我的是:<ContentControl Content="ContentControl"> 他的是:<ContentControl Name="contentControl2">
趕緊改改,果然對了
查了下ClipToBounds=“true”的意思:當你設置ClipToBounds為True時,超出部分一定會被裁剪掉;但當你設置ClipToBounds為False時,超出部分不一定不會被裁剪掉
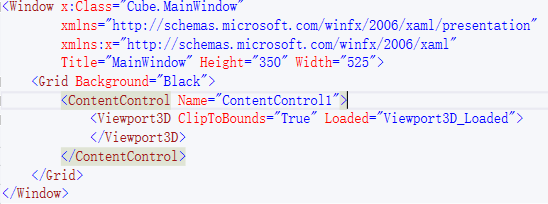
窗體佈局到這裡就完了。下麵是我的代碼,我的原則是感覺沒有用的東西就不要寫,等它報錯。所以很多屬性我都刪掉了

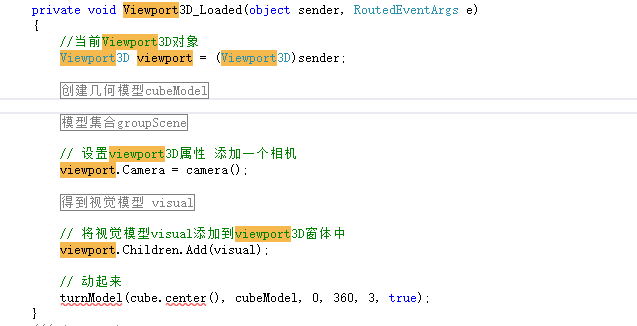
第三步 將Viewport3D 屬性loaded中的Viewport3D_Loaded寫出來
這段代碼的作用是繪製viewport3D中的畫面。也是這段程式的主體部分
下麵是源代碼(不是我寫的)

先翻譯一下

業務邏輯大概就是這樣,然後補充相關的代碼,讓它先能跑起來。
先建一個WpfCube類,

using System.Windows.Media;
    using System.Windows.Media.Media3D;
    /// <summary>
    /// 這個類負責創建一個 立方體的 GeometryModel3D對象
    /// </summary>
    public class WpfCube
    {
        private Point3D origin;
        private double width;
        private double height;
        private double depth;

        public Point3D centerBottom()
        {
            Point3D c = new Point3D(
                origin.X + (width / 2),
                origin.Y + height,
                origin.Z + (depth / 2)
                );

            return c;
        }

        public Point3D center()
        {
            Point3D c = new Point3D(
                origin.X + (width / 2),
                origin.Y - height / 2,
                origin.Z + (depth / 2)
                );

            return c;
        }

        public Point3D centerTop()
        {
            Point3D c = new Point3D(
                origin.X + (width / 2),
                origin.Y,
                origin.Z + (depth / 2)
                );

            return c;
        }

        public WpfCube(Point3D P0, double w, double h, double d)
        {
            width = w;
            height = h;
            depth = d;

            origin = P0;
        }

        public WpfCube(WpfCube cube)
        {
            width = cube.width;
            height = cube.height;
            depth = cube.depth;

            origin = new Point3D(cube.origin.X, cube.origin.Y, cube.origin.Z);
        }

        public WpfRectangle Front()
        {
            WpfRectangle r = new WpfRectangle(origin, width, height, 0);

            return r;
        }

        public WpfRectangle Back()
        {
            WpfRectangle r = new WpfRectangle(new Point3D(origin.X + width, origin.Y, origin.Z + depth), -width, height, 0);

            return r;
        }

        public WpfRectangle Left()
        {
            WpfRectangle r = new WpfRectangle(new Point3D(origin.X, origin.Y, origin.Z + depth),
                0, height, -depth);

            return r;
        }

        public WpfRectangle Right()
        {
            WpfRectangle r = new WpfRectangle(new Point3D(origin.X + width, origin.Y, origin.Z),
                0, height, depth);

            return r;
        }

        public WpfRectangle Top()
        {
            WpfRectangle r = new WpfRectangle(origin, width, 0, depth);

            return r;
        }

        public WpfRectangle Bottom()
        {
            WpfRectangle r = new WpfRectangle(new Point3D(origin.X + width, origin.Y - height, origin.Z),
                -width, 0, depth);

            return r;
        }

        public static void addCubeToMesh(Point3D p0, double w, double h, double d,
            MeshGeometry3D mesh)
        {
            WpfCube cube = new WpfCube(p0, w, h, d);

            double maxDimension = Math.Max(d, Math.Max(w, h));

            WpfRectangle front = cube.Front();
            WpfRectangle back = cube.Back();
            WpfRectangle right = cube.Right();
            WpfRectangle left = cube.Left();
            WpfRectangle top = cube.Top();
            WpfRectangle bottom = cube.Bottom();

            front.addToMesh(mesh);
            back.addToMesh(mesh);
            right.addToMesh(mesh);
            left.addToMesh(mesh);
            top.addToMesh(mesh);
            bottom.addToMesh(mesh);
        }

        public GeometryModel3D CreateModel(Color color)
        {
            return CreateCubeModel(origin, width, height, depth, color);
        }

        public static GeometryModel3D CreateCubeModel(Point3D p0, double w, double h, double d, Color color)
        {
            MeshGeometry3D mesh = new MeshGeometry3D();

            addCubeToMesh(p0, w, h, d, mesh);

            Material material = new DiffuseMaterial(new SolidColorBrush(color));

            GeometryModel3D model = new GeometryModel3D(mesh, material);

            return model;
        }
    }
WpfCube.cs
然後裡面還有一個WpfRectangle類,這個類負責立方體的一個平面

 using System.Windows.Media;
    using System.Windows.Media.Media3D;
    /// <summary>
    /// 這個類負責一個構建一個面
    /// </summary>
    public class WpfRectangle
    {
        private Point3D p0;
        private Point3D p1;
        private Point3D p2;
        private Point3D p3;

        /// <summary>
        /// 必須4個點確定一個長方形
        /// </summary>
        public WpfRectangle(Point3D P0, Point3D P1, Point3D P2, Point3D P3)
        {
            p0 = P0;
            p1 = P1;
            p2 = P2;
            p3 = P3;
        }

        public WpfRectangle(Point3D P0, double w, double h, double d)
        {
            p0 = P0;

            if (w != 0.0 && h != 0.0) // front / back
            {
                p1 = new Point3D(p0.X + w, p0.Y, p0.Z);
                p2 = new Point3D(p0.X + w, p0.Y - h, p0.Z);
                p3 = new Point3D(p0.X, p0.Y - h, p0.Z);
            }
            else if (w != 0.0 && d != 0.0) // top / bottom
            {
                p1 = new Point3D(p0.X, p0.Y, p0.Z + d);
                p2 = new Point3D(p0.X + w, p0.Y, p0.Z + d);
                p3 = new Point3D(p0.X + w, p0.Y, p0.Z);
            }
            else if (h != 0.0 && d != 0.0) // side / side
            {
                p1 = new Point3D(p0.X, p0.Y, p0.Z + d);
                p2 = new Point3D(p0.X, p0.Y - h, p0.Z + d);
                p3 = new Point3D(p0.X, p0.Y - h, p0.Z);
            }
        }

        public void addToMesh(MeshGeometry3D mesh)
        {
            WpfTriangle.addTriangleToMesh(p0, p1, p2, mesh);
            WpfTriangle.addTriangleToMesh(p2, p3, p0, mesh);
        }

        public static void addRectangleToMesh(Point3D p0, Point3D p1, Point3D p2, Point3D p3,
            MeshGeometry3D mesh)
        {
            WpfTriangle.addTriangleToMesh(p0, p1, p2, mesh);
            WpfTriangle.addTriangleToMesh(p2, p3, p0, mesh);
        }

        public static GeometryModel3D CreateRectangleModel(Point3D p0, Point3D p1, Point3D p2, Point3D p3)
        {
            return CreateRectangleModel(p0, p1, p2, p3, false);
        }

        public static GeometryModel3D CreateRectangleModel(Point3D p0, Point3D p1, Point3D p2, Point3D p3, bool texture)
        {
            MeshGeometry3D mesh = new MeshGeometry3D();

            addRectangleToMesh(p0, p1, p2, p3, mesh);

            Material material = new DiffuseMaterial(
                new SolidColorBrush(Colors.White));

            GeometryModel3D model = new GeometryModel3D(mesh, material);

            return model;
        }
    }
WpfRectangle.cs
然後我們發現裡面還有一個WpfTriangle類 好像是管構造三角形的類,構造四邊形用的兩個三角形拼湊起的。(為什麼要這麼麻煩?難道系統沒有自帶構建四邊形的方法?)

    using System.Windows.Media;
    using System.Windows.Media.Media3D;
    /// <summary>
    /// 負責構建三角形的類
    /// </summary>
    class WpfTriangle
    {
        private Point3D p1;
        private Point3D p2;
        private Point3D p3;

        public WpfTriangle(Point3D P1, Point3D P2, Point3D P3)
        {
            p1 = P1;
            p2 = P2;
            p3 = P3;
        }


        public static void addTriangleToMesh(Point3D p0, Point3D p1, Point3D p2, MeshGeometry3D mesh)
        {
            addTriangleToMesh(p0, p1, p2, mesh, false);
        }


        public static void addPointCombined(Point3D point, MeshGeometry3D mesh, Vector3D normal)
        {
            bool found = false;

            int i = 0;

            foreach (Point3D p in mesh.Positions)
            {
                if (p.Equals(point))
                {
                    found = true;
                    mesh.TriangleIndices.Add(i);
                    mesh.Positions.Add(point);
                    mesh.Normals.Add(normal);
                    break;
                }

                i++;
            }

            if (!found)
            {
                mesh.Positions.Add(point);
                mesh.TriangleIndices.Add(mesh.TriangleIndices.Count);
                mesh.Normals.Add(normal);
            }

        }


        public static void addTriangleToMesh(Point3D p0, Point3D p1, Point3D p2,
            MeshGeometry3D mesh, bool combine_vertices)
        {
            Vector3D normal = CalculateNormal(p0, p1, p2);

            if (combine_vertices)
            {
                addPointCombined(p0, mesh, normal);
                addPointCombined(p1, mesh, normal);
                addPointCombined(p2, mesh, normal);
            }
            else
            {
                mesh.Positions.Add(p0);
                mesh.Positions.Add(p1);
                mesh.Positions.Add(p2);
                mesh.TriangleIndices.Add(mesh.TriangleIndices.Count);
                mesh.TriangleIndices.Add(mesh.TriangleIndices.Count);
                mesh.TriangleIndices.Add(mesh.TriangleIndices.Count);
                mesh.Normals.Add(normal);
                mesh.Normals.Add(normal);
                mesh.Normals.Add(normal);
            }
        }


        public GeometryModel3D CreateTriangleModel(Color color)
        {
            return CreateTriangleModel(p1, p2, p3, color);
        }

        public static GeometryModel3D CreateTriangleModel(Point3D P0, Point3D P1, Point3D P2, Color color)
        {
            MeshGeometry3D mesh = new MeshGeometry3D();

            addTriangleToMesh(P0, P1, P2, mesh);

            Material material = new DiffuseMaterial(new SolidColorBrush(color));

            GeometryModel3D model = new GeometryModel3D(mesh, material);

            return model;
        }

        public static Vector3D CalculateNormal(Point3D P0, Point3D P1, Point3D P2)
        {
            Vector3D v0 = new Vector3D(P1.X - P0.X, P1.Y - P0.Y, P1.Z - P0.Z);

            Vector3D v1 = new Vector3D(P2.X - P1.X, P2.Y - P1.Y, P2.Z - P1.Z);

            return Vector3D.CrossProduct(v0, v1);
        }
    }
WpfTriangle.cs
然後看看源代碼

我所有文件都建好了,只剩完善 MainWindow.xaml.cs中的代碼了。好開心
下麵重點研究下下麵的方法
WpfCube cube = new WpfCube(new System.Windows.Media.Media3D.Point3D(0, 0, 0), sceneSize / 6, sceneSize / 6, sceneSize / 6);
這行代碼調用wpfcube類的構造函數,定義原點,寬高深(我還是喜歡坐標表示法中的,原點,x軸,y軸,z軸)
接著創建一個模型出來,傳入模型的顏色,然後這個方法又調用繪製6個面的方法
GeometryModel3D cubeModel = cube.CreateModel(Colors.Aquamarine);
模型有了,然後要把他放到場景中去:
//創建一個模型集合來保存我們的模型
Model3DGroup groupScene = new Model3DGroup();

//將我們的模型添加到模型集合
groupScene.Children.Add(cubeModel);
然後需要添加光線,不然就是漆黑一片,將源碼中的添加光線註釋掉,然後將Grid的背景顏色設為藍色顯示如下。

創建模型的時候,我們選了顏色Colors.Aquamarine,但是顯示出來是黑色就是因為沒有光。
所以要正常顯示還要往場景中加入光
// 添加一個方向光
groupScene.Children.Add(positionLight(new Point3D(-sceneSize, sceneSize / 2, 0.0)));

// 添加環境光
groupScene.Children.Add(new AmbientLight(Colors.Gray));

        public DirectionalLight positionLight(Point3D position)
        {
            DirectionalLight directionalLight = new DirectionalLight();
            directionalLight.Color = Colors.Gray;
            directionalLight.Direction = new Point3D(0, 0, 0) - position;
            return directionalLight;
        }
positionLight方法
仔細研究了下這個方法發現這個方法是傳入一個點然後返回從原點到這個點方向的灰色光線,應該是做陰影效果的。
一個環境光一個陰影光,就將立方體襯托出來了。
為viewport3D設置視覺模型
            #region 得到視覺模型 visual
            // 創建一個視覺模型--我們眼睛看到的
            ModelVisual3D visual = new ModelVisual3D();

            // 用我們做的幾何模型來填充視覺模型
            visual.Content = groupScene;
            #endregion

            // 將視覺模型visual添加到viewport3D窗體中
            viewport.Children.Add(visual);
這樣之就將模型場景封裝成一個視覺模型,添加到viewport3D中,但是現在還看不見。
需要為viewport3D設置Camera,因為屏幕上只是個平面,我們的模型是3D的,所以要設置一個觀察點,將3D模型的投影成一個平面圖形。

viewport.Camera = camera();
        /// <summary>
        /// 得到一個透視投影攝像機
        /// </summary>
        /// <returns></returns>
        public PerspectiveCamera camera()
        {
            PerspectiveCamera perspectiveCamera = new PerspectiveCamera();
            perspectiveCamera.Position = new Point3D(-sceneSize, sceneSize / 2, sceneSize);//設置觀察點
            perspectiveCamera.LookDirection = new Vector3D(lookat.X - perspectiveCamera.Position.X,
                                                           lookat.Y - perspectiveCamera.Position.Y,
                                                           lookat.Z - perspectiveCamera.Position.Z);//設置觀察方向 空間向量的表示方式
            perspectiveCamera.FieldOfView = 60;//水平視角
            return perspectiveCamera;
        }
     Point3D lookat = new Point3D(0, 0, 0);
camera()方法
現在的效果如下:

最後就是讓模型動起來

turnModel(cube.center(), cubeModel, 0, 360, 3, true);
/// <summary>
        /// 模型動起來
        /// </summary>
        /// <param name="center"></param>
        /// <param name="model"></param>
        /// <param name="beginAngle">開始角度</param>
        /// <param name="endAngle">結束角度</param>
        /// <param name="seconds"></param>
        /// <param name="forever"></param>
        public void turnModel(Point3D center, GeometryModel3D model, double beginAngle, double endAngle, double seconds, bool forever)
        {
            //向量作為兩個旋轉軸
            Vector3D vector = new Vector3D(0, 1, 0);
            Vector3D vector2 = new Vector3D(1, 0, 0);

            // 創建AxisAngleRotation3D(三維旋轉)。我們可以設置一個0度的旋轉,因為我們要給他們做動畫
            AxisAngleRotation3D rotation = new AxisAngleRotation3D(vector, 0.0);
            AxisAngleRotation3D rotation2 = new AxisAngleRotation3D(vector2, 0.0);

            // 創建雙動畫來動畫我們的每一個旋轉
            DoubleAnimation doubleAnimation = new DoubleAnimation(beginAngle, endAngle, durationTS(seconds));
            DoubleAnimation doubleAnimation2 = new DoubleAnimation(beginAngle, endAngle, durationTS(seconds));

            // 為我們的動畫設置重覆的行為和持續時間
            if (forever)
            {
                doubleAnimation.RepeatBehavior = RepeatBehavior.Forever;
                doubleAnimation2.RepeatBehavior = RepeatBehavior.Forever;
            }

            doubleAnimation.BeginTime = durationTS(0.0);
            doubleAnimation2.BeginTime = durationTS(0.0);

            // 創建2個旋轉變換應用到我們的模型。每個需要一個旋轉和一個中心點
            RotateTransform3D rotateTransform = new RotateTransform3D(rotation, center);
            RotateTransform3D rotateTransform2 = new RotateTransform3D(rotation2, center);

            // 創建一個轉換組來保持我們的2個轉換
            Transform3DGroup transformGroup = new Transform3DGroup();
            transformGroup.Children.Add(rotateTransform);
            transformGroup.Children.Add(rotateTransform2);

            // 將旋轉組添加到模型上
            model.Transform = transformGroup;

            // 開始動畫 -- specify a target object and property for each animation -- in this case,
            //目標是我們創造的兩個AxisAngleRotation3D對象 並且 我們改變每個的角度屬性
            rotation.BeginAnimation(AxisAngleRotation3D.AngleProperty, doubleAnimation);
            rotation2.BeginAnimation(AxisAngleRotation3D.AngleProperty, doubleAnimation2);
        }

        private int durationM(double seconds)
        {
            int milliseconds = (int)(seconds * 1000);
            return milliseconds;
        }

        public TimeSpan durationTS(double seconds)
        {
            TimeSpan ts = new TimeSpan(0, 0, 0, 0, durationM(seconds));
            return ts;
        }
turnModel方法
然後就可以動了。
但是先在做模型都是用的unity3d和cocos2d程式裡面直接寫模型就只能在cpu中跑,gpu就不管了


