本文為原創文章,轉載請註明出處。 文章最後附帶DEMO,請需要的朋友下載。 從API 17開始,Android提供了Presentation類,為多屏異顯開發提供了官方支持,當然最終需求的實現也需要底層硬體及驅動的支持。 基本需求:控制輔屏全屏顯示與主顯不同的內容,且當主顯全屏顯示的內容變化後對輔屏 ...
本文為原創文章,轉載請註明出處。
文章最後附帶DEMO,請需要的朋友下載。
從API 17開始,Android提供了Presentation類,為多屏異顯開發提供了官方支持,當然最終需求的實現也需要底層硬體及驅動的支持。
基本需求:控制輔屏全屏顯示與主顯不同的內容,且當主顯全屏顯示的內容變化後對輔屏顯示內容的延續性(例如輔屏視頻播放)不產生影響。
本文主要內容有以下幾點:
(1)Presentation的基本用法;
(2)自定義Dialog的使用(全屏);
(3)採用自定義Dialog對話框方式代替Activity間的切換,防止因Activity進入Paused狀態導致Presentation不再顯示或顯示內容不持續的情況,例如想讓輔屏連續播放視頻,如果採用Activity切換方式,在Activity切換後新的Activity控制的Presentation很難延續上一個Presentation的視頻播放位置且用戶體驗不好。
Presentation的高級用法比如硬體狀態改變事件監聽等,請參考官方API或其他文章。
通常,使用Presentation有幾個要點:
(1)生命周期,Android API官方文檔有段原話"A presentation is automatically canceled (see cancel()) when the display to which it is attached is removed. An activity should take care of pausing and resuming whatever content is playing within the presentation whenever the activity itself is paused or resumed.",意思是當與presentation 綁定的Display被移除或Activitiey進入pauseed、resuming狀態時必須由我們自己控制Presentation的生命周期即Activity不在主顯顯示時由其創建的Presentation也將消失。
(2)獲得Display,每個Presentation必須指定單獨的Display用於與主屏幕不同內容的展現。
(3)設置ContentView,與Activity一樣,Presentation也可以通過setContentView方法設置Presentation展現的XML佈局文件。
說明:為了便於代碼重構和邏輯分離,自定義的Presentation和Dialog均定義成單獨的類,如果功能很簡單也可以定義成內部類。
一、自定義Presentation顯示
通常獲得Presentation顯示需要的Display有兩種方法,MediaRouter 和DisplayManager ,本文將採用DisplayManage獲取Display的方式。
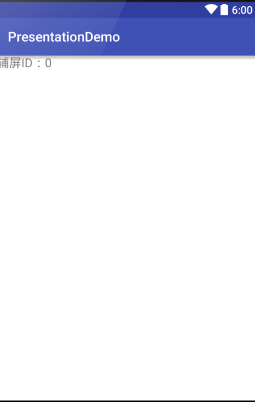
(1)創建佈局文件presentation_content.xml,效果如下:

(2)創建XiaoshubaoPresentation.java類文件:

 1 package xiaoshubao.presentationdemo;
 2
 3 import android.app.Presentation;
 4 import android.content.Context;
 5 import android.os.Bundle;
 6 import android.view.Display;
 7 import android.widget.TextView;
 8
 9 /**
10  * 作者:xiaoshubao
11  * 時間:2016/06/30
12  * 版本: V1.0
13  * 說明:
14  */
15 public class XiaoshubaoPresentation  extends Presentation {
16     private Display mdisplay;
17     public XiaoshubaoPresentation(Context context, Display display) {
18         super(context, display);
19         this.mdisplay = display;
20     }
21
22
23     @Override
24     protected void onStart() {
25         super.onStart();
26         MessageUtils.showInfo("MyPresentation....onStart");
27     }
28
29     @Override
30     protected void onStop() {
31         super.onStop();
32         MessageUtils.showInfo("MyPresentation....onStop");
33     }
34
35     @Override
36     public void show() {
37         super.show();
38         MessageUtils.showInfo("MyPresentation....show");
39     }
40
41     @Override
42     public void hide() {
43         super.hide();
44         MessageUtils.showInfo("MyPresentation....hide");
45     }
46
47     @Override
48     public void dismiss() {
49         super.dismiss();
50         MessageUtils.showInfo("MyPresentation....dismiss");
51     }
52
53     @Override
54     protected void onCreate(Bundle savedInstanceState) {
55         super.onCreate(savedInstanceState);
56         setContentView(R.layout.presentation_content);
57         initData();
58         MessageUtils.showInfo("MyPresentation....savedInstanceState");
59     }
60
61     private void initData() {
62         TextView mPresentationId = (TextView) findViewById(R.id.presentationIdTextView);
63         mPresentationId.setText("" + mdisplay.getDisplayId());
64     }
65 }
View Code
(3)顯示XiaoshubaoPresentation

 1   /**
 2      * 初始化輔屏顯示
 3      */
 4     private void initPresentation() {
 5         DisplayManager displayManager = (DisplayManager) getSystemService(Context.DISPLAY_SERVICE);
 6         if (displayManager != null) {
 7             Display[] displays = displayManager.getDisplays(DisplayManager.DISPLAY_CATEGORY_PRESENTATION);
 8             for (Display display : displays) {
 9                 XiaoshubaoPresentation mPresentation = new XiaoshubaoPresentation(this, display);
10                 mPresentation.show();
11                 mPresentationListView.add(mPresentation);
12             }
13         }
14         TextView presentationCount=(TextView)findViewById(R.id.presentationCount);
15         presentationCount.setText("輔屏數量:"+mPresentationListView.size());
16     }
View Code
代碼說明:
- DisplayManager displayManager = (DisplayManager) getSystemService(Context.DISPLAY_SERVICE);獲得displayManager對象,以便於獲得顯示屏幕的抽象對象Display。
-
Display[] displays = displayManager.getDisplays(DisplayManager.DISPLAY_CATEGORY_PRESENTATION);
DISPLAY_CATEGORY_PRESENTATION:This category can be used to identify secondary displays that are suitable for
* use as presentation displays such as HDMI or Wireless displays,即選擇可供Presentation顯示內容的Display。
-
XiaoshubaoPresentation mPresentation = new XiaoshubaoPresentation(this, display);//設置Presentation的呈現Display
-
mPresentation.show();//顯示Presentation
(4)隱藏Presentation
presentation.hide();
(5)釋放Presentation資源
presentation.dismiss();
二、自定義Dialog顯示
大致思路:定義Style控制Dialog全屏顯示->定義Dialog XML佈局文件->自定義Dialog類文件->響應Dialog界面控制項事件。
(1)定義Dialog全屏顯示的Style

1     <style name="XiaoshubaoDialogStyle">
2         <item name="android:windowNoTitle">true</item>
3         <item name="android:windowFullscreen">true</item>
4     </style>
View Code
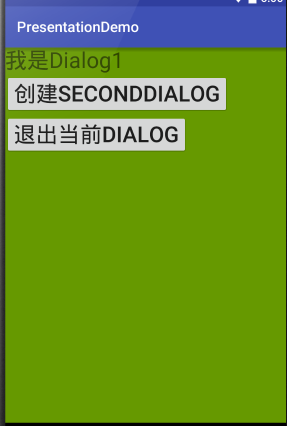
(2)Dialog佈局文件效果

Dialog1效果

Dialog2效果
(3)創建XiaoshubaoFirstDialog.java類文件

 1 package xiaoshubao.presentationdemo;
 2
 3 import android.app.Dialog;
 4 import android.content.Context;
 5 import android.view.View;
 6 import android.widget.Button;
 7
 8 /**
 9  * 作者:xiaoshubao
10  * 時間:2016/06/30
11  * 版本: V1.0
12  * 說明:
13  */
14 public class XiaoshubaoFirstDialog extends Dialog {
15     private Context context;
16     private XiaoshubaoFirstDialog dialog;
17
18     public XiaoshubaoFirstDialog(Context context, int themeResId) {
19         super(context, themeResId);
20         this.context = context;
21         dialog = this;
22     }
23
24     @Override
25     public void create() {
26         super.create();
27     }
28
29     @Override
30     public void show() {
31         super.show();
32         initListener();
33     }
34
35     /**
36      * 初始化控制項事件
37      */
38     private void initListener() {
39         Button createSecondDialogButton = (Button) findViewById(R.id.createSecondDialogButton);
40         createSecondDialogButton.setOnClickListener(btn_createSecondDialog);
41
42         Button dismmisDialogButton = (Button) findViewById(R.id.dismmisDialogButton);
43         dismmisDialogButton.setOnClickListener(dismmisDialogOnclick);
44     }
45
46     private View.OnClickListener btn_createSecondDialog = new View.OnClickListener() {
47         @Override
48         public void onClick(View v) {
49             XiaoshubaoSecondDialog secondDialog = new XiaoshubaoSecondDialog(context, R.style.XiaoshubaoDialogStyle);
50             secondDialog.setContentView(R.layout.dialog_second);
51             secondDialog.show();
52         }
53     };
54     private View.OnClickListener dismmisDialogOnclick = new View.OnClickListener() {
55         @Override
56         public void onClick(View v) {
57             dialog.dismiss();
58         }
59     };
60 }
View Code
(4)創建XiaoshubaoSecondDialog.java類文件

 1 package xiaoshubao.presentationdemo;
 2
 3 import android.app.Dialog;
 4 import android.content.Context;
 5 import android.view.View;
 6 import android.widget.Button;
 7
 8 /**
 9  * 作者:xiaoshubao
10  * 時間:2016/06/30
11  * 版本: V1.0
12  * 說明:
13  */
14 public class XiaoshubaoSecondDialog extends Dialog {
15     public XiaoshubaoSecondDialog(Context context, int themeResId) {
16         super(context, themeResId);
17         dialog=this;
18     }
19     private XiaoshubaoSecondDialog dialog;
20     @Override
21     public void create() {
22         super.create();
23     }
24
25     @Override
26     public void show() {
27         super.show();
28         initListener();
29     }
30     /**
31      * 初始化控制項事件
32      */
33     private void initListener() {
34         Button dismmisDialogButton = (Button) findViewById(R.id.dismmisDialogButton);
35         dismmisDialogButton.setOnClickListener(dismmisDialogOnclick);
36     }
37     private View.OnClickListener dismmisDialogOnclick = new View.OnClickListener() {
38         @Override
39         public void onClick(View v) {
40             dialog.dismiss();
41         }
42     };
43 }
View Code
(5)設置Dialog控制項響應事件

 1  /**
 2      * 初始化控制項事件
 3      */
 4     private void initListener() {
 5         Button createSecondDialogButton = (Button) findViewById(R.id.createSecondDialogButton);
 6         createSecondDialogButton.setOnClickListener(btn_createSecondDialog);
 7
 8         Button dismmisDialogButton = (Button) findViewById(R.id.dismmisDialogButton);
 9         dismmisDialogButton.setOnClickListener(dismmisDialogOnclick);
10     }
11
12     private View.OnClickListener btn_createSecondDialog = new View.OnClickListener() {
13         @Override
14         public void onClick(View v) {
15             XiaoshubaoSecondDialog secondDialog = new XiaoshubaoSecondDialog(context, R.style.XiaoshubaoDialogStyle);
16             secondDialog.setContentView(R.layout.dialog_second);
17             secondDialog.show();
18         }
19     };
20     private View.OnClickListener dismmisDialogOnclick = new View.OnClickListener() {
21         @Override
22         public void onClick(View v) {
23             dialog.dismiss();
24         }
25     };
View Code
(6)顯示Dialog

1  public void btn_createDialogBtnClick(View v) {
2         mainDialog = new XiaoshubaoFirstDialog(this, R.style.XiaoshubaoDialogStyle); //設置全屏樣式
3         mainDialog.setContentView(R.layout.dialog_first); //設置dialog的佈局
4         mainDialog.show();//顯示dialog界面
5     }
View Code
(7)釋放Dialog資源
dialog.dismiss();
三、綜述
項目最終呈現的效果如上面預覽圖,重點是給初學Android的朋友瞭解多屏異顯及Dialog全屏顯示和事件響應。
DEMO下載地址


