
京東物流:康睿 姚再毅 李振 劉斌 王北永 說明:以下全部均基於elasticsearch8.1 版本 一.跨集群檢索 - ccr 官網文檔地址: https://www.elastic.co/guide/en/elasticsearch/reference/8.1/modules-cross-cl ...
京東物流:康睿 姚再毅 李振 劉斌 王北永
說明:以下全部均基於elasticsearch8.1 版本
一.跨集群檢索 - ccr
官網文檔地址:
https://www.elastic.co/guide/en/elasticsearch/reference/8.1/modules-cross-cluster-search.html
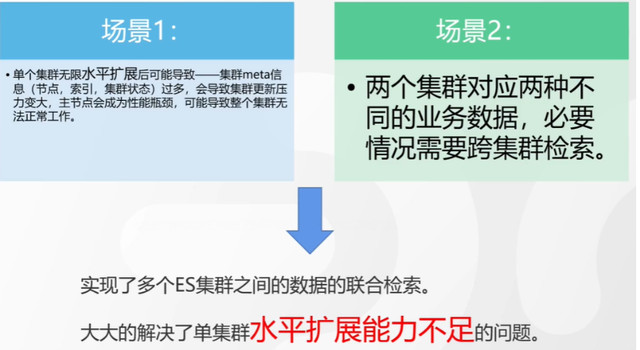
跨集群檢索的背景和意義
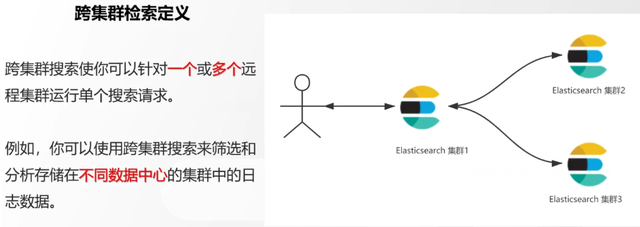
跨集群檢索定義
跨集群檢索環境搭建
官網文檔地址:
https://www.elastic.co/guide/en/elasticsearch/reference/8.1/modules-cross-cluster-search.html
步驟1:搭建兩個本地單節點集群,本地練習可取消安全配置
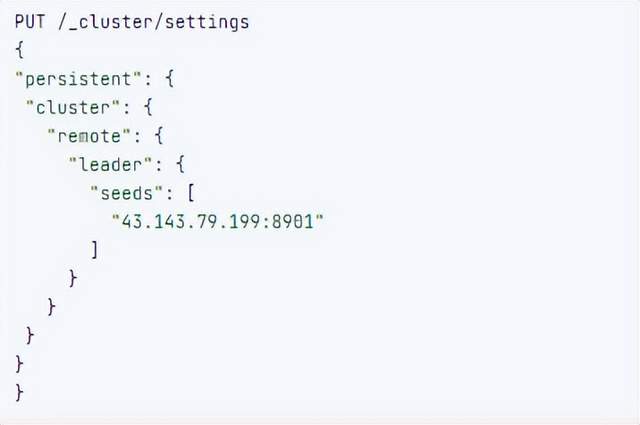
步驟2:每個集群都執行以下命令
PUT _cluster/settings { "persistent": { "cluster": { "remote": { "cluster_one": { "seeds": [ "172.21.0.14:9301" ] },"cluster_two": { "seeds": [ "172.21.0.14:9302" ] } } } } }
步驟3:驗證集群之間是否互通
方案1:Kibana 可視化查看:stack Management -> Remote Clusters -> status 應該是 connected! 且必須打上綠色的對號。
方案2:GET _remote/info
跨集群查詢演練
# 步驟1 在集群 1 中添加數據如下
PUT test01/_bulk
{"index":{"_id":1}}
{"title":"this is from cluster01..."}

# 步驟2 在集群 2 中添加數據如下:
PUT test01/_bulk
{"index":{"_id":1}}
{"title":"this is from cluster02..."}

# 步驟 3:執行跨集群檢索如下: 語法:POST 集群名稱1:索引名稱,集群名稱2:索引名稱/_search
POST cluster_one:test01,cluster_two:test01/_search
{
  "took" : 7,
  "timed_out" : false,
  "num_reduce_phases" : 3,
  "_shards" : {
    "total" : 2,
    "successful" : 2,
    "skipped" : 0,
    "failed" : 0
  },
  "_clusters" : {
    "total" : 2,
    "successful" : 2,
    "skipped" : 0
  },
  "hits" : {
    "total" : {
      "value" : 2,
      "relation" : "eq"
    },
    "max_score" : 1.0,
    "hits" : [
      {
        "_index" : "cluster_two:test01",
        "_id" : "1",
        "_score" : 1.0,
        "_source" : {
          "title" : "this is from cluster02..."
        }
      },
      {
        "_index" : "cluster_one:test01",
        "_id" : "1",
        "_score" : 1.0,
        "_source" : {
          "title" : "this is from cluster01..."
        }
      }
    ]
  }
}
二.跨集群複製 - ccs - 該功能需付費
官網文檔地址:
https://www.elastic.co/guide/en/elasticsearch/reference/current/xpack-ccr.html
如何保障集群的高可用
- 副本機制
- 快照和恢復
- 跨集群複製(類似mysql 主從同步)
跨集群複製概述

跨集群複製配置
- 準備兩個集群,網路互通
- 開啟 license 使用,可試用30天
- 開啟位置:Stack Management -> License mangement.
3.定義好誰是Leads集群,誰是follower集群
4.在follower集群配置Leader集群
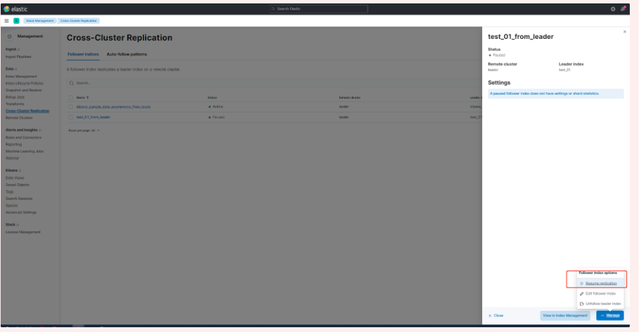
5.在follower集群配置Leader集群的索引同步規則(kibana頁面配置)
a.stack Management -> Cross Cluster Replication -> create a follower index.
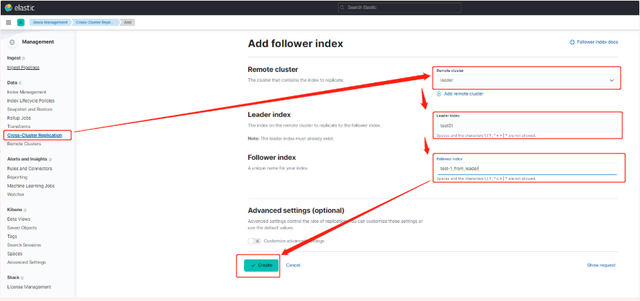
6.啟用步驟5的配置
三索引模板
官網文檔地址:
https://www.elastic.co/guide/en/elasticsearch/reference/8.1/index-templates.html
8.X之組件模板
1.創建組件模板-索引setting相關
# 組件模板 - 索引setting相關
PUT _component_template/template_sttting_part
{
  "template": {
    "settings": {
      "number_of_shards": 3,
      "number_of_replicas": 0
    }
  }
}
2.創建組件模板-索引mapping相關
# 組件模板 - 索引mapping相關
PUT _component_template/template_mapping_part
{
  "template": {
    "mappings": {
      "properties": {
        "hosr_name":{
          "type": "keyword"
        },
        "cratet_at":{
          "type": "date",
          "format": "EEE MMM dd HH:mm:ss Z yyyy"
        }
      }
    }
  }
}
3.創建組件模板-配置模板和索引之間的關聯
// **註意:composed_of 如果多個組件模板中的配置項有重覆,後面的會覆蓋前面的,和配置的順序有關**
# 基於組件模板,配置模板和索引之間的關聯
# 也就是所有 tem_* 該表達式相關的索引創建時,都會使用到以下規則
PUT _index_template/template_1
{
  "index_patterns": [
    "tem_*"
  ],
  "composed_of": [
    "template_sttting_part",
    "template_mapping_part"
  ]
}
4.測試
# 創建測試
PUT tem_001
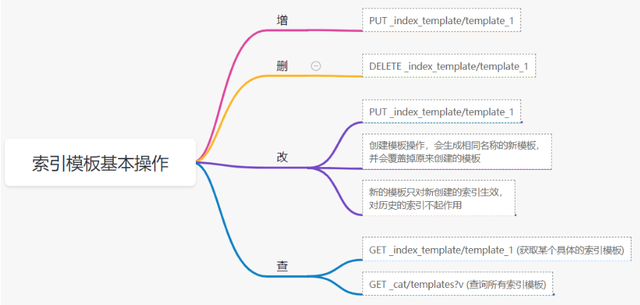
索引模板基本操作
實戰演練
需求1:預設如果不顯式指定Mapping,數值類型會被動態映射為long類型,但實際上業務數值都比較小,會存在存儲浪費。需要將預設值指定為Integer
索引模板,官網文檔地址:
https://www.elastic.co/guide/en/elasticsearch/reference/8.1/index-templates.html
mapping-動態模板,官網文檔地址:
https://www.elastic.co/guide/en/elasticsearch/reference/8.1/dynamic-templates.html
# 結合mapping 動態模板 和 索引模板
# 1.創建組件模板之 - mapping模板
PUT _component_template/template_mapping_part_01
{
  "template": {
    "mappings": {
      "dynamic_templates": [
        {
          "integers": {
            "match_mapping_type": "long",
            "mapping": {
              "type": "integer"
            }
          }
        }
      ]
    }
  }
}

# 2. 創建組件模板與索引關聯配置
PUT _index_template/template_2
{
  "index_patterns": ["tem1_*"],
  "composed_of": ["template_mapping_part_01"]
}

# 3.創建測試數據
POST tem1_001/_doc/1
{
  "age":18
}

# 4.查看mapping結構驗證
get tem1_001/_mapping
需求2:date_*開頭的欄位,統一匹配為date日期類型。
索引模板,官網文檔地址:
https://www.elastic.co/guide/en/elasticsearch/reference/8.1/index-templates.html
mapping-動態模板,官網文檔地址:
https://www.elastic.co/guide/en/elasticsearch/reference/8.1/dynamic-templates.html
# 結合mapping 動態模板 和 索引模板
# 1.創建組件模板之 - mapping模板
PUT _component_template/template_mapping_part_01
{
  "template": {
    "mappings": {
      "dynamic_templates": [
        {
          "integers": {
            "match_mapping_type": "long",
            "mapping": {
              "type": "integer"
            }
          }
        },
        {
        "date_type_process": {
          "match": "date_*",
          "mapping": {
            "type": "date",
            "format":"yyyy-MM-dd HH:mm:ss"
          }
        }
      }
      ]
    }
  }
}

# 2. 創建組件模板與索引關聯配置
PUT _index_template/template_2
{
  "index_patterns": ["tem1_*"],
  "composed_of": ["template_mapping_part_01"]
}


# 3.創建測試數據
POST tem1_001/_doc/2
{
  "age":19,
  "date_aoe":"2022-01-01 18:18:00"
}

# 4.查看mapping結構驗證
get tem1_001/_mapping
四.LIM 索引生命周期管理
官網文檔地址:
https://www.elastic.co/guide/en/elasticsearch/reference/8.1/index-lifecycle-management.html
什麼是索引生命周期
索引的 生-> 老 -> 病 -> 死
是否有過考慮,如果一個索引,創建之後,就不再去管理了?會發生什麼?
什麼是索引生命周期管理
索引太大了會如何?
大索引的恢復時間,要遠比小索引恢復慢的多的多索引大了以後,檢索會很慢,寫入和更新也會受到不同程度的影響索引大到一定程度,當索引出現健康問題,會導致整個集群核心業務不可用
最佳實踐
集群的單個分片最大文檔數上限:2的32次冪減1,即20億左右官方建議:分片大小控制在30GB-50GB,若索引數據量無限增大,肯定會超過這個值
用戶不關註全量
某些業務場景,業務更關註近期的數據,如近3天、近7天大索引會將全部歷史數據彙集在一起,不利於這種場景的查詢
索引生命周期管理的歷史演變

LIM前奏 - rollover 滾動索引
官網文檔地址:
https://www.elastic.co/guide/en/elasticsearch/reference/8.1/index-rollover.html
# 0.自測前提,lim生命周期rollover頻率。預設10分鐘
PUT _cluster/settings
{
  "persistent": {
    "indices.lifecycle.poll_interval": "1s"
  }
}

# 1. 創建索引,並指定別名
PUT test_index-0001
{
  "aliases": {
    "my-test-index-alias": {
      "is_write_index": true
    }
  }
}

# 2.批量導入數據
PUT my-test-index-alias/_bulk
{"index":{"_id":1}}
{"title":"testing 01"}
{"index":{"_id":2}}
{"title":"testing 02"}
{"index":{"_id":3}}
{"title":"testing 03"}
{"index":{"_id":4}}
{"title":"testing 04"}
{"index":{"_id":5}}
{"title":"testing 05"}

# 3.rollover 滾動規則配置
POST my-test-index-alias/_rollover
{
  "conditions": {
    "max_age": "7d",
    "max_docs": 5,
    "max_primary_shard_size": "50gb"
  }
}

# 4.在滿足條件的前提下創建滾動索引
PUT my-test-index-alias/_bulk
{"index":{"_id":7}}
{"title":"testing 07"}

# 5.查詢驗證滾動是否成功
POST my-test-index-alias/_search
LIM前奏 - shrink 索引壓縮
官網文檔地址:
https://www.elastic.co/guide/en/elasticsearch/reference/8.1/ilm-shrink.html核心步驟:
1. 將數據全部遷移至一個獨立的節點
2. 索引禁止寫入
3. 方可進行壓縮
# 1.準備測試數據
DELETE kibana_sample_data_logs_ext
PUT kibana_sample_data_logs_ext
{
  "settings": {
    "number_of_shards": 5,
    "number_of_replicas": 0
  }
}
POST _reindex
{
  "source": {
    "index": "kibana_sample_data_logs"
  },
  "dest": {
    "index": "kibana_sample_data_logs_ext"
  }
}


# 2.壓縮前必要的條件設置
# number_of_replicas :壓縮後副本為0
# index.routing.allocation.include._tier_preference 數據分片全部路由到hot節點
# "index.blocks.write 壓縮後索引不再允許數據寫入
PUT kibana_sample_data_logs_ext/_settings
{
  "settings": {
    "index.number_of_replicas": 0,
    "index.routing.allocation.include._tier_preference": "data_hot",
    "index.blocks.write": true
  }
}

# 3.實施壓縮
POST kibana_sample_data_logs_ext/_shrink/kibana_sample_data_logs_ext_shrink
{
  "settings":{
    "index.number_of_replicas": 0,
    "index.number_of_shards": 1,
    "index.codec":"best_compression"
  },
  "aliases":{
    "kibana_sample_data_logs_alias":{}
  }
}
LIM實戰
全局認知建立 - 四大階段
官網文檔地址:
https://www.elastic.co/guide/en/elasticsearch/reference/8.1/overview-index-lifecycle-management.html
生命周期管理階段(Policy):
https://www.elastic.co/guide/en/elasticsearch/reference/8.1/ilm-index-lifecycle.html
Hot階段(生)
Set priority
Unfollow
Rollover
Read-only
Shrink
Force Merge
Search snapshot
Warm階段(老)
Set priority
Unfollow
Read-only
Allocate
migrate
Shirink
Force Merge
Cold階段(病)
Search snapshot
Delete階段(死)
delete
演練
1.創建policy
-
Hot階段設置,rollover: max_age:3d,max_docs:5, max_size:50gb, 優先順序:100
-
Warm階段設置:min_age:15s , forcemerage段合併,熱節點遷移到warm節點,副本數設置0,優先順序:50
-
Cold階段設置: min_age 30s, warm遷移到cold階段
-
Delete階段設置:min_age 45s,執行刪除操作
PUT _ilm/policy/kr_20221114_policy
{
  "policy": {
    "phases": {
      "hot": {
        "min_age": "0ms",
        "actions": {
          "set_priority": {
            "priority": 100
          },
          "rollover": {
            "max_size": "50gb",
            "max_primary_shard_size": "50gb",
            "max_age": "3d",
            "max_docs": 5
          }
        }
      },
      "warm": {
        "min_age": "15s",
        "actions": {
          "forcemerge": {
            "max_num_segments": 1
          },
          "set_priority": {
            "priority": 50
          },
          "allocate": {
            "number_of_replicas": 0
          }
        }
      },
      "cold": {
        "min_age": "30s",
        "actions": {
          "set_priority": {
            "priority": 0
          }
        }
      },
      "delete": {
        "min_age": "45s",
        "actions": {
          "delete": {
            "delete_searchable_snapshot": true
          }
        }
      }
    }
  }
}

2.創建index template
PUT _index_template/kr_20221114_template
{
  "index_patterns": ["kr_index-**"],
  "template": {
    "settings": {
      "index": {
        "lifecycle": {
          "name": "kr_20221114_policy",
          "rollover_alias": "kr-index-alias"
        },
        "routing": {
          "allocation": {
            "include": {
              "_tier_preference": "data-hot"
            }
          }
        },
        "number_of_shards": "3",
        "number_of_replicas": "1"
      }
    },
    "aliases": {},
    "mappings": {}
  }
}
3.測試需要修改lim rollover刷新頻率
PUT _cluster/settings
{
  "persistent": {
    "indices.lifecycle.poll_interval": "1s"
  }
}
4.進行測試
# 創建索引,並制定可寫別名
PUT kr_index-0001
{
  "aliases": {
    "kr-index-alias": {
      "is_write_index": true
    }
  }
}
# 通過別名新增數據
PUT kr-index-alias/_bulk
{"index":{"_id":1}}
{"title":"testing 01"}
{"index":{"_id":2}}
{"title":"testing 02"}
{"index":{"_id":3}}
{"title":"testing 03"}
{"index":{"_id":4}}
{"title":"testing 04"}
{"index":{"_id":5}}
{"title":"testing 05"}
# 通過別名新增數據,觸發rollover
PUT kr-index-alias/_bulk
{"index":{"_id":6}}
{"title":"testing 06"}
# 查看索引情況
GET kr_index-0001

get _cat/indices?v
過程總結
第一步:配置 lim pollicy
-
橫向:Phrase 階段(Hot、Warm、Cold、Delete) 生老病死
-
縱向:Action 操作(rollover、forcemerge、readlyonly、delete)
第二步:創建模板 綁定policy,指定別名
第三步:創建起始索引
第四步:索引基於第一步指定的policy進行滾動
五.Data Stream
官網文檔地址:
https://www.elastic.co/guide/en/elasticsearch/reference/8.1/ilm-actions.html
特性解析
Data Stream讓我們跨多個索引存儲時序數據,同時給了唯一的對外介面(data stream名稱)
-
寫入和檢索請求發給data stream
-
data stream將這些請求路由至 backing index(後臺索引)

Backing indices
每個data stream由多個隱藏的後臺索引構成
-
自動創建
-
要求模板索引
rollover 滾動索引機制用於自動生成後臺索引
- 將成為data stream 新的寫入索引
應用場景
- 日誌、事件、指標等其他持續創建(少更新)的業務數據
- 兩大核心特點
- 時序性數據
- 數據極少更新或沒有更新
創建Data Stream 核心步驟

官網文檔地址:
https://www.elastic.co/guide/en/elasticsearch/reference/8.1/set-up-a-data-stream.html
Set up a data stream
To set up a data stream, follow these steps:
- Create an index lifecycle policy
- Create component templates
- Create an index template
- Create the data stream
- Secure the data stream
演練
1. 創建一個data stream,名稱為my-data-stream
2. index_template 名稱為 my-index-template
3. 滿足index格式【"my-data-stream*"】的索引都要被應用到
4. 數據插入的時候,在data_hot節點
5. 過3分鐘之後要rollover到data_warm節點
6. 再過5分鐘要到data_cold節點
# 步驟1 。創建 lim policy
PUT _ilm/policy/my-lifecycle-policy
{
  "policy": {
    "phases": {
      "hot": {
        "actions": {
          "rollover": {
            "max_size": "50gb",
            "max_age": "3m",
            "max_docs": 5
          },
          "set_priority": {
            "priority": 100
          }
        }
      },
      "warm": {
        "min_age": "5m",
        "actions": {
          "allocate": {
            "number_of_replicas": 0
          },
          "forcemerge": {
            "max_num_segments": 1
          },
          "set_priority": {
            "priority": 50
          }
        }
      },
      "cold": {
        "min_age": "6m",
        "actions": {
          "freeze":{}
        }
      },
      "delete": {
        "min_age": "45s",
        "actions": {
          "delete": {}
        }
      }
    }
  }
}

# 步驟2 創建組件模板 - mapping
PUT _component_template/my-mappings
{
  "template": {
    "mappings": {
      "properties": {
        "@timestamp": {
          "type": "date",
          "format": "date_optional_time||epoch_millis"
        },
        "message": {
          "type": "wildcard"
        }
      }
    }
  },
  "_meta": {
    "description": "Mappings for @timestamp and message fields",
    "my-custom-meta-field": "More arbitrary metadata"
  }
}

# 步驟3 創建組件模板 - setting
PUT _component_template/my-settings
{
  "template": {
    "settings": {
      "index.lifecycle.name": "my-lifecycle-policy",
      "index.routing.allocation.include._tier_preference":"data_hot"
    }
  },
  "_meta": {
    "description": "Settings for ILM",
    "my-custom-meta-field": "More arbitrary metadata"
  }
}

# 步驟4 創建索引模板
PUT _index_template/my-index-template
{
  "index_patterns": ["my-data-stream*"],
  "data_stream": { },
  "composed_of": [ "my-mappings", "my-settings" ],
  "priority": 500,
  "_meta": {
    "description": "Template for my time series data",
    "my-custom-meta-field": "More arbitrary metadata"
  }
}

# 步驟5 創建 data stream  並 寫入數據測試
PUT my-data-stream/_bulk
{ "create":{ } }
{ "@timestamp": "2099-05-06T16:21:15.000Z", "message": "192.0.2.42 - - [06/May/2099:16:21:15 +0000] \"GET /images/bg.jpg HTTP/1.0\" 200 24736" }
{ "create":{ } }
{ "@timestamp": "2099-05-06T16:25:42.000Z", "message": "192.0.2.255 - - [06/May/2099:16:25:42 +0000] \"GET /favicon.ico HTTP/1.0\" 200 3638" }

POST my-data-stream/_doc
{
  "@timestamp": "2099-05-06T16:21:15.000Z",
  "message": "192.0.2.42 - - [06/May/2099:16:21:15 +0000] \"GET /images/bg.jpg HTTP/1.0\" 200 24736"
}


# 步驟6 查看data stream 後臺索引信息
GET /_resolve/index/my-data-stream*


