
我的Vue之旅。使用 Vue 3.1 + TypeScript + Router + Tailwind.css 構建手機底部導航欄、仿B站的登錄、註冊頁面。 ...
第一期 · 使用 Vue 3.1 + TypeScript + Router + Tailwind.css 構建手機底部導航欄、仿B站的登錄、註冊頁面。
代碼倉庫
alicepolice/Vue-05 (github.com)
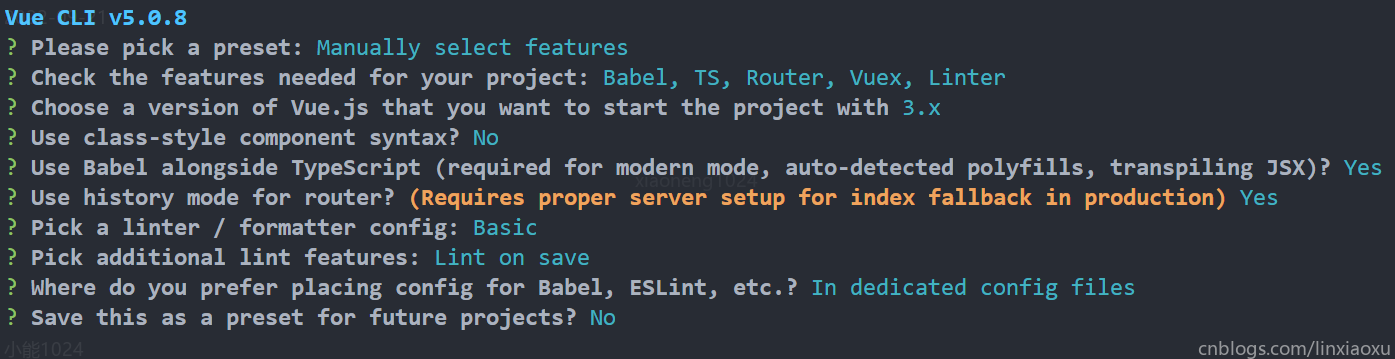
構建項目
新建項目
導入bootstrap-icons-vue
bootstrap-icons-vue - npm (npmjs.com)
導入Tailwind
在 Vue 3 和 Vite 安裝 Tailwind CSS - Tailwind CSS 中文文檔
安裝VSCODE插件
構建目錄文件
PS C:\Users\小能喵喵喵\Desktop\Vue\Homework\homework2\src> tree /f
C:.
│   App.vue
│   index.css
│   main.ts
│   shims-vue.d.ts
│
├───assets
│       3.png
│       4.png
│       logo.png
│
├───components
│       BottomBar.vue
│
├───router
│       index.ts
│
├───store
│       index.ts
│
└───views
        AboutView.vue
        HomeLoginView.vue
        HomeView.vue
        LoginView.vue
        RegisterView.vue
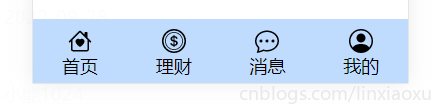
構建底部導航欄
Router
- redirect用於訪問網站根目錄的時候跳轉至特定哈希錨點對應的頁面
const routes: Array<RouteRecordRaw> = [
  {
    path: '/',
    name: '',
    redirect: () => {
      return { name: "home" }
    }
  },
  {
    path: '/home',
    name: 'home',
    component: HomeView
  },
  {
    path: '/login',
    name: 'login',
    component: LoginViewVue
  },
  {
    path: '/register',
    name: 'register',
    component: RegisterViewVue
  },
  {
    path: '/about',
    name: 'about',
    component: AboutViewVue
  }
]
App.vue
使用 typescript 語法明確規定了setBottomFlag接收的布爾類型,同時嚴格規定 vue 應用實例 data 函數返回的對象中變數的類型,即 as 語法。
v-show="bottomFlag" 用於隱藏導航欄,setBottomFlag 由各個 router-view 負責 emit 觸發。
<template>
  <router-view @set-bottom-flag="setBottomFlag" />
  <BottomBar v-show="bottomFlag" :items="bottomItems" />
</template>


<script lang="ts">
import { defineComponent } from "vue";
import BottomBar from "@/components/BottomBar.vue";

type BottomItem = {
  text: string;
  icon: string;
  routerName: string;
};

export default defineComponent({
  name: "App",
  components: {
    BottomBar,
  },
  data() {
    return {
      bottomItems: [
        { text: "首頁", icon: "b-icon-house-heart", routerName: "home" },
        { text: "理財", icon: "b-icon-coin", routerName: "about" },
        { text: "消息", icon: "b-icon-chat-dots", routerName: "about" },
        { text: "我的", icon: "b-icon-person-circle", routerName: "about" },
      ] as BottomItem[],
      bottomFlag: true as boolean,
    };
  },
  methods: {
    setBottomFlag(value: boolean): void {
      this.bottomFlag = value;
    },
  },
});
</script>
BottomBar.vue
這裡使用了 windtail css 功能性類語法,具體信息可以通過官方文檔查到。
在vue3.1中,router-link的tag已經被廢除,需要使用插槽的方式。給 router-link 添加 custom v-slot="{ navigate }"。navigate 是觸發導航的函數。 @click = "navigate" 通過對其他標簽的點擊間接觸發router-link的導航函數。
custom -> <router-link> 是否不應將其內容包裝在 <a> 標記中。
icon的生成使用了動態控制項,依賴外部傳進去的數組 ->:is
// 來自 App.vue 的數組傳遞給了當前的 props -> items
bottomItems: [
{ text: "首頁", icon: "b-icon-house-heart", routerName: "home" },
{ text: "理財", icon: "b-icon-coin", routerName: "about" },
{ text: "消息", icon: "b-icon-chat-dots", routerName: "about" },
{ text: "我的", icon: "b-icon-person-circle", routerName: "about" },
] as BottomItem[],
<template>
  <div
    class="
      box-border
      h-16
      absolute
      container
      bg-blue-200
      bottom-0
      left-0
      flex flex-nowrap
      items-center
    "
  >
    <div v-for="(item, index) in items" :key="index" style="width: 100%">
      <router-link :to="{ name: item.routerName }" custom v-slot="{ navigate }">
        <div @click="navigate" class="text-center">
          <div class="pt-2">
            <component :is="item.icon" class="m-auto text-2xl" />
            <div class="text-lg">
              {{ item.text }}
            </div>
          </div>
        </div>
      </router-link>
    </div>
  </div>
</template>
<script lang="ts">
export default {
  props: {
    items: Array,
  },
};
</script>
修改HomeView.vue
在Home頁面下預設顯示底部導航欄,在掛載的時候通知父組件事件。
this.$emit("set-bottom-flag", true);
<template>
  <div class="text-6xl">主頁面 HELLO WORLD</div>
</template>

<script lang="ts">
import { defineComponent } from "vue";

export default defineComponent({
  name: "HomeView",
  components: {},
  mounted() {
    this.$emit("set-bottom-flag", true);
  },
});
</script>
構建登錄、註冊
提取組件
對於按鈕和表單元素之類的小型組件,與簡單的 CSS 類相比,創建模板片斷或 JavaScript 組件通常會感覺過重。
官方建議使用 @layer components { ... } 指令包裝自定義組件樣式,以告訴 Tailwind 這些樣式屬於哪一層。
在 src/index.css 中定義表單標簽、按鈕標簽共用的 Tailwind CSS 樣式集合
/* ./src/index.css */
@tailwind base;
@tailwind components;
@tailwind utilities;

@layer components {
  .login-register-input {
    @apply inline-block bg-white focus:outline-none py-3 pl-3 appearance-none leading-normal;
  }
  .login-register-solid-button{
    @apply
    focus:outline-none
    text-white
    bg-pink-400
    font-medium
    rounded-sm
    text-lg
    px-5
    py-2.5
    mb-2
  }
  .login-register-hollow-button{
    @apply
    focus:outline-none
    text-pink-400
    border-pink-400 border
    font-medium
    rounded-sm
    text-lg
    px-5
    py-2.5
    mb-2
  }
  .login-register-checkbox{
    @apply
    ml-2
    text-sm
    font-medium
    text-gray-500
    dark:text-gray-300
    text-left
  }
}
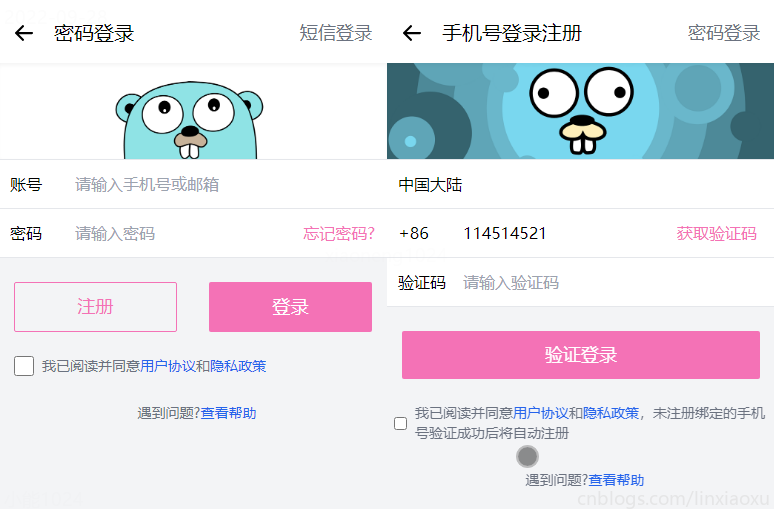
LoginView.vue
router-link
註意 router-link 的用法,這裡分別綁定了左箭頭、簡訊登錄。主要靠如下語法。
 custom v-slot="{ navigate }
// 上: router-link標簽中的屬性, 下: 綁定實現像a標簽那樣具備跳轉功能的標簽
 @click="navigate"
動態綁定背景圖片方式
require 從依賴項返回導出。是同步過程,不會觸發對伺服器的請求。編譯器會確保依賴項可用。
<div
class="bg-cover bg-center h-24 shadow-inner"
:style="{
'background-image': 'url(' + banner + ')',
}"
></div>
  data() {
    return {
      banner: require("../assets/3.png"),
    };
  }
更多資料可參考
https://stackoverflow.com/questions/67193179/how-can-i-link-background-image-vue-cli
https://stackoverflow.com/questions/35242272/vue-js-data-bind-style-backgroundimage-not-working
輸入密碼的時候切換背景
依托兩個事件,通過當前游標對錶單標簽的進出實現。
@focusin="changeIMG('4.png')"
@focusout="changeIMG('3.png')"
  methods: {
    changeIMG(src: string): void {
      this.banner = require(`../assets/${src}`);
    },
  },
完整代碼
<template>
  <div class="container bg-gray-100 absolute inset-0">
    <div class="box-border bg-white border-b-1 border-b-black h-16 p-2">
      <router-link :to="{ name: 'home' }" custom v-slot="{ navigate }">
        <b-icon-arrow-left-short
          class="inline-block text-4xl align-middle mr-3 mt-2"
          @click="navigate"
        />
      </router-link>

      <span class="text-xl absolute top-5">密碼登錄</span>
      <router-link :to="{ name: 'register' }" custom v-slot="{ navigate }">
        <span
          class="text-lg absolute right-4 top-5 text-gray-500"
          @click="navigate"
          >簡訊登錄</span
        >
      </router-link>
    </div>

    <div
      class="bg-cover bg-center h-24 shadow-inner"
      :style="{
        'background-image': 'url(' + banner + ')',
      }"
    ></div>
    <div class="border-y">
      <div class="login-register-input w-1/6">賬號</div>
      <input
        id="username"
        class="login-register-input w-5/6"
        type="text"
        placeholder="請輸入手機號或郵箱"
      />
    </div>
    <div class="border-b">
      <div class="login-register-input w-1/6">密碼</div>
      <input
        id="password"
        class="login-register-input w-3/6"
        type="text"
        placeholder="請輸入密碼"
        @focusin="changeIMG('4.png')"
        @focusout="changeIMG('3.png')"
      />
      <div class="login-register-input pl-8 w-2/6 text-pink-400 text-center">
        忘記密碼?
      </div>
    </div>
    <div class="text-center pt-6 flex justify-around">
      <button type="button" class="login-register-hollow-button w-5/12">
        註冊
      </button>
      <button type="button" class="login-register-solid-button w-5/12">
        登錄
      </button>
    </div>
    <div class="text-center pt-4">
      <div class="flex items-center align-top">
        <input
          id="link-checkbox"
          type="checkbox"
          value=""
          class="ml-4 w-5 h-5 bg-gray-100 rounded"
        />
        <label
          for="link-checkbox"
          class="ml-2 text-sm font-medium text-gray-500 text-left"
          >我已閱讀並同意<a href="#" class="text-blue-600">用戶協議</a>和<a
            href="#"
            class="text-blue-600"
            >隱私政策</a
          ></label
        >
      </div>
    </div>
    <div class="text-center pt-6">
      <label class="login-register-checkbox">
        遇到問題?<a href="#" class="text-blue-600">查看幫助</a>
      </label>
    </div>
  </div>
</template>

<script lang="ts">
import { defineComponent } from "vue";

export default defineComponent({
  name: "LoginView",
  components: {},
  data() {
    return {
      banner: require("../assets/3.png"),
    };
  },
  methods: {
    changeIMG(src: string): void {
      this.banner = require(`../assets/${src}`);
    },
  },
  mounted() {
    this.$emit("set-bottom-flag", false);
  },
});
</script>
RegisterView.vue
部分功能與 Login.view 類似。
表單填入更改標簽顏色
當輸入手機號時,獲取驗證碼會由灰變成粉色。將字體顏色從固定的class抽取出放入動態class綁定計算屬性。每當phone發生變化即可改變顏色。
      <div
        class="login-register-input w-2/6 text-center"
        :class="changeGetCodeColor"
      >
        獲取驗證碼
      </div>
  computed: {
    changeGetCodeColor(): string {
      if (this.phone == "") {
        return "text-gray-400";
      } else {
        return "text-pink-400";
      }
    },
  },
完整代碼
<template>
  <div class="container bg-gray-100 absolute inset-0">
    <div class="box-border bg-white border-b-1 border-b-black h-16 p-2">
      <router-link :to="{ name: 'home' }" custom v-slot="{ navigate }">
        <b-icon-arrow-left-short
          class="inline-block text-4xl align-middle mr-3 mt-2"
          @click="navigate"
        />
      </router-link>

      <span class="text-xl absolute top-5">手機號登錄註冊</span>
      <router-link :to="{ name: 'login' }" custom v-slot="{ navigate }">
        <span
          class="text-lg absolute right-4 top-5 text-gray-500"
          @click="navigate"
          >密碼登錄</span
        >
      </router-link>
    </div>

    <div
      class="bg-cover bg-center h-24 shadow-inner"
      :style="{
        'background-image': 'url(' + banner + ')',
      }"
    ></div>
    <div>
      <select id="countries" class="login-register-input w-full border-y">
        <option selected value="CN">中國大陸</option>
        <option value="US">美國</option>
        <option value="CA">加拿大</option>
        <option value="FR">法國</option>
        <option value="DE">德國</option>
      </select>
    </div>
    <div class="border-b">
      <div class="login-register-input w-1/6">+86</div>
      <input
        id="phone"
        class="login-register-input w-3/6"
        type="text"
        placeholder="請輸入手機號碼"
        v-model="phone"
      />
      <div
        class="login-register-input w-2/6 text-center"
        :class="changeGetCodeColor"
      >
        獲取驗證碼
      </div>
    </div>
    <div class="border-b">
      <div class="login-register-input w-1/6">驗證碼</div>
      <input
        id="code"
        class="login-register-input w-5/6"
        type="text"
        placeholder="請輸入驗證碼"
        @focusin="changeIMG('4.png')"
        @focusout="changeIMG('3.png')"
      />
    </div>
    <div class="text-center pt-6">
      <button type="button" class="login-register-solid-button w-11/12">
        驗證登錄
      </button>
    </div>
    <div class="text-center pt-4">
      <div class="flex items-center align-top">
        <input
          id="link-checkbox"
          type="checkbox"
          value=""
          class="login-register-checkbox"
        />
        <label
          for="link-checkbox"
          class="
            ml-2
            text-sm
            font-medium
            text-gray-500
            dark:text-gray-300
            text-left
          "
          >我已閱讀並同意<a
            href="#"
            class="text-blue-600 dark:text-blue-500 hover:underline"
            >用戶協議</a
          >和<a
            href="#"
            class="text-blue-600 dark:text-blue-500 hover:underline"
            >隱私政策</a
          >,未註冊綁定的手機號驗證成功後將自動註冊</label
        >
      </div>
    </div>
    <div class="text-center pt-6">
      <label
        class="
          ml-2
          text-sm
          font-medium
          text-gray-500
          dark:text-gray-300
          text-left
        "
      >
        遇到問題?<a
          href="#"
          class="text-blue-600 dark:text-blue-500 hover:underline"
          >查看幫助</a
        >
      </label>
    </div>
  </div>
</template>

<script lang="ts">
import { defineComponent } from "vue";

export default defineComponent({
  name: "RegisterView",
  components: {},
  data() {
    return {
      banner: require("../assets/3.png"),
      phone: "",
    };
  },
  methods: {
    changeIMG(src: string): void {
      this.banner = require(`../assets/${src}`);
    },
  },
  computed: {
    changeGetCodeColor(): string {
      if (this.phone == "") {
        return "text-gray-400";
      } else {
        return "text-pink-400";
      }
    },
  },
  mounted() {
    this.$emit("set-bottom-flag", false);
  },
});
</script>
一些零散的知識補充
Module not found: Error: Can't resolve 'sass-loader'
Module not found: Error: Can't resolve 'sass-loader'
解決方法: 運行如下命令後重新啟動服務
npm install sass-loader -D
npm install node-sass -D
聲明式、命令式
命令式UI:構建全功能UI實體,然後在UI更改時使用方法對其進行變更。
聲明式UI:描述當前的UI狀態,並且不需要關心它是如何過渡到框架的。
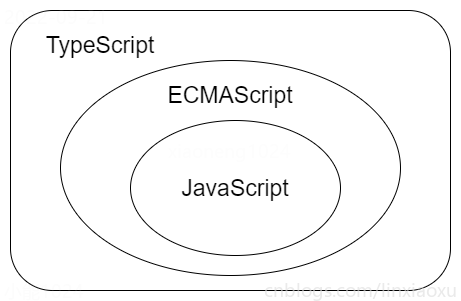
TS、ECMA、JS 關係
配置NPM鏡像
npm config set registry=http://registry.npm.taobao.org
初試TS
var hello = "hello world"
console.log(hello)
npm install -g typescript
tsc helloworld ::編譯ts
node helloworld ::運行js
變數提升
當使用var聲明一個變數的時候,該變數會被提升到作用域的頂端,但是賦值的部分並不會被提升。
console.log(hello)
var hello = "hello world"
而let、const不會,實際開發中建議儘量使用用 let 和 const 代替var。
好用的網站
Tailwind CSS Select / Listbox Form - Free Examples (tailwind-elements.com)
Bootstrap Icons · Official open source SVG icon library for Bootstrap (getbootstrap.com)


