//前提需要 //需要一個 serialPort 工具 可在vs自帶的工具欄中獲得 //源代碼加串口工具地址: //鏈接:https://pan.baidu.com/s/1YbfvdXEmfsJX87D-Jxljyg 提取碼:d32x //記錄用戶打開的串口號 可改為泛型模式 string seri ...
//前提需要
//需要一個 serialPort 工具 可在vs自帶的工具欄中獲得
//源代碼加串口工具地址:
//鏈接:https://pan.baidu.com/s/1YbfvdXEmfsJX87D-Jxljyg 提取碼:d32x
//記錄用戶打開的串口號 可改為泛型模式
string serialPortName;
//一般電腦是沒有串口號的,所以要用個軟體創建虛擬串口號
//軟體名 - Configure Virtual Serial Port Driver
波特率設置的值為 1382400,921600,460800,256000,230400,128000,115200,76800,57600,
43000,38400,19200,14400,9600,4800,1200
停止位設置的值為:1,1.5,2
數據位設置的值為:8,7,6,5
校驗位設置的值為:無,奇校驗,偶校驗
步驟:
1.設置串口的基本數據 (串口號,波特率,數據位,停止位,校驗位)
2.使用Open打開串口
3.使用串口工具的DataReceived()事件進行數據的接收
4.創建發送數據 Write() ,一般發送的是byte數組
5.使用Close關閉串口
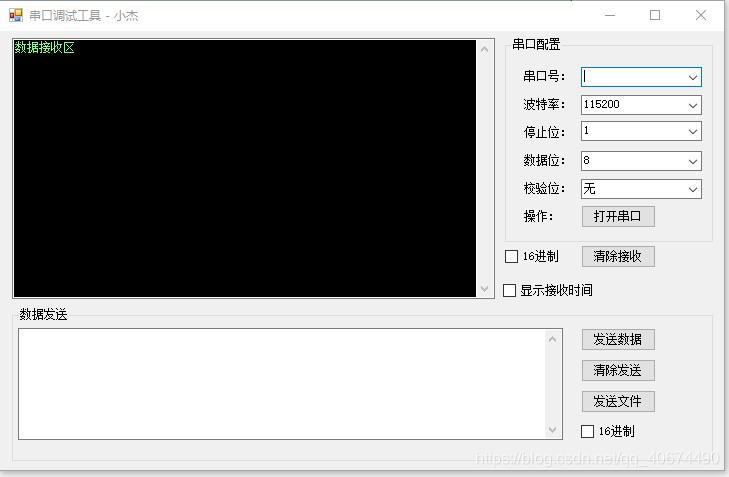
界面:
//一
//在視窗Load事件中,設置串口基本數據的預設值
//1.拿到電腦上可以使用的串口號,並賦值給視窗的串口下拉列表中,預設選項索引為0
string[] prots = System.IO.Ports.SerialPort.GetPortNames();
this.cbPort.Items.AddRange(prots);
this.cbPort.SelectedIndex = this.cbPort.Items.Count > 0 ? 0 : -1;
//2.設置波特率,停止位,數據位,校驗位的預設值。
this.cbBaud.Text = "115200";
this.cbStopBit.Text = "1";
this.cbDataBit.Text = "8";
this.cbComparable.Text = "無";
//二
//設置打開串口和關閉串口按鈕的單擊事件
//為串口拿到基本數據
serialPort .PortName = this.cbPort.Text;//串口號
serialPortName = this.cbPort.Text;//記錄用戶打開的串口號
serialPort.BaudRate = int.Parse(this.cbBaud.Text);//波特率
serialPort.DataBits = int.Parse(this.cbDataBit.Text);//數據位
//設置停止位
if (this.cbStopBit.Text == "1") { serialPort.StopBits = StopBits.One; }
else if (this.cbStopBit.Text == "1.5") { serialPort.StopBits = StopBits.OnePointFive; }
else if (this.cbStopBit.Text == "2") { serialPort.StopBits = StopBits.Two; }
//設置奇偶校驗
if (this.cbComparable.Text == "無") { serialPort.Parity = Parity.None; }
else if (this.cbComparable.Text == "奇校驗") { serialPort.Parity = Parity.Odd; }
else if (this.cbComparable.Text == "偶校驗") { serialPort.Parity = Parity.Even; }
//打開串口 只需要使用Open打開串口
serialPort1.Open();
this.btnOpenStat.Text = "關閉串口";
//如果按鈕的Text為 關閉串口的話
serialPort.Close();//Close() - 關閉串口
//三 本次串口的簡單數據協議 1 - 字元串 bp - 醫療數據 2 - 文件
//通過串口工具自帶的DataReceived事件進行串口的數據接收
//這次的是自己定義的數據協議,一般都是用公司預設的協議 或者RS232和RS485
//獲取可以讀取的位元組數 預設最大值是4096 如果想要更改可以直接改變串口的ReadBufferSize屬性
int len = serialPort.BytesToRead;
if(len == serialPort.ReadBufferSize){
MessageBox.Show("程式最多只能接受"+serialPort1.ReadBufferSize+"位元組的數據!","提示");
return;
}
//拿到數據,Read()
byte[] buff = new byte[len];
serialPort.Read(buff,0,len);
//如果選中了顯示時間就賦值,沒有就算
string DateNow = string.Empty;
//根據協議進行判斷
if(buff[0]==1){
//拿出原來的數據並去除協議部分 然後放入另一個byte[]數組中
byte[] result = new byte[len];
Buffer.BlockCopy(buff,1,result,0,buff.Length-1);
//將byte數組保存可讀string 根據自己的編碼格式進行轉碼
string str = Encoding.Default.GetString(result);
//將數據分割為string[] 判斷是否為醫療數據
string[] strPle = str.Split(',');
if(strPle[0]=="bp"){
//放入方法中,重新拼裝成可用數據
str = RecHBpData(strPle);
}
//由於我們的接收數據的事件是在一個子線程裡面的,
//所以需要Invoke才能給我們主線程創建的控制項賦值
//當然你也可以使用InvokeRequired()來判斷是否為主線程創建的控制項,我這裡就沒使用了
Invoke(new Action(() => {
//是否顯示時間
if(this.ckDateTime.Checked){
DateNow = "\r\n" + DateTime.Now.ToString();
}
//是否為16進位顯示
if(this.checkBox1.Checked){
this.txtMsg.AppendText(DateNow + "\r\n" + byteToHexStr(buff));
}
//預設是使用字元串顯示
else{
this.txtMsg.AppendText(DateNow + "\r\n" + str);
}
})));
}
//如果傳送的文件的話
else if(buff[0]==2){
ProcessRecieveFile(buff);
}
//一般呢,這些方法是放在一個方法類庫裡面,但是我懶得放就在一個類裡面了
#region 封裝的方法
/// <summary>
/// 傳輸的是文件就進行文件的操作
/// </summary>
/// <param name="data">數據流</param>
public void ProcessRecieveFile(byte[] data)
{
using (SaveFileDialog dialog = new SaveFileDialog())
{
dialog.DefaultExt = "txt";
dialog.Filter = "文本文件(*.txt)|*.txt|所有文件(*.*)|*.*";
//由於大部分可能不是主線程,所以我們要加this,不然不會彈出保存框
if (dialog.ShowDialog(this) != DialogResult.OK)
{
return;
}
byte[] result = new byte[data.Length - 1];
Buffer.BlockCopy(data, 1, result, 0, data.Length - 1);
File.WriteAllBytes(dialog.FileName, result);
}
}
#region 封裝 數據定義的協議
public static string RecHBpData(string[] strPle)
{
string str = string.Empty;
//判斷儀器
str += $"{StaticConstant.DicMedicalnoun[strPle[1]]} ";
//增加時間
str += " " + strPle[2] + " " + strPle[3] + "\r\n";
//增加具體數據
str += $"{StaticConstant.DicMedicalnoun[strPle[4]]}: {strPle[5].TrimStart('0')} \r\n{StaticConstant.DicMedicalnoun[strPle[6]]}: {strPle[7].TrimStart('0')}";
return str;
}
#endregion
/// <summary>
/// 位元組數組轉16進位字元串
/// </summary>
/// <param name="bytes">byte數組</param>
/// <returns>16進位顯示形式</returns>
public static string byteToHexStr(byte[] bytes)
{
string retuenStr = "";
try
{
if (bytes != null)
{
for (int i = 0; i < bytes.Length; i++)
{
retuenStr += bytes[i].ToString("X2") + " ";//變成16進位,兩個中間用空格隔開
}
}
return retuenStr;
}
catch (Exception ex)
{
return retuenStr;
}
}
/// <summary>
/// 字元串轉16進位格式,不夠自動前面補0
/// </summary>
/// <param name="hexString"></param>
/// <returns></returns>
public static byte[] strToHexByte(string hexString)
{
int i;
if ((hexString.Length % 2) != 0)
{//奇數個
byte[] returnBytes = new byte[(hexString.Length + 1) / 2];
try
{
for (i = 0; i < hexString.Length - 1; i++)
{
returnBytes[i] = Convert.ToByte(hexString.Substring(i * 2, 2), 16);
i = i * 2;
}
returnBytes[returnBytes.Length - 1] = Convert.ToByte(hexString.Substring(hexString.Length - 1, 1).PadLeft(2, '0'), 16);
}
catch (Exception)
{
MessageBox.Show("含有非16進位字元", "提示");
return null;
}
return returnBytes;
}
else
{
byte[] returnBytes = new byte[(hexString.Length) / 2];
try
{
for (i = 0; i < hexString.Length; i++)
{
returnBytes[i] = Convert.ToByte(hexString.Substring(i * 2, 2), 16);
}
}
catch (Exception)
{
MessageBox.Show("含有非16進位字元", "提示");
return null;
}
return returnBytes;
}
}
#endregion
//我的醫療數據的封裝是放在配置文件中,一般我們都是放在資料庫中,不過我就做個小學習工具就 //沒做到資料庫裡面了
//四 發送數據
//發送數據,我這邊分為發送文件和發送字元串
//1.發送字元串
string str = this.txtSendMsg.Text.Trim().Tostring();
try{
if(str.Length > 0){
//16進位發送
if(this.ckSend.Checked){
byte[] byt = strToHexBytes(str);
byte[] result = new byte[byt.Length+1];
//加上數據協議
result[0] = 1;
//數據轉移
Buffer.BlockCopy(byt,0,result,1,byt.Lengt);
//發送數據,byte形式發送
serialPort.Write(result,0,result.Length);
}
//預設字元串發送
else{
//根據自己的編碼格式編碼
byte[] dataByte = Encoding.Default.GetBytes(str);
byte[] result = new byte[dataByte.Length + 1];
//加上數據協議
result[0] = 1;
Buffer.BlockCopy(dataByte ,0,result,1,dataByte .Lengt);
//發送數據,byte形式發送
serialPort.Write(result,0,result.Length);
}
}
}catch(Exception ex){}
//2.發送文件
try{
using(OpenFileDialog dialog = new OpenFileDialog()){
if(dialog.ShowDialog(this) != DialogResult.OK){
return;
}
byte[] data = File.ReadAllBytes(dialog.FileName);
byte[] result = new byte[data.Length + 1];
result[0] = 2;
Buffer.BlockCopy(data,0,result,1,data.Length);
serialPort.Write(result,0,result.Lenght);
}
}catch(Exception ex){
MessageBox.Show(ex.Message);
}


