輔助器方法 在開發ASP.NET MVC項目時,經常會用到輔助器方法,它能夠提供很多遍歷的工作,比如可以對代碼塊和標記進行打包等。下麵通過新建一個示例項目來看看其在實際使用中的情況。 示例項目 項目名:HelperMethods 模板:Basic(基本) 項目名:HelperMethods 模板:B ...
輔助器方法
在開發ASP.NET MVC項目時,經常會用到輔助器方法,它能夠提供很多遍歷的工作,比如可以對代碼塊和標記進行打包等。下麵通過新建一個示例項目來看看其在實際使用中的情況。
示例項目
- 項目名:HelperMethods
-
模板:Basic(基本)

首先要在項目中添加一個控制器——Home:
using System;
using System.Collections.Generic;
using System.Linq;
using System.Web;
using System.Web.Mvc;

namespace HelperMethods.Controllers
{
    public class HomeController : Controller
    {

        public ActionResult Index()
        {
            ViewBag.Fruits = new string[] { "Apple", "Orange", "Pear" };
            ViewBag.Cities = new string[] { "New York", "London", "Paris" };

            string message = "This is an HTML element: <input>";

            return View((object)message);
        }

    }
}
該控制器的Index動作方法的視圖為一個強類型視圖,且未使用佈局,內容如下:
@model string

@{
    Layout = null;
}

<!DOCTYPE html>

<html>
<head>
    <meta name="viewport" content="width=device-width" />
    <title>Index</title>
</head>
<body>
    <div>
        Here are the fruits:
        @foreach (string str in (string[])ViewBag.Fruits)
        {
            <b>@str</b>
        }
    </div>
    <div>
        Here are the cities:
        @foreach (string str in (string[])ViewBag.Cities)
        {
            <b>@str</b>
        }
    </div>
    <div>
        Here is the message:
        <p>@Model</p>
    </div>
</body>
</html>
效果如圖:

創建自定義輔助器方法
後面通過創建自定義的輔助器方法瞭解內聯輔助器方法和外部輔助器方法。
內聯的輔助器方法
故名思議,內聯輔助器方法是在視圖中定義的一種輔助器方法,這也是最簡單的一種輔助器方法。下麵創建的自定義內聯輔助器方法使用了@helper標簽,內容如下:
@model string

@{
    Layout = null;
}

@helper ListArrayItems(string[] items)
{
    foreach (string str in items)
    {
        <b>@str</b>
    }
}

<!DOCTYPE html>

<html>
<head>
    <meta name="viewport" content="width=device-width" />
    <title>Index</title>
</head>
<body>
    <div>
        Here are the fruits: @ListArrayItems(ViewBag.Fruits)
    </div>
    <div>
        Here are the cities: @ListArrayItems(ViewBag.Cities)
    </div>
    <div>
        Here is the message:
        <p>@Model</p>
    </div>
</body>
</html>
從上面的代碼中可以看出內聯輔助器方法的定義類似於規則的C#方法。內聯輔助器具有名稱和參數。但是這和一般的方法不同的是它沒有返回值。
提示:在使用內斂的輔助器時,不需要將ViewBag的動態屬性轉換成相應的類型,輔助器方法會在運行時進行評估。
內聯輔助器的方法體遵循Razor視圖其餘部分的通用語法。即:文字字元串被視為靜態HTML,需要有Razor處理的語句需要以@字元為首碼。
外部輔助器方法
外部的HTML輔助器方法會被表示成C#的擴展方法。它的使用更為廣泛,但由於C#不能方便的直接處理HTML元素的生成,所以,編寫這類的方法會更難一些。下麵是一個自定義的外部輔助器方法——CustomHelpers.cs,內容:
using System;
using System.Collections.Generic;
using System.Linq;
using System.Web;
using System.Web.Mvc;

namespace HelperMethods.Infrastructure
{
    public static class CustomHelpers
    {

        public static MvcHtmlString ListArrayItems(this HtmlHelper html, string[] list)
        {
            TagBuilder tag = new TagBuilder("ul");

            foreach (string str in list)
            {
                TagBuilder itemTag = new TagBuilder("li");
                itemTag.SetInnerText(str);
                tag.InnerHtml += itemTag.ToString();
            }

            return new MvcHtmlString(tag.ToString());
        }

    }
}
上面的方法ListArrayItems採取的是擴展方法的方式,這一點在第一個參數中通過this關鍵字進行了定義。該類型的參數具有一些很有用的屬性,這裡簡單做個列舉:
HtmlHelper:
- RouteCollection:返回應用程式定義的路由集合
- ViewBag:返回視圖包數據,這些數據是從動作方法傳遞給調用輔助器方法的視圖的
- ViewContext:返回ViewContext對象,該對象能夠對請求的細節以及請求的處理方式進行訪問
當創建的內容與正在處理的請求有關時,ViewContext屬性非常有用,下麵是該屬性具有的一些常用的屬性:
ViewContext
- Controller:返回處理當前請求的控制器,繼承自ControllerContext
- HttpContext:返回描述當前請求的HttpContext對象,繼承自ControllerContext
- IsChildAction:如果已調用輔助器的視圖正由一個子動作渲染,則返回true,繼承自ControllerContext
- RouteData:返回請求的路由數據,繼承自ControllerContext
- View:返回已調用輔助器方法的IView實現的實例
在創建HTML元素時,最簡單常用的方式是使用TagBuilder類,它能夠建立HTML字元串,而且可以處理各種轉義及特殊字元。
該類具有的一些最有用的成員如下:
- InnerHtml:將元素內容設置為HTML字元串的一個屬性。賦給這個屬性的值將不進行編碼,即可以將它嵌入HTML元素
- SetInnerText(string):設置HTML元素的文本內容。String參數將被編碼,以使它安全顯示
- AddCssClass(string):對HTML元素添加一個CSS的class
- MergeAttribute(string,string,bool):對HTML元素添加一個標簽屬性。第一個參數是標簽屬性名稱,第二個是其值。bool參數指定是否替換已存在的同名標簽屬性
說明:為了區別其他屬性的說法,這裡講HTML元素的屬性叫做標簽屬性,如<a id="123" />,其中,id就是a元素的一個標簽屬性。
下麵來看一下外部輔助器方法是如何使用的,這和前面的內聯輔助器方法的使用不同:
@model string
@using HelperMethods.Infrastructure

@{
    Layout = null;
}

<!--自定義的內聯輔助器方法-->
@*@helper ListArrayItems(string[] items)
{
    foreach (string str in items)
    {
        <b>@str</b>
    }
}*@

<!DOCTYPE html>

<html>
<head>
    <meta name="viewport" content="width=device-width" />
    <title>Index</title>
</head>
<body>
    <!--使用內聯輔助器方法-->
    @*<div>
        Here are the fruits: @ListArrayItems(ViewBag.Fruits)
    </div>
    <div>
        Here are the cities: @ListArrayItems(ViewBag.Cities)
    </div>*@
    <!--使用自定義的外部輔助器方法-->
    <div>
        Here are the fruits: @Html.ListArrayItems((string[])ViewBag.Fruits)
    </div>
    <div>
        Here are the cities: @Html.ListArrayItems((string[])ViewBag.Cities)
    </div>
    <div>
        Here is the message:
        <p>@Model</p>
    </div>
</body>
</html>
從上面示例代碼中可以看出使用外部輔助器方法的方式,下麵做一下簡單總結(上面示例中保留了內聯的輔助器方法以及其使用的代碼——註釋調用部分,是為了方便比較這兩種輔助器方法的使用的對比)。
使用外部輔助器方法的註意事項:
- 需要引用輔助器擴展方法所在的命名空間。引用方式:@using,但如果定義了大量的自定義輔助器,最好將它們的命名空間添加到/Views/Web.config文件中,以方便它們在視圖中總是可用的。
-
使用@ Html.<helper>引用輔助器,<helper>表示擴展方法的名稱(即定義的外部輔助器方法的名稱)。在使用外部輔助器方法時需要註意的是需要將傳遞給方法參數的數據轉換成對應的類型,這點和內聯輔助器方法的使用不同。比如這裡的ViewBag.Fruits需要轉成string數組類型。
使用輔助器方法的時機
一個讓我們容易迷惑的是該何時使用輔助器方法,而不是分部視圖或子動作,尤其是在特性功能之間有重疊的時候。
使用輔助器方法只是為了減少視圖中的重覆量,且只用於簡單的內容。對於更複雜的標記和內容,可以使用分部視圖,而在需要實現對模型數據操作時,則應該使用子動作。建議要註意保持輔助器方法儘可能簡單(如果輔助器不只是含有少量的C#代碼,或者C#代碼多餘HTML元素,那麼最好選擇子動作)。
管理輔助器方法中的字元串編碼
ASP.NET MVC框架通過自動對數據編碼的方式實現了安全地將數據添加到Web頁面。我們可以模擬一個存在潛在問題的字元串,並將其傳遞給視圖,來看看其效果:
using System;
using System.Collections.Generic;
using System.Linq;
using System.Web;
using System.Web.Mvc;

namespace HelperMethods.Controllers
{
    public class HomeController : Controller
    {
        public ActionResult Index()
        {
            ViewBag.Fruits = new string[] { "Apple", "Orange", "Pear" };
            ViewBag.Cities = new string[] { "New York", "London", "Paris" };

            string message = "This is an HTML element: <input>";

            return View((object)message);
        }

    }
}
現在模型對象包含了一個有效的HTML元素,但當Razor渲染該值時,將看到如下HTML結果:
<div> Here is the message: <p>This is an HTML element: <input></p> </div>
這是一種基本的安全性保護,可以防止數據值被瀏覽器解釋成為有效標記。這也是一種常見的網站攻擊形式的基礎,惡意用戶試圖添加他們自己的HTML標記或JavaScript代碼,以試圖破壞應用程式的行為。
Razor會自動地對視圖中使用的數據值進行編碼,但輔助器方法卻需要能夠生成HTML,因此,視圖引擎對它們給予了更高的信任等級——這可能需要一些特別的註意。
- 演示問題
為了能夠演示這種問題,我們對CustomerHelpers按照下麵的方式做些修改
using System;
using System.Collections.Generic;
using System.Linq;
using System.Web;
using System.Web.Mvc;

namespace HelperMethods.Infrastructure
{
    public static class CustomHelpers
    {

        public static MvcHtmlString ListArrayItems(this HtmlHelper html, string[] list)
        {
            TagBuilder tag = new TagBuilder("ul");

            foreach (string str in list)
            {
                TagBuilder itemTag = new TagBuilder("li");
                itemTag.SetInnerText(str);
                tag.InnerHtml += itemTag.ToString();
            }

            return new MvcHtmlString(tag.ToString());
        }

        public static MvcHtmlString DisplayMessage(this HtmlHelper html, string msg)
        {
            string result = String.Format("This is the message: <p>{0}</p>", msg);
            return new MvcHtmlString(result);
        }

    }
}
下麵是對Index.cshtml視圖的修改,用來使用上面的輔助器方法:
@model string
@using HelperMethods.Infrastructure

@{
    Layout = null;
}

<!DOCTYPE html>

<html>
<head>
    <meta name="viewport" content="width=device-width" />
    <title>Index</title>
</head>
<body>
    <p>This is the content from the view:</p>
    <div style="border:thin solid black;padding:10px">
        Here is the message:
        <p>@Model</p>
    </div>

    <p>This is the content from the helper method:</p>
    <div style="border:thin solid black;padding:10px">
        @Html.DisplayMessage(Model)
    </div>
</body>
</html>
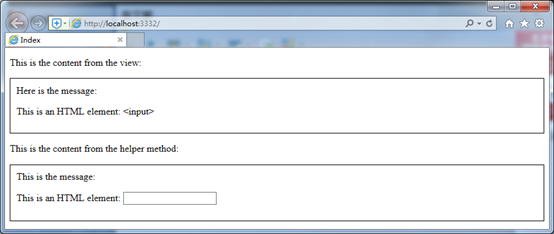
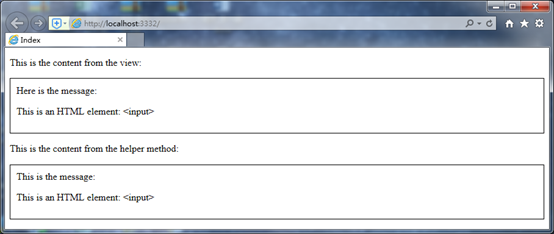
效果如下:

MVC框架會認為輔助器方法生成的內容是安全的,但事實上未必如此,因此也導致了瀏覽器錯誤的顯示了結果——顯示成了input元素,這樣該元素也就成為了被利用的對象。
- 對輔助器方法的內容進行編碼
要解決上面的問題,有兩種方式:
- 將輔助器方法的返回類型改為string——這是最簡單一種方式。
- HtmlHelper類定義的Encode的實例方法可以解決這個問題,它能夠對字元串值進行編碼,以使它能夠安全地包含在視圖中。
在實際項目中如何選擇,要取決於輔助器方法產生的內容的性質決定。後面分別看看這兩種方式:
第一種,字元串化的方法會警告視圖引擎,這是一段不安全的內容,需要在添加到視圖之前進行編碼。
        /// <summary>
        /// 字元串的返回結果,以通知視圖引擎在添加信息之前進行編碼
        /// </summary>
        /// <param name="html"></param>
        /// <param name="msg"></param>
        /// <returns></returns>
        public static string DisplayMessage(this HtmlHelper html, string msg)
        {
            return String.Format("This is the message: <p>{0}</p>", msg);
        }
這種方式的問題是如果打算生HTML元素,則會是一個問題,如果只是顯示內容,這樣做還是很方便的。

從上面的截圖可以看到,我們不需要對p元素也做這種處理,這樣就不太友好了。我們可以通過有選擇地對數據值進行編碼,這就需要用到第二種方法了——選擇性的編碼:
        /// <summary>
        /// 使用 Encode 實例方法解決字元串編碼問題
        /// </summary>
        /// <param name="html"></param>
        /// <param name="msg"></param>
        /// <returns></returns>
        public static MvcHtmlString DisplayMessage(this HtmlHelper html, string msg)
        {
            string encodeMessage = html.Encode(msg);
            string result = String.Format("This is the message: <p>{0}</p>", encodeMessage);
            return new MvcHtmlString(result);
        }
當然,使用這種辦法也是有一些問題的,因為它不是自動進行的,所以,在開發的時候需要人為地及時使用。所以,最好在一開始就明確地編碼所有數據值。

使用內建的Form輔助器方法
創建Form元素
首先,添加一些內容以方便後面的演示。先添加一個模型類到Models文件夾中——Person.cs,該類用來做視圖模型類,而Address和Role類型將展示一些更高級的特性。
using System;
using System.Collections.Generic;
using System.Linq;
using System.Web;

namespace HelperMethods.Models
{
    public class Person
    {
        public int PersonId { get; set; }
        public string FirstName { get; set; }
        public string LastName { get; set; }
        public DateTime BirthDate { get; set; }
        public Address HomeAddress { get; set; }
        public bool IsApproved { get; set; }
        public Role Role { get; set; }
    }

    public class Address
    {
        public string Line1 { get; set; }
        public string Line2 { get; set; }
        public string City { get; set; }
        public string PostalCode { get; set; }
        public string Country { get; set; }
    }

    public enum Role
    {
        Admin,
        User,
        Guest
    }

}
向Home控制器中添加新方法來使用這些模型對象:
using HelperMethods.Models;
using System;
using System.Collections.Generic;
using System.Linq;
using System.Web;
using System.Web.Mvc;

namespace HelperMethods.Controllers
{
    public class HomeController : Controller
    {
        public ActionResult Index()
        {
            ViewBag.Fruits = new string[] { "Apple", "Orange", "Pear" };
            ViewBag.Cities = new string[] { "New York", "London", "Paris" };

            string message = "This is an HTML element: <input>";

            return View((object)message);
        }

        public ActionResult CreatePerson()
        {
            return View(new Person());
        }

        [HttpPost]
        public ActionResult CreatePerson(Person person)
        {
            return View(person);
        }

    }
}
依靠模型綁定,MVC框架將通過表單數據創建一個Person對象,並將其傳遞給待遇HttpPost註解屬性的動作方法。
為了明白表單的各部分是如何通過輔助器方法實現的,我們從一個標準的HTML表單開始觀察其與輔助器方法之間的不同。
@model HelperMethods.Models.Person

@{
    ViewBag.Title = "CreatePerson";
}

<h2>CreatePerson</h2>

<form action="/Home/CreatePerson" method="post">
    <div class="dataElem">
        <label>PersonId</label>
        <input name="personId" value="@Model.PersonId"/>
    </div>
    <div class="dataElem">
        <label>First Name</label>
        <input name="firstName" value="@Model.FirstName" />
    </div>
    <div class="dataElem">
        <label>Last Name</label>
        <input name="lastName" value="@Model.LastName" />
    </div>
    <input type="submit" value="提交"/>
</form>
提示:這裡設置了所以input元素中name標簽屬性的值,以便與input元素顯示的模型屬性相對應。在處理post請求時,MVC框架預設的模型綁定器會使用name屬性,用input元素包含的值構造模型類型的屬性值。而且,如果省略了name屬性,表單將不能正常工作。
下麵的/View/Shared/_Layout.cshtml視圖刪掉了對Razor標簽@Scripts和@Styles的調用,以保證示例儘可能的簡單,具體如下:
<!DOCTYPE html>
<html>
<head>
    <meta charset="utf-8" />
    <meta name="viewport" content="width=device-width" />
    <title>@ViewBag.Title</title>
    <link href="~/Content/Site.css" rel="stylesheet" />
    <style type="text/css">
        label {
            display: inline-block;
            width: 100px;
        }

        .dateElem {
            margin: 5px;
        }
    </style>
</head>
<body>
    @RenderBody()
</body>
</html>
啟動並導航到/Home/CreatePerson來查看效果:

在該示例中點擊"提交"按鈕僅會重新顯示表單中的數據,因為前面我們未對其做任何處理。通過F12(IE11瀏覽器)來查看一下最終瀏覽器端的HTML代碼:
<!DOCTYPE html>
<html>
<head>
<meta charset="utf-8">
<meta name="viewport" content="width=device-width">
<title>CreatePerson</title>
<link href="/Content/Site.css" rel="stylesheet">
<style type="text/css">
label {
display: inline-block;
width: 100px;
}
.dateElem {
margin: 5px;
}
</style>
</head>
<body>
<h2>CreatePerson</h2>
<form action="/Home/CreatePerson" method="post">
<div class="dataElem">
<label>PersonId</label>
<input name="personId" value="1">
</div>
<div class="dataElem">
<label>First Name</label>
<input name="firstName" value="L">
</div>
<div class="dataElem">
<label>Last Name</label>
<input name="lastName" value="yf">
</div>
<input type="submit" value="提交">
</form>
</body>
</html>
後面我們通過它來瞭解運用輔助器方法後引起的變化。
註:用輔助器方法生成form、input等HTML元素也不是必須的。還可以像我們這裡的做法,通過純手工編寫靜態的HTML標簽,並用視圖數據或視圖模型對象對它們進行填充。使用輔助器方法可以提供很多便利,不是因為它們創建了必需的或特殊的HTML,因此,如果不喜歡,完全可以不使用(輔助器方法)。
- 創建表單元素
最常用的生成表單的輔助器是Html.BeginForm和Html.EndForm。它們生成form標簽,且會根據應用程式的路由機制,為這個form生成一個有效的action標簽屬性。
BeginForm方法有13個重載版本,EndForm只有一個版本定義——只是用來生成</form>,下麵示例僅適用於BeginForm的最基本的版本,來演示一下這是如何使用的:
@model HelperMethods.Models.Person

@{
    ViewBag.Title = "CreatePerson";
}

<h2>CreatePerson</h2>

@Html.BeginForm()
<div class="dataElem">
    <label>PersonId</label>
    <input name="personId" value="@Model.PersonId" />
</div>
<div class="dataElem">
    <label>First Name</label>
    <input name="firstName" value="@Model.FirstName" />
</div>
<div class="dataElem">
    <label>Last Name</label>
    <input name="lastName" value="@Model.LastName" />
</div>
<input type="submit" value="提交" />
@{Html.EndForm();}
通過上面示例可以發現EndForm方法是被當做一條C#語句使用的,和BeginForm不同——BeginForm返回的是一個能夠插入到視圖中的結果。這樣會有種怪異的感覺——兩種方法的使用風格完全不同。但是,這也沒多大關係,我們可以採取下麵的這種做法——將BeginForm封裝在一個using表達式中。在using塊的最後,.NET運行時會在BeginForm方


