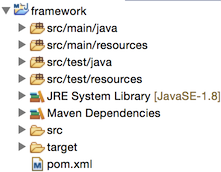
一、首先編寫微服務基礎項目framework 1、pom.xml 1 <?xml version="1.0" encoding="UTF-8"?> 2 <project xmlns="http://maven.apache.org/POM/4.0.0" xmlns:xsi="http://www.w ...
一、首先編寫微服務基礎項目framework

1、pom.xml

 1 <?xml version="1.0" encoding="UTF-8"?>
 2 <project xmlns="http://maven.apache.org/POM/4.0.0" xmlns:xsi="http://www.w3.org/2001/XMLSchema-instance"
 3     xsi:schemaLocation="http://maven.apache.org/POM/4.0.0 http://maven.apache.org/maven-v4_0_0.xsd">
 4
 5     <modelVersion>4.0.0</modelVersion>
 6
 7     <parent>
 8         <groupId>org.springframework.boot</groupId>
 9         <artifactId>spring-boot-starter-parent</artifactId>
10         <version>1.3.0.RELEASE</version>
11     </parent>
12
13     <groupId>com.microservice</groupId>
14     <artifactId>framework</artifactId>
15     <version>1.0-SNAPSHOT</version>
16     <packaging>jar</packaging>
17
18     <properties>
19         <java.version>1.8</java.version><!-- 官方推薦 -->
20     </properties>
21
22     <!-- 引入實際依賴 -->
23     <dependencies>
24         <dependency>
25             <groupId>org.springframework.boot</groupId>
26             <artifactId>spring-boot-starter-web</artifactId>
27         </dependency>
28         <!-- consul-client -->
29         <dependency>
30             <groupId>com.orbitz.consul</groupId>
31             <artifactId>consul-client</artifactId>
32             <version>0.10.0</version>
33         </dependency>
34         <!-- consul需要的包 -->
35         <dependency>
36             <groupId>org.glassfish.jersey.core</groupId>
37             <artifactId>jersey-client</artifactId>
38             <version>2.22.2</version>
39         </dependency>
40         <dependency>
41             <groupId>com.alibaba</groupId>
42             <artifactId>fastjson</artifactId>
43             <version>1.1.15</version>
44         </dependency>
45         <dependency>
46             <groupId>org.springframework.boot</groupId>
47             <artifactId>spring-boot-starter-actuator</artifactId>
48         </dependency>
49         <dependency>
50             <groupId>org.projectlombok</groupId>
51             <artifactId>lombok</artifactId>
52             <version>1.16.8</version>
53             <scope>provided</scope>
54         </dependency>
55     </dependencies>
56
57     <build>
58         <plugins>
59             <plugin>
60                 <groupId>org.springframework.boot</groupId>
61                 <artifactId>spring-boot-maven-plugin</artifactId>
62             </plugin>
63         </plugins>
64     </build>
65 </project>
View Code
說明:
- 上邊的<packaging>jar</packaging>可以去掉。因為spring-boot-maven-plugin會打jar包的
- 引入spring-boot-starter-actuator是為了註冊服務的時候可以直接使用"http://localhost:8080/health"進行健康檢查。見第二十章 springboot + consul
2、com.microservice.framework.MySpringAplication

 1 package com.microservice.framework;
 2
 3 import org.springframework.boot.SpringApplication;
 4 import org.springframework.boot.autoconfigure.SpringBootApplication;
 5
 6 import com.microservice.framework.consul.ConsulRegisterListener;
 7
 8 /**
 9  * 註意:@SpringBootApplication該註解必須在SpringApplication.run()所在的類上
10  *
11  */
12 @SpringBootApplication
13 public class MySpringAplication {
14
15     public void run(String[] args) {
16         SpringApplication sa = new SpringApplication(MySpringAplication.class);
17         sa.addListeners(new ConsulRegisterListener());
18         sa.run(args);
19     }
20
21     public static void main(String[] args) {
22     }
23 }
View Code
註意:這裡的main方法聲明是要有的(否則無法install為jar)。
3、com.microservice.framework.consul.ConsulRegisterListener

 1 package com.microservice.framework.consul;
 2
 3 import java.net.MalformedURLException;
 4 import java.net.URI;
 5
 6 import org.springframework.context.ApplicationListener;
 7 import org.springframework.context.event.ContextRefreshedEvent;
 8
 9 import com.orbitz.consul.AgentClient;
10 import com.orbitz.consul.Consul;
11
12 /**
13  * 監聽contextrefresh事件
14  */
15 public class ConsulRegisterListener implements ApplicationListener<ContextRefreshedEvent> {
16
17     @Override
18     public void onApplicationEvent(ContextRefreshedEvent event) {
19         Consul consul = event.getApplicationContext().getBean(Consul.class);
20         ConsulProperties prop = event.getApplicationContext().getBean(ConsulProperties.class);
21
22         AgentClient agentClient = consul.agentClient();
23         try {
24             agentClient.register(prop.getServicePort(),
25                                  URI.create(prop.getHealthUrl()).toURL(),
26                                  prop.getHealthInterval(),
27                                  prop.getServicename(),
28                                  prop.getServicename(), // serviceId:
29                                  prop.getServiceTag());
30         } catch (MalformedURLException e) {
31             e.printStackTrace();
32         }
33     }
34
35 }
View Code
註意:這個代碼是關鍵,後邊會講改代碼的作用。
其中,ConsulProperties和Consul我們需要在代碼中構建成Bean(如下變4和5),之後才能從容器中取出來,否則為null。
4、com.microservice.framework.consul.ConsulProperties

 1 package com.microservice.framework.consul;
 2
 3 import org.springframework.beans.factory.annotation.Value;
 4 import org.springframework.stereotype.Component;
 5
 6 import lombok.Getter;
 7 import lombok.Setter;
 8
 9 @Component
10 @Getter @Setter
11 public class ConsulProperties {
12
13     @Value("${service.name}")
14     private String servicename;
15     @Value("${service.port:8080}")
16     private int servicePort;
17     @Value("${service.tag:dev}")
18     private String serviceTag;
19 //    @Value("${serviceIp:localhost}")
20 //    private String serviceIp;
21
22     @Value("${health.url}")
23     private String healthUrl;
24     @Value("${health.interval:10}")
25     private int healthInterval;
26
27 }
View Code
註意:
- 這裡使用lombok簡化了pojo
- @value註解中可以指定預設值,查看上邊":"後邊的值就是
5、com.microservice.framework.consul.ConsulConfig

 1 package com.microservice.framework.consul;
 2
 3 import org.springframework.context.annotation.Bean;
 4 import org.springframework.context.annotation.Configuration;
 5
 6 import com.orbitz.consul.Consul;
 7
 8 @Configuration
 9 public class ConsulConfig {
10
11     @Bean
12     public Consul consul(){
13         return Consul.builder().build();
14     }
15 }
View Code
編寫完上述代碼後,執行"mvn clean install",如果成功的話,此時"framework-1.0-SNAPSHOT.jar"這個jar就會裝載到本地的.m2/repository/com/microservice/framework/q.0-SNAPSHOT中了(mac中.m2預設在~下)
二、開發第一個微服務myserviceA

像上邊所示,我們創建了client和server。
- server:用於實現具體邏輯
- client:用於封裝server介面(通常就是server模塊的controller中的各個url),提供給其他service或gateway甚至是app使用
1、myserviceA
pom.xml

 1 <?xml version="1.0" encoding="UTF-8"?>
 2 <project xmlns="http://maven.apache.org/POM/4.0.0" xmlns:xsi="http://www.w3.org/2001/XMLSchema-instance"
 3     xsi:schemaLocation="http://maven.apache.org/POM/4.0.0 http://maven.apache.org/maven-v4_0_0.xsd">
 4
 5     <modelVersion>4.0.0</modelVersion>
 6
 7     <parent>
 8         <groupId>org.springframework.boot</groupId>
 9         <artifactId>spring-boot-starter-parent</artifactId>
10         <version>1.3.0.RELEASE</version>
11     </parent>
12
13     <groupId>com.microservice</groupId>
14     <artifactId>myserviceA</artifactId>
15     <version>1.0-SNAPSHOT</version>
16     <packaging>pom</packaging>
17
18     <properties>
19         <java.version>1.8</java.version><!-- 官方推薦 -->
20     </properties>
21
22     <modules>
23         <module>server</module>
24         <module>client</module>
25     </modules>
26
27     <!-- 引入實際依賴 -->
28     <dependencies>
29         <dependency>
30             <groupId>org.springframework.boot</groupId>
31             <artifactId>spring-boot-starter-web</artifactId>
32         </dependency>
33     </dependencies>
34 </project>
View Code
2、myserviceA-server
2.1、pom.xml

 1 <?xml version="1.0" encoding="UTF-8"?>
 2 <project xmlns="http://maven.apache.org/POM/4.0.0" xmlns:xsi="http://www.w3.org/2001/XMLSchema-instance"
 3     xsi:schemaLocation="http://maven.apache.org/POM/4.0.0 http://maven.apache.org/maven-v4_0_0.xsd">
 4
 5     <modelVersion>4.0.0</modelVersion>
 6
 7     <parent>
 8         <groupId>com.microservice</groupId>
 9         <artifactId>myserviceA</artifactId>
10         <version>1.0-SNAPSHOT</version>
11     </parent>
12
13     <artifactId>myserviceA-server</artifactId>
14
15     <!-- 引入實際依賴 -->
16     <dependencies>
17         <dependency>
18             <groupId>com.microservice</groupId>
19             <artifactId>framework</artifactId>
20             <version>1.0-SNAPSHOT</version>
21         </dependency>
22         <dependency>
23             <groupId>com.alibaba</groupId>
24             <artifactId>fastjson</artifactId>
25             <version>1.1.15</version>
26         </dependency>
27     </dependencies>
28
29     <build>
30         <plugins>
31             <plugin>
32                 <groupId>org.springframework.boot</groupId>
33                 <artifactId>spring-boot-maven-plugin</artifactId>
34             </plugin>
35         </plugins>
36     </build>
37 </project>
View Code
2.2、application.properties

1 service.name=myserviceA
2 service.port=8080
3 service.tag=dev
4 health.url=http://localhost:8080/health
5 health.interval=10
View Code
說明:
- service.name(這是一個service在註冊中心的唯一標識)
- service.port
- service.tag(該值用於在註冊中心的配置管理,dev環境下使用dev的配置,prod下使用prod的配置,配置管理通常使用KV來實現的,tag用於構建Key)
- health.url(健康檢查的url)
- health.interval(每隔10s ping一次health.url,進行健康檢查)
2.3、com.microservice.myserviceA.MyServiceAApplication

 1 package com.microservice.myserviceA;
 2
 3 import org.springframework.boot.autoconfigure.SpringBootApplication;
 4
 5 import com.microservice.framework.MySpringAplication;
 6
 7 @SpringBootApplication
 8 public class MyServiceAApplication {
 9
10     public static void main(String[] args) {
11         MySpringAplication mySpringAplication = new MySpringAplication();
12         mySpringAplication.run(args);
13     }
14 }
View Code
說明:這裡調用了framework中的MySpringAplication的run(),該run()首先初始化了SpringApplication實例,之後為該實例添加ConsulRegisterListener實例,最後再執行SpringApplication的run()。
ConsulRegisterListener的執行時機見附4 springboot源碼解析-run(),簡言之,就是
- run()方法會先構建容器ApplicationContext,之後將各個BeanDefinition裝入該容器,最後刷新容器,這時候執行ConsulRegisterListener中的onApplication方法,用於註冊service到consul。
3、myserviceA-client
pom.xml

 1 <?xml version="1.0" encoding="UTF-8"?>
 2 <project xmlns="http://maven.apache.org/POM/4.0.0" xmlns:xsi="http://www.w3.org/2001/XMLSchema-instance"
 3     xsi:schemaLocation="http://maven.apache.org/POM/4.0.0 http://maven.apache.org/maven-v4_0_0.xsd">
 4
 5     <modelVersion>4.0.0</modelVersion>
 6
 7     <parent>
 8         <groupId>com.microservice</groupId>
 9         <artifactId>myserviceA</artifactId>
10         <version>1.0-SNAPSHOT</version>
11     </parent>
12
13     <artifactId>myserviceA-client</artifactId>
14
15     <build>
16         <plugins>
17             <plugin>
18                 <groupId>org.springframework.boot</groupId>
19                 <artifactId>spring-boot-maven-plugin</artifactId>
20             </plugin>
21         </plugins>
22     </build>
23 </project>
View Code
該client以後在需要用到的時候完成。
測試:啟動consul,開發環境下,直接使用"consul agent -dev"快速啟動,查看consul UI,如下:

啟動"myserviceA-server",啟動完成後,查看consul UI,如下:

表示註冊成功,我們還可以查看myserviceA的健康檢查URL,如下:

以上就完成了基本微服務架構的搭建與服務啟動時自動註冊!


