
Spring Boot 教程 swagger ui 1. 什麼是Swagger? Swagger™的目標是為REST APIs 定義一個標準的,與語言無關的介面,使人和電腦在看不到源碼或者看不到文檔或者不能通過網路流量檢測的情況下能發現和理解各種服務的功能。當服務通過Swagger定義,消費者就能 ...
Spring Boot 教程 - swagger-ui
1. 什麼是Swagger?
Swagger™的目標是為REST APIs 定義一個標準的,與語言無關的介面,使人和電腦在看不到源碼或者看不到文檔或者不能通過網路流量檢測的情況下能發現和理解各種服務的功能。當服務通過Swagger定義,消費者就能與遠程的服務互動通過少量的實現邏輯。類似於低級編程介面,Swagger去掉了調用服務時的很多猜測。
瀏覽 Swagger 去瞭解更多關於Swagger 項目的信息,包括附加的支持其他語言的庫。
2. 在項目中集成Swagger
-
2.1 引入maven依賴
我自己的項目中使用的是swagger2。
<!--springboot父工程--> <parent> <groupId>org.springframework.boot</groupId> <artifactId>spring-boot-starter-parent</artifactId> <version>2.2.2.RELEASE</version> <relativePath/> <!-- lookup parent from repository --> </parent> <dependencies> <!--springboot框架web組件--> <dependency> <groupId>org.springframework.boot</groupId> <artifactId>spring-boot-starter-web</artifactId> <version>2.2.2.RELEASE</version> </dependency> <!--swagger-ui組件--> <dependency> <groupId>io.springfox</groupId> <artifactId>springfox-swagger-ui</artifactId> <version>2.9.2</version> </dependency> <!--swagger組件--> <dependency> <groupId>io.springfox</groupId> <artifactId>springfox-swagger2</artifactId> <version>2.9.2</version> </dependency> <!--mybatis整合springboot組件--> <dependency> <groupId>org.mybatis.spring.boot</groupId> <artifactId>mybatis-spring-boot-starter</artifactId> <version>2.1.0</version> </dependency> <!--mysql資料庫連接驅動--> <dependency> <groupId>mysql</groupId> <artifactId>mysql-connector-java</artifactId> <version>8.0.18</version> </dependency> <!--lombok組件--> <dependency> <groupId>org.projectlombok</groupId> <artifactId>lombok</artifactId> <version>1.18.10</version> </dependency> </dependencies> <build> <!--springboot的maven插件--> <plugins> <plugin> <groupId>org.springframework.boot</groupId> <artifactId>spring-boot-maven-plugin</artifactId> </plugin> <plugin> <groupId>org.apache.maven.plugins</groupId> <artifactId>maven-compiler-plugin</artifactId> <configuration> <compilerArgs> <arg>-parameters</arg> </compilerArgs> </configuration> </plugin> </plugins> </build> -
2.2 Swagger的配置
SwggerConfig.java:package com.butterflytri.config; import com.google.common.base.Predicates; import io.swagger.annotations.ApiOperation; import org.springframework.context.annotation.Bean; import org.springframework.context.annotation.Configuration; import org.springframework.context.annotation.Profile; import springfox.documentation.builders.ApiInfoBuilder; import springfox.documentation.builders.ParameterBuilder; import springfox.documentation.builders.PathSelectors; import springfox.documentation.builders.RequestHandlerSelectors; import springfox.documentation.schema.ModelRef; import springfox.documentation.service.ApiInfo; import springfox.documentation.service.Contact; import springfox.documentation.service.Parameter; import springfox.documentation.spi.DocumentationType; import springfox.documentation.spring.web.plugins.Docket; import springfox.documentation.swagger2.annotations.EnableSwagger2; import java.util.ArrayList; import java.util.HashSet; import java.util.List; import java.util.Set; /** * @author: WJF * @date: 2020/5/21 * @description: SwaggerConfig */ /** * {@link Configuration}:標誌這是一個配置類,在spring boot引導類啟動時,會自動載入這個類的配置。 * {@link Profile}:說明載入配置文件 'application.yml' 時載入對應的配置。 * {@link EnableSwagger2}:啟用Swagger2的配置。 */ @Configuration @Profile("dev") @EnableSwagger2 public class SwaggerConfig { @Bean public Docket restApi() { Class[] classes = this.getClasses(); Set<String> consumesSet = new HashSet<>(); consumesSet.add("application/x-www-form-urlencoded"); return new Docket(DocumentationType.SWAGGER_2) .apiInfo(apiInfo()) .globalOperationParameters(parameters()) .ignoredParameterTypes(classes) .forCodeGeneration(true) .consumes(consumesSet) .select() .apis(Predicates.and(RequestHandlerSelectors.withMethodAnnotation(ApiOperation.class))) .paths(PathSelectors.any()) .build(); } /** * API文檔的基本信息 * @return ApiInfo */ private ApiInfo apiInfo() { return new ApiInfoBuilder() .title("學生管理平臺") .description("學生管理平臺文檔") .termsOfServiceUrl("http://127.0.0.1:8080/butterflytri/swagger-ui.html") .contact(new Contact("wjf", "http://butterflytri.com", "[email protected]")) .version("2.0") .build(); } /** * Swagger2可以在Swagger2文檔中添加參數 * @return List<Parameter> */ private List<Parameter> parameters() { // 添加一個參數butterflytri,參數描述:不死蝶 ParameterBuilder paramBuilder = new ParameterBuilder(); List<Parameter> paramList = new ArrayList<Parameter>(); paramBuilder.name("butterflytri") .description("不死蝶") .modelRef(new ModelRef("string")) .parameterType("header") .required(true) .build(); paramList.add(paramBuilder.build()); return paramList; } /** * 獲取class數組 * @return Class[] */ private Class[] getClasses() { return new Class[]{}; } } -
2.3 控制層
StudentController.java:package com.butterflytri.controller; import com.butterflytri.entity.Student; import com.butterflytri.service.StudentService; import io.swagger.annotations.Api; import io.swagger.annotations.ApiImplicitParam; import io.swagger.annotations.ApiImplicitParams; import io.swagger.annotations.ApiOperation; import org.springframework.web.bind.annotation.*; import javax.annotation.Resource; import java.util.List; /** * @author: WJF * @date: 2020/5/16 * @description: StudentController */ @Api(tags = "學生管理介面") @RestController @RequestMapping("/student") public class StudentController { @Resource private StudentService studentService; /** * GET :請求從伺服器獲取特定資源。舉個例子:GET /student(獲取所有學生) * @return List<Student> */ @ApiOperation(value = "查詢所有學生", httpMethod = "GET", notes = "查詢所有學生") @GetMapping("/student") public List<Student> student() { return studentService.findAll(); } /** * GET :請求從伺服器獲取特定資源。舉個例子:GET /student/1(獲取id為1學生) * @param id * @return Student */ @ApiOperation(value = "查詢學生詳情", httpMethod = "GET", notes = "查詢學生詳情") @ApiImplicitParam(name = "id", value = "學生id", required = true, paramType = "form", dataTypeClass = Long.class) @GetMapping("/student/{id}") public Student student(@PathVariable("id") Long id) { return studentService.findOne(id); } /** * POST :在伺服器上創建一個新的資源。舉個例子:POST /student(添加學生) * @param student */ @PostMapping("/student") @ApiOperation(value = "添加學生", httpMethod = "POST", notes = "添加學生") @ApiImplicitParams({ @ApiImplicitParam(name = "studentName", value = "學生姓名", required = true, paramType = "form", dataTypeClass = String.class), @ApiImplicitParam(name = "studentNo", value = "學生學號", required = true, paramType = "form", dataTypeClass = String.class), @ApiImplicitParam(name = "sex", value = "學生性別", required = true, paramType = "form", dataTypeClass = String.class), @ApiImplicitParam(name = "age", value = "學生年齡", required = true, paramType = "form", dataTypeClass = Integer.class) }) public void student(@RequestBody Student student) { studentService.add(student); } /** * PUT :更新伺服器上的資源(客戶端提供更新後的整個資源)。舉個例子:PUT /student/1(更新學號為 1 的學生的所有信息) * @param id */ @PutMapping("/student/{id}") @ApiOperation(value = "根據id修改學生信息(大範圍)", httpMethod = "PUT", notes = "根據id修改學生信息") @ApiImplicitParams({ @ApiImplicitParam(name = "id", value = "學生id", required = true, paramType = "from", dataTypeClass = Long.class), @ApiImplicitParam(name = "studentName", value = "學生姓名", required = true, paramType = "form", dataTypeClass = String.class), @ApiImplicitParam(name = "studentNo", value = "學生學號", required = true, paramType = "form", dataTypeClass = String.class), @ApiImplicitParam(name = "sex", value = "學生性別", required = true, paramType = "form", dataTypeClass = String.class), @ApiImplicitParam(name = "age", value = "學生年齡", required = true, paramType = "form", dataTypeClass = Integer.class) }) public void updateById(@PathVariable("id") Long id, Student student) { studentService.updateAll(id,student); } /** * DELETE :從伺服器刪除特定的資源。舉個例子:DELETE /student/1(刪除學號為 1 的學生) * @param id */ @DeleteMapping("/student/{id}") @ApiOperation(value = "根據id刪除學生信息", httpMethod = "DELETE", notes = "根據id刪除學生信息") @ApiImplicitParam(name = "id", value = "學生id", required = true, paramType = "from", dataTypeClass = Long.class) public void deleteById(@PathVariable("id") Long id) { studentService.delete(id); } /** * PATCH :更新伺服器上的資源(客戶端提供更改的屬性,可以看做作是部分更新),使用的比較少,這裡就不舉例子了。 * @param id * @param student */ @PatchMapping("/student/{id}") @ApiOperation(value = "根據id修改學生信息(小範圍)", httpMethod = "PATCH", notes = "根據id修改學生信息") @ApiImplicitParams({ @ApiImplicitParam(name = "id", value = "學生id", required = true, paramType = "from", dataTypeClass = Long.class), @ApiImplicitParam(name = "studentName", value = "學生姓名", required = true, paramType = "form", dataTypeClass = String.class), @ApiImplicitParam(name = "studentNo", value = "學生學號", required = true, paramType = "form", dataTypeClass = String.class), @ApiImplicitParam(name = "sex", value = "學生性別", required = true, paramType = "form", dataTypeClass = String.class), @ApiImplicitParam(name = "age", value = "學生年齡", required = true, paramType = "form", dataTypeClass = Integer.class) }) public void updatePart(@PathVariable("id") Long id, Student student) { studentService.updatePart(id,student); } }這些註解也是很容易理解的,相信各位聰明的技術大牛很快就會使用了。這些註解的具體作用其實看看就懂了,甚至不用去查資料,在這裡解釋下
@ApiImplicitParam這個註解的一個屬性paramType,這個屬性的取值有以下幾種:- header:放在請求頭,用於請求頭參數的獲取。使用
@RequestHeader,在代碼中接收參數。 - query:用於get請求的參數拼接。使用
@RequestParam,在代碼中接收參數。 - path:用於restful介面請求參數的獲取。使用
@PathVariable,在映射地址上接收參數。 - body:放在請求體中,使用
@RequestBody接收參數。 - form:使用form表單的形式傳遞參數。
- header:放在請求頭,用於請求頭參數的獲取。使用
-
2.4 Entity
Student.java:package com.butterflytri.entity; import io.swagger.annotations.ApiModel; import io.swagger.annotations.ApiModelProperty; import lombok.Getter; import lombok.Setter; import lombok.ToString; import java.io.Serializable; /** * @author: WJF * @date: 2020/5/16 * @description: Student */ @ToString @Getter @Setter @ApiModel("學生Entity") public class Student implements Serializable { @ApiModelProperty("學生id") private Long id; @ApiModelProperty("學生姓名") private String studentName; @ApiModelProperty("學生學號") private String studentNo; @ApiModelProperty("性別") private String sex; @ApiModelProperty("年齡") private Integer age; }可以使用
@ApiModelProperty註解來標識每個Entity屬性的意思。 -
2.5 運行結果
啟動項目,訪問
http://127.0.0.1:8080/butterflytri/swagger-ui.html即可看到下麵的頁面:
點開學生管理介面可以看到
StudentController.java中寫的所有介面方法: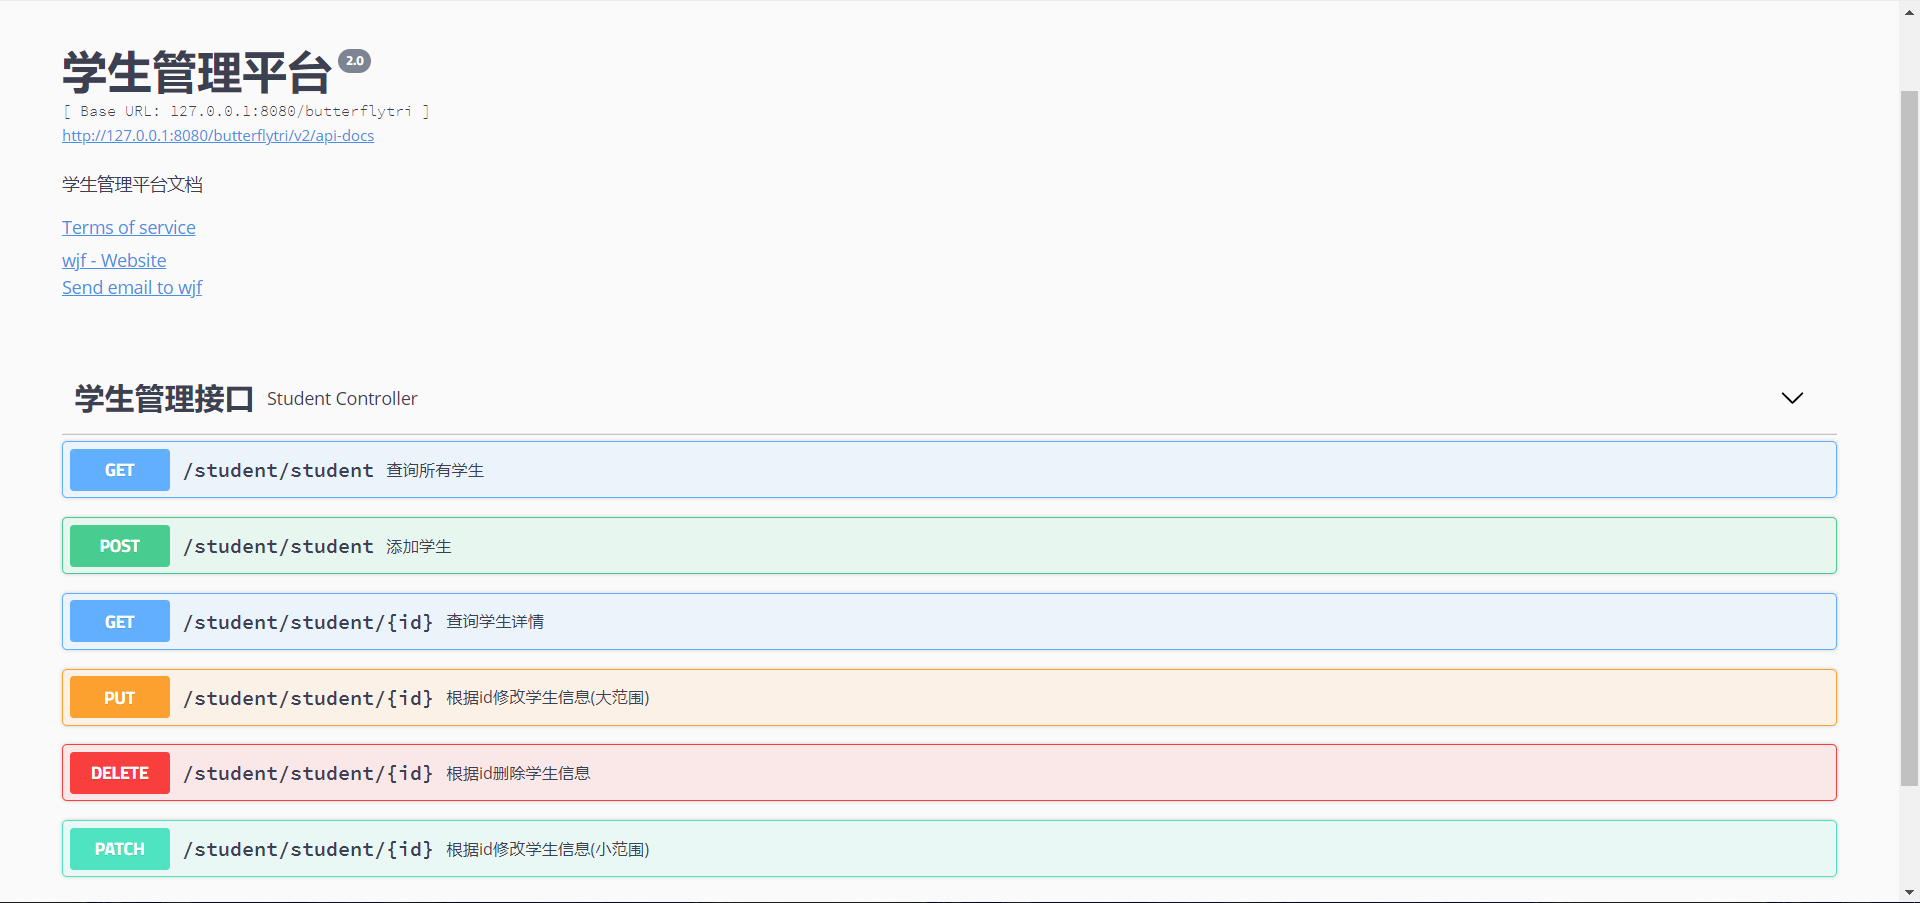
點開下麵的Models,可以看到Entity中的
Student.java實體類: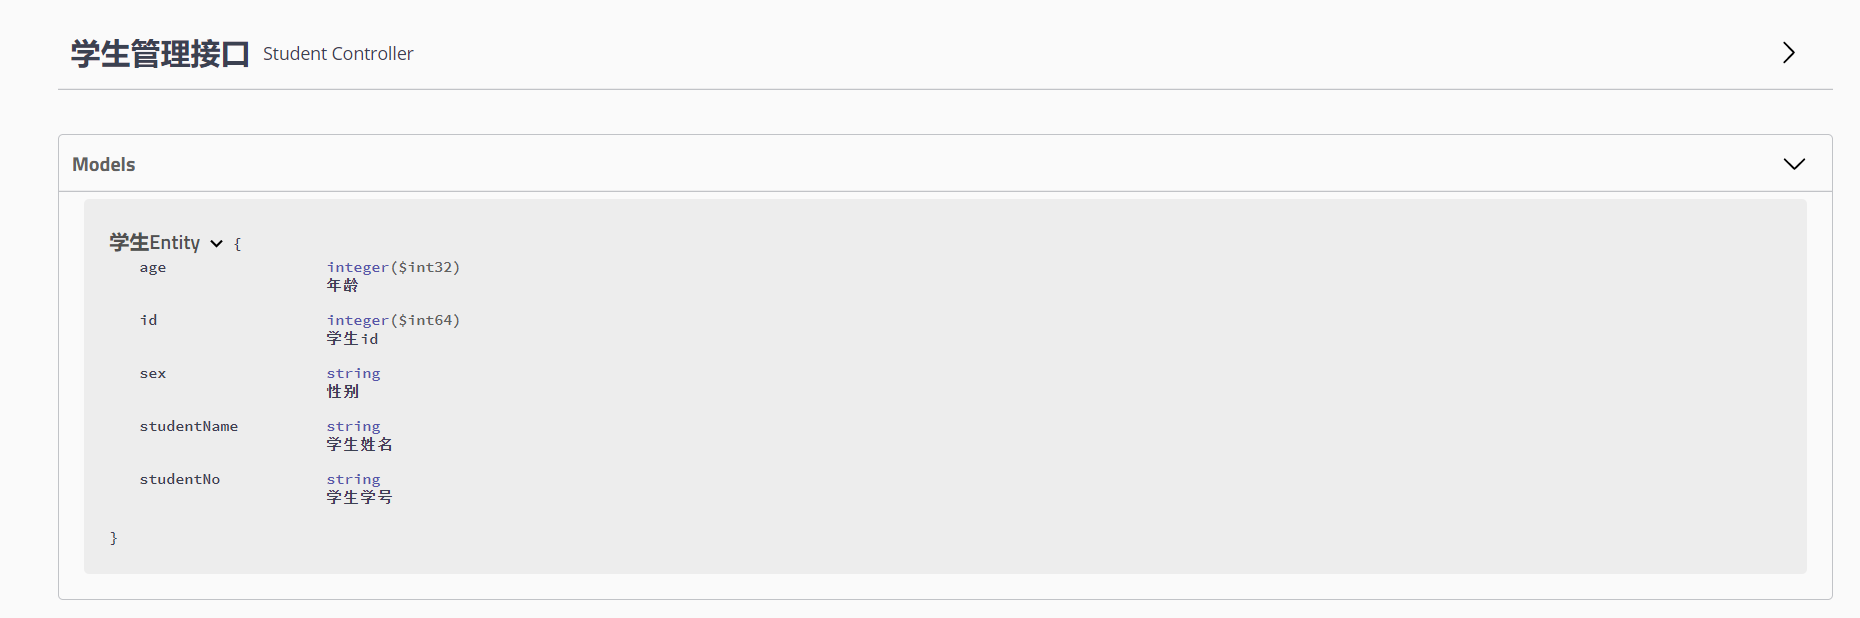
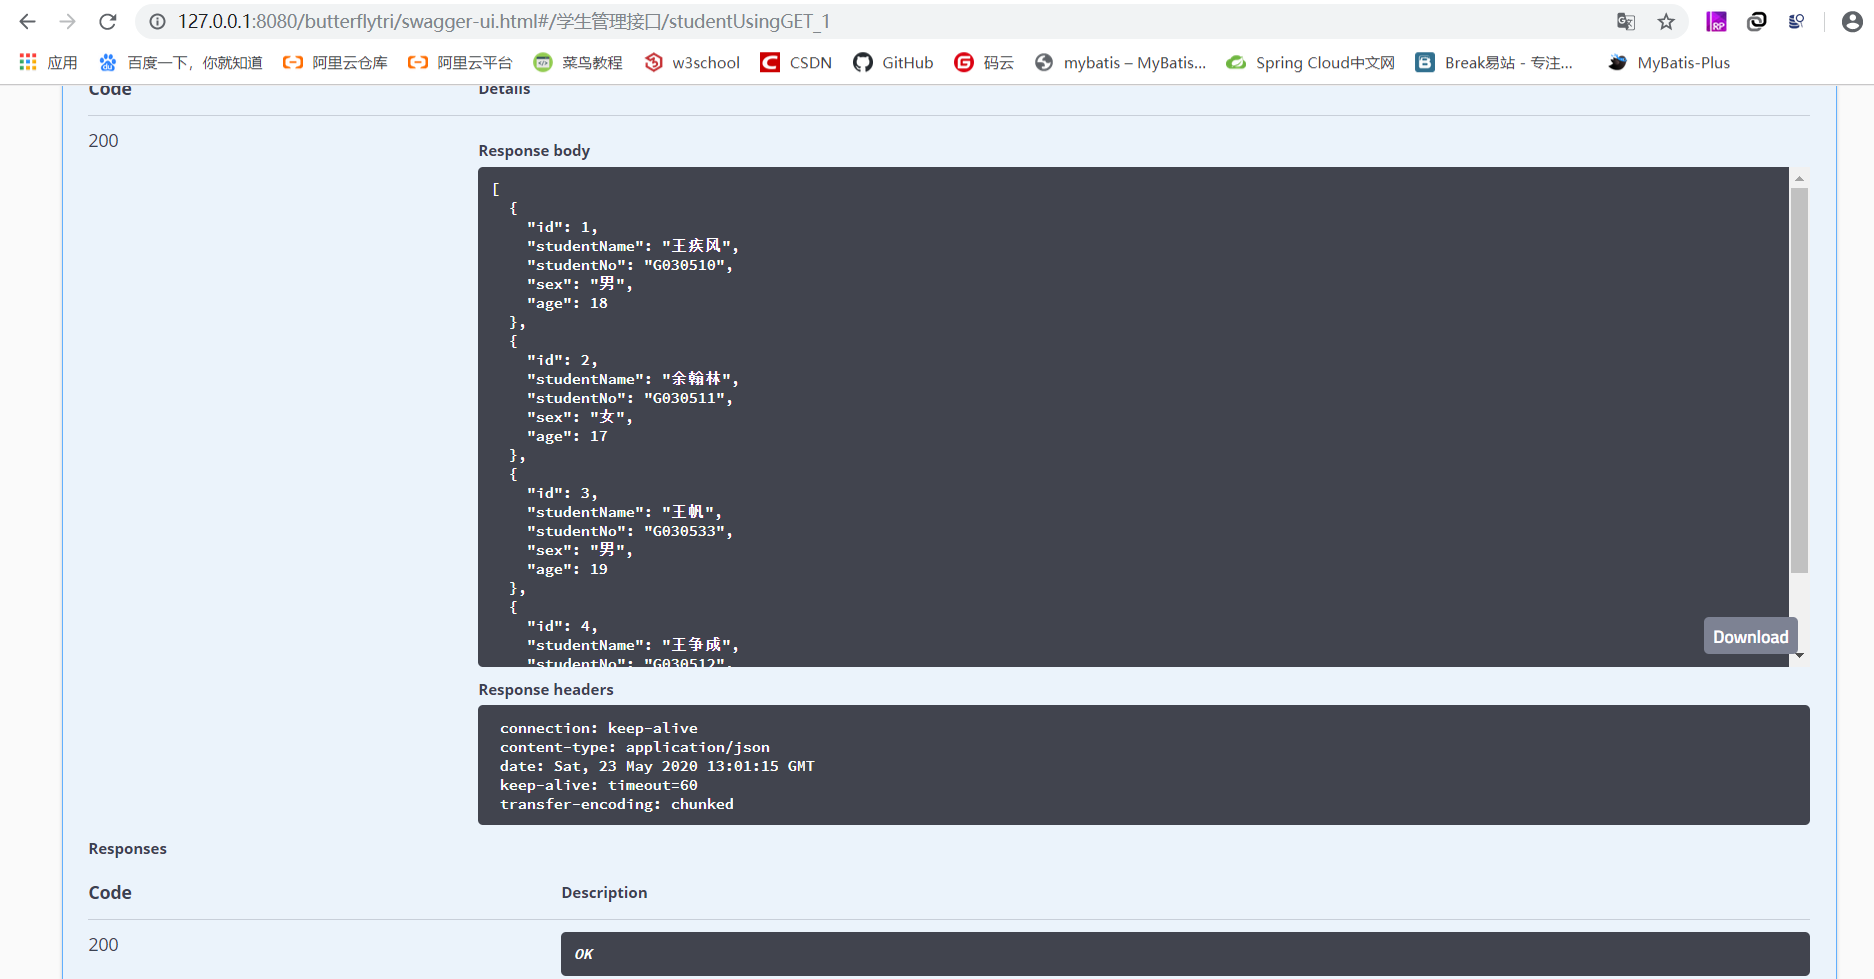
再點開查詢所有學生這個方法,調用一下這個方法,點擊Try it out測試一下方法:
在這裡看到了一個參數
butterflytri,而且還是必傳參數,這是因為我在SwaggerConfig.java這個配置文件類中進行了配置,不清楚的可以往上翻一翻,看看那個配置類。
點擊了Try it out按鈕後,隨便給這個參數賦值,反正這個參數沒有什麼,只是給大家做演示看的。然後點擊execute按鈕,就可以看到返回結果:
3. 項目地址
本項目傳送門:spring-boot-swagger-ui
此教程會一直更新下去,覺得博主寫的可以的話,關註一下,也可以更方便下次來學習。

