
前提: SpringBoot + Vue + ElementUI 實現後臺管理系統模板 -- 前端篇(一):搭建基本環境:https://www.cnblogs.com/l-y-h/p/12930895.html 一、定義公共組件頁面 簡單的頁面效果如下所示:(做的比較粗糙,大致理解頁面即可) 1、 ...
前提:
SpringBoot + Vue + ElementUI 實現後臺管理系統模板 -- 前端篇(一):搭建基本環境:https://www.cnblogs.com/l-y-h/p/12930895.html
一、定義公共組件頁面
簡單的頁面效果如下所示:(做的比較粗糙,大致理解頁面即可)

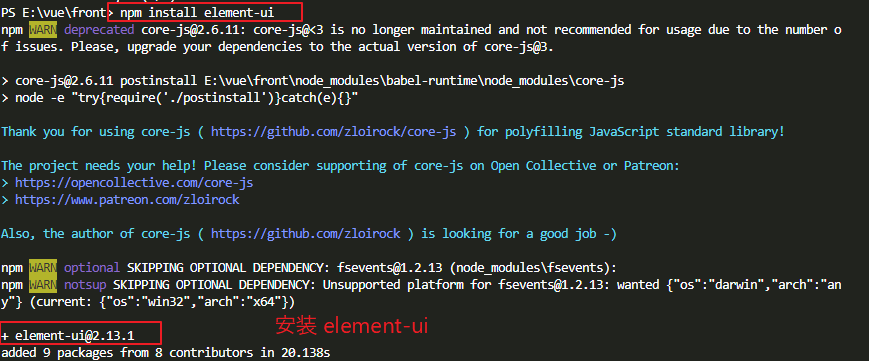
1、安裝 element-ui
(1)簡介
一款 ui 框架。使用 element-ui 用於實現頁面的繪製。
【官網:】
    https://element.eleme.cn/#/zh-CN

【文檔:】
    https://element.eleme.cn/#/zh-CN/component/installation
(2)安裝
可以通過 npm 或者 cdn 方式使用,此處使用 npm 方式安裝。
【安裝方式一:(npm 安裝)】
    npm install element-ui

【安裝方式二:(CDN 方式引入)】
    <!-- 引入樣式 -->
    <link rel="stylesheet" href="https://unpkg.com/element-ui/lib/theme-chalk/index.css">
    <!-- 引入組件庫 -->
    <script src="https://unpkg.com/element-ui/lib/index.js"></script>
(3)引入 element-ui
在 main.js 中引入(也可以自定義一個 js,然後在 main.js 中引入自定義的 js)。
// 引入 element-ui
import ElementUI from 'element-ui'
// 引入 element-ui 的 css 文件
import 'element-ui/lib/theme-chalk/index.css';
// 聲明使用 element-ui
Vue.use(ElementUI);

2、修改 App.vue
(1)簡介
頁面主入口。
通過 router 將組件 顯示在 router-view 標簽處。(基本路由規則到本文末尾可以看)

(2)修改頁面內容
<template>
  <div id="app">
    <router-view/>
  </div>
</template>

<style>
#app {
  font-family: Avenir, Helvetica, Arial, sans-serif;
  -webkit-font-smoothing: antialiased;
  -moz-osx-font-smoothing: grayscale;
  text-align: center;
  color: #2c3e50;
}
/* 解決子組件中 height: 100% 不生效問題 */
html,body,#app{
    height: 100%;
    margin: 0;
    padding: 0;
    overflow: hidden;
}
</style>
3、404.vue
(1)簡介
定義錯誤頁面。
當錯誤發生時,用於跳轉到 404 頁面。

(2)定義頁面內容
<template>
    <div class="error-wrapper">
        <h2 class="not-found-title">404</h2>
        <p class="not-found-desc">抱歉!您訪問的頁面<em>失聯</em>啦 ...</p>
        <el-button @click="$router.go(-1)">返回上一頁</el-button>
        <el-button type="primary" class="not-found-btn-gohome" @click="$router.push({ name: 'Home' })">進入首頁</el-button>
    </div>
</template>

<script>
    export default {}
</script>

<style>
    .error-wrapper {
        position: absolute;
        top: 0;
        right: 0;
        bottom: 0;
        left: 0;
        overflow: hidden;
    }

    .not-found-title {
        margin: 20px 0 15px;
        font-size: 10em;
        font-weight: 400;
        color: rgb(55, 71, 79);
    }

    .not-found-desc {
        margin: 0 0 30px;
        font-size: 26px;
        color: rgb(118, 131, 143);
    }

    .not-found-desc>em {
        font-style: normal;
        color: #ee8145;
    }

    .not-found-btn-gohome {
        margin-left: 30px;
    }
</style>
(3)頁面顯示如下:

4、Login.vue
(1)簡介
定義登陸頁面。
訪問系統時,用於跳轉到登錄界面。
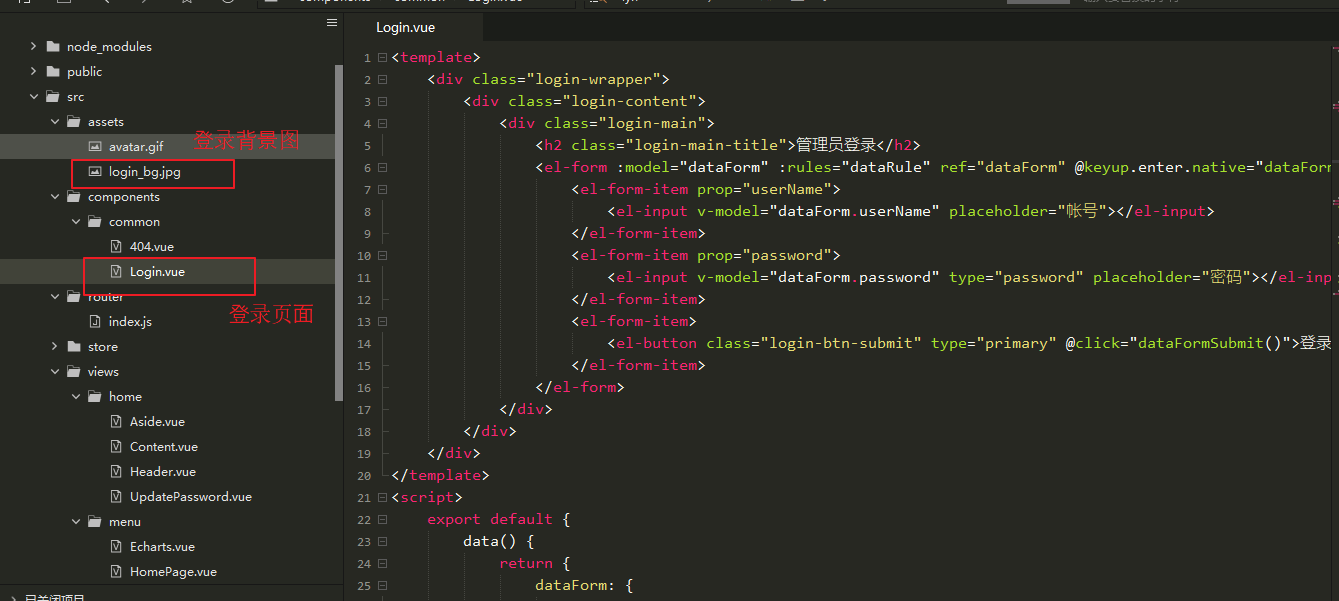
背景圖(來源於網路):

(2)定義頁面內容:
<template>
    <div class="login-wrapper">
        <div class="login-content">
            <div class="login-main">
                <h2 class="login-main-title">管理員登錄</h2>
                <el-form :model="dataForm" :rules="dataRule" ref="dataForm" @keyup.enter.native="dataFormSubmit()" status-icon>
                    <el-form-item prop="userName">
                        <el-input v-model="dataForm.userName" placeholder="帳號"></el-input>
                    </el-form-item>
                    <el-form-item prop="password">
                        <el-input v-model="dataForm.password" type="password" placeholder="密碼"></el-input>
                    </el-form-item>
                    <el-form-item>
                        <el-button class="login-btn-submit" type="primary" @click="dataFormSubmit()">登錄</el-button>
                    </el-form-item>
                </el-form>
            </div>
        </div>
    </div>
</template>
<script>
    export default {
        data() {
            return {
                dataForm: {
                    userName: '',
                    password: ''
                },
                dataRule: {
                    userName: [{
                        required: true,
                        message: '帳號不能為空',
                        trigger: 'blur'
                    }],
                    password: [{
                        required: true,
                        message: '密碼不能為空',
                        trigger: 'blur'
                    }]
                }
            }
        },
        methods: {
            // 提交表單
            dataFormSubmit() {
                // TODO:登錄代碼邏輯待完善
                alert("登錄代碼邏輯未完善")
                this.$router.replace({name: 'Home'})
            }
        }
    }
</script>
<style>
    .login-wrapper {
        position: absolute;
        top: 0;
        right: 0;
        bottom: 0;
        left: 0;
        overflow: hidden;
        background-color: rgba(38, 50, 56, .6);
        background: url(~@/assets/login_bg.jpg) no-repeat;
        background-size: 100% 100%;
    }

    .login-content {
        position: absolute;
        top: 0;
        right: 0;
        bottom: 0;
        left: 0;
        margin: auto;
        height: 300px;
        width: 400px;
        background-color: #112234;
        opacity: .8;
    }

    .login-main {
        color: beige;
        padding: 20px 20px 10px 20px;
    }
</style>
(3)頁面顯示如下:

二、定義主頁面
主頁面 可以拆分成多個組件,每個組件負責一部分頁面的顯示。
拆分成 Header、Aside、Content 三個頁面。
其中:
Header 用於定義導航欄信息
Aside 用於定義菜單欄信息
Content 用於顯示各個菜單選項的頁面
1、Home.vue
(1)簡介
定義主界面。
通過 Login 登錄系統後,需要跳轉到 主頁面。
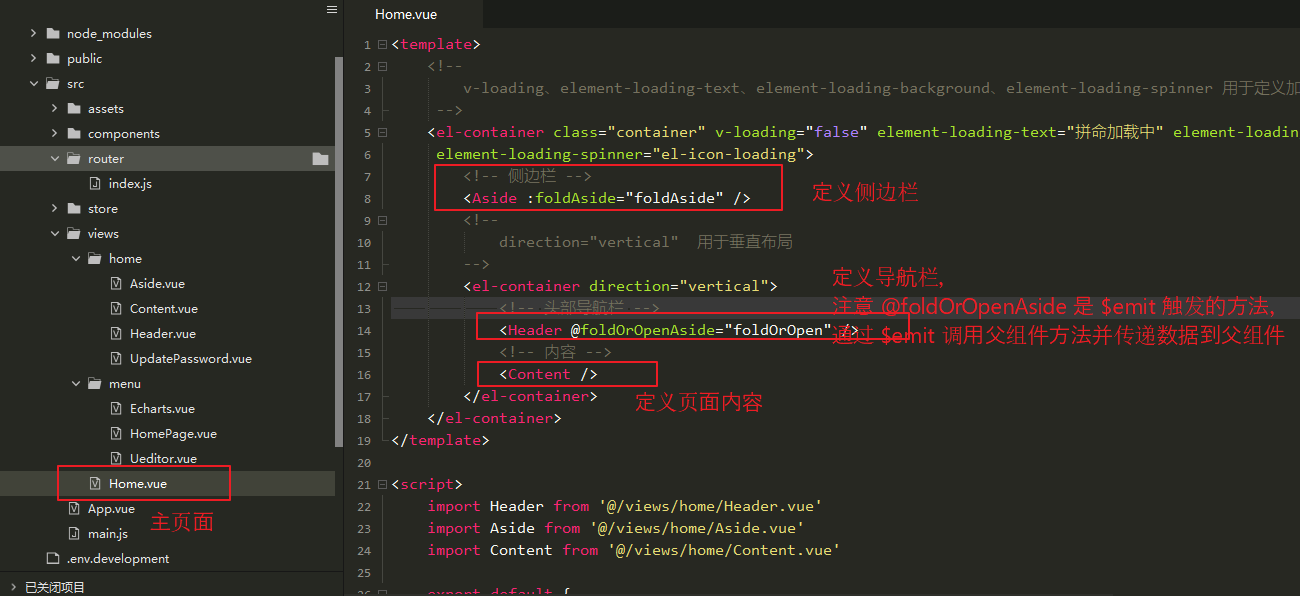
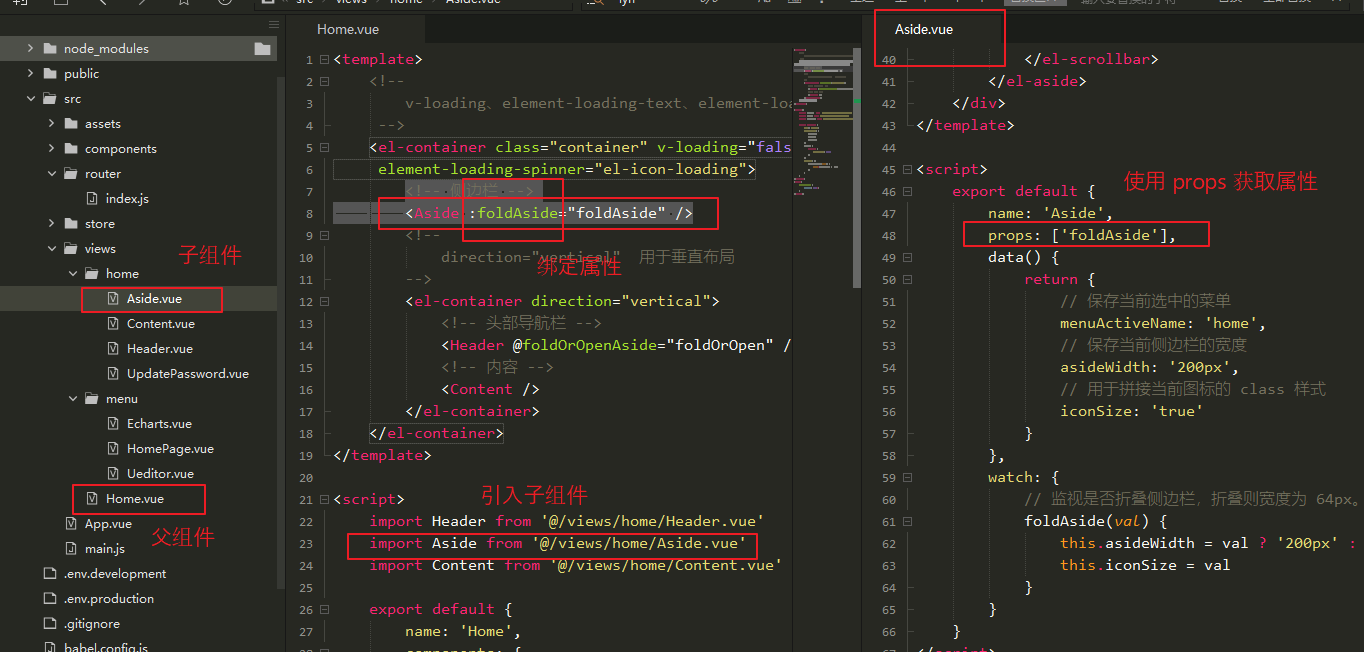
(2)定義頁面內容
<template>
    <!--
        v-loading、element-loading-text、element-loading-background、element-loading-spinner 用於定義載入的樣式
     -->
    <el-container class="container" v-loading="false" element-loading-text="拼命載入中" element-loading-background="rgba(0, 0, 0, 0.8)"
     element-loading-spinner="el-icon-loading">
        <!-- 側邊欄 -->
        <Aside :foldAside="foldAside" />
        <!--
            direction="vertical"  用於垂直佈局
        -->
        <el-container direction="vertical">
            <!-- 頭部導航欄 -->
            <Header @foldOrOpenAside="foldOrOpen" />
            <!-- 內容 -->
            <Content />
        </el-container>
    </el-container>
</template>

<script>
    import Header from '@/views/home/Header.vue'
    import Aside from '@/views/home/Aside.vue'
    import Content from '@/views/home/Content.vue'

    export default {
        name: 'Home',
        components: {
            Header,
            Aside,
            Content
        },
        data() {
            return {
                foldAside: true
            }
        },
        methods: {
            foldOrOpen(data) {
                this.foldAside = data
            }
        }
    }
</script>
<style>
    .container {
        height: 100%;
    }
</style>
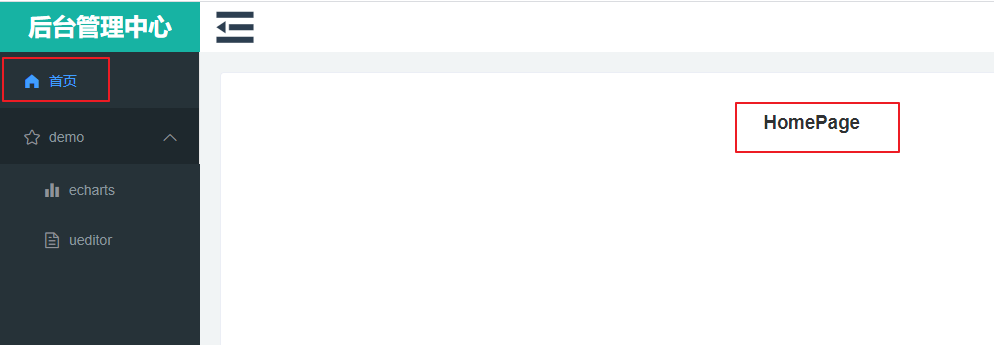
(3)頁面顯示如下:

2、Header.vue
(1)簡介
用於定義主頁面的導航欄。
通過導航欄,可以進行一些操作。比如:摺疊側邊欄、修改密碼、退出登錄等。
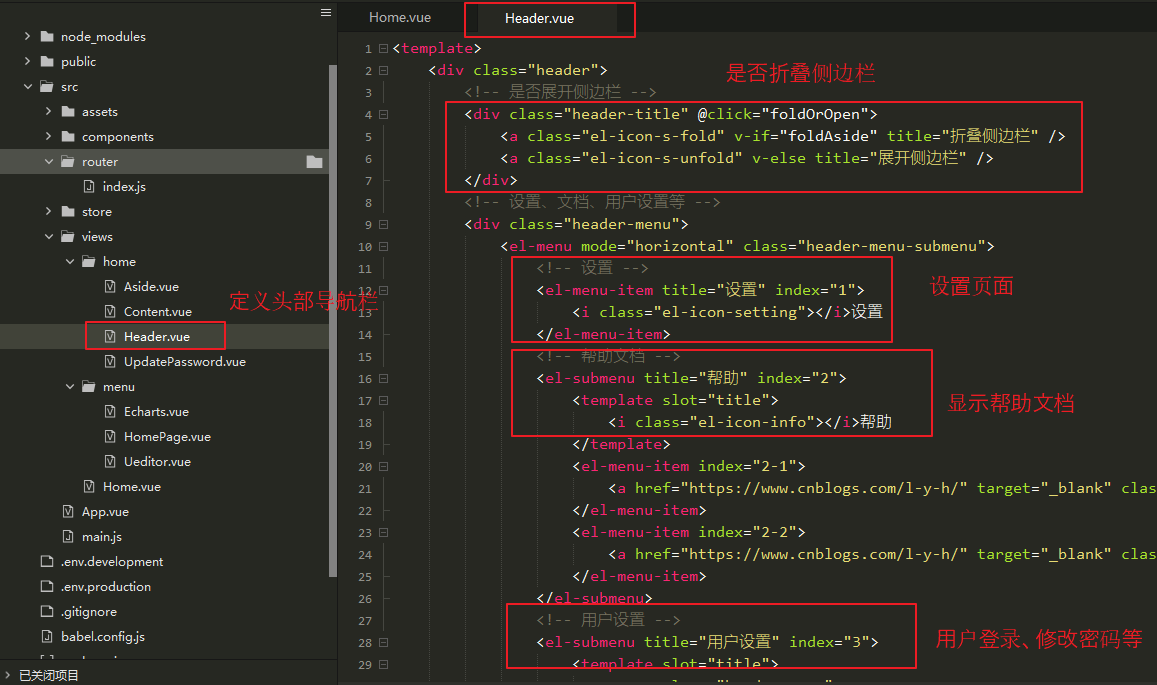
(2)定義頁面內容
<template>
    <div class="header">
        <!-- 是否展開側邊欄 -->
        <div class="header-title" @click="foldOrOpen">
            <a class="el-icon-s-fold" v-if="foldAside" title="摺疊側邊欄" />
            <a class="el-icon-s-unfold" v-else title="展開側邊欄" />
        </div>
        <!-- 設置、文檔、用戶設置等 -->
        <div class="header-menu">
            <el-menu mode="horizontal" class="header-menu-submenu">
                <!-- 設置 -->
                <el-menu-item title="設置" index="1">
                    <i class="el-icon-setting"></i>設置
                </el-menu-item>
                <!-- 幫助文檔 -->
                <el-submenu title="幫助" index="2">
                    <template slot="title">
                        <i class="el-icon-info"></i>幫助
                    </template>
                    <el-menu-item index="2-1">
                        <a href="https://www.cnblogs.com/l-y-h/" target="_blank" class="header-submenu-a">博客地址</a>
                    </el-menu-item>
                    <el-menu-item index="2-2">
                        <a href="https://www.cnblogs.com/l-y-h/" target="_blank" class="header-submenu-a">代碼地址</a>
                    </el-menu-item>
                </el-submenu>
                <!-- 用戶設置 -->
                <el-submenu title="用戶設置" index="3">
                    <template slot="title">
                        <span class="header-span">
                            <img src="~@/assets/avatar.gif" :alt="userName"> {{ userName }}
                        </span>
                    </template>
                    <el-menu-item index="3-1" @click="showPasswordBox">
                        <i class="el-icon-edit"></i>修改密碼
                    </el-menu-item>
                    <el-menu-item index="3-2" @click="logout">
                        <i class="el-icon-close"></i>退出
                    </el-menu-item>
                </el-submenu>
            </el-menu>
        </div>
        <!-- 密碼修改框 -->
        <UpdatePassword v-if="UpdatePasswordVisible" ref="updatePassowrd"></UpdatePassword>
    </div>
</template>

<script>
    import UpdatePassword from '@/views/home/UpdatePassword.vue'
    export default {
        name: 'Header',
        data() {
            return {
                // 是否展開側邊欄
                foldAside: true,
                // 預設用戶名
                userName: 'admin',
                // 是否展開密碼框
                UpdatePasswordVisible: false
            }
        },
        components: {
            // 引入密碼框組件
            UpdatePassword
        },
        methods: {
            // 展開密碼修改框
            showPasswordBox() {
                this.UpdatePasswordVisible = true
                // this.$nextTick 表示數據渲染後,執行密碼框初始化
                this.$nextTick(() => {
                    this.$refs.updatePassowrd.init()
                })
            },
            // 展開、摺疊側邊欄
            foldOrOpen() {
                this.foldAside = !this.foldAside
                // this.$emit 用於觸發父組件的方法,並傳遞參數值
                this.$emit("foldOrOpenAside", this.foldAside)
            },
            // 退出登錄,回到登錄界面
            logout() {
                // TODO:退出邏輯待完成
                alert("退出邏輯未完成");
                this.$router.push({
                    name: "Login"
                })
            }
        }
    }
</script>

<style>
    .header {
        padding: 0 10px;
        display: flex;
        height: 50px;
        line-height: 50px;
    }

    .header-title {
        height: 50px;
        width: 50px;
        float: left;
        font-size: 50px;
        cursor: pointer;
    }

    .header-menu {
        height: 50px;
        width: 100%;
        flex: 1;
        line-height: 50px;
        font-size: 30px;
    }
    .header-menu-submenu {
        float: right;
    }
    .header-submenu-a {
        text-decoration: none;
        color: #4CC4B8;
        font-weight: bold;
        font-size: 16px;
    }
    .header-submenu-a:hover {
        background-color: #2C3E50;
    }
    .el-menu--horizontal>.el-menu-item,
    .el-menu--horizontal>.el-submenu .el-submenu__title {
        height: 50px !important;
        line-height: 50px !important;
    }
    .el-menu--collapse .el-menu .el-submenu, .el-menu--popup {
        min-width: auto !important;
    }
    .header-span img {
        width: 40px;
        height: 40px;
        line-height: 40px;
        margin: 5px 10px 10px 10px;
    }
    .header-span {
        font-size: 20px;
    }
</style>
(3)頁面顯示如下

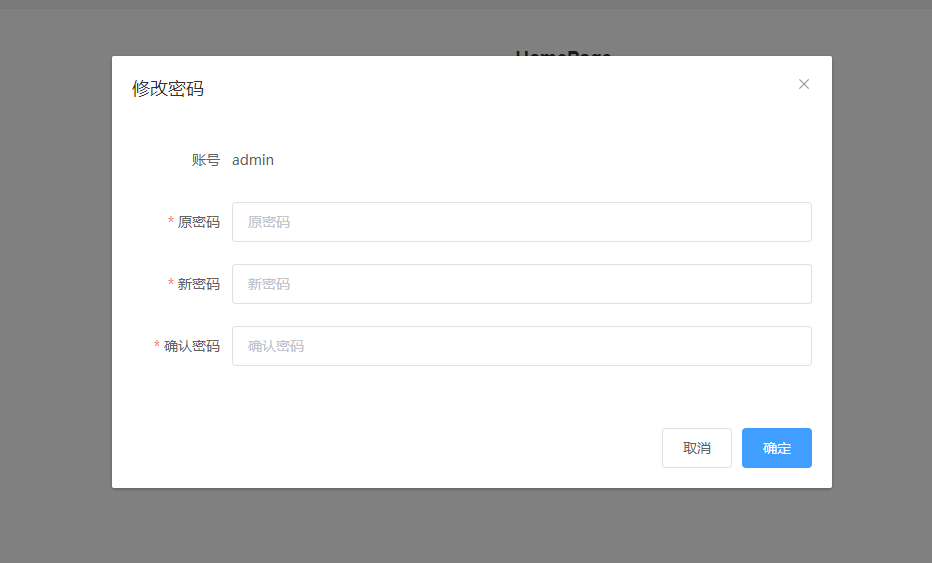
3、UpdatePassword.vue
(1)簡介
定義密碼修改框,用於修改用戶密碼。

(2)定義頁面內容
<template>
    <el-dialog title="修改密碼" :visible.sync="visible" :append-to-body="true">
        <el-form :model="dataForm" :rules="dataRule" ref="dataForm" @keyup.enter.native="dataFormSubmit()" label-width="100px">
            <el-form-item label="賬號">
                <span>{{ userName }}</span>
            </el-form-item>
            <el-form-item label="原密碼" prop="password">
                <el-input type="password" v-model="dataForm.password" placeholder="原密碼"></el-input>
            </el-form-item>
            <el-form-item label="新密碼" prop="newPassword">
                <el-input type="password" v-model="dataForm.newPassword" placeholder="新密碼"></el-input>
            </el-form-item>
            <el-form-item label="確認密碼" prop="confirmPassword">
                <el-input type="password" v-model="dataForm.confirmPassword" placeholder="確認密碼"></el-input>
            </el-form-item>
        </el-form>
        <span slot="footer" class="dialog-footer">
            <el-button @click="visible = false">取消</el-button>
            <el-button type="primary" @click="dataFormSubmit()">確定</el-button>
        </span>
    </el-dialog>
</template>

<script>
    export default {
        data() {
            return {
                userName: 'admin',
                visible: false,
                dataForm: {
                    password: '',
                    newPassword: '',
                    confirmPassword: ''
                },
                dataRule: {
                    password: [{
                        required: true,
                        message: '原密碼不能為空',
                        trigger: 'blur'
                    }],
                    newPassword: [{
                        required: true,
                        message: '新密碼不能為空',
                        trigger: 'blur'
                    }],
                    confirmPassword: [{
                        required: true,
                        message: '確認密碼不能為空',
                        trigger: 'blur'
                    }]
                }
            }
        },
        methods: {
            // 初始化
            init() {
                this.visible = true
                // 初始化清空表單內容
                this.$nextTick(() => {
                    this.$refs['dataForm'].resetFields()
                })
            },
            // 表單提交,回到登錄界面
            dataFormSubmit() {
                // TODO: 表達提交邏輯待完成
                alert("表達提交邏輯未完成")
                this.visible = false;
                this.$nextTick(() => {
                    this.$router.push({
                        name: "Login"
                    })
                })
            }
        }
    }
</script>
(3)頁面顯示如下
4、this.$nextTick 與 this.$emit 簡單介紹
(1)this.$nextTick
其用於數據渲染之後執行。
比如:
修改了某個數據,這個數據需要 dom 更新之後才會顯示出來,此時就可以使用 this.$nextTick。其傳遞一個回調函數,在數據渲染之後執行。
在 Header.vue 中,就使用到了這個。如下所示:
密碼修改框通過 UpdatePasswordVisible 來控制是否顯示。
showPasswordBox() 方法被執行時,UpdatePassword 組件開始載入,數據渲染完成後觸發 this.$nextTick 的回調函數,進行密碼框的初始化。
<!-- 密碼修改框 -->
<UpdatePassword v-if="UpdatePasswordVisible" ref="updatePassowrd"></UpdatePassword>


// 展開密碼修改框
showPasswordBox() {
    this.UpdatePasswordVisible = true
    // this.$nextTick 表示數據渲染後,執行密碼框初始化
    this.$nextTick(() => {
        this.$refs.updatePassowrd.init()
    })
},
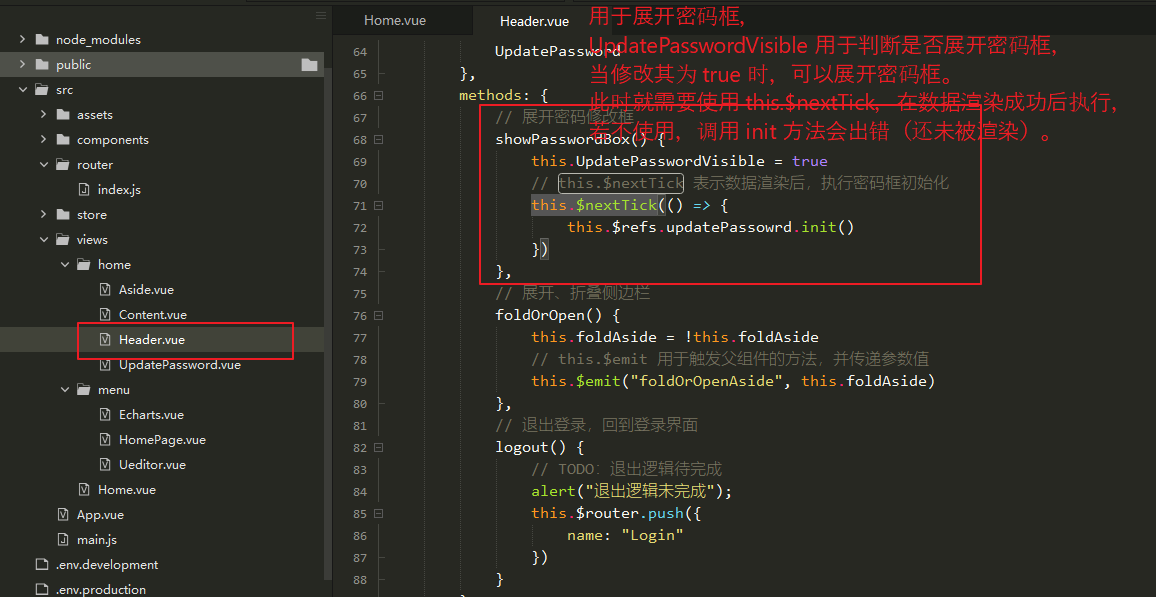
若立即使用 this.$refs.updatePassowrd.init() 調用 UpdatePassword 的 init 方法,會報錯,因為此時的 UpdatePassword 數據還未渲染,若想成功執行,需要使用 this.$nextTick,表示在數據渲染成功後執行。
// 展開密碼修改框
showPasswordBox() {
    this.UpdatePasswordVisible = true
    this.$refs.updatePassowrd.init()
},

(2)this.$emit
用於子組件向父組件傳遞數據,並觸發父組件的方法。
在Home.vue 與 Header.vue 中,就使用到了這個。如下所示:
在 Home 組件里引入了 Header 組件,並定義了 @foldOrOpenAside 方法,
在 Header 組件里通過 this.$emit 調用 foldOrOpenAside 方法,並傳遞數據(可選)。
【Home.vue】
<Header @foldOrOpenAside="foldOrOpen" />

foldOrOpen(data) {
    this.foldAside = data
}

【Header.vue】
<div class="header-title" @click="foldOrOpen"></div>
// 展開、摺疊側邊欄
foldOrOpen() {
    this.foldAside = !this.foldAside
    // this.$emit 用於觸發父組件的方法,並傳遞參數值
    this.$emit("foldOrOpenAside", this.foldAside)
},

5、Aside.vue
(1)簡介
用於定義側邊欄,顯示菜單。
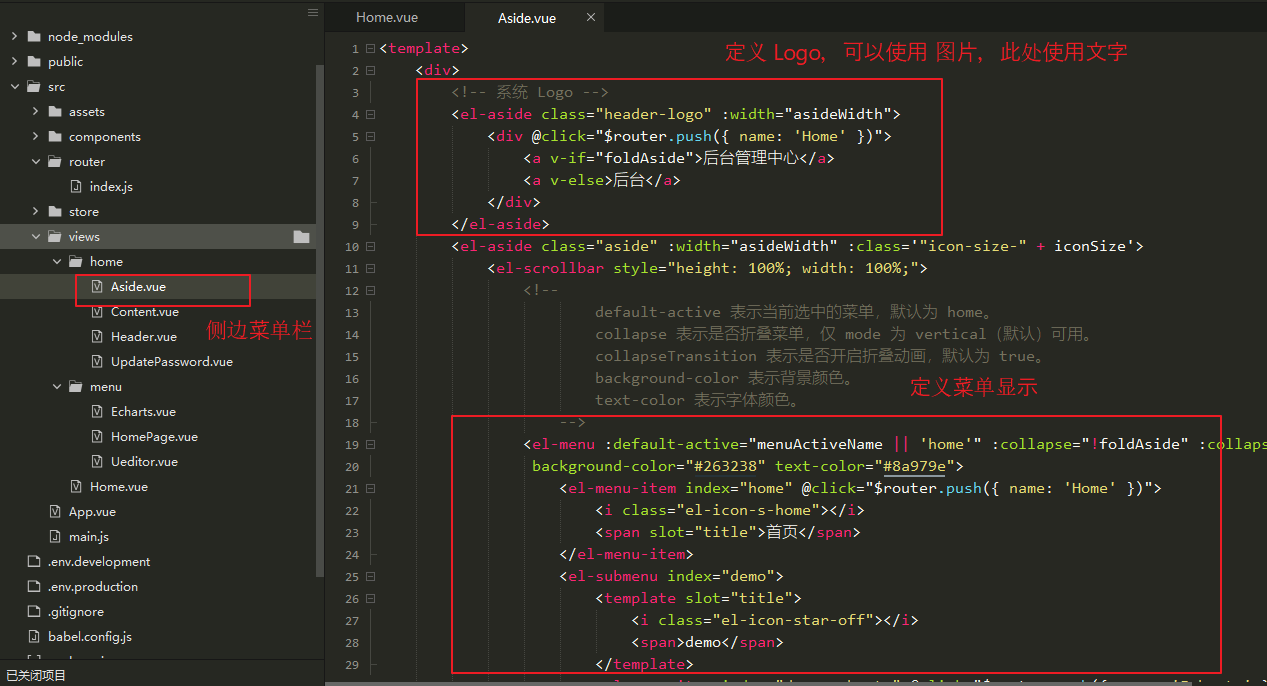
(2)定義頁面內容
<template>
    <div>
        <!-- 系統 Logo -->
        <el-aside class="header-logo" :width="asideWidth">
            <div @click="$router.push({ name: 'Home' })">
                <a v-if="foldAside">後臺管理中心</a>
                <a v-else>後臺</a>
            </div>
        </el-aside>
        <el-aside class="aside" :width="asideWidth" :class='"icon-size-" + iconSize'>
            <el-scrollbar style="height: 100%; width: 100%;">
                <!--
                        default-active 表示當前選中的菜單,預設為 home。
                        collapse 表示是否摺疊菜單,僅 mode 為 vertical(預設)可用。
                        collapseTransition 表示是否開啟摺疊動畫,預設為 true。
                        background-color 表示背景顏色。
                        text-color 表示字體顏色。
                    -->
                <el-menu :default-active="menuActiveName || 'home'" :collapse="!foldAside" :collapseTransition="false"
                 background-color="#263238" text-color="#8a979e">
                    <el-menu-item index="home" @click="$router.push({ name: 'Home' })">
                        <i class="el-icon-s-home"></i>
                        <span slot="title">首頁</span>
                    </el-menu-item>
                    <el-submenu index="demo">
                        <template slot="title">
                            <i class="el-icon-star-off"></i>
                            <span>demo</span>
                        </template>
                        <el-menu-item index="demo-echarts" @click="$router.push({ name: 'Echarts' })">
                            <i class="el-icon-s-data"></i>
                            <span slot="title">echarts</span>
                        </el-menu-item>
                        <el-menu-item index="demo-ueditor" @click="$router.push({ name: 'Ueditor' })">
                            <i class="el-icon-document"></i>
                            <span slot="title">ueditor</span>
                        </el-menu-item>
                    </el-submenu>
                </el-menu>
            </el-scrollbar>
        </el-aside>
    </div>
</template>

<script>
    export default {
        name: 'Aside',
        props: ['foldAside'],
        data() {
            return {
                // 保存當前選中的菜單
                menuActiveName: 'home',
                // 保存當前側邊欄的寬度
                asideWidth: '200px',
                // 用於拼接當前圖標的 class 樣式
                iconSize: 'true'
            }
        },
        watch: {
            // 監視是否摺疊側邊欄,摺疊則寬度為 64px。
            foldAside(val) {
                this.asideWidth = val ? '200px' : '64px'
                this.iconSize = val
            }
        }
    }
</script>

<style>
    .aside {
        margin-bottom: 0;
        height: 100%;
        max-height: calc(100% - 50px);
        width: 100%;
        max-width: 200px;
        background-color: #263238;
        text-align: left;
        right: 0;
    }

    .header-logo {
        background-color: #17b3a3;
        text-align: center;
        height: 50px;
        line-height: 50px;
        width: 200px;
        font-size: 24px;
        color: #fff;
        font-weight: bold;
        margin-bottom: 0;
        cursor: pointer;
    }
    .el-submenu .el-menu-item {
        max-width: 200px !important;
    }
    .el-scrollbar__wrap {
        overflow-x: hidden !important;
    }
    .icon-size-false i {
        font-size: 30px !important;
    }
    .icon-size-true i {
        font-size: 18px !important;
    }
</style>
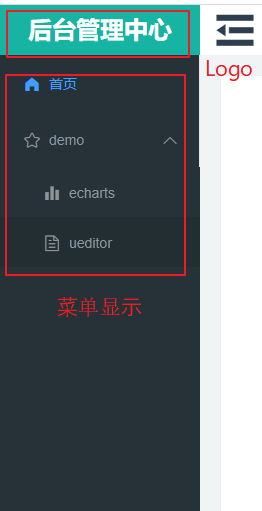
(3)頁面顯示如下
6、props 簡單介紹
其用於父組件向子組件傳遞數據。
在 Home.vue 和 Aside.vue 中,就使用到了這個。如下所示:
在 Home.vue 中引入 Aside.vue 組件,並定義了 :foldAside 屬性。
在 Aside.vue 組件中,使用 props 可以獲取到 這個 屬性。
【Home.vue】
<!-- 側邊欄 -->
<Aside :foldAside="foldAside" />

【Aside.vue】
props: ['foldAside'],
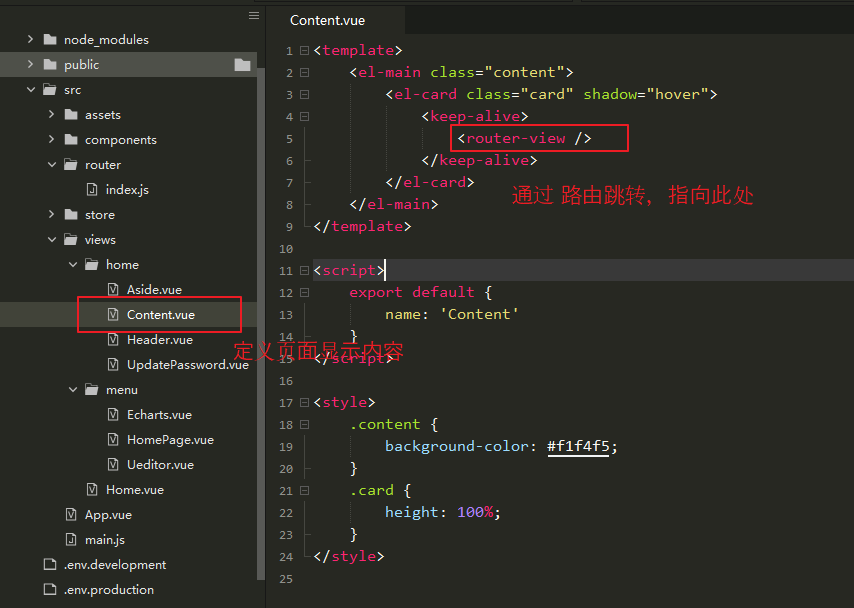
7、Content.vue
(1)簡介
用於定義各個菜單點擊後的頁面顯示。
同樣需要使用 router 進行頁面跳轉(嵌套路由,通過 children 中的規則定義跳轉路徑),基本路由規則本文最後有介紹。
(2)定義頁面內容
<template>
    <el-main class="content">
        <el-card class="card" shadow="hover">
            <keep-alive>
                <router-view />
            </keep-alive>
        </el-card>
    </el-main>
</template>

<script>
    export default {
        name: 'Content'
    }
</script>

<style>
    .content {
        background-color: #f1f4f5;
    }
    .card {
        height: 100%;
    }
</style>
(3)頁面顯示如下
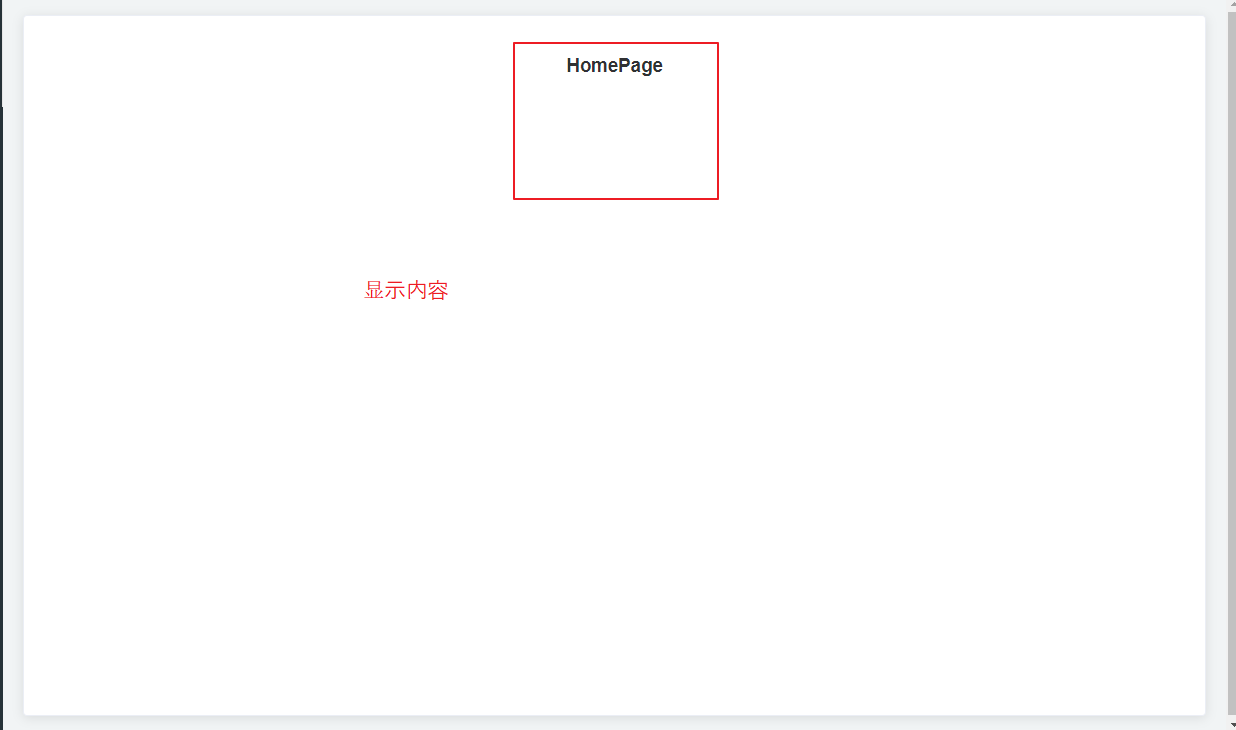
8、定義 content 顯示頁面(僅供測試)
【Ueditor.vue】
<template>
    <div>
        <h1>Ueditor</h1>
    </div>
</template>

<script>
</script>

<style>
</style>

【HomePage.vue】
<template>
    <div style="height: 800px;">
        <h1>HomePage</h1>
    </div>
</template>

<script>
</script>

<style>
</style>

【Echarts.vue】
<template>
    <div>
        <h1>Echarts</h1>
    </div>
</template>

<script>
</script>

<style>
</style>
點擊 Aside 中各個菜單,在 Content 會顯示不同的 頁面。

9、基本路由問題
(1)簡介
想要各個組件頁面間能夠順利跳轉,就需要 router 來操作了。
此處簡單寫了路由跳轉規則,後續會進行修改。
(2)定義路由跳轉規則
path 指的是 路徑。
redirect 指的是 需要跳轉的路徑。
name 指的是 路由的名字(此項目中,均使用 name 進行路由跳轉)。
component 指的是 路由的組件,用於顯示頁面(<router-view /> 會載入組件)。
children 指的是 子路由(路由中顯示另一個路由)。
import Vue from 'vue'
import VueRouter from 'vue-router'
import Home from '../views/Home.vue'

Vue.use(VueRouter)

const routes = [{
        path: '/',
        redirect: {
            name: "Login"
        }
    },
    {
        path: '/404',
        name: '404',
        component: () => import('@/components/common/404.vue')
    },
    {
        path: '/Login',
        name: 'Login',
        component: () => import('@/components/common/Login.vue')
    },
    {
        path: '/Home',
        name: 'Home',
        component: () => import('@/views/Home.vue'),
        redirect: {
            name: 'HomePage'
        },
        children: [{
                path: '/Home/Page',
                name: 'HomePage',
                component: () => import('@/views/menu/HomePage.vue')
            },
            {
                path: '/Home/Demo/Echarts',
                name: 'Echarts',
                component: () => import('@/views/menu/Echarts.vue')
            },
            {
                path: '/Home/Demo/Ueditor',
                name: 'Ueditor',
                component: () => import('@/views/menu/Ueditor.vue')
            }
        ]
    },
]

const router = new VueRouter({
    // routes 用於定義 路由跳轉 規則
    routes,
    // mode 用於去除地址中的 #
    mode: 'history',
    // scrollBehavior 用於定義路由切換時,頁面滾動。
    scrollBehavior: () => ({
        y: 0
    })
})

// 解決相同路徑跳轉報錯
const routerPush = VueRouter.prototype.push;
VueRouter.prototype.push = function push(location, onResolve, onReject) {
    if (onResolve || onReject)
        return routerPush.call(this, location, onResolve, onReject)
    return routerPush.call(this, location).catch(error => error)
};

export default router


