簡要:本系列文章講會對expo進行全面的介紹,本人從2017年6月份接觸expo以來,對expo的研究斷斷續續,一路走來將近10個月,廢話不多說,接下來你看到內容,講全部來與官網 我猜去全部機翻+個人修改補充+demo測試的形式,對expo進行一次大補血!歡迎加入expo興趣學習交流群:597732 ...
簡要:本系列文章講會對expo進行全面的介紹,本人從2017年6月份接觸expo以來,對expo的研究斷斷續續,一路走來將近10個月,廢話不多說,接下來你看到內容,講全部來與官網
我猜去全部機翻+個人修改補充+demo測試的形式,對expo進行一次大補血!歡迎加入expo興趣學習交流群:597732981
【之前我寫過一些列關於expo和rn入門配置的東i西,大家可以點擊這裡查看:從零學習rn開發】
相關文章:
Expo大作戰(一)--什麼是expo,如何安裝expo clinet和xde,xde如何使用
Expo大作戰(二)--expo的生命周期,expo社區交流方式,expo學習必備資源,開發使用expo時關註的一些問題
Expo大作戰(三)--針對已經開發過react native項目開發人員有針對性的介紹了expo,expo的局限性,開發時項目選型註意點等
Expo大作戰(四)--快速用expo構建一個app,expo中的關鍵術語
Expo大作戰(五)--expo中app.json 文件的配置信息
Expo大作戰(六)--expo開發模式,expo中exp命令行工具,expo中如何查看日誌log,expo中的調試方式
Expo大作戰(七)--expo如何使用Genymotion模擬器
Expo大作戰(八)--expo中的publish以及expo中的link,對link這塊東西沒有詳細看,大家可以來和我交流
寫在二十三章以後的話,之前的翻譯,不管如何,好與不好,終究是告一段落,也把expo基礎理論的東西又深入的理解了一遍,後續expo大作戰系列將主要介紹expo sdk的api。
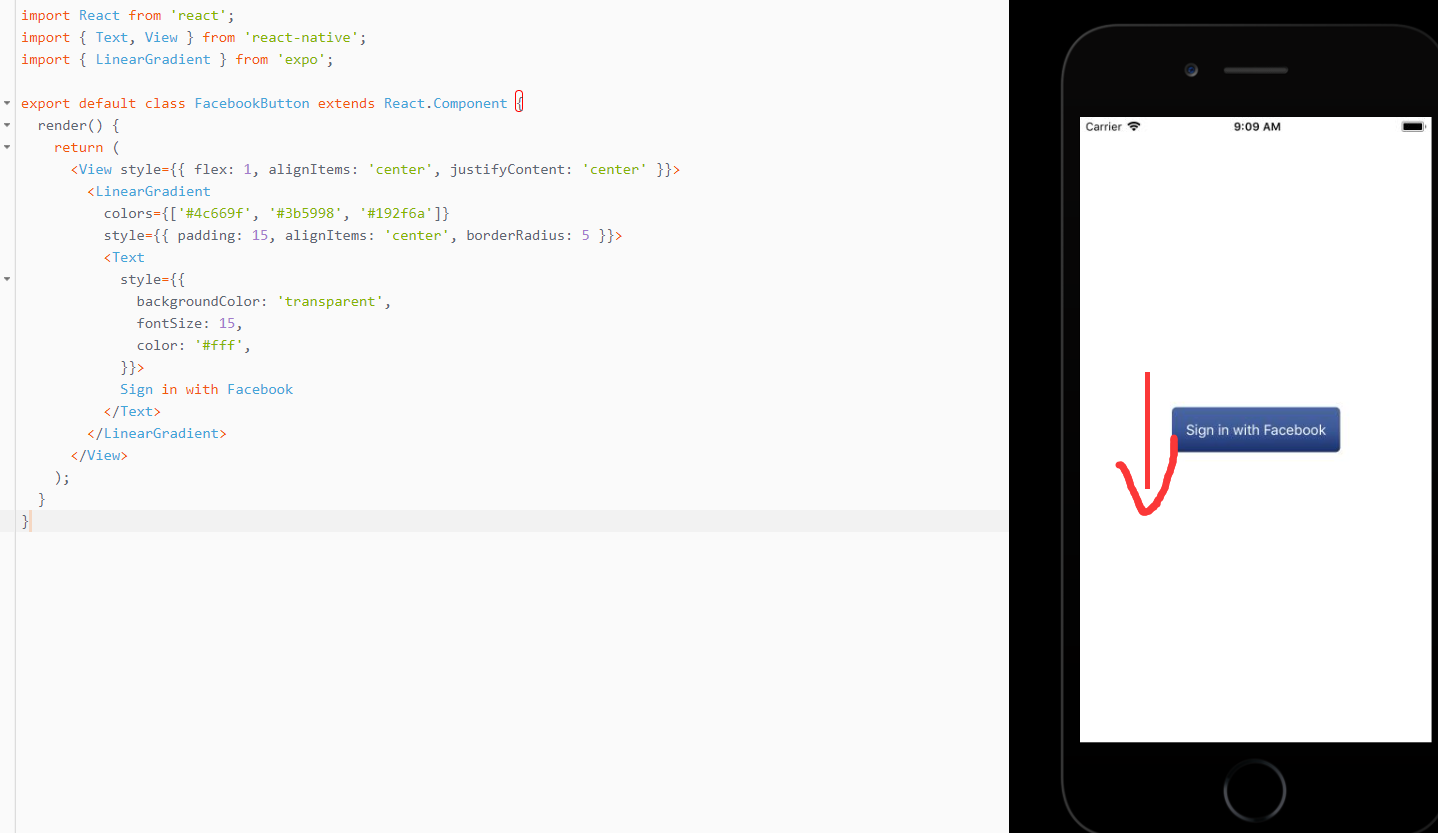
LinearGradient
呈現漸變視圖的React組件。
import React from 'react';
import { Text, View } from 'react-native';
import { LinearGradient } from 'expo';

export default class FacebookButton extends React.Component {
  render() {
    return (
      <View style={{ flex: 1, alignItems: 'center', justifyContent: 'center' }}>
        <LinearGradient
          colors={['#4c669f', '#3b5998', '#192f6a']}
          style={{ padding: 15, alignItems: 'center', borderRadius: 5 }}>
          <Text
            style={{
              backgroundColor: 'transparent',
              fontSize: 15,
              color: '#fff',
            }}>
            Sign in with Facebook
          </Text>
        </LinearGradient>
      </View>
    );
  }
}
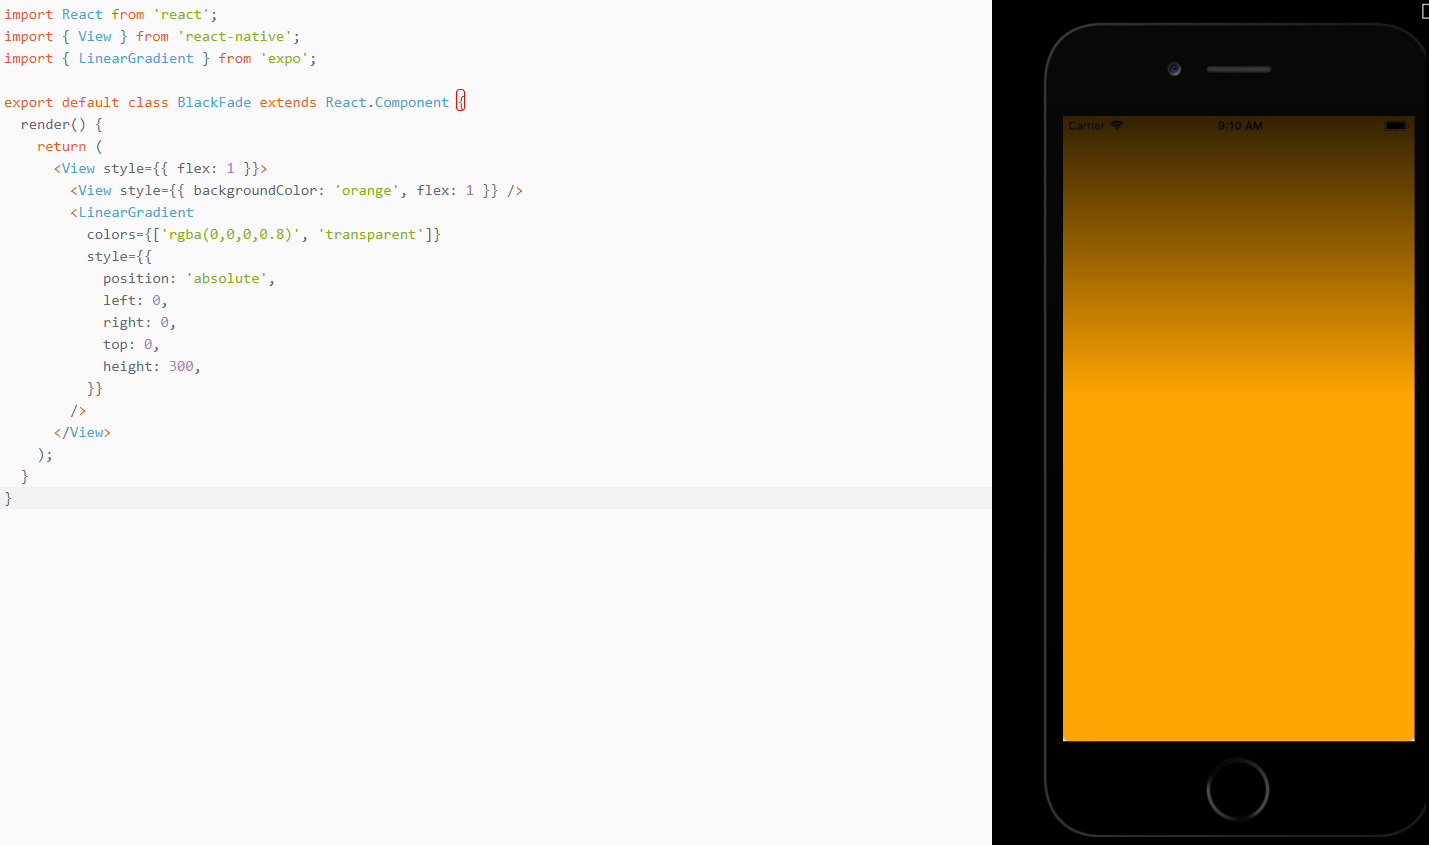
import React from 'react';
import { View } from 'react-native';
import { LinearGradient } from 'expo';

export default class BlackFade extends React.Component {
  render() {
    return (
      <View style={{ flex: 1 }}>
        <View style={{ backgroundColor: 'orange', flex: 1 }} />
        <LinearGradient
          colors={['rgba(0,0,0,0.8)', 'transparent']}
          style={{
            position: 'absolute',
            left: 0,
            right: 0,
            top: 0,
            height: 300,
          }}
        />
      </View>
    );
  }
}
Expo.LinearGradient
Props
color
表示漸變中停止的顏色數組。 至少需要兩種顏色(否則它不是漸變,它只是一種填充!)。start
一個[x,y]數組,其中x和y是浮點數。 它們代表漸變開始的位置,作為漸變總體大小的一部分。 例如,[0.1,0.1]表示漸變將從頂部開始10%,從左側開始10%。end
與開始相同,但是漸變結束。end
與顏色具有相同長度的數組,其中每個元素都是具有與開始和結束值相同含義的浮動元素,但是它們表示該索引處的顏色應該位於哪裡。
KeepAwake
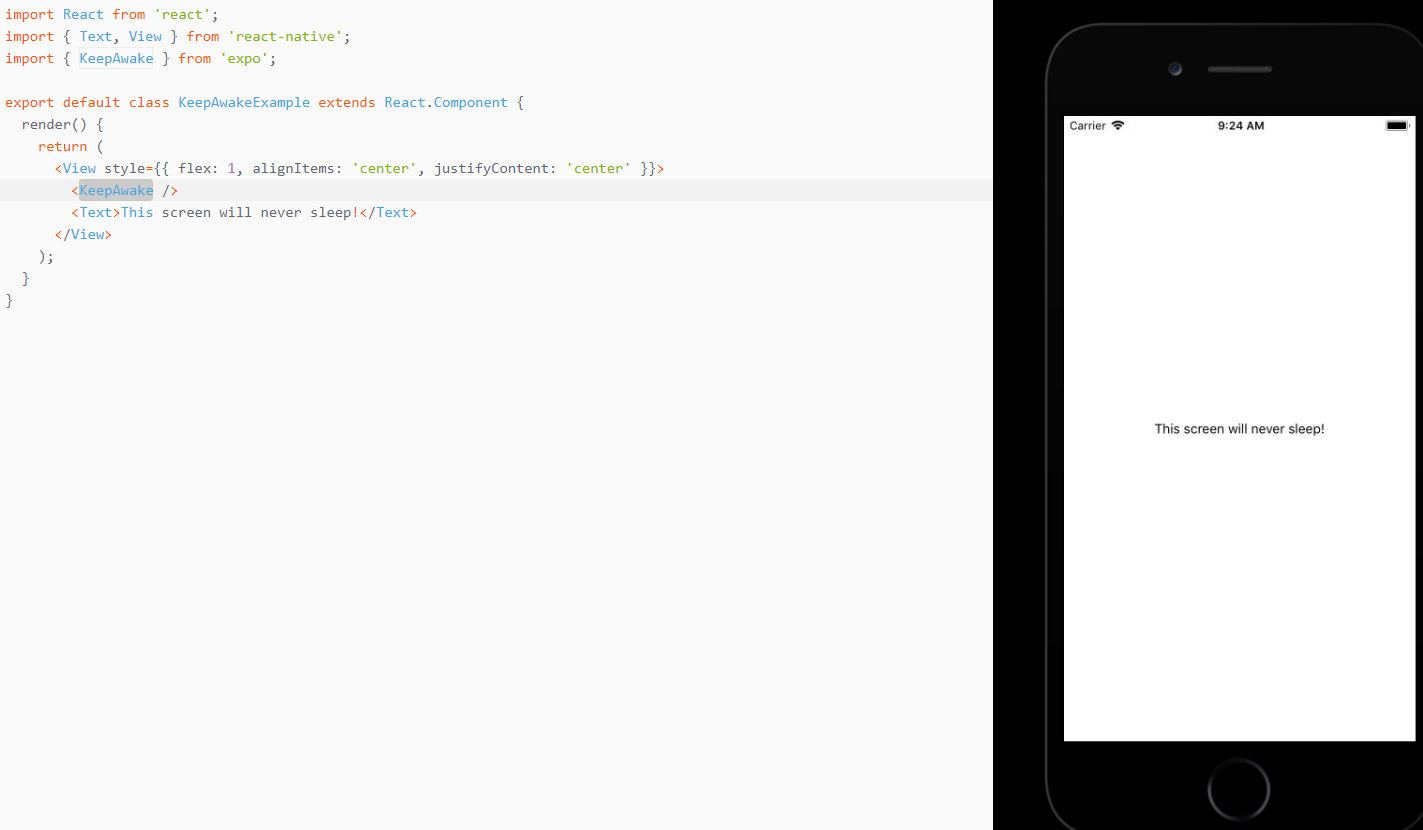
一個React組件,可以防止屏幕在渲染時休眠。 它還暴露了靜態方法來直接控制行為。
例如:組件
import React from 'react';
import { Text, View } from 'react-native';
import { KeepAwake } from 'expo';

export default class KeepAwakeExample extends React.Component {
  render() {
    return (
      <View style={{ flex: 1, alignItems: 'center', justifyContent: 'center' }}>
        <KeepAwake />
        <Text>This screen will never sleep!</Text>
      </View>
    );
  }
}
Example: static methods
import React from 'react';
import { Button, View } from 'react-native';
import { KeepAwake } from 'expo';

export default class KeepAwakeExample extends React.Component {
  render() {
    return (
      <View style={{ flex: 1, alignItems: 'center', justifyContent: 'center' }}>
        <Button onPress={this._activate}>Activate</Button>
        <Button onPress={this._deactivate}>Deactivate</Button>
      </View>
    );
  }

  _activate = () => {
    KeepAwake.activate();
  }

  _deactivate = () => {
    KeepAwake.deactivate();
  }
}
IntentLauncherAndroid
提供一種啟動android intents的方法。 例如 - 打開特定的設置屏幕。(Provides a way to launch android intents. e.g. - opening a specific settings screen.)用法
Expo.IntentLauncherAndroid.startActivityAsync(activity, data)開始指定的活動。 可以指定可選的數據參數,以將其他數據對象傳遞給活動。 該方法將返回一個承諾,解決用戶何時返回到應用程式。
有幾個預定義的常量可用於活動參數。 你可以在expo/expo-sdk/src/IntentLauncherAndroid.js.中找到它們。
例
import { IntentLauncherAndroid } from 'expo';

// Open location settings
IntentLauncherAndroid.startActivityAsync(
  IntentLauncherAndroid.ACTION_LOCATION_SOURCE_SETTINGS
);
Gyroscope
訪問設備Guroscope感測器以響應三維空間中的旋轉變化。
Expo.Gyroscope.addListener(listener)訂閱Gyroscope的更新。
參數
偵聽器(函數) - 當Gyroscope更新可用時調用的回調函數。 當被調用時,監聽器被提供一個包含鍵x,y,z的對象的單個參數。返回
一個EventSubscription對象,當您想要取消訂閱偵聽器時,您可以調用remove()。Expo.Gyroscope.removeAllListeners()
刪除所有聽眾。Expo.Gyroscope.setUpdateInterval(intervalMs)
訂閱Gyroscope的更新。參數
intervalMs(數字) - Gyroscope更新之間的期望間隔(以毫秒為單位)。
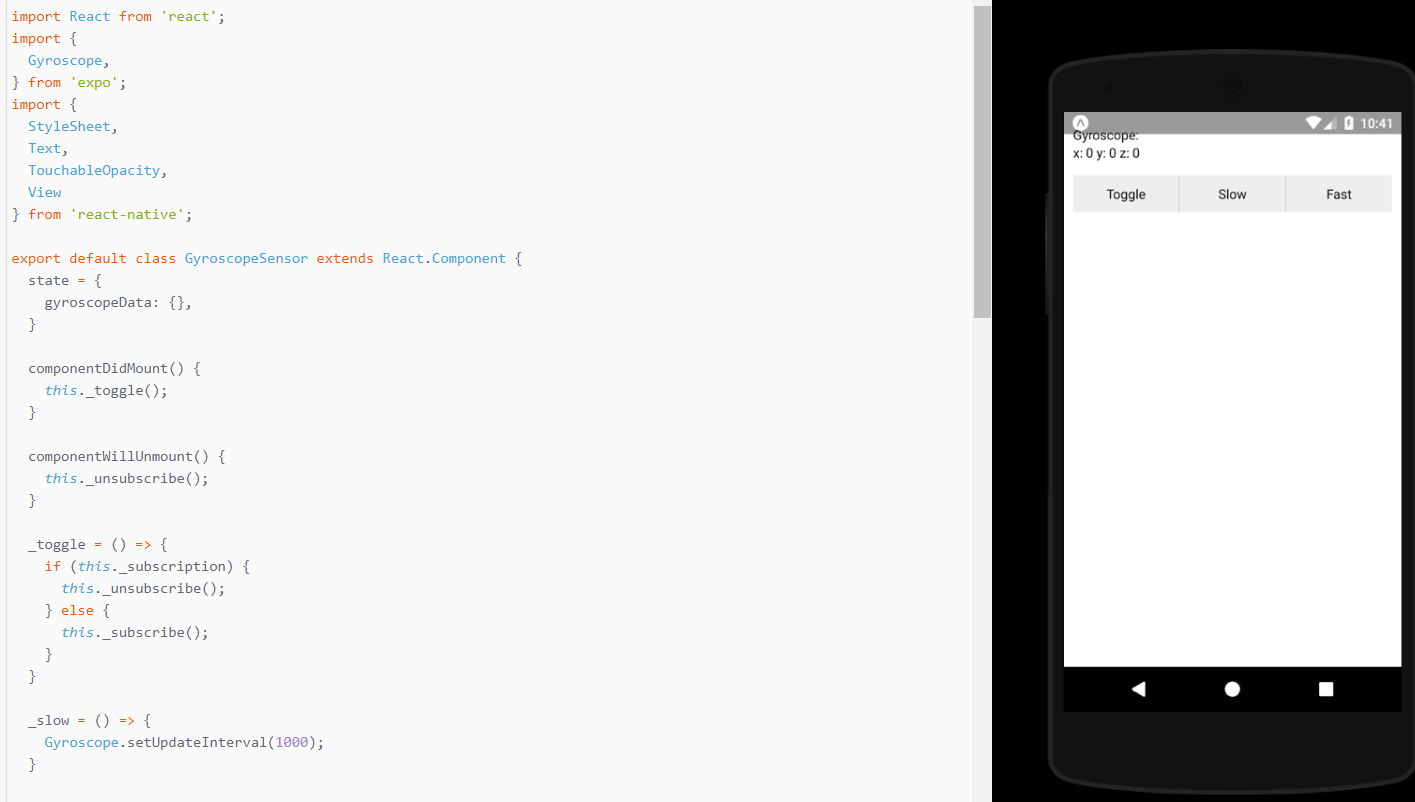
import React from 'react';
import {
  Gyroscope,
} from 'expo';
import {
  StyleSheet,
  Text,
  TouchableOpacity,
  View
} from 'react-native';

export default class GyroscopeSensor extends React.Component {
  state = {
    gyroscopeData: {},
  }

  componentDidMount() {
    this._toggle();
  }

  componentWillUnmount() {
    this._unsubscribe();
  }

  _toggle = () => {
    if (this._subscription) {
      this._unsubscribe();
    } else {
      this._subscribe();
    }
  }

  _slow = () => {
    Gyroscope.setUpdateInterval(1000);
  }

  _fast = () => {
    Gyroscope.setUpdateInterval(16);
  }

  _subscribe = () => {
    this._subscription = Gyroscope.addListener((result) => {
      this.setState({gyroscopeData: result});
    });
  }

  _unsubscribe = () => {
    this._subscription && this._subscription.remove();
    this._subscription = null;
  }

  render() {
    let { x, y, z } = this.state.gyroscopeData;

    return (
      <View style={styles.sensor}>
        <Text>Gyroscope:</Text>
        <Text>x: {round(x)} y: {round(y)} z: {round(z)}</Text>

        <View style={styles.buttonContainer}>
          <TouchableOpacity onPress={this._toggle} style={styles.button}>
            <Text>Toggle</Text>
          </TouchableOpacity>
          <TouchableOpacity onPress={this._slow} style={[styles.button, styles.middleButton]}>
            <Text>Slow</Text>
          </TouchableOpacity>
          <TouchableOpacity onPress={this._fast} style={styles.button}>
            <Text>Fast</Text>
          </TouchableOpacity>
        </View>
      </View>
    );
  }
}

function round(n) {
  if (!n) {
    return 0;
  }

  return Math.floor(n * 100) / 100;
}

const styles = StyleSheet.create({
  container: {
    flex: 1
  },
  buttonContainer: {
    flexDirection: 'row',
    alignItems: 'stretch',
    marginTop: 15,
  },
  button: {
    flex: 1,
    justifyContent: 'center',
    alignItems: 'center',
    backgroundColor: '#eee',
    padding: 10,
  },
  middleButton: {
    borderLeftWidth: 1,
    borderRightWidth: 1,
    borderColor: '#ccc',
  },
  sensor: {
    marginTop: 15,
    paddingHorizontal: 10,
  },
});
下一張繼續介紹,這一篇主要介紹了:expo sdk api之LinearGradient(線性漸變),KeepAwake(保持屏幕不休眠),IntentLauncherAndroid,Gyroscope(磁力感測計),Lottie(動畫)!,歡迎大家關註我的微信公眾號,這篇文章是否被大家認可,我的衡量標準就是公眾號粉絲增長人數。歡迎大家轉載,但必須保留本人博客鏈接!


