Flutter中如何實現沉浸式透明Statusbar狀態欄效果? 如下圖:狀態欄是指android手機頂部顯示手機狀態信息的位置。android 自4.4開始新加入透明狀態欄功能,狀態欄可以自定義顏色背景,使titleBar能夠和狀態欄融為一體,增加沉浸感。 如上圖Flutter狀態欄預設為黑色半透 ...
- Flutter中如何實現沉浸式透明Statusbar狀態欄效果?
如下圖:狀態欄是指android手機頂部顯示手機狀態信息的位置。
android 自4.4開始新加入透明狀態欄功能,狀態欄可以自定義顏色背景,使titleBar能夠和狀態欄融為一體,增加沉浸感。

如上圖Flutter狀態欄預設為黑色半透明,那麼如何去掉這個狀態欄的黑色半透明背景色,讓其和標題欄顏色一致,通欄沉浸式,實現如下圖效果呢?且繼續看下文講述。


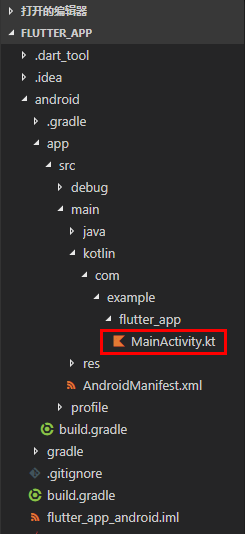
在flutter項目目錄下找到android主入口頁面MainActivity.kt或MainActivity.java,判斷一下版本號然後將狀態欄顏色修改設置成透明,因為他本身是黑色半透明。
MainActivity.kt路徑: android\app\src\main\kotlin\com\example\flutter_app\MainActivity.kt

在MainActivity.kt頁面新增如下高亮代碼片段
package com.example.flutter_app

import androidx.annotation.NonNull;
import io.flutter.embedding.android.FlutterActivity
import io.flutter.embedding.engine.FlutterEngine
import io.flutter.plugins.GeneratedPluginRegistrant

//引入
import android.os.Build;
import android.os.Bundle;

class MainActivity: FlutterActivity() {
    override fun configureFlutterEngine(@NonNull flutterEngine: FlutterEngine) {
        GeneratedPluginRegistrant.registerWith(flutterEngine);
    }

    //設置狀態欄沉浸式透明(修改flutter狀態欄黑色半透明為全透明)
    override fun onCreate(savedInstanceState: Bundle?) {
        super.onCreate(savedInstanceState);
        if (Build.VERSION.SDK_INT >= Build.VERSION_CODES.LOLLIPOP) {
            window.statusBarColor = 0
        }
    }
}
註意:flutter項目預設是使用Kotlin語言
Kotlin 是一種在 Java 虛擬機上運行的靜態類型編程語言,被稱之為 Android 世界的Swift,由 JetBrains 設計開發並開源。
Kotlin 可以編譯成Java位元組碼,也可以編譯成 JavaScript,方便在沒有 JVM 的設備上運行。
在Google I/O 2017中,Google 宣佈 Kotlin 取代 Java 成為 Android 官方開發語言。
Kotlin詳情見:https://www.kotlincn.net/
flutter create flutter_app 命令創建flutter項目時,預設是Kotlin語言模式,如果想要修改成Java語言,則運行如下命令創建項目即可
flutter create -a java flutter_app
如果是java語言模式下,修改沉浸式狀態欄方法和上面同理
MainActivity.java路徑: android\app\src\main\java\com\example\flutter_app\MainActivity.java
在MainActivity.java頁面新增如下高亮代碼片段
package com.example.demo1;

import androidx.annotation.NonNull;
import io.flutter.embedding.android.FlutterActivity;
import io.flutter.embedding.engine.FlutterEngine;
import io.flutter.plugins.GeneratedPluginRegistrant;

// 引入
import android.os.Build;
import android.os.Bundle;

public class MainActivity extends FlutterActivity {
  @Override
  public void configureFlutterEngine(@NonNull FlutterEngine flutterEngine) {
    GeneratedPluginRegistrant.registerWith(flutterEngine);
  }

  // 設置狀態欄沉浸式透明(修改flutter狀態欄黑色半透明為全透明)
  @Override
  protected void onCreate(Bundle savedInstanceState) {
    super.onCreate(savedInstanceState);
    if (Build.VERSION.SDK_INT >= Build.VERSION_CODES.LOLLIPOP) {
      getWindow().setStatusBarColor(0);
    }
  }
}
最後一步,去掉右上角banner提示
return MaterialApp(
    title: 'Flutter Demo',
    debugShowCheckedModeBanner: false,
    theme: ThemeData(
        primarySwatch: Colors.green,
    ),
    home: MyHomePage(title: 'Flutter Demo App'),
    ...
);
-
Flutter中實現鹹魚底部導航凸起效果

如上圖: BottomNavigationBar 組件普通底部導航欄配置
int _selectedIndex = 0;
// 創建數組引入頁面
List pglist = [HomePage(), FindPage(), CartPage(), ZonePage(), UcenterPage(),];

...

Scaffold(
    body: pglist[_selectedIndex],

    // 抽屜菜單
    // drawer: new Drawer(),

    // 普通底部導航欄
    bottomNavigationBar: BottomNavigationBar(
        fixedColor: Colors.red,
        type: BottomNavigationBarType.fixed,
        elevation: 5.0,
        unselectedFontSize: 12.0,
        selectedFontSize: 18.0,
        items: [
            BottomNavigationBarItem(icon: Icon(Icons.home), title: Text('Home')),
            BottomNavigationBarItem(icon: Icon(Icons.search), title: Text('Find')),
            BottomNavigationBarItem(icon: Icon(Icons.add), title: Text('Cart')),
            BottomNavigationBarItem(icon: Icon(Icons.photo_filter), title: Text('Zone')),
            BottomNavigationBarItem(icon: Icon(Icons.face), title: Text('Ucenter')),
        ],
        currentIndex: _selectedIndex,
        onTap: _onItemTapped,
    ),
)

void _onItemTapped(int index) {
    setState(() {
        _selectedIndex = index;
    });
}

如上圖: BottomNavigationBar 組件仿鹹魚凸起導航欄配置
int _selectedIndex = 0;
// 創建數組引入頁面
List pglist = [HomePage(), FindPage(), CartPage(), ZonePage(), UcenterPage(),];

...

Scaffold(
    body: pglist[_selectedIndex],

    // 抽屜菜單
    // drawer: new Drawer(),

    // 普通底部導航欄
    bottomNavigationBar: BottomNavigationBar(
        fixedColor: Colors.red,
        type: BottomNavigationBarType.fixed,
        elevation: 5.0,
        unselectedFontSize: 12.0,
        selectedFontSize: 18.0,
        items: [
            BottomNavigationBarItem(icon: Icon(Icons.home), title: Text('Home')),
            BottomNavigationBarItem(icon: Icon(Icons.search), title: Text('Find')),
            BottomNavigationBarItem(icon: Icon(null), title: Text('Cart')),
            BottomNavigationBarItem(icon: Icon(Icons.photo_filter), title: Text('Zone')),
            BottomNavigationBarItem(icon: Icon(Icons.face), title: Text('Ucenter')),
        ],
        currentIndex: _selectedIndex,
        onTap: _onItemTapped,
    ),

    floatingActionButton: FloatingActionButton(
        backgroundColor: _selectedIndex == 2 ? Colors.red : Colors.grey,
        child: Column(
            mainAxisAlignment: MainAxisAlignment.center,
            children: [
                Icon(Icons.add)
            ]
        ),
        onPressed: (){
            setState(() {
                _selectedIndex = 2;
            });
        },
    ),
    floatingActionButtonLocation: FloatingActionButtonLocation.centerDocked,
)

void _onItemTapped(int index) {
    setState(() {
        _selectedIndex = index;
    });
}

如上圖: BottomAppBar 組件凸起凹陷導航欄配置
int _selectedIndex = 0;
// 創建數組引入頁面
List pglist = [HomePage(), FindPage(), CartPage(), ZonePage(), UcenterPage(),];

...

Scaffold(
    body: pglist[_selectedIndex],

    // 抽屜菜單
    // drawer: new Drawer(),

    // 底部凸起凹陷導航欄
    bottomNavigationBar: BottomAppBar(
        color: Colors.white,
        shape: CircularNotchedRectangle(),
        child: Row(
            mainAxisAlignment: MainAxisAlignment.spaceAround,
            children: <Widget>[
                IconButton(
                    icon: Icon(Icons.home),
                    color: _selectedIndex == 0 ? Colors.red : Colors.grey,
                    onPressed: (){
                        _onItemTapped(0);
                    },
                ),
                IconButton(
                    icon: Icon(Icons.search),
                    color: _selectedIndex == 1 ? Colors.red : Colors.grey,
                    onPressed: (){
                        _onItemTapped(1);
                    },
                ),

                SizedBox(width: 50,),

                IconButton(
                    icon: Icon(Icons.photo_filter),
                    color: _selectedIndex == 3 ? Colors.red : Colors.grey,
                    onPressed: (){
                        _onItemTapped(3);
                    },
                ),
                IconButton(
                    icon: Icon(Icons.face),
                    color: _selectedIndex == 4 ? Colors.red : Colors.grey,
                    onPressed: (){
                        _onItemTapped(4);
                    },
                ),
            ],
        ),
    ),
)

void _onItemTapped(int index) {
    setState(() {
        _selectedIndex = index;
    });
}
夜深了,這次就分享到這裡,後續計劃使用flutter/dart開發一個實例項目,屆時再分享。


