
LinkedList實現原理(JDK1.8) LinkedList底層採用雙向鏈表,如果對鏈表這種結構比較熟悉的話,那LinkedList的實現原理看明白就相當容易。 鏈表通過“指針”將一組零散的記憶體塊串聯起來使用,每一個元素(節點)通過指針指向它的下一個元素,最後一個節點的下一個指向為null,而 ...
LinkedList實現原理(JDK1.8)
LinkedList底層採用雙向鏈表,如果對鏈表這種結構比較熟悉的話,那LinkedList的實現原理看明白就相當容易。
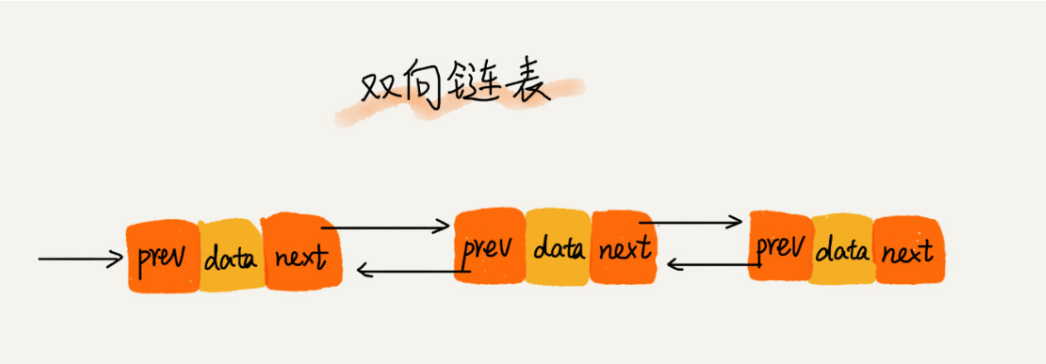
鏈表通過“指針”將一組零散的記憶體塊串聯起來使用,每一個元素(節點)通過指針指向它的下一個元素,最後一個節點的下一個指向為null,而雙向鏈表就是除頭節點的每一個元素都有指針同時再指向它的上一個元素。鏈表不同於數組,由於其地址的不連續,且元素占用大小的不確定,所以沒法根據地址直接取值,獲取元素時需要遍歷訪問,而雙向鏈表相比於單向鏈表,一定程度上占用了額外的記憶體,但支持了雙向遍歷,加快了元素索取。

public class LinkedList<E> extends AbstractSequentialList<E>
    implements List<E>, Deque<E>, Cloneable, java.io.Serializable
LinkedList繼承於AbstractSequentialList抽象類,AbstractSequentialList又繼承於AbstractList,最終實現了List的介面,所以LinkedList支持List集合的一些常規操作,但同時LinkedList又實現了Queue介面,所以LinkedList也支持隊列的一些使用,例如peek、pop等。
1.成員變數
    transient int size = 0;

    /**
     * Pointer to first node.
     * Invariant: (first == null && last == null) ||
     *            (first.prev == null && first.item != null)
     */
    transient Node<E> first;

    /**
     * Pointer to last node.
     * Invariant: (first == null && last == null) ||
     *            (last.next == null && last.item != null)
     */
    transient Node<E> last;
LinkedList的主要成員變數就3個,大小size、頭結點first、尾節點last,這也符合雙向鏈表的特點,根據頭或者尾部節點就可以遍歷整個鏈表。至於節點類型,則是內部類Node。
    private static class Node<E> {
        // 節點數據
        E item;
        // 下一節點
        Node<E> next;
        // 上一節點
        Node<E> prev;

        Node(Node<E> prev, E element, Node<E> next) {
            this.item = element;
            this.next = next;
            this.prev = prev;
        }
    }
Node類就簡簡單單三個屬性,也即雙向鏈表節點必須的3個要素,當前節點數據item,下一節點next和上一節點prev。
2.構造方法
    public LinkedList() {
    }

    public LinkedList(Collection<? extends E> c) {
        this();
        // 添加所有元素
        addAll(c);
    }
LinkedList主要就兩個構造方法,一個無參的構造,什麼也沒做,另一個接受集合的構造,該方法初始化了LinkedList對象並添加了所有集合c的元素。
至於addAll方法,我們後面再看。
LinkedList因為基於鏈表,所以不需要提前申請記憶體大小,也就不存在初始化指定容量大小,因而LinkedList是沒有初始化指定size的構造方法的。
3.添加元素
3.1.尾部添加
LinkedList的添加方法有很多,首先最簡單也是最常用的尾部添加。
    public boolean add(E e) {
        linkLast(e);
        return true;
    }
主要邏輯就是linkLast(E e) 了。
    void linkLast(E e) {
        final Node<E> l = last;
        // 構造新的節點,上一節點指向原來的last
        final Node<E> newNode = new Node<>(l, e, null);
        last = newNode;
        if (l == null)
            first = newNode;
        else
            l.next = newNode;
        size++;
        // 操作數自增
        modCount++;
    }
尾部添加,就是構造新的節點newNode,並將改節點的上一節點prev指向原來的last,同時改節點為新的last節點。l == null判斷是否當前是第一次添加,如果 l 為 null,則newNode同時也是頭結點,當前集合中僅有newNode一個元素,不為null時,因為雙向鏈表,所有 l 的下一個節點next指向了newNode。
最後就是大小size自增與操作計數modCount的自增,尾部添加元素就完成了。
尾部操作除了add,還有個addLast(E e) 方法,兩者除了返回值不一樣,沒有任何差別了,都是調用的linkLast方法。
    public void addLast(E e) {
        linkLast(e);
    }
3.2.中間添加
    public void add(int index, E element) {
        // 範圍檢查
        checkPositionIndex(index);
        if (index == size)
            linkLast(element);
        else
            linkBefore(element, node(index));
    }
對於中間添加,需要首先進行範圍檢查,即保證插入位置index在[0, size]之間,否則拋出數組越界異常IndexOutOfBoundsException,呃……數組越界……
    private void checkPositionIndex(int index) {
        if (!isPositionIndex(index))
            throw new IndexOutOfBoundsException(outOfBoundsMsg(index));
    }

    private boolean isPositionIndex(int index) {
        return index >= 0 && index <= size;
    }
如果index == size,其實就是尾部插入,所以調用了linkLast,這個剛剛尾部插入已經說過。
如果index < size,中間插入的時候,需要分兩步:
- node(int index)方法獲取到index位置的元素succ
- linkBefore(E e, Node
succ)將需要插入的元素element連接到succ後面
node方法是一個頻繁被調用的方法,LinkedList 的很多操作都依賴於該方法查找到對應的元素。根據索引 index 獲取元素時,因為雙向鏈表的支持前後遍歷,所以進行了位置判斷,index < (size >> 1),與中間位置比較,靠前則前序遍歷,否則後序遍歷。
    Node<E> node(int index) {
        // assert isElementIndex(index);
        if (index < (size >> 1)) { //前序遍歷
            Node<E> x = first;
            for (int i = 0; i < index; i++)
                x = x.next;
            return x;
        } else {
            Node<E> x = last;
            for (int i = size - 1; i > index; i--)
                x = x.prev;
            return x;
        }
    }
遍歷邏輯很簡單,迴圈到index上一個節點(後序則是下一個)位置,獲取next(後序使用prev)返回index位置對應的節點Node對象succ。
    void linkBefore(E e, Node<E> succ) {
        // assert succ != null;
        final Node<E> pred = succ.prev;
        final Node<E> newNode = new Node<>(pred, e, succ);
        succ.prev = newNode;
        if (pred == null)
            first = newNode;
        else
            pred.next = newNode;
        size++;
        modCount++;
    }
linkBefore和linkLast幾乎完全一樣,除了一個是添加到 last 節點後,一個是添加到 succ 節點後。
對於中間插入,如果index為0時,其實就是頭部插入,這個時候比不用調用node方法去查找元素了,所以LinkedList也提供了一個addFirst(E e)方法。
    public void addFirst(E e) {
        linkFirst(e);
    }

    private void linkFirst(E e) {
        final Node<E> f = first;
        final Node<E> newNode = new Node<>(null, e, f);
        first = newNode;
        if (f == null)
            last = newNode;
        else
            f.prev = newNode;
        size++;
        modCount++;
    }
3.3.批量插入
LinkedList提供尾部批量插入和中間批量插入,但內部實現其實都是調用的addAll(int index, Collection<? extends E> c)。
    public boolean addAll(Collection<? extends E> c) {
        return addAll(size, c);
    }

    public boolean addAll(int index, Collection<? extends E> c) {
        // 範圍校驗
        checkPositionIndex(index);
        Object[] a = c.toArray();
        int numNew = a.length;
        if (numNew == 0)
            return false;
        // succ是index位置元素,pred是index的前一個元素
        Node<E> pred, succ;
        if (index == size) { // 尾部插入
            succ = null;
            pred = last;
        } else {
            succ = node(index);
            pred = succ.prev;
        }
        // 迴圈插入
        for (Object o : a) {
            @SuppressWarnings("unchecked") E e = (E) o;
            Node<E> newNode = new Node<>(pred, e, null);
            if (pred == null)
                first = newNode;
            else
                pred.next = newNode;
            pred = newNode;
        }
        // 銜接處理
        if (succ == null) {
            last = pred;
        } else {
            pred.next = succ;
            succ.prev = pred;

        size += numNew;
        modCount++;
        return true;
    }
addAll(int index, Collection<? extends E> c)方法初一看,好像有些複雜,但明白其原理後,就變得清晰多了。鏈表插入就如同接水管,先從某一個位置斷開水管,然後用介面連接上需要接入的部分。這個方法里,關鍵的是兩個Node對象pred, 和 succ,succ 是index位置元素,pred是index的前一個元素(變動)。
特殊情況 index == size 時,即尾部插入,所以succ 就是null了,而 pred則為尾部節點last。
然後就是迴圈賦值了,在迴圈中構造node節點,類似於linkLast。
最後的是銜接處理,如果尾部插入的話,那pred就是尾部節點了(迴圈賦值時有pred = newNode處理),所以只需要指定last = pred。而中間插入,指明 pred.next = succ、succ.prev = pred即將index位置與新的前一個元素綁定到一起。
4.查找元素
LinkedList 除了提供通用的 get,因為其屬性中含有 first 和 last 節點,也提供了 getFirst 和 getLast 方法。
    public E getFirst() {
        final Node<E> f = first;
        if (f == null)
            throw new NoSuchElementException();
        return f.item;
    }

    public E getLast() {
        final Node<E> l = last;
        if (l == null)
            throw new NoSuchElementException();
        return l.item;
    }
對於getFirst 和 getLast,因為是成員變數,省去了查找的過程,直接返回其節點 item 即可。
    public E get(int index) {
        // 範圍校驗
        checkElementIndex(index);
        // node方法獲取節點
        return node(index).item;
    }
而通過指針的獲取,主要就是調用node方法找對index對應的節點,node方法前面已經講過,不再累述。
5.修改元素
對於LinkedList集合中元素的修改,需要先查找到該元素,然後更改其Node節點數據item即可。
    public E set(int index, E element) {
        // 範圍檢查
        checkElementIndex(index);
        // 獲取index對應位置的Node對象
        Node<E> x = node(index);
        E oldVal = x.item;
        x.item = element;
        return oldVal;
    }
6.刪除元素
LinkedList提供了很多種刪除元素的方法,但是內部實現邏輯基本都相同,即找到對應的Node節點,然後將指向該節點的指向替換。
6.1.根據索引移除
我們先來看看根據索引的remove(int index)方法。
    public E remove(int index) {
        // 範圍檢查
        checkElementIndex(index);
        // 解除節點指針連接
        return unlink(node(index));
    }
刪除時的範圍檢查就不說了,node方法也不再多提,刪除的主要邏輯就是unlink(Node
    E unlink(Node<E> x) {
        // assert x != null;
        final E element = x.item;
        // 下一節點
        final Node<E> next = x.next;
        // 前一節點
        final Node<E> prev = x.prev;
        // 前一節點prev存在則將prev的下一節點指向next,不存在則當前移除節點其實就是頭結點,next就是新的first
        if (prev == null) {
            first = next;
        } else {
            prev.next = next;
            x.prev = null;
        }
        // 下一節點next存在,則將next上一節點指向prev,不存在則說明當前移除的是未節點
        if (next == null) {
            last = prev;
        } else {
            next.prev = prev;
            x.next = null;
        }
        // 觸發GC工作
        x.item = null;
        size--;
        // 操作計數器自增
        modCount++;
        return element;
    }
整個unlink方法就是個標準的雙向鏈表刪除操作,三個節點prev,x,next,刪除x 其實就是將 prev指向next,並next指向prev,只是其中多了一些特殊的判斷。
看了按索引刪除的remove,再來看另外兩個特例removeFirst 和 removeLast。
    public E removeFirst() {
        final Node<E> f = first;
        if (f == null)
            throw new NoSuchElementException();
        return unlinkFirst(f);
    }

    private E unlinkFirst(Node<E> f) {
        // assert f == first && f != null;
        final E element = f.item;
        final Node<E> next = f.next;
        f.item = null;
        f.next = null; // help GC
        first = next;
        if (next == null)
            last = null;
        else
            next.prev = null;
        size--;
        // 操作計數器自增
        modCount++;
        return element;
    }
unlinkFirst就是個簡化版的unlink方法,因為只用處理頭結點,下一個節點next存在就將next作為新的first。
同理removeLast也是類似,這裡各位看官自行進行體會。
    public E removeLast() {
        final Node<E> l = last;
        if (l == null)
            throw new NoSuchElementException();
        return unlinkLast(l);
    }

    private E unlinkLast(Node<E> l) {
        // assert l == last && l != null;
        final E element = l.item;
        final Node<E> prev = l.prev;
        l.item = null;
        l.prev = null; // help GC
        last = prev;
        if (prev == null)
            first = null;
        else
            prev.next = null;
        size--;
        modCount++;
        return element;
    }
而LinkedList還有個無參的remove,這個是Deque介面定義的,實現也就是調用的removeFirst。
    public E remove() {
        return removeFirst();
    }
6.2.根據元素移除
根據元素移除其實和根據索引移除沒有太大差別,只不過找到對應節點的方式發生了變化。
    public boolean remove(Object o) {
        // 判斷元素是否為null,因為LinkedList支持添加null
        if (o == null) {
            for (Node<E> x = first; x != null; x = x.next) {
                if (x.item == null) {
                    unlink(x);
                    return true;
                }
            }
        } else {
            for (Node<E> x = first; x != null; x = x.next) {
                if (o.equals(x.item)) {
                    unlink(x);
                    return true;
                }
            }
        }
        return false;
    }
可以看到,無論元素是否為null,都是先找到該節點,然後調用了unlink方法。
因為支持雙向遍歷的特性,LinkedList很人性的提供了前序刪除和後序刪除的方法,即removeFirstOccurrence與removeLastOccurrence。
    public boolean removeFirstOccurrence(Object o) {
        return remove(o);
    }

    public boolean removeLastOccurrence(Object o) {
        if (o == null) {
            // 後序遍歷
            for (Node<E> x = last; x != null; x = x.prev) {
                if (x.item == null) {
                    unlink(x);
                    return true;
                }
            }
        } else {
            // 後序遍歷
            for (Node<E> x = last; x != null; x = x.prev) {
                if (o.equals(x.item)) {
                    unlink(x);
                    return true;
                }
            }
        }
        return false;
    }
這兩個方法沒什麼玄幻的,removeLastOccurrence只是反序遍歷了集合。
6.3.批量刪除
在LinkedList類中,並沒有removeAll方法,因為他未對其進行重寫,而是使用了父類AbstractCollection的
    public boolean removeAll(Collection<?> c) {
        Objects.requireNonNull(c);
        boolean modified = false;
        // 使用迭代器
        Iterator<?> it = iterator();
        while (it.hasNext()) {
            if (c.contains(it.next())) {
                it.remove();
                modified = true;
            }
        }
        return modified;
    }
removeAll的實現原理其實就是迭代刪除,迭代器的獲取方法iterator()在AbstractCollection類中只是個抽象方法,AbstractList類有其實現,但AbstractSequentialList類中覆寫該方法。
    public Iterator<E> iterator() {
        return listIterator();
    }
iterator方法會調用listIterator(),這個方法實現在AbstractList類中,他調用了listIterator(int index)方法,但LinkedList重寫了該方法,所以兜兜轉轉最終還是回到了LinkedList中。
    public ListIterator<E> listIterator(int index) {
        checkPositionIndex(index);
        return new ListItr(index);
    }
這裡ListItr對象是LinkedList的內部類。
    private class ListItr implements ListIterator<E> {
        private Node<E> lastReturned;
        private Node<E> next;
        private int nextIndex;
        // 期待計數器
        private int expectedModCount = modCount;
ListItr在初始化的時候,會將操作計數器modCount賦值給expectedModCount,而之後的每次remove方法,都會校驗expectedModCount與modCount是否相等,否則會拋出異常。
ListItr的remove方法,每次調用後,都將expectedModCount自增,已達到和unlink中modCount++的同步,從而使得modCount == expectedModCount 一直成立,這也是為什麼我們迴圈刪除LinkedList元素時需要使用其迭代器的remove方法。
        public void remove() {
            // 校驗modCount
            checkForComodification();
            if (lastReturned == null)
                throw new IllegalStateException();

            Node<E> lastNext = lastReturned.next;
            // unlink刪除節點邏輯,該方法中有modCount++;
            unlink(lastReturned);
            if (next == lastReturned)
                next = lastNext;
            else
                nextIndex--;
            lastReturned = null;
            // expectedModCount自增
            expectedModCount++;
        }

        final void checkForComodification() {
            // expectedModCount與modCount必須相等
            if (modCount != expectedModCount)
                throw new ConcurrentModificationException();
        }

